
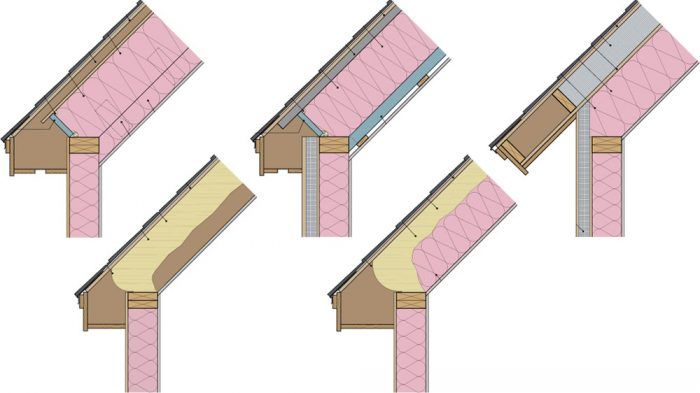
Five Cathedral Ceilings That Work
As long as you pay attention to minimum code requirements for R-values, these cathedral ceiling details can be used in all climate zones.
When people post questions on the Green Building Advisor forum about cathedral-ceiling insulation, they are often directed to a 3,800-word article from 2011 called “How to Build an Insulated Cathedral Ceiling.” While the comprehensive information in that article—including detailed discussions of vapor diffusion, condensation risks, and failure modes—is useful, it may represent information overload for many builders.
This article will cut to the chase by providing simple descriptions of five cathedral ceilings that work. While these five assemblies are probably the most common approaches used, note that there are other acceptable ways to insulate a cathedral ceiling.
General principles
R-value minimums. In Climate Zones 4, 5, 6, 7, and 8, most prescriptive building codes require ceiling insulation to have a minimum R-value of R-49. In Zones 2 and 3, the minimum requirement is R-38, while in Zone 1, it’s R-30. (Here is a link to a climate zone map.)
That said, local codes may differ from these general guidelines, so it’s worth asking your local building department about minimum R-value requirements in your community.
For more information on minimum R-values for cathedral ceilings, see “Three Code-Approved Tricks for Reducing Insulation Thickness.”
Rafter depth. Note that 2×10 rafters equipped with a 1-inch-deep ventilation space have room for only 8 inches of insulation. If you are insulating with fiberglass, that’s not enough space for the minimum R-values required by building codes unless you live in Climate Zone 1. So if you hope to insulate your ceiling with a fluffy insulation material like fiberglass batts, and you plan to install all of the insulation between your rafters, you’ll either need very deep rafters, or you’ll need to scab on some extra framing material (for example, 2x4s) to your rafters with plywood gussets to get enough depth for the minimum insulation levels required by building codes.
Air-sealing. Most cathedral ceiling moisture problems can be traced to air leaks. The best way to ensure good insulation performance is to make sure that your roof assembly includes a bulletproof air barrier, and to make sure that all electrical boxes and other penetrations are carefully sealed against air leakage.
Assembly #1: Vented assembly with fiberglass or mineral wool insulation
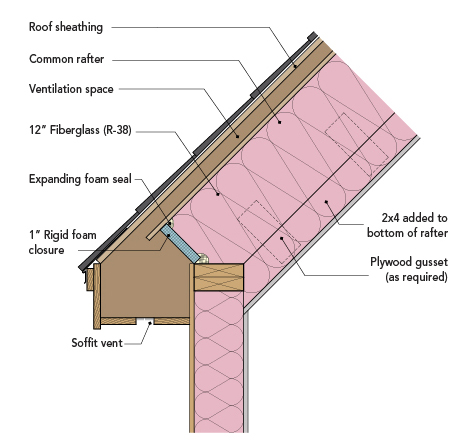
If your rafters are deep enough, you can create a vented assembly insulated with fiberglass batts or mineral wool batts, as shown in the illustration at the top of this page. Vented assemblies require an air space between the top of the insulation layer and the underside of the roof sheathing. Most builders use a ventilation baffle to define this air space. The air channel must be at least 1 inch deep—2 inches is better—and must be connected to soffit vents at the bottom of the assembly and a ridge vent at the top of the assembly.
Note that vented roof assemblies require a simple gable roof or shed roof, without any hips, valleys, dormers, or skylights. If your roof is convoluted, you need to use an unvented approach.
For more information on vented roof assemblies, see “How to Build an Insulated Cathedral Ceiling” and “Site-Built Ventilation Baffles for Roofs.”
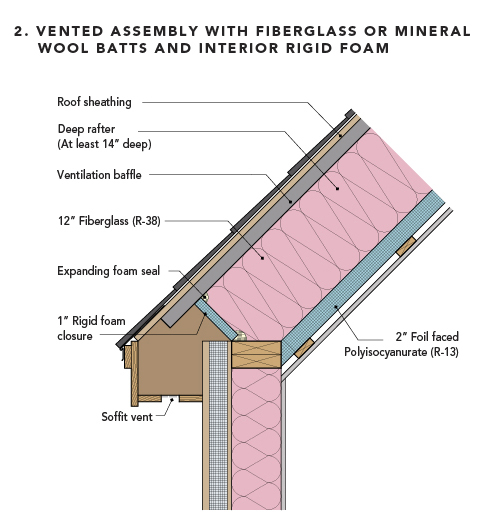
Assembly #2: Vented assembly with fiberglass or mineral wool batts and interior rigid foam
If your rafters aren’t deep enough to accommodate the R-value you need, you can create a vented roof assembly with fiberglass or mineral wool batts between the rafters, supplemented by a continuous layer of rigid foam on the interior side of the rafters.
In most cases, you’ll want to tape the rigid foam seams with high-quality tape, and install 1×3 or 1×4 strapping (perpendicular to the rafters, installed 16 inches on center) on the interior side of the rigid foam to make it easier to install a drywall ceiling.
Since this is a vented assembly, it can’t be used on convoluted roofs.
To calculate the total R-value of your roof assembly for code compliance purposes, add the nominal R-value of the batt insulation to the nominal value of the rigid foam layer. For example, if you combine R-30 batts with 2 inches of EPS (R-8), code officials will consider the assembly to have a total R-value of R-38. If you combine R-38 batts with 2 inches of polyiso (R-11), you’ll end up with an R-49 assembly.
Assembly #3: Unvented assembly with continuous rigid foam above the roof sheathing and fiberglass batts, mineral wool batts, or cellulose under the roof sheathing
This type of roof assembly combines a continuous layer of rigid foam above the roof sheathing with fluffy insulation (fiberglass, mineral wool, or cellulose) between the rafters.
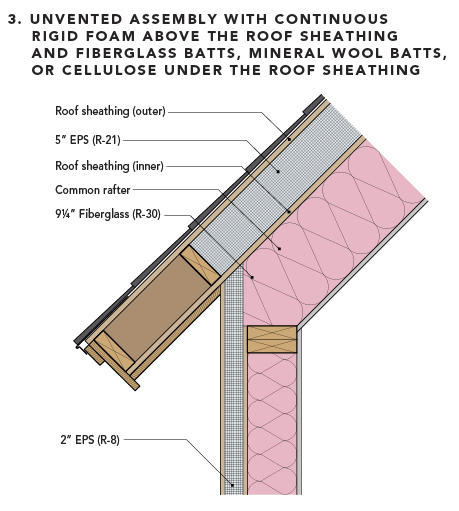
The rigid foam layer limits thermal bridging through the rafters and keeps the roof sheathing warm (and therefore dry) during the winter, so this is a high-performance way to create a cathedral ceiling. Note that this type of roof assembly should not include any interior polyethylene; it’s best if the assembly can dry towards the interior.
Since it’s an unvented approach, it will work well on convoluted roofs.
Assuming you will be meeting the minimum prescriptive R-values required by building codes—that is, R-49 in Zones 4, 5, 6, 7, and 8, or R-38 in Zones 2 and 3, or R-30 in Zone 1—here are the required R-values for your rigid foam layer and your fluffy insulation:
- Zone 1: R-5 minimum for rigid foam, R-25 maximum for fluffy insulation.
- Zone 2 or 3: R-5 minimum for rigid foam, R-33 maximum for fluffy insulation.
- Marine Zone 4: R-10 minimum for rigid foam, R-39 maximum for fluffy insulation.
- Zone 4A or 4B: R-15 minimum for rigid foam, R-34 maximum for fluffy insulation.
- Zone 5: R-20 minimum for rigid foam, R-29 maximum for fluffy insulation.
- Zone 6: R-25 minimum for rigid foam, R-24 maximum for fluffy insulation.
- Zone 7: R-30 minimum for rigid foam, R-19 maximum for fluffy insulation.
- Zone 8: R-35 minimum for rigid foam, R-14 maximum for fluffy insulation.
For more information on this type of roof assembly, see “How to Install Rigid Foam On Top of Roof Sheathing.”
Assembly #4: Unvented assembly with closed-cell spray foam
It’s possible to create an unvented roof assembly using only closed-cell spray foam.
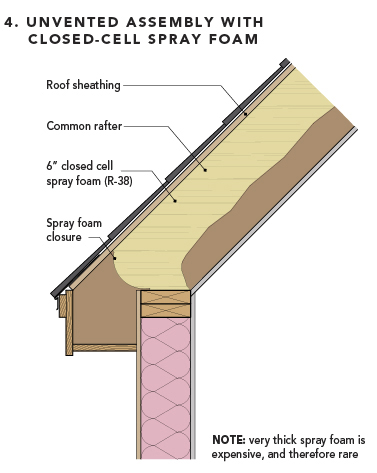
There are two main advantages to this approach:
- Closed-cell spray foam has a high R-value per inch, so this approach can work for roofs with rafters that aren’t deep enough for a ventilation channel and fiberglass batts.
- Since this is an unvented approach, it works well for roofs that are too convoluted for vent channels.
There are three main disadvantages to this approach:
- Most brands of closed-cell spray foam use a blowing agent that has a high global warming potential—meaning that this type of insulation is not environmentally friendly.
- Closed-cell spray foam is expensive.
- This approach fails to address thermal bridging through the rafters.
Some builders avoid this approach, preferring assemblies that provide a way for the roof sheathing to dry in at least one direction in case the sheathing ever gets damp. For more information on this issue, see “Sandwiching Roof Sheathing Between Two Impermeable Layers.”
Open-cell spray foam is not recommended in this type of assembly, since the vapor permeability of open-cell spray foam may allow interior moisture to migrate to the sheathing, raising the risk that the sheathing will get damp. For more information on this issue, see “Open-Cell Spray Foam and Damp Roof Sheathing.”
Assembly #5: Unvented flash-and-batt assembly
The flash-and-batt (or flash-and-fill) approach combines a layer of closed-cell spray foam with a layer of fluffy insulation (fiberglass, mineral wool, or cellulose).

If you want to use this approach, the entire assembly must have a high enough R-value to meet minimum code requirements. In addition, building codes require the spray foam layer to meet the minimum R-value needed in your particular climate zone to avoid condensation problems. Here are the required minimum R-values for the spray foam layer: R-5 in Zone 1, 2, or 3; R-10 in Marine Zone 4; R-15 in Zones 4A or 4B; R-20 in Zone 5; R-25 in Zone 6; R-30 in Zone 7; and R-35 in Zone 8. The R-value of the total roof assembly will be higher than these numbers, of course, because the fluffy insulation also provides significant R-value.
For a flash-and-batt job, be sure to specify closed-cell spray foam—open-cell spray foam won’t work for flash-and-batt. For more information on this approach, see “Flash-and-Batt Insulation.”
As with Assembly #4, some builders avoid this approach, preferring assemblies that provide a way for the roof sheathing to dry in at least one direction in case the sheathing ever gets damp. For more information on this issue, see “Sandwiching Roof Sheathing Between Two Impermeable Layers.”
Final advice
Achieving minimum required R-values for cathedral ceilings isn’t easy or cheap. If you’re a green builder, however, you know how important it is to achieve or exceed minimum requirements for R-value.
Moisture problems in cathedral ceilings are quite common, especially in cold climates. Moreover, many ice dam problems can be traced to sloppy cathedral ceiling details. Knowing these facts, builders should be on guard against the temptation to skimp on ceiling R-value or cut corners on air-sealing details.
_________________________________________________________________________
Illustrations by Alexandra Baczek. Originally published on GBA.com.
Fine Homebuilding Recommended Products
Fine Homebuilding receives a commission for items purchased through links on this site, including Amazon Associates and other affiliate advertising programs.

Respirator Mask

Staple Gun
Great Stuff Foam Cleaner


View Comments
It would be interesting to see a cost comparison of these 5 roof options for both material and labor per sq ft for for a 1000 sq ft roof for instance. Also would be interesting to see with the material costs of 2021, does it change the cost effectiveness and make say foam filled cheapest since less wood, and foam hasn't seen such large cost increases as say double roof sheathing may cost or labor to complete blocking between each truss, etc.
It would also be interesting to see how often anything even similar to these designs ever gets done. It seems like one of the least checked aspects of a project by permitting and inspectors, at least in the midwest. We'll see some form of insulation, but not nearly to this level, even in brand new builds.
What about CC spray foam inside and XPS rigid board outside?
What about spray foam insulation?
I'm building a small home from a Best Barns shed kit that uses 2x6's for rafters. I'm trying to meet codes and I'm in western Washington (zone 4?). My plan is to use spray foam on walls and ceiling. Would this be the best method? I'm also concerned about moisture and/or ventilation requirements. If anyone has some recommendations, I'm open.
Somehow I missed the part on spray foam. Ignore the previous comment (it wont let me edit or delete)
I'm building a small home from a Best Barns shed kit that uses 2x6's for rafters. I'm trying to meet codes and I'm in western Washington (zone 4?). My plan is to use spray foam on walls and ceiling, but that wont get me to r-49. Would installing rigid foam over sheathing to reduce thermal bridging, get me to r-49?I'm also concerned about moisture and/or ventilation requirements. If anyone has some recommendations, I'm open.