
Insulating a Wood-Framed Floor Assembly
For better energy performance, homes built on piers, rooms above garages, and cantilevered bays need properly air-sealed and insulated floors.
Most wood-framed floor assemblies — for example, floor joists over a basement — have conditioned space on all sides, and therefore don’t need insulation. Sometimes, though, a wood-framed floor assembly has outdoor air on the underside — as is the case with a house on piers, for example, or the cantilevered floor of a bump-out, or the floor of a bonus room over a cold garage. In these cases, builders need to do a good job of insulating and air-sealing the floor assembly.
Why do we insulate ceilings to a higher R-value than floors?
Building codes require that ceiling assemblies include more insulation than floor assemblies. Many builders explain this requirement by saying, “Heat rises.” In fact, if we’re talking about conduction and radiation — two of the three heat flow mechanisms — heat will flow equally in all directions, including downward, from warm surfaces to cold air. When we consider heat flow associated with air movement (convection), however, the issue gets more complicated. While we can’t accurately say that “heat rises,” it’s certainly true that warm air rises.
In most homes, air leakage and the stack effect ensure that air near the ceiling is warmer than air near the floor. (For more information on these mechanisms, see “Cold Floors and Warm Ceilings.”) That’s one reason that codes require higher R-values for ceilings than floors.
The second reason for the requirement is that it is usually cheaper to install high-R attic insulation than it is to install high-R floor insulation or wall insulation. In other words, the fact that attic insulation is cheap to install alters the cost-effectiveness calculation in favor of thick attic insulation.

Although floor assemblies that are exposed on one side to outdoor conditions must be insulated, there isn’t much value associated with insulating a floor assembly over a basement, even when the basement is unfinished. That’s because the typical basement includes a water heater and furnace — appliances which keep the basement warm during the winter. Since unfinished basements are semi-conditioned, the floor assembly over an unfinished basement never faces anything like outdoor conditions.
A casual approach to insulation leads to comfort problems
Historically, most wood-framed floor assemblies that required insulation were poorly detailed. The typical approach involved sloppy installation of fiberglass batts, protected on the underside by chicken wire, vinyl soffit material, or OSB. In many cases, the batts weren’t thick enough to fill the joist bays, so they slumped away from the subfloor. Since these casually built assemblies usually have air leakage problems, their thermal performance is dismal.
This type of floor feels cold all winter long. If the floor assembly includes plumbing, frozen pipes are a distinct possibility.
Three rules for insulated floors
Here are the basic rules to follow when insulating a wood-framed floor assembly:
- Pay attention to airtightness. If you want comfort and good thermal performance, air leakage is your enemy. The most obvious air barrier is the subfloor (OSB or plywood). If you install the subfloor with continuous beads of construction adhesive, you’ll end up with a good interior air barrier — but remember, the adhesive needs to be continuous. Interrupted dabs of adhesive aren’t good enough. Joists that support a seam between subfloor panels will need two parallel beads of adhesive. (An old-fashioned board subfloor can’t be detailed as an air barrier. When remodeling an older home, you should cover any board subfloor with OSB or plywood if you care about air leakage.)
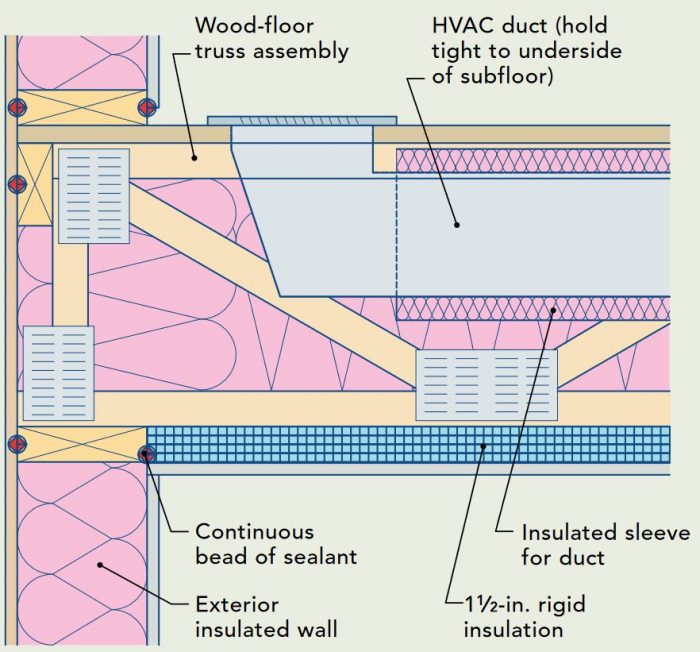
Although it’s essential to install your subfloor in an airtight manner, that step isn’t enough to avoid air leakage problems. You also need to assure that the perimeter of the floor assembly (the rim joist areas) are airtight, and that there is an airtight layer on the underside of your joists. These steps are necessary to prevent outdoor air from filtering through the insulation and to prevent heat-robbing convective loops.
Air sealing is particularly important for the floor assembly of a bonus room over a garage, since garage air can be nasty or even poisonous. Remember that every bonus room needs a carbon monoxide detector.
- For the highest R-value, fill the joist bays completely, without leaving any insulation voids. Most building codes in Climate Zones 5, 6, 7, and 8 require floor assemblies to have a minimum R-value of R-30. (If you are unsure of your local code requirements, check with your town’s building department.) Remember that it’s perfectly OK to exceed minimum R-value requirements. Most builders insulate joist bays with fiberglass batts, mineral wool batts, dense-packed cellulose, or blown-in fiberglass, although some builders prefer to use open-cell spray foam because it is an excellent air barrier. If you are installing closed-cell spray foam — a type of insulation with a high R-value per inch — you probably won’t need to fill the joist bays to their full depth.
- To reduce thermal bridging through the floor joists, install a continuous layer of rigid foam insulation on the underside of the joists. One inch of rigid foam is much better than nothing, and a 2-inch layer is even better.
If the rigid foam seams are carefully taped, the foam layer can also act as the floor assembly’s exterior air barrier. Foil-faced polyisocyanurate is the easiest type of rigid foam to tape, although EPS will work with a compatible high-quality tape. (Environmentally conscious builders avoid the use of XPS, which is manufactured with a blowing agent that has a high global warming potential. For more information on this issue, see “Choosing Rigid Foam.”)
Rigid foam needs to be protected on the exterior from physical abuse and damage by raccoons. Most builders use OSB to protect the exterior side of the rigid foam. (In the case of a bonus room over a garage, the exterior air barrier is usually 5/8″ gypsum wallboard with taped seams.)
Bonus rooms
As an example of the details required for insulated floors, let’s look at a typical bonus room over a garage. The insulation work is typically performed from below.
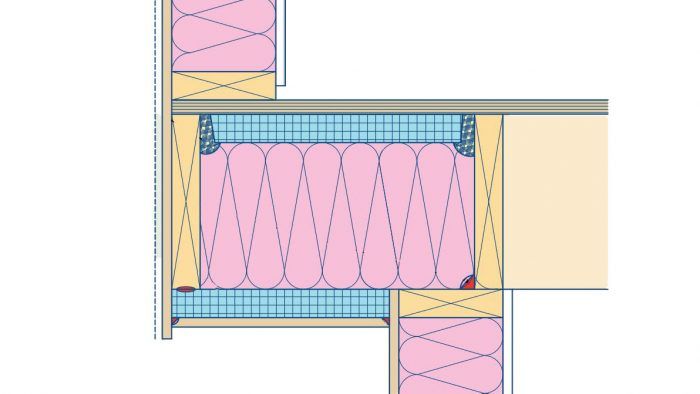
If the area of the heated bonus room above the garage is smaller than the area of the garage ceiling, you’ll need to install blocking between the joists to provide an air barrier where the floor insulation stops; this blocking is located directly under the kneewalls. If you omit this blocking, unconditioned air will have free access to your joist bays.
Blocking can be made from 2x lumber or rigid foam. If it is being installed between I-joists or floor trusses, rigid foam will be easier to cut into odd shapes than lumber. Whatever material you use for blocking, it’s essential to seal the perimeter of each piece of blocking with caulk, high-quality tape, or canned spray foam.
If the floor is the same size as the garage, you’ll need to air-seal the rim-joist area carefully. If ceiling joists extend from the house into the garage, you need to install blocking between the joists to maintain the home’s air barrier. Once the blocking has been installed, seal air leaks at the blocking and the rim-joist area on all four sides of the garage.
For more information on bonus room details, see “Bonus Room Problems.”
What about plumbing pipes or ducts?
With careful planning, you may be able to avoid locating any plumbing pipes or forced-air ducts in your insulated floor assembly. If circumstances compel you to include pipes or ducts between insulated floor joists, you’ll need to specify thicker than usual joists to accommodate the utilities without compromising on insulation thickness. If you’re building in a cold climate, keep your pipes close to the interior side of the assembly, and be meticulous about your air sealing details to avoid frozen pipes.
Counterintuitive advice on air gaps
Over the years, several GBA readers have posted questions about unusual advice from Joseph Lstiburek, a principal at Building Science Corporation. Surprisingly, Lstiburek recommends that builders insulate floor assemblies with undersized batts, with the batts installed tight to the ceiling below, leaving a deliberate air gap between the top of the batt and the underside of the subfloor. This curious suggestion seems to contradict the advice of many energy-efficiency experts.
As most builders realize, insulated floor assemblies usually suffer from thermal bridging through the joists. (In other words, the joists do a worse job of insulating than the batts.) If you look at a typical insulated floor assembly in winter from indoors with an infrared camera, you’ll see that there is a cold stripe above each joist.
Lstiburek explains that if you leave an air gap above the batts, the air trapped between the top of the batts and the subfloor will be warm in winter, since it’s on the interior side of the insulation. This warm air helps keep the tops of the floor joists warmer than they would otherwise be, thereby reducing the contrast in temperature between the floor joists and the insulated joist bays.
When this topic came up in in a Q&A query, I wrote, “Lstiburek’s approach — leaving an air space between the top of the insulation and the subfloor — is dangerous to follow if you are a builder with average skills, because air leaks in floor assemblies can allow cold exterior air to infiltrate the joist bays. Once that happens, this detail is a disaster. The detail only works if the builder has impeccable air-sealing skills.
“Here’s the bottom line: The insulation that is doing most of the work in this assembly is the continuous layer of rigid foam under the joists. If you want a warmer floor, beef up the thickness of the rigid foam — and do an impeccable job of air sealing at the perimeter of the floor assembly (the rim joist area). Then it hardly matters how much fluffy stuff you put between the floor joists. You can put in a little (the Lstiburek approach) or a lot (my way).”
When I discussed this issue with Lstiburek, he admitted that leaving the air space above the insulation results in greater heat flow (because the batts aren’t as thick as usual) and thus (to a limited degree) the air space results in more energy use. But Lstiburek claims that a floor assembly with his unusual detail will be more comfortable.
If the joist bays are completely filled with insulation, the difference in temperature between the subfloor directly above a joist and the subfloor above the center of a joist bay — a difference in temperature caused by thermal bridging through the joists — will be 1.5 F°, according to Lstiburek. If you leave an air space above the insulation, Lstiburek says, the difference in temperature between the two locations is 0.5 F°, which is less noticeable and therefore more comfortable. (Joe wanted me to emphasize that he is not advocating in favor of less insulation — only for improved comfort.)
That said, if you install a continuous layer of rigid foam insulation across the underside of the joists, you get the best of both worlds — plenty of R-value and no cold spots above the joists due to thermal bridging.
Lstiburek’s article about the theoretical usefulness of an air gap between the batts and the subfloor points out a serious downside to his insulation technique: Some versions of the building code forbid the practice. (For example, Section R402.2.7 of the 2012 IECC requires that “Floor insulation shall be installed to maintain permanent contact with the underside of the subfloor decking.”) Before you decide to try Lstiburek’s approach to floor insulation, consult your local code official.
What if the floor has hydronic tubing for a radiant floor?
Any insulated floor assembly that includes hydronic tubing for a radiant floor requires above-average details for insulation below the tubing. If you are planning to install a radiant floor, beef up the insulation thickness. Remember: foil-faced bubble wrap has negligible R-value, and should never be substituted for real insulation.
What about slabs on grade?
For information on insulating slabs, see these two articles:
Originally published on GBA.com.
Fine Homebuilding Recommended Products
Fine Homebuilding receives a commission for items purchased through links on this site, including Amazon Associates and other affiliate advertising programs.

Caulking Gun

Nitrile Work Gloves

Great Stuff Foam Cleaner

