FHB Logo Facebook LinkedIn Email Pinterest Twitter X Instagram Tiktok YouTube Plus Icon Close Icon Navigation Search Icon Navigation Search Icon Arrow Down Icon Video Guide Icon Article Guide Icon Modal Close Icon Guide Search Icon Skip to content
Subscribe
Log In
  • How-To
  • Design
  • Tools & Materials
  • Restoration
  • Videos
  • Blogs
  • Forum
  • Magazine
  • Members
  • FHB House
  • Podcast
Log In
How-To

Laminating Curved Stair Stringers

By Joe Hawkins Issue 218

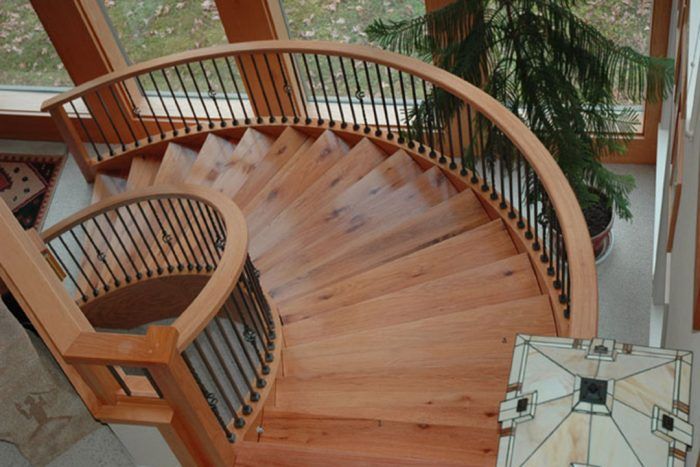
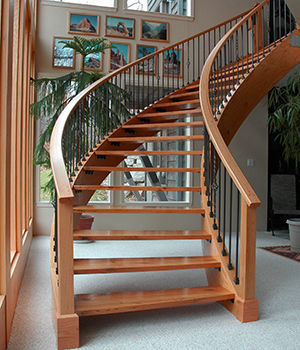
A while back, my company built a set of freestanding curved stairs for a client. It was such a successful project that I decided to repeat it in my own house. I figured the sweeping curve and implied lightness of the new stairs would look better in our two-story atrium than the existing set of traditional stairs with a midlevel landing. The central trick to the helical stringers is building two curved, temporary stud walls that serve as a lamination form. The wall layout also is used to determine the rise, the run, and the taper of the treads.

To plan the layout, I drew out everything on the floor first. Next, I made a 3-1/2-in.-wide paper template of the inside and outside radius, then transferred the template lines onto 3/4-in. plywood and cut out the curve to make the top and bottom plates.

Working with my wife, Pam, I built the walls on the curved plates by lining up each stud with a riser mark. Starting at the bottom, we marked the rise on the first stud; for each successive stud, we added one tread height. This gave us the baseline for the top of the stringer, which we then raised 2 in. to accommodate a 1-in.-wide nosing.

For the stringers, we ripped 3/8-in. plywood into pieces 15-7/8-in. wide. After making the plumb and level cuts, we bent the first layer onto the stud walls following our stringer line and attached it using 1-1/4-in. drywall screws. I used a brush to coat the entire surface of the next layer with yellow glue, then screwed that layer over the first layer, offsetting the seams by 4 ft. We built up 11 layers, creating a 4-1/8-in.-thick stringer.

Once the glue was dry, we removed the stud walls. Then we removed the stringers, covered them with oak veneer, and replaced them. I had 1/4-in.-thick steel angle brackets welded to the steel header above to secure the stringers at the top, and then I bolted the bottom of the stringers to the floor. Using rough-sawn 2-in. white oak salvaged from an old barn, I made the treads and attached them to the stringers with steel stair-tread brackets from Simpson Strong-Tie.

For the handrails, I cut 1/4-in. by 1-1/2-in. oak strips and, using the stringer top as a form, laminated 15 layers with clamps and glue. After the glue dried, I sanded them down and routed a handrail profile onto the edges. Posts installed at the top and bottom of each stringer were made from 4×4 stock from the old barn.

I attached blocks to the bottom of a router for a guide and plowed a 1/2-in.-wide by 3/4-in.-deep dado in the bottom of each handrail to accept the 1/2-in.-sq. steel spindles. On the top of the stringers, I drilled 5/8-in. holes on 4-in. centers. We used 1/2-in.-sq. steel bases at the bottom of each spindle to cover the round holes. At the top and bottom of every tenth spindle, I put a small screw to attach the spindle solidly to the stringer and handrail.

First, draw the layout on the floor

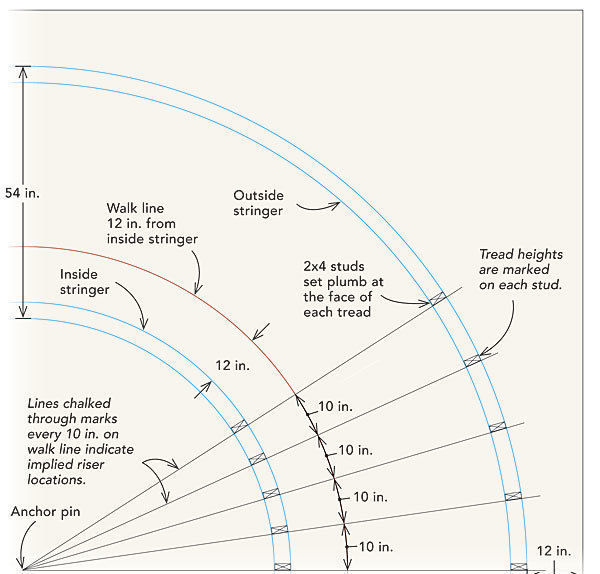
To compute the stair’s rise and run on a radius, the author established his starting point on the floor directly below the upper landing. With a string hooked to an anchor pin in the floor, he drew the line for the inner stringer, then drew the walk line and outer stringer. Through trial and error, he measured the tread width at the walk line and found that a width of 10 in. would create the run he wanted. To determine the rise, he divided the total rise by the number of treads that would produce an approximate rise of 7 in. After the layout was established, he transferred the stringer radii onto plywood, which he then cut and used for plates. Studs positioned at the face of each tread created a form that he used to laminate the stringers.

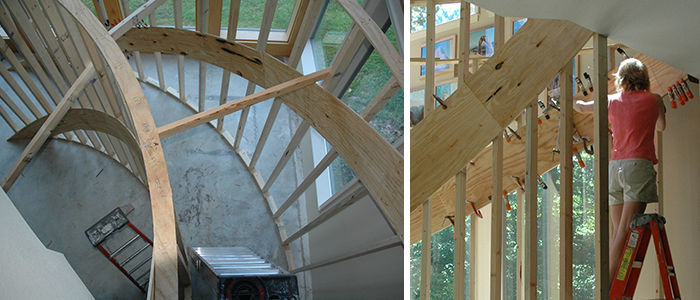
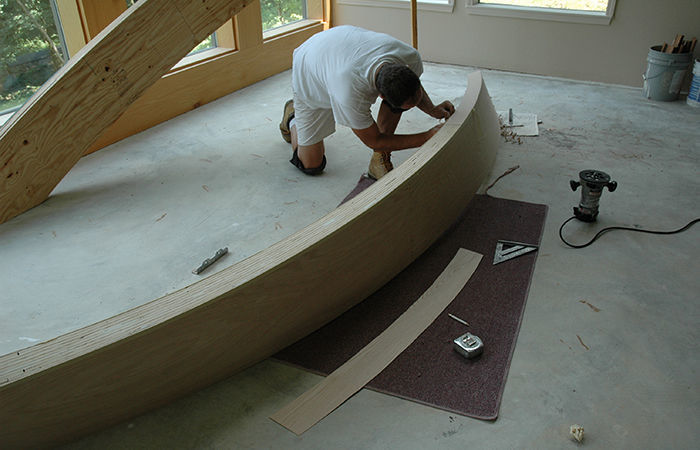
Temporary wall functions as form

Templated from the layout drawn on the floor, the plywood wall plates are used to build a pair of curved walls that replicate the curve of the stairs. Temporary bracing keeps the walls plumb. Each stud is positioned at the implied location of a riser, and each tread height is marked on that stud. The stringers are laid up along these marks. Each successive layer of 3/8-in. plywood is screwed and glued to the previous layer. Clamps help to maintain a consistent lamination.
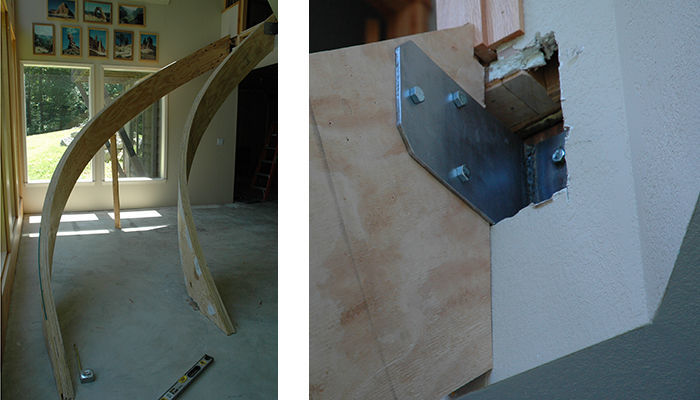
Make sure they work

When the glue has dried on all the laminations, remove the stud walls, snap off protruding screws, and patch and sand the stringer surface in preparation for veneer. Fasten the stringers to the upper landing with steel angle brackets welded and bolted to the steel header.

Beautification, skin deep.

Apply the veneer with contact cement to all faces of the stringers once they have been unbolted from their positions. Flush-trim each face before gluing the adjoining face.

Photos by Pam Hawkins; Illustration by Rodney Diaz

Sign up for eletters today and get the latest how-to from Fine Homebuilding, plus special offers.

Signing you up...

This site is protected by reCAPTCHA and the Google Privacy Policy and Terms of Service apply.
See all newsletters
See all newsletters
×

Get home building tips, offers, and expert advice in your inbox

Signing you up...

This site is protected by reCAPTCHA and the Google Privacy Policy and Terms of Service apply.
See all newsletters
See all newsletters

New Feature

Fine Homebuilding Forums

Ask questions, offer advice, and share your work

View Comments

  1. LarsDav | Nov 16, 2024 06:28pm | #1

    I have been searching for a while, learning about laminated stingers. I have read several articles, and watched a plethora of videos.. This article is one to pin. Simple, and full of great info. It cuts all the fluff and gets straight to the business. Thank you for writing it.

Log in or create an account to post a comment.

Sign up Log in

Become a member and get full access to FineHomebuilding.com

Up Next

Video Shorts

Featured Story

Fast, Accurate Wall Framing

A rear addition provides a small-scale example of how to frame efficiently.

Featured Video

How to Install Cable Rail Around Wood-Post Corners

Use these tips to keep cables tight and straight for a professional-looking deck-railing job.

Related Stories

  • Outdoor Lighting
  • Step Up Your Stair-Gauge Game
  • FHB Podcast Segment: Drywall-Free Half Wall Finish
  • Original Woodwork in Old Houses

Discussion Forum

Recent Posts and Replies

  • |
  • |
  • |
  • |
  • |
  • |
View More Create Post

Highlights

Fine Homebuilding All Access
Fine Homebuilding Podcast
Tool Tech
Plus, get an extra 20% off with code GIFT20

"I have learned so much thanks to the searchable articles on the FHB website. I can confidently say that I expect to be a life-long subscriber." - M.K.

Get home building tips, offers, and expert advice in your inbox

Signing you up...

This site is protected by reCAPTCHA and the Google Privacy Policy and Terms of Service apply.
See all newsletters
See all newsletters

Video

View All Videos
  • FHB Podcast Segment: Drywall-Free Half Wall Finish
  • Installing Risers and Treads on Wraparound Deck Stairs
  • Installing Deck and Border Boards
  • Building Wraparound Box-Frame Stairs on a Deck
View All

Stairs

View All Stairs Articles
  • Original Woodwork in Old Houses
  • Functional Floating Home
  • Stairway Basics
View All Stairs Articles

Fine Homebuilding Magazine

  • Issue 332 - July 2025
    • Custom Built-ins With Job-Site Tools
    • Fight House Fires Through Design
    • Making the Move to Multifamily
  • Issue 331 - June 2025
    • A More Resilient Roof
    • Tool Test: You Need a Drywall Sander
    • Ducted vs. Ductless Heat Pumps
  • Issue 330 - April/May 2025
    • Deck Details for Durability
    • FAQs on HPWHs
    • 10 Tips for a Long-Lasting Paint Job
  • Issue 329 - Feb/Mar 2025
    • Smart Foundation for a Small Addition
    • A Kominka Comes West
    • Making Small Kitchens Work
  • Issue 328 - Dec/Jan 2025
    • How a Pro Replaces Columns
    • Passive House 3.0
    • Tool Test: Compact Line Lasers

Fine Home Building

Newsletter Sign-up

  • Fine Homebuilding

    Home building tips, offers, and expert advice in your inbox.

  • Green Building Advisor

    Building science and energy efficiency advice, plus special offers, in your inbox.

  • Old House Journal

    Repair, renovation, and restoration tips, plus special offers, in your inbox.

Signing you up...

This site is protected by reCAPTCHA and the Google Privacy Policy and Terms of Service apply.
See all newsletters

Follow

  • Fine Homebuilding

    Dig into cutting-edge approaches and decades of proven solutions with total access to our experts and tradespeople.

    Start Free Trial Now
    • Facebook
    • Instagram
    • X
    • LinkedIn
  • GBA Prime

    Get instant access to the latest developments in green building, research, and reports from the field.

    Start Free Trial Now
    • Facebook
    • YouTube
  • Old House Journal

    Learn how to restore, repair, update, and decorate your home.

    Subscribe Now
    • Facebook
    • Instagram
    • X

Membership & Magazine

  • Online Archive
  • Start Free Trial
  • Magazine Subscription
  • Magazine Renewal
  • Gift a Subscription
  • Customer Support
  • Privacy Preferences
  • About
  • Contact
  • Advertise
  • Careers
  • Terms of Use
  • Site Map
  • Do not sell or share my information
  • Privacy Policy
  • Accessibility
  • California Privacy Rights

© 2025 Active Interest Media. All rights reserved.

Fine Homebuilding receives a commission for items purchased through links on this site, including Amazon Associates and other affiliate advertising programs.

X
X
This is a dialog window which overlays the main content of the page. The modal window is a 'site map' of the most critical areas of the site. Pressing the Escape (ESC) button will close the modal and bring you back to where you were on the page.

Main Menu

  • How-To
  • Design
  • Tools & Materials
  • Video
  • Blogs
  • Forum
  • Project Guides
  • Reader Projects
  • Magazine
  • Members
  • FHB House

Podcasts

  • FHB Podcast
  • ProTalk

Webinars

  • Upcoming and On-Demand

Podcasts

  • FHB Podcast
  • ProTalk

Webinars

  • Upcoming and On-Demand

Popular Topics

  • Kitchens
  • Business
  • Bedrooms
  • Roofs
  • Architecture and Design
  • Green Building
  • Decks
  • Framing
  • Safety
  • Remodeling
  • Bathrooms
  • Windows
  • Tilework
  • Ceilings
  • HVAC

Magazine

  • Current Issue
  • Past Issues
  • Magazine Index
  • Subscribe
  • Online Archive
  • Author Guidelines

All Access

  • Member Home
  • Start Free Trial
  • Gift Membership

Online Learning

  • Courses
  • Project Guides
  • Reader Projects
  • Podcast

More

  • FHB Ambassadors
  • FHB House
  • Customer Support

Account

  • Log In
  • Join

Newsletter

Get home building tips, offers, and expert advice in your inbox

Signing you up...

This site is protected by reCAPTCHA and the Google Privacy Policy and Terms of Service apply.
See all newsletters
See all newsletters

Follow

  • X
  • YouTube
  • instagram
  • facebook
  • pinterest
  • Tiktok

Join All Access

Become a member and get instant access to thousands of videos, how-tos, tool reviews, and design features.

Start Your Free Trial

Subscribe

FHB Magazine

Start your subscription today and save up to 70%

Subscribe

We hope you’ve enjoyed your free articles. To keep reading, become a member today.

Get complete site access to expert advice, how-to videos, Code Check, and more, plus the print magazine.

Start your FREE trial

Already a member? Log in