
6 Steps to Install an Exterior Door
Follow the guidelines for prepping the opening, dry-fitting the door, installing the exterior frame, and sealing, casing, and flashing the frame.
Though the process is much the same, exterior door units are inherently more complex to install than interior doors, because of the need to make them weathertight. If you discover rot in the existing door frame or the surrounding framing, attend to that before installing a new unit. Follow these six steps in install an exterior door.
1) Prepping the opening
Most of the prep work involves leveling and weatherproofing the bottom of the opening. That’s where water is most likely to enter and damage flooring, subflooring, and framing. When installing an exterior door, cover the work area with tarps to contain the mess and heavy cardboard to protect finish floors.
Before ordering the new door unit, measure the height and width of the RO and the thickness of the wall. Check the trimmer studs for plumb, the header and sill for level, and corners for square. Generally, the RO will be 2 in. wider than the door—or 1⁄2 in. to 1 in. taller and wider than the framed unit. (When the prehung unit arrives, check all these measurements again—and the dimensions of the unit as well.)
Determine the height of the finish floor. In most cases, prehung doors come with a combination sill/threshold already attached—usually screwed to the bottom of the jamb legs. In new construction, this combo sill/threshold sits directly on the plywood subfloor, although in some installations the doorsill sits directly on top of the floor joists with subflooring and finish flooring butting up against it.
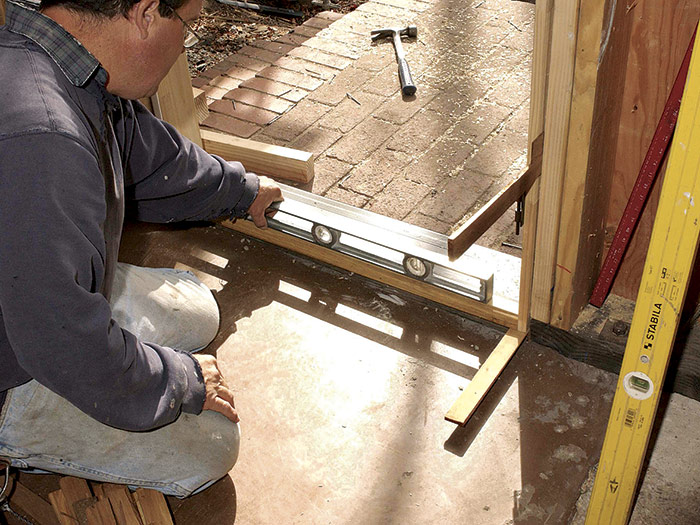
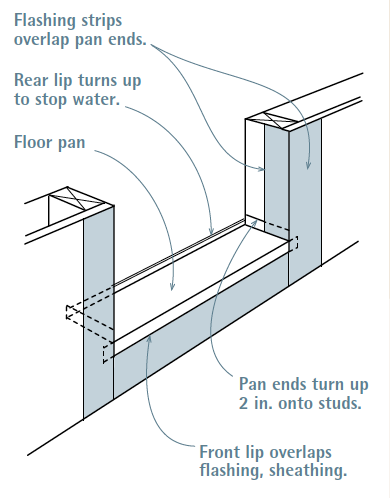
Install a sill pan, even if the doorway is protected by an overhang. Given the popularity of rubberized self-adhesive flashings these days, most builders fashion a sill pan from membrane such as the Moistop Corner Shield. Because most of these products are flexible and self-sealing, they can be easily fitted into corners or rolled to create water dams. If your region gets driving rains, a prefabricated metal or plastic sill pan is another option. Whatever the pan material, however, fold its ends and back edge up—as shown in the drawing below—so the pan will confine any water that gets under the sill. All sill pans should be caulked well inside corners and along seams. If you use a bituminous membrane, make sure the sealant you use is compatible with the membrane. Butyl-based sealants are usually a safe bet, but check manufacturer’s specs for both products.
2) Sill pan for exterior door
| PRO TIP: Sill pans fashioned from a bituminous, self-adhered flashing material are easier to fit and secure than preformed, sheet-metal sill pans. An aluminum-faced flashing such as DuPont FlexWrap is easy to run up the sides of a rough opening and form into corners to get a good seal. Screwing or nailing down metal sill pans, on the other hand, compromises their ability to keep water out. |
Before installing the door, weatherproof the sides of the RO by folding building paper or housewrap into the opening, making sure that it overlaps the upturned edges of the sill pan. Alternatively, if you haven’t yet installed a water-resistive barrier, you can attach flexible, self-adhesive flashing tape to the sides of the RO that will overlap the tops of the sill pan. Flashing tape comes in widths up to 12 in. and can be easily shaped and smoothed around the corners of the RO. Finally, to direct water away from framing, the outer lip of the sill pan must overlap any exterior flashing beneath the sill. To keep water out, above always overlaps below.
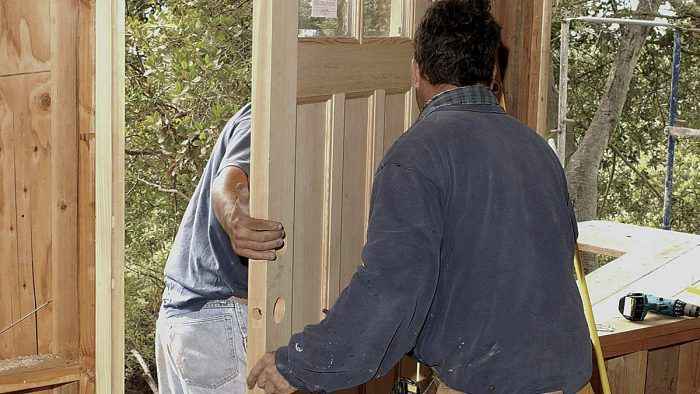
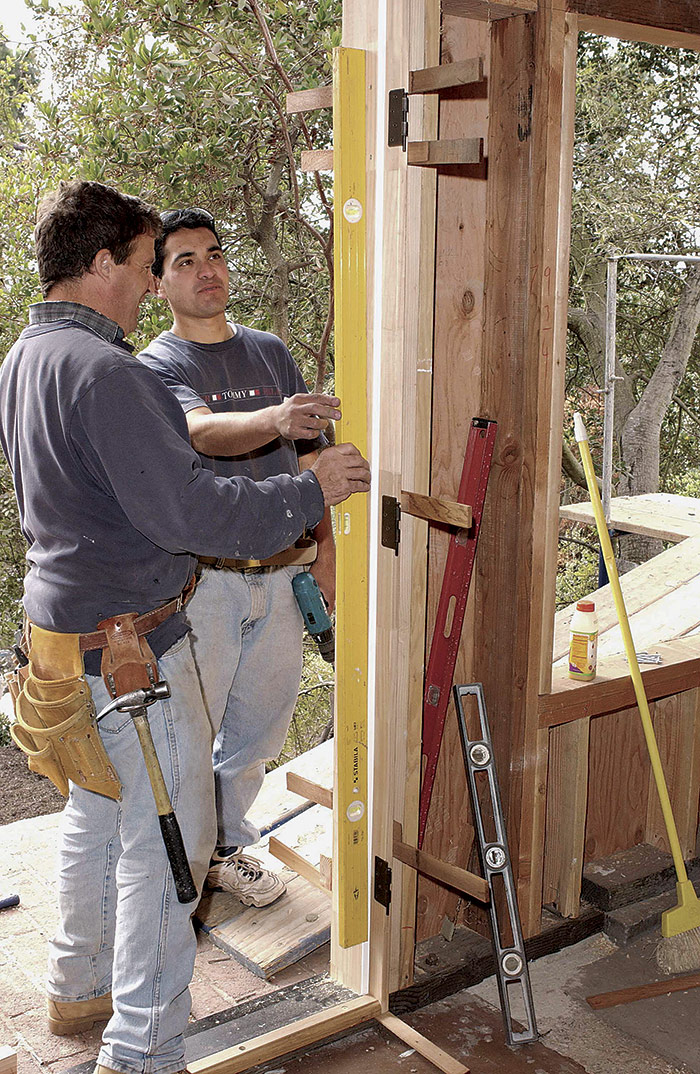
3) Dry-fitting the door
Once you’ve prepped the opening, place the door unit in it to see what needs doing. This is a dry run, so leave the door in the frame. You’ll need a helper for this sequence.
Test-fit the door frame in the opening. Center it right to left in the RO; there should be 1⁄4 in. to 1⁄2 in. of clearance around the frame so it can be shimmed. Then, margin the frame—center it within the thickness of the wall. Jamb edges inside and out should be flush to wall surfaces, or 1⁄16 in. proud to accommodate framing quirks.
Is the door frame square? If it is, there will be an even reveal (gap) between the door and the jambs all the way around the door. If not, the frame is skewed. To square it, remove the frame from the opening, and tilt the frame to one side until acute corners (less than 90°) become square and the reveal is even all around. Factory-made exterior door frames are made from heavy stock, milled to exact specifications, and reinforced with sturdy sills, so they rarely arrive out of square. Place the unit back in the opening and check that the reveal is even.
Assuming the reveal is even, remove the unit from the RO. If the bottom of the opening is not level, attend to that now, as described in “Leveling a Doorsill” above. Then caulk the bottom of the opening with a triple bead of caulk.
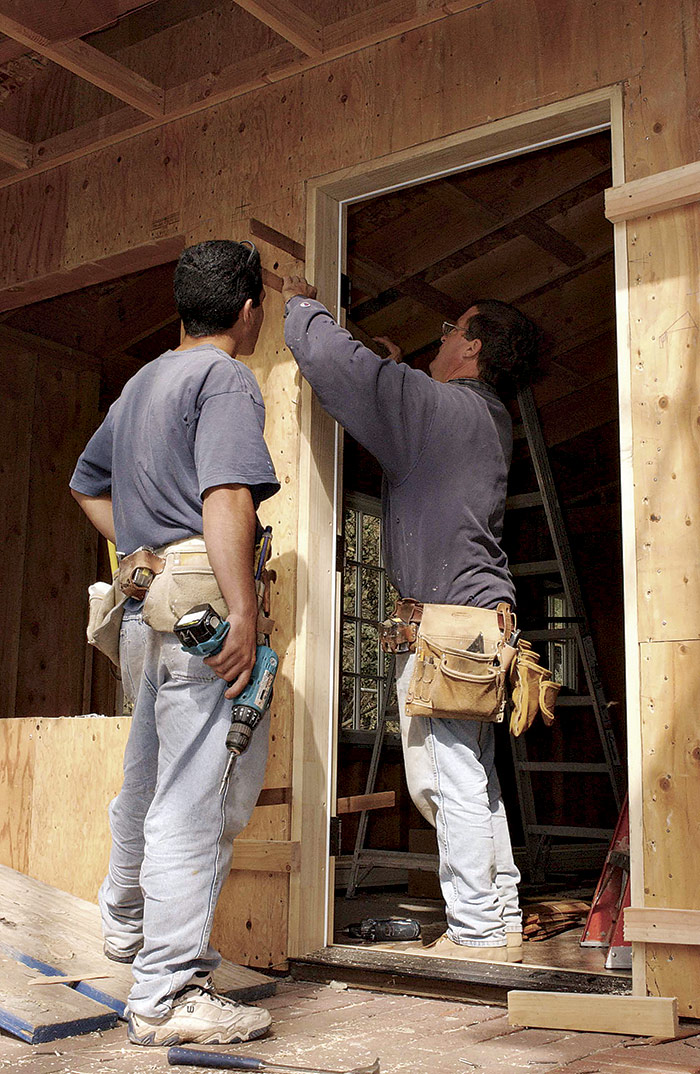
4) Installing an exterior frame
There is no one right way to install a prehung exterior door. Some carpenters prefer to install door frames with doors in them. Others prefer to remove the door, plumb and attach the hinge jamb, rehang the door, then attach the other jambs. Although the photo sequence shows the door removed, both methods are described here.
Method 1: The door stays hung
Pry off the shipping blocks, remove the plastic plugs from the lock bore, and place the unit into the RO. (At this point, assume the doorsill is level.) Approximately center the unit left to right in the opening, then margin the hinge jamb while a helper keeps the unit from tipping. Near the top of the hinge jamb, drive in a 10d finish nail through the face of the jamb to tack it to the trimmer. (You may have to open the door to do this.) Then hold a 6-ft. level to the edge of the jamb and then to the face of the jamb to see if the hinge jamb is plumb.
| PRO TIP: Hand-nail the finish nails used to tack a frame to the RO and leave nail heads sticking up. If you use a nail gun for this operation, you’ll likely drive the nails all the way in—making subsequent adjustments difficult. |
If the sill is level and the frame has remained square, you should get a plumb reading. Also, sight along the frame to make sure the jamb stock is straight. If the hinge jamb is plumb, insert pairs of shims between the hinge jamb and the trimmer stud—one pair of shims behind each of the three hinges and two more pairs spaced equidistant between the hinge shims. Because you and your helper will have a door between you, you’ll need to communicate constantly as you insert shim pairs from both sides and continually check for plumb.
If, on the other hand, the hinge jamb is not plumb, the frame may be racked slightly. Again, assuming that the sill is level, insert a flat bar between the frame and the trimmer near the top of the frame, and pry the frame out on one side until the hinge jamb is plumb. Then tack the hinge jamb as described. If the hinge jamb is bowed, that could give you an off-plumb reading, too. Adjust shims and use nails to adjust the bowed section.
Once you’ve plumbed and secured the hinge jamb, read the reveal—make sure there is an even clearance between the door and the jambs—to position the head and the latch jambs. Use nails to draw the frame toward the trimmer or adjust the shims so the reveal is uniform—typically about 1⁄8 in. As you work the jambs, also use the edge of your Speed Square to make sure frame edges are margined in the wall.
One final aside: Precased door units can be shimmed only from the inside. In that case, insert a shim, fat end first, until it butts against the back of the casing, then slide additional shims, thin edge first, until shims are tight. Nail or screw below each stack of shims, then close the door and see if it seats evenly against the frame.
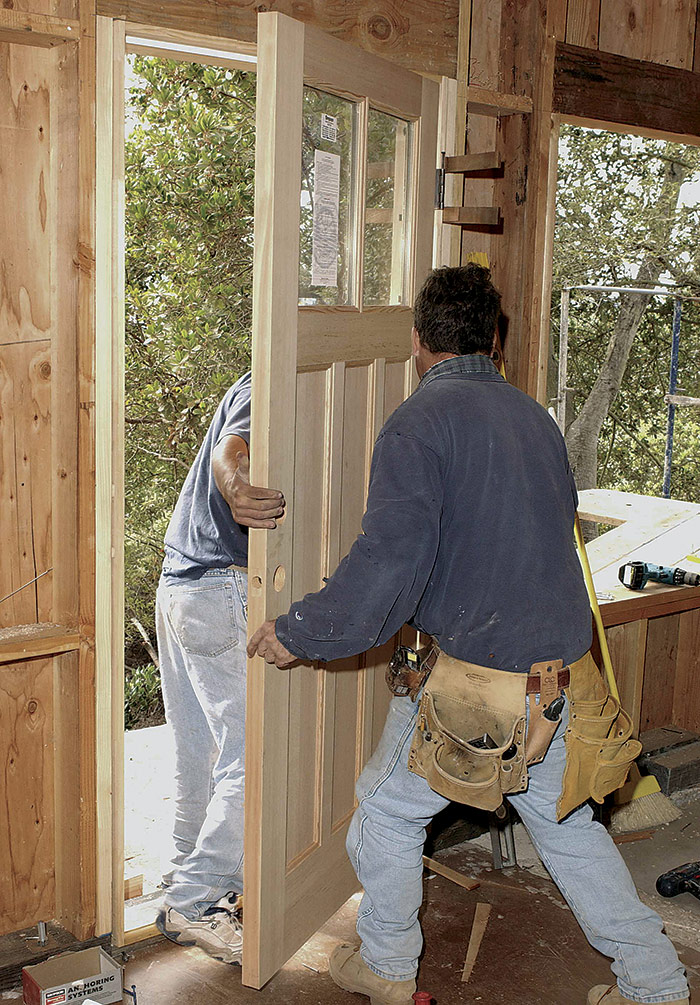
Method 2: Remove the door
After prepping the opening, pull the hinge pins and remove the door from the frame. (As is the case in the directions above, assume the doorsill is level.)
Center the frame left to right in the opening, and margin the frame. If you’re working solo and want to make sure the frame stays margined, tack temporary cleats to the outside of the frame and to the exterior sheathing, as shown in the photo. Tack it lightly though, because you’ll probably need to reposition the frame as you plumb its sides.
 |
 |
Start with the hinge jamb. Having margined the frame, drive a 10d finish nail in the middle of the hinge jamb about 6 in. down from the top; leave the nail head sticking out. Using a 6-ft. level to check for plumb, shim the jamb behind each hinge: top, bottom, and then middle hinge. If you nail just below the shims, they’ll be easier to adjust. Use two 10d finish nails for each shimming point and, again, leave the nail heads sticking up. As you hold your level against the jamb hinge, note whether the jamb stock is straight. If it bows, you’ll need to nail or adjust shims to pull the jamb into line. In all, use five pairs of shims (and nails) to secure the jamb hinge.
Using a framing square to ensure that it’s roughly square to the hinge jamb, tack the head jamb to the header. The head jamb’s position is approximate at this point because you’ll use the door to fit things more exactly. With the aid of a helper, set the exterior door back on its hinges. Close the door and note how it fits the frame. Without weatherstripping, there should be an even reveal, about 1⁄8 in. wide, around the door.
If the door hits the edge of the latch jamb, that jamb may be bowed or the shims behind the hinge jamb may be too thick. Adjusting an uncased exterior door frame is similar to “working” an interior door frame. Shim the head jamb and then the latch jamb—fine-tuning the jambs so the 1⁄8-in. reveal between the door and the frame is constant. Operate the door to make sure it opens and shuts without binding. The latch jamb should have four or five pairs of shims, and the head jamb should have at least three. Then fit insulation between the frame and the RO, install casing, and flash the unit, as described in the following section.
 |
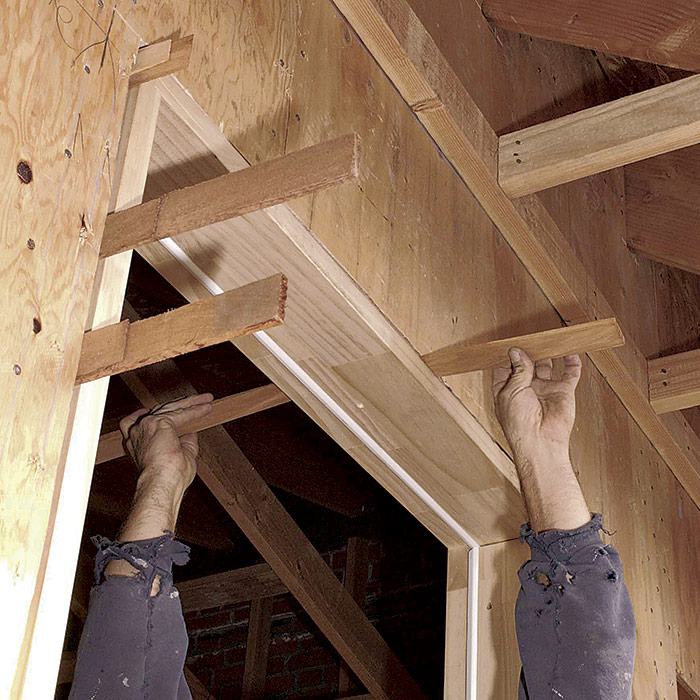 |
Shimming Exterior DoorsShim exterior door frames at five points along each side jamb. Along the hinge jamb, shim behind each of the three hinges—or as close as possible if hinge-screw points stick out of the back side—and add two more sets of shims spaced equidistant between hinge shims. Space shims along the latch jamb at roughly the same intervals, but don’t shim directly behind strike plates or dead bolts. Shim the head jamb midway and at both corners. Exterior door frames are often installed with pairs of 10d galvanized finish nails that go through or slightly below each pair of shims. Using two nails at each interval keeps the frame from twisting. Other builders favor pairs of 2 1⁄2-in. stainless-steel trim-head or plated flathead screws because they grip better and can be removed easily. In addition, many builders remove the middle screw of the top hinge, shim behind it, and replace the original screws with 2 1⁄2-in. or 3-in. screws that sink deep into framing. Here are some fine points to consider:
|
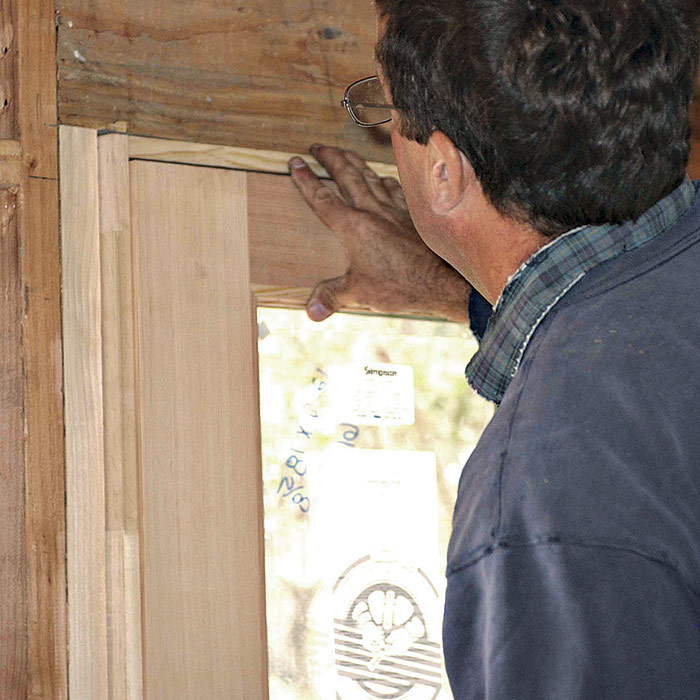
5) Sealing, casing, and flashing the frame
If any edges or faces of the frame are still unfinished, prime or paint them before installing exterior casing.
If the cavity between the jambs and the framing is accessible only from the outside, fill it with insulation before installing the exterior casing. I favor packing the cavity with loose fiberglass or recycled cotton insulation. Should you need to adjust the frame at some future time, you will be able to do so easily. If you fill the cavity with spray foam—even low-expanding foam—you are, in effect, gluing everything together and creating a huge mess for the next person to work on the frame. Avoid high-expansion foam at all costs: It’s so powerful that it can easily bow jambs into the opening and bind doors and windows.
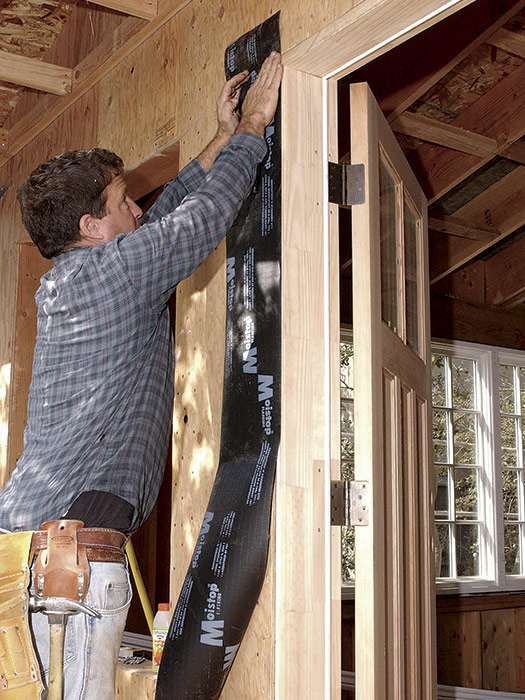
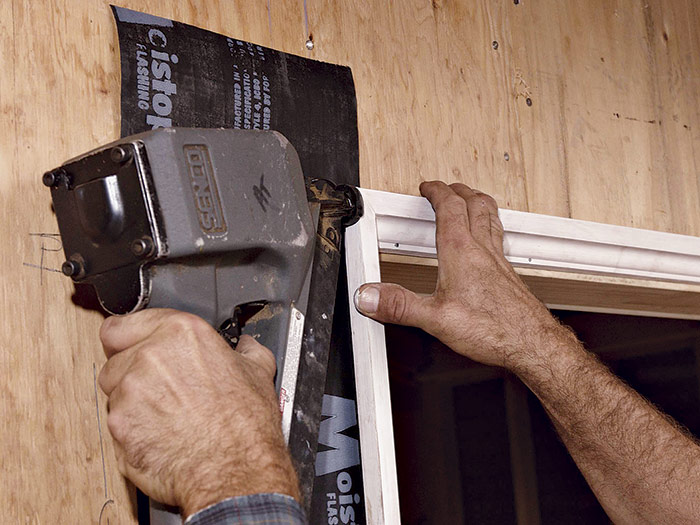
Before attaching casing, air-seal the gaps around the frame. There are two primary ways to do this. The first is to apply self-adhesive flashing tape so that it straddles the gap between the jambs and the housewrap. The second way is to run beads of siliconized acrylic caulk around the jamb edges and the RO, then press 6-in.-wide fiber-reinforced paper flashing strips into the caulk. These strips aren’t self-adhesive, so staple edges that overlap the sheathing. Whether you use tape or strips, align their edges back 1⁄4 in. from the inside edge of the frame so they won’t be visible. (Strips are favored by builders who want a thinner material between frame jambs and casing, or those who have not yet installed housewrap and want to slide flashing under the housewrap at the head and sides.)
 |
 |
If the unit’s doorsill has horns that extend beyond the side jambs, trim each horn to match similar details elsewhere on the house. Typically, horns line up with the outer edge of side jambs or protrude 1⁄4 in. beyond them. Because the sill is pitched, you’ll need to cut the bottoms of the casing at the same angle; use an adjustable bevel gauge to transfer the angle to the casing.
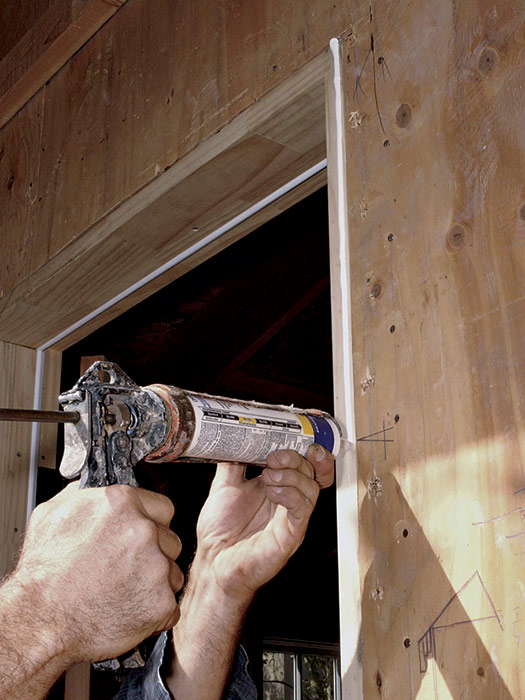
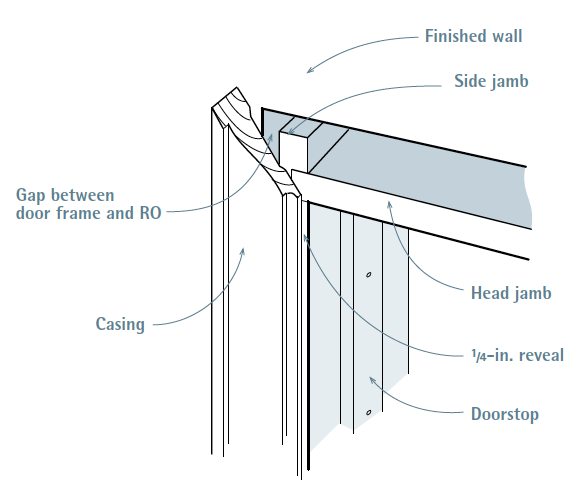
Attach the casing. Set the inside edges of jamb casing back 1⁄4 in. from the inner edges of the jambs to create a 1⁄4-in. reveal. Then nail up the head casing. If casing corners are mitered, nail through the joint to draw it tight. Note: A flashing strip or piece of flashing tape will be applied over the upper leg of the cap flashing to direct water away from the sheathing. (Above overlaps below.)
6) Door-casing reveal
 |
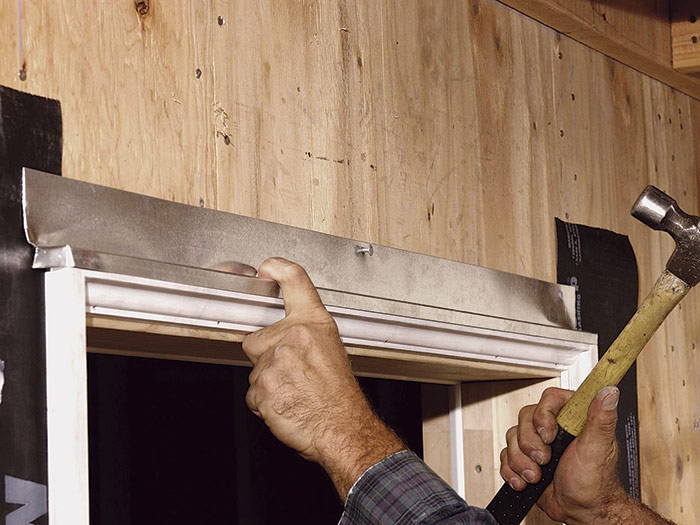 |
Once you have installed the head casing, attach the head flashing (cap flashing) that was supplied by the door manufacturer. If your prehung door didn’t come with head flashing, any sheet-metal shop can fabricate a piece of galvanized head flashing with the proper offset for the thickness of the head casing so water drips beyond it. Many lumberyards also carry a variety of preformed flashing, and brickworks carry specialized head casing.
Caulk the head casing/sheathing joint, press the cap flashing down onto the casing, then use large-head nails to nail the top flange of the flashing to the sheathing. Apply self-adhesive flashing tape or strip flashing over the top leg of the head flashing, and run housewrap and siding down over that.

RELATED STORIES
Excerpted from Renovation, 5th Edition (The Taunton Press, 2019) by Michael Litchfield and Chip Harley
Available in the Taunton Store and at Amazon.com.

View Comments
Why do none the articles address the installation whenever the subfloor is a concrete slab