
Air leaks can account for 20% to 30% of the total heat loss of an insulated house. If your budget is tight, sealing seams and holes in the building envelope, packing insulation into the gaps around windows and doors, and installing weatherstripping should be your first priority. The single most crucial piece of weatherstripping is a tight-fitting door threshold.
Weatherstripping Jambs
Today, there are three main types of weatherstripping: tubular, metal-leaf, and kerf-in. Most are easy to install and require few special tools. Prehung exterior doors typically come with weatherstripping attached, which can be easily removed before installing the unit so you can better see the 1⁄8-in. reveal between the door and the jambs. Door shoe gaskets (which seal the bottom of a door) are removed for the same reason.
Door Weatherstripping
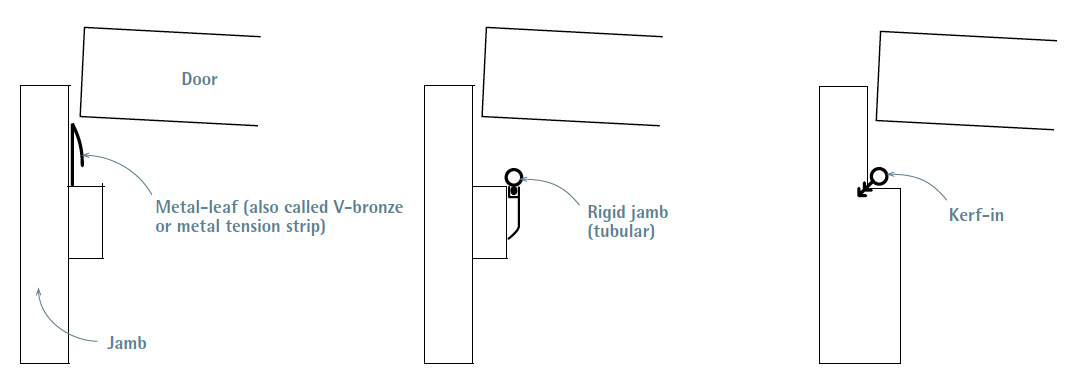
Tubular is the easiest to retrofit to old doors and the least expensive type of permanent weatherstripping. The reinforced part of the strips is usually metal, with slots for screws; slots allow you to adjust the stripping so it fits tight to windows or doors. To install tubular weatherstripping, shut the door and press the strip’s flexible seal against the door, then screw the reinforced part to the jamb. Don’t buy tubular stripping that nails up or has round holes (not slots) because it can’t be adjusted.
Metal-leaf, commonly called a V-bronze or metal tension strip, is a thin metal strip folded lengthwise and nailed with brads to door jambs. When the door shuts, it compresses the metal, stopping drafts. Metal tension strips are durable and, because they fit between the door or window and the frame, are hidden when the door is shut. When installing it, place the leaves flush to the doorstop, spacing brads every 3 in. Install the head piece first, then the sides. To keep the leaves from snagging where they meet in the corners, snip them back at a slight angle (5°). In time, the leaves flatten, but they can be raised by running a flathead screwdriver down the center of the fold.
Kerf-in features flexible stripping (silicone, vinyl, or nylon) that slides into a kerf (slot) between the jamb and the doorstop. Kerf-in is the preferred weatherstripping for prehung exterior doors because it seals tightly and can be easily replaced if the stripping gets compressed over time. To cut kerfs into existing frames, use a kerfing tool, which looks like a laminate trimmer on an angled base. Silicone stripping is a good choice for retrofits because it compresses so small that old doors shut easily without doorstop adjustments. At head-jamb corners, cut stripping at 45° angles so it lies flat.
Sealing Under the Door
Weatherstripping at the bottom of a door must create a tight seal and be durable. Elements that attach to door bottoms are called shoes or sweeps; those that attach to doorsills are thresholds. Although primarily intended to reduce drafts, they also must resist water seeping or blowing in under the door. If your region gets a lot of precipitation, a roof or porch overhang should be your first line of defense—properly sized, the overhang should extend out from the building half the distance from the doorsill to the underside of the eave.
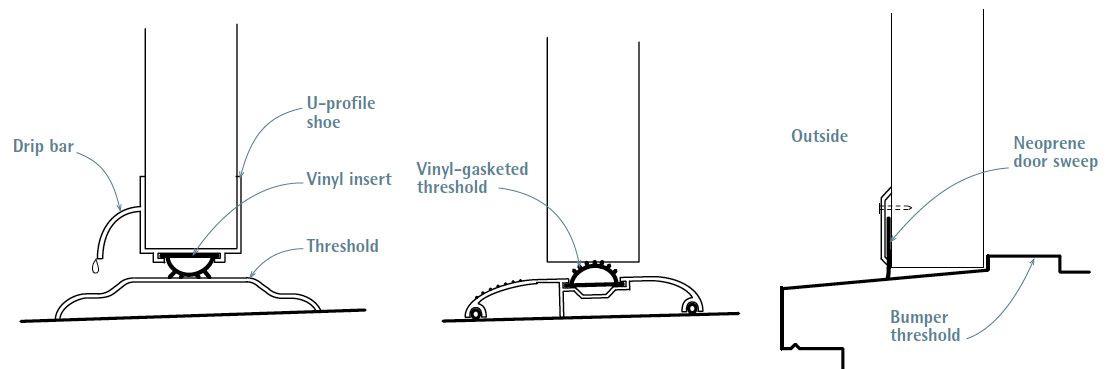
Attaching sweeps and shoes. If you’re fortunate enough to have an outswing door, install a compressible gasket to the integral stop in the threshold and a flap neoprene sweep to the outside of the door. On an outswing door, cut the sweep to length and hold it against the bottom edge of the door so the sweep just touches the threshold when the door is shut. Flap sweeps are not as durable as kerf-in sweeps, but they’re inexpensive, easy to install, and reasonably durable.
Inswing and Outswing DoorsThe vast majority of exterior doors on residences are inswing doors, which swing into living spaces. In a perfect world, they would all be outswing doors, which are inherently better at blocking air and water because, when they are closed, outswing doors butt against a stop in the threshold that is similar to the stops in jambs. Add a compression gasket to that threshold stop and water will have to defy the laws of gravity to get around it. But our imperfect world includes burglars, who can easily pop the hinge pins of an outswing door to gain entry—unless you install nonremovable hinges. Food for thought. |
Weatherstripping Thresholds
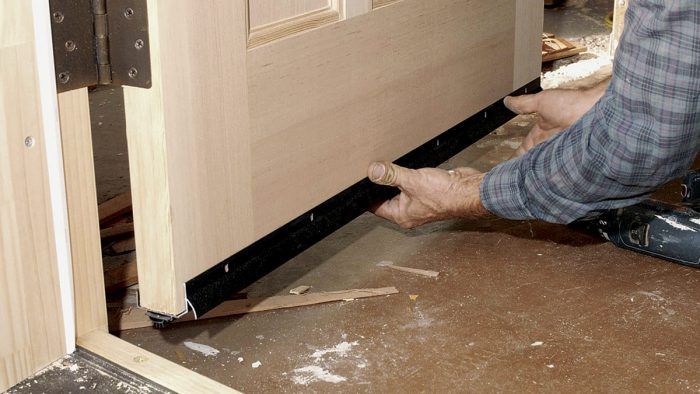
If you have an inswing door, install a door shoe or a gasketed threshold. To do so, measure the distance, at several points, between the bottom of the door and the top of the threshold. Typically, you’ll need about 1⁄2 in. of space between the door and the threshold to accommodate the thickness of the shoe and its vinyl insert—check the manufacturer’s specs to be sure. If there’s not enough clearance, plane or cut down the door.
After measuring, pull the door’s hinge pins and lift the door out. Then, using a hacksaw, cut the shoe to length—typically, the shoe stops short of the doorstops on either side, so it will be 1 in. shorter than the width of the door. Shoes have screw slots that let you adjust their height; attach the shoe with one screw at each end. Rehang the door, lower the shoe until its seal makes solid contact with the threshold, tighten the screws at that height, and then open and shut the door. The door should drag slightly as you operate it, and you shouldn’t see daylight under the shut door. Finally, insert and tighten the rest of the screws in their slots.
| PRO TIP: Metal thresholds are thin enough to cut with hacksaws or jigsaws. But an oscillating multitool with a metal blade is the tool of choice: wide enough to track properly and cut square, yet agile enough to notch door-frame profiles. Play it safe: Don’t hand-hold stock while cutting it. Clamp it down so your hands are free. And by all means, wear eye protection and work gloves when cutting metal. |
Installing a gasketed threshold is similar. If there is an existing (ungasketed) threshold, remove it and measure from the underside of the door to the top of the sill. Remove the door so you have complete access to both ends of the doorway. The trickiest parts of fitting a threshold are the complex trim profiles at either end—doorstops, jamb casing, and so on. Using heavy cardboard or “door skins” (thin wood veneer), create a template, transfer those profiles to the underside of the threshold stock, and use an oscillating multitool with a metal-cutting blade to make cuts. Dry-fit the threshold to ensure a good fit, then remove it, caulk the sill, and screw the unit down. Install and adjust the threshold’s gasket, rehang the door, and test the fit.
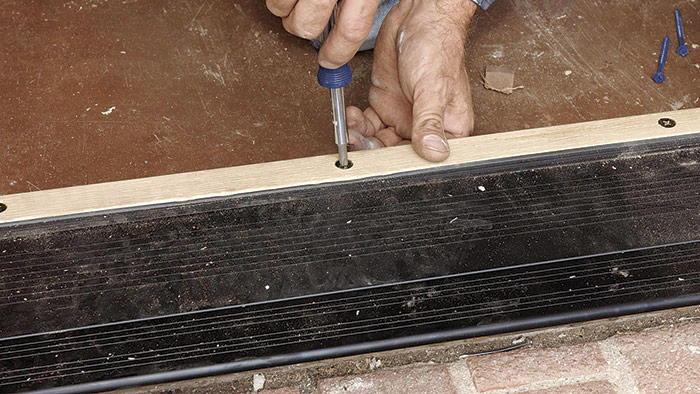
Retrofitting a water-return threshold. This is a bit more work. A three-piece threshold can be installed over an existing threshold. Consisting of a sill cover, a drain pan, and a threshold with weep holes, the assembly is sloped to send water back outside, hence the name water return.
The retrofit requires accurate measurements and careful cutting so all three pieces fit snugly to the existing door frame. To start, measure the widest point of the doorway opening and rough-cut the sill cover to that length. Next, hold one end of the sill cover square to the base of a jamb, and scribe the jamb’s profile onto the metal sill. Use an oscillating multitool with a metal-cutting blade to cut the first end before scribing and cutting the other end. The sill cover must slope about 1⁄8 in. toward the outside so it will shed water. Hold a torpedo level on the sill cover while you temporarily shim the back edge up.
Water-Return Threshold
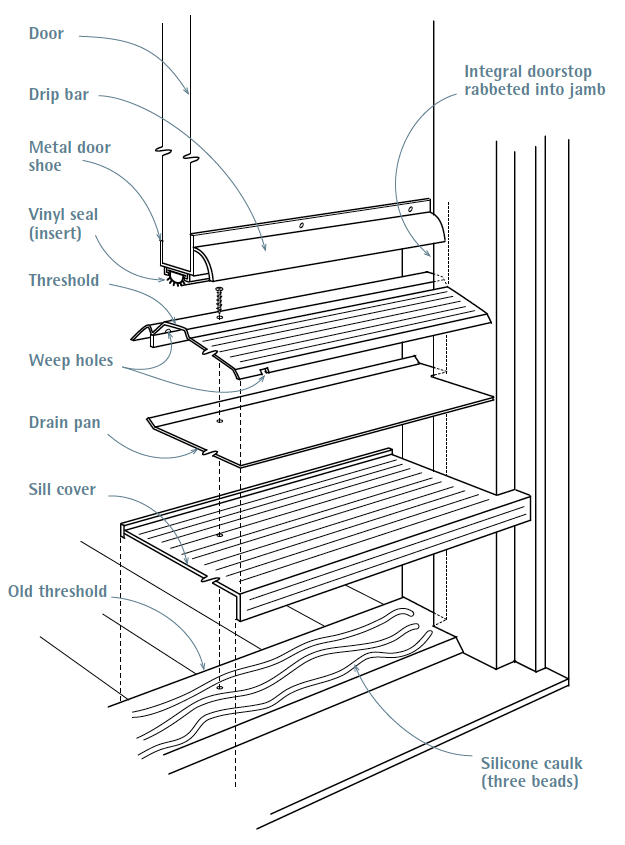
Measure and cut the threshold (not the drain pan) next. Usually, the threshold lines up to the outside edge of the doorstop, so when the door shuts, it fits snugly to the threshold as well. As you did with the sill cover, scribe the profile of the jambs onto both ends and cut them out. With the threshold resting on the sill cover, lightly scribe the outside edge of the threshold onto the sill cover, using an awl or a pocketknife. The outer edge of the drain pan should sit just shy of this scribed line. Remove the threshold and scribe the profiles of the jambs onto the drain pan; use aviation snips or an oscillating multitool to cut the pan—it’s very thin.
With all three threshold pieces in place (and sloping toward the outside), measure up 1⁄2 in. onto each jamb and make pencil marks. The 1⁄2 in. indicates the thickness of the door shoe you’ll attach to the bottom of the door. Remove the threshold and the drain pan, shut the door, and spread a scriber to the distance from the top of the sill cover to the mark(s) on the jambs. Then scribe the bottom of the door to indicate the amount that you’ll need to trim off. Cut down the door, vacuum the existing threshold thoroughly, apply three beads of silicone caulking across the opening, and press the sill cover into it. Then do the same with the sill drain pan. Also caulk the jamb-and-pan joints. Finally, screw down the threshold and install the shoe on the bottom of the door, as described in the preceding section.

Excerpted from Renovation, 5th Edition (The Taunton Press, 2019) by Michael Litchfield and Chip Harley
Available in the Taunton Store and at Amazon.com.
