
Efficient Custom Roof Cutting
To keep a framing crew rolling, it pays to have the rafters cut before the walls are up.
Synopsis: Production roof framer Ryan Smith describes the process he developed that allows him to cut the roof before the rest of the house has taken shape, even on a complex custom home. Using the dimensions from the building plans verified against the foundation makes it easy to calculate and draw the angles and offsets and organize the cutlist. He cuts the parts one ridge at a time by starting with the ridge, then moving on to the commons, and then cutting the hip rafters and their jacks, and the valleys and theirs.
Driving around the greater Buffalo area, I see custom houses go up all the time. The floors and walls come together quickly, but the pace tends to slow to a crawl when the framers get to the roof. In a lot of ways this makes sense; the wall studs usually arrive precut to length for quick assembly, but the parts for stick-built roofs generally don’t come ready to nail.
I’ve been working for years to figure out how to stop the roof framing from becoming a choke point. All our company does is frame houses, and the quicker we can move on to the next, the more money we make. I’ve come up with a process that allows me to cut the roof before the rest of the house has taken shape. This may sound daunting, but it’s not rocket science. The dimensions you need to calculate every stick of wood should all be on the building plans. Of course, it’s rarely that simple.
For this process to work, the plans have to be verified against the foundation, and then the framers have to build the floors and walls plumb and level on top of it. Checking the plans themselves over carefully is just as important. It’s often the case that the person drawing the plans doesn’t quite understand how a complicated roof comes together. It’s not uncommon to see something on a plan-view drawing that looks completely different from an elevation drawing. Most of the time the elevation is correct, but the architect just didn’t know how to draw the creation in plan view. Make sure to check for these kinds of discrepancies before doing any calculations or cutting to avoid wasting time and material. After that, it’s largely about staying organized, both when calculating the roof parts and cutting and piling them up. This isn’t something you’re going to master overnight, and I’m not going to get into the math of figuring out every angle or mention every situation you’re likely to come across—that would take more pages than this magazine has. But I hope this article will get you thinking in the mindset of a custom roof framer and help you become better at your craft.
Check the foundation and wall framing for square
The first step when custom roof cutting is the same as any framing job: checking the foundation for square. How well the foundation contractor performed their job has a huge impact on how much time the framers spend getting accurate, square lines snapped and mudsills fastened on the foundation walls. Starting square is the only way to ensure an accurate and true building from the first-floor deck all the way up to the rooflines.
This can be done numerous ways, but the most common and time-efficient way for my money is the tried-and-true Pythagorean theorem: a2+b2=c2. In carpentry math, this is sometimes called the “3-4-5 rule,” which describes the lengths of the sides of a basic right triangle. Measure and mark 3 ft. off the corner in one direction and 4 ft. in the other, and if the corner is square, the diagonal length between those marks will be exactly 5 ft. If the measurement you get is smaller or larger than that, the corner isn’t square. For increased accuracy, use the largest multiple of 3-4-5 that you can—6-8-10, 9-12-15, or even larger—because any error will grow and be easier to see with larger triangles. Depending on the shape of the foundation, we check five or six corners for square and pull corner to corner across the foundation’s biggest rectangles to check those for square and verify the walls are parallel.
Next, check the wall lengths against the plans. If something’s out of square or a hair long or short, you can usually compensate when installing the mudsills. The dimensions and squareness at the mudsill are what really count. Whatever those dimensions end up being, I write them down on the foundation or mudsill. Then I take those measurements and mark them on two sets of plan drawings. I take a set for calculating and cutting the roof, and the house gets a set for whoever is laying out and framing the floors and walls. That way, when the rest of the crew is rolling floor joists and cutting wall plates, they can easily maintain the dimensions as they go around the house. If that doesn’t happen, then all of the calculations and cutting I do for the roof, which happens while the rest of the house is coming together, is for nothing. If a wall grows 1/2 in. in length, the roof I cut won’t work. There’s definitely a learning curve to operating this way, but it’s actually made us better as a whole. The crew is now conscious of those dimensions and how important they are.
With square and lengths verified, you can begin to figure your roof structure. One caveat I’ll add here is that we don’t build our roofs right on top of the walls; for extra insulation depth, we run ceiling joists with a rimboard on top of the walls, similar to a floor, and attach a plate on top of those to set the rafters on. If for some reason the walls aren’t perfectly plumb (which sometimes happens with tall balloon-framed walls), we can adjust the plates so the roof will fit. Another advantage is that we don’t have to worry about the ceiling-joist layout interfering with hip and valley rafters, which is a common thing framers have to work around.
Calculate every rafter
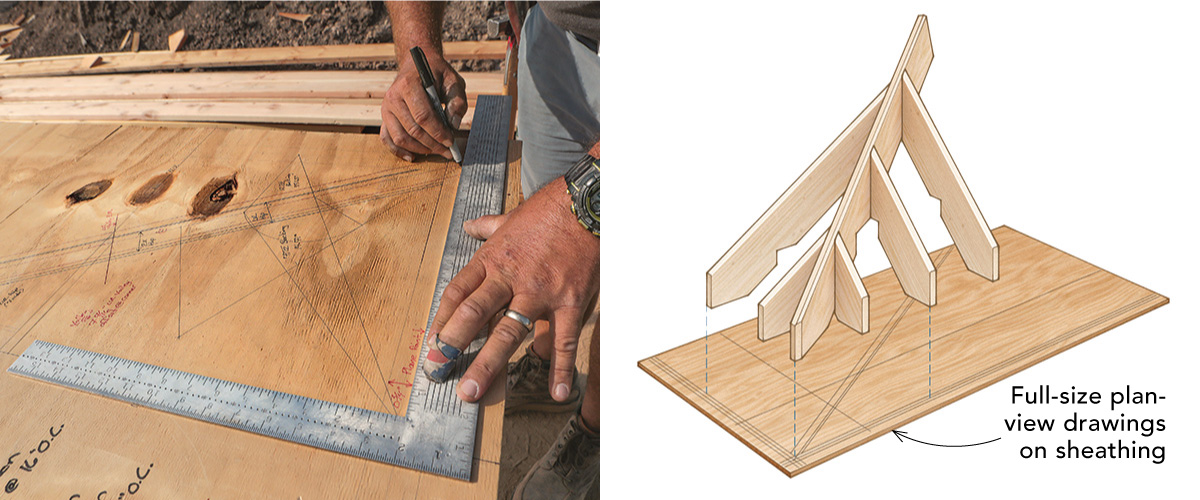
In the last issue, I wrote about my process for creating the drawings I need to set up for calculating irregular hips and valleys (see Conquering Complicated Roofs in FHB #301). That process includes an elevation drawing and a method for drawing out irregular hips and valleys in plan view. I create these drawings to get the angles and offsets needed for calculating and cutting as well as the height above plate (HAP) for the birdsmouth cuts and additional plating needed for irregular roofs.
Between the verified building plans and the drawings mentioned above, you’ll have all the necessary dimensions and geometry needed to calculate every rafter. But for efficiency you also need a method to keep those calculations organized. So before I do any figuring, I mark up the building plans to help keep everything straight.
I pick a corner to reference everything else from, which I call the “boss corner.” If I ever have a question about where to pull a measurement or layout from, I reference back to this corner as a starting point. Then I break up the roof into sections dictated by the ridges and the hips and valleys that connect to them. I label each section—hip 1, hip 2, valley 1, valley 2, and so on—highlighting the ridges, valleys, and hips on the drawings.
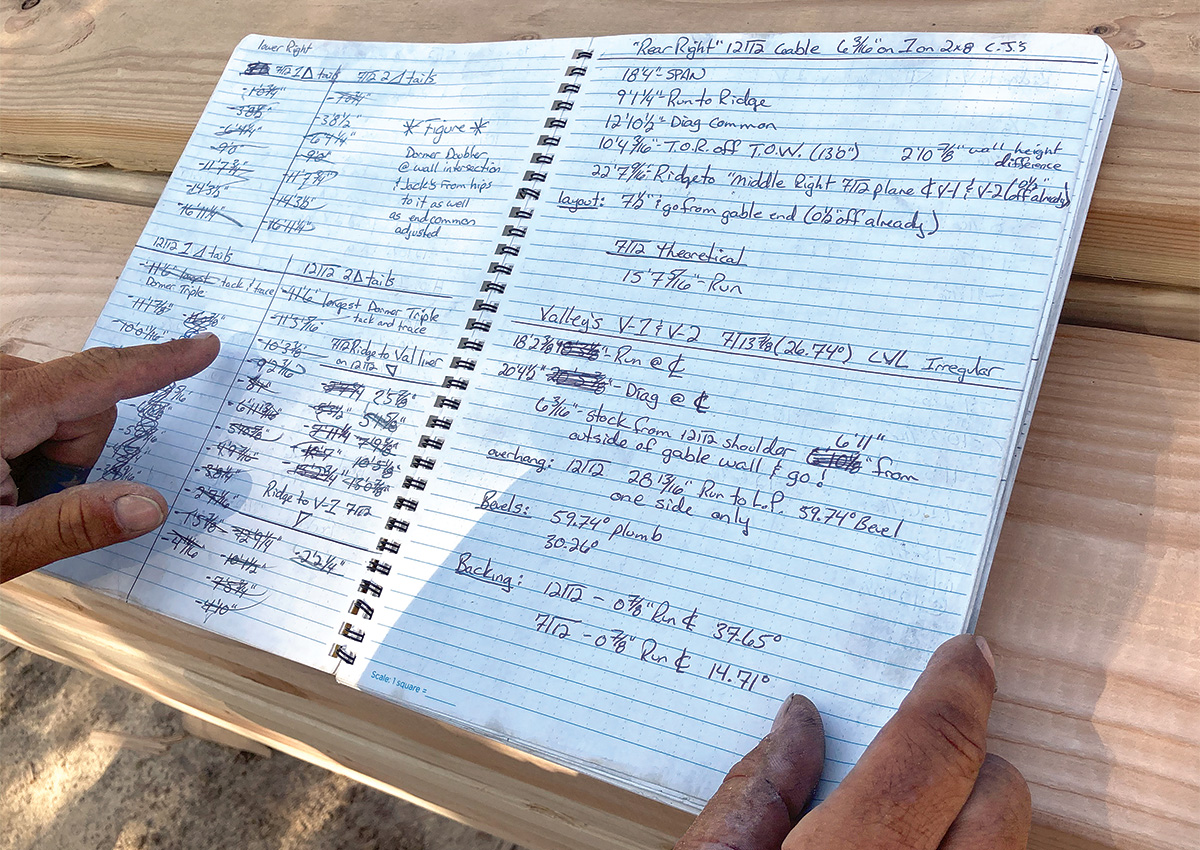
Each of these roof sections gets at least a couple pages in my notebook, the first of which notes the section of roof, the lumber used (needed for making deductions in the calculations), the run, the HAP for the birdsmouths, the overhang, the backing angles (which I also get from the plan-view drawing), and any other information needed for calculating. Then I calculate the rafters for the section and move on to the next. What I’m creating is just a cutlist. Later, I’ll cross them off as I cut.
While I do write down overhang lengths and the type of tail a section gets (based on the pitch), I don’t calculate the lengths of the rafter tails. For hip jacks and commons I create patterns. For irregular hip and valley rafters, I simply figure out the horizontal projection of the overhang and use a framing square and stair gauges to lay them out using the dimensions determined from the plan-view drawing.
Cut the roof parts
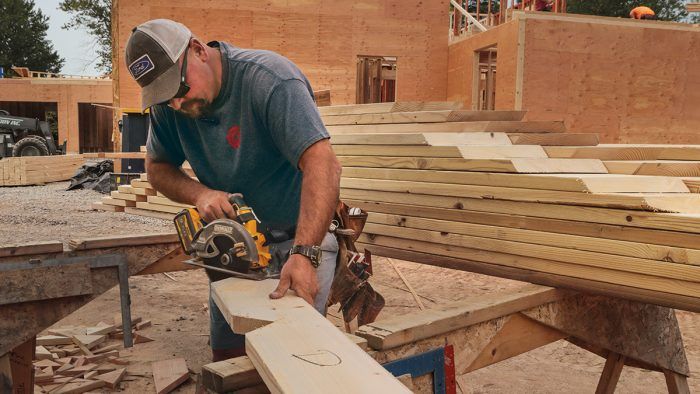
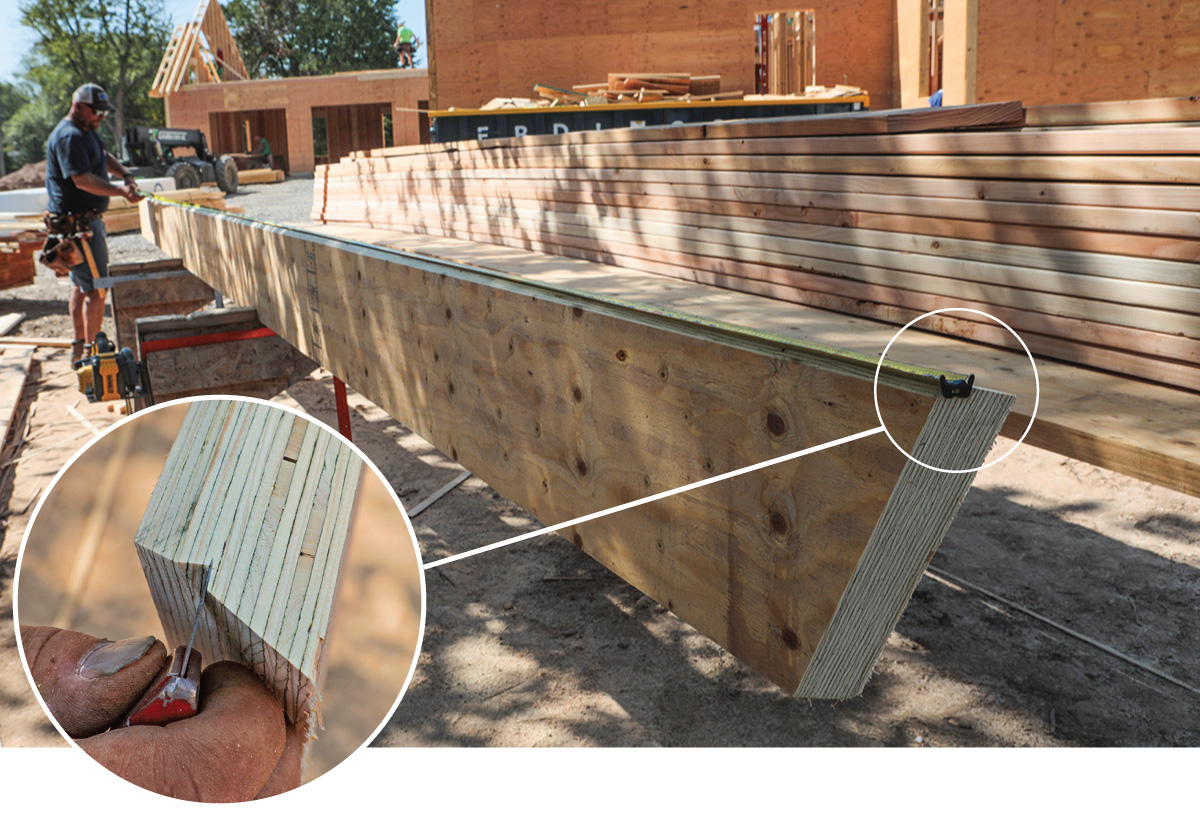
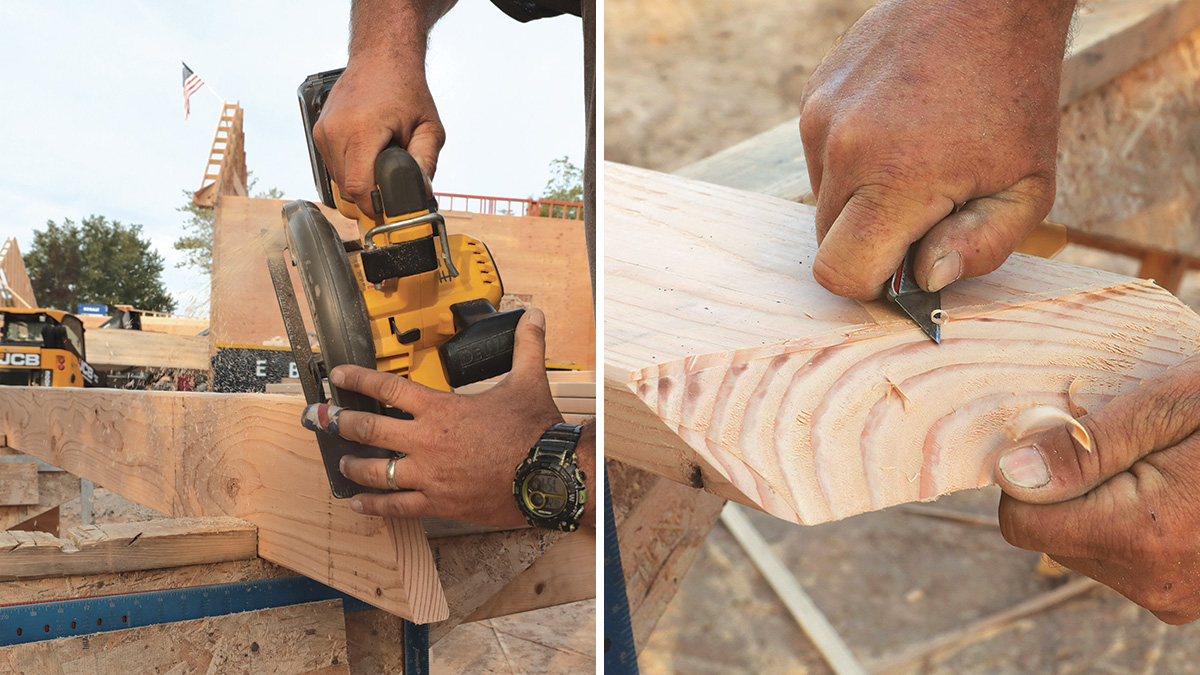
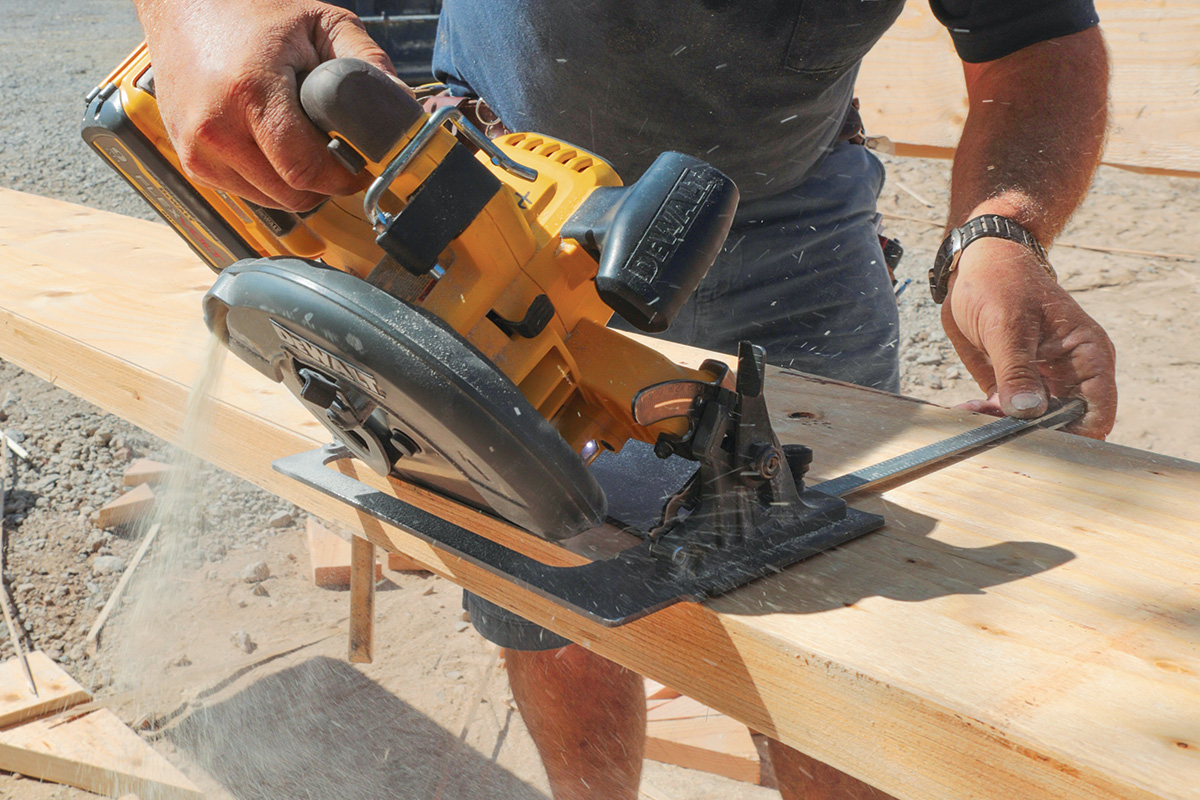
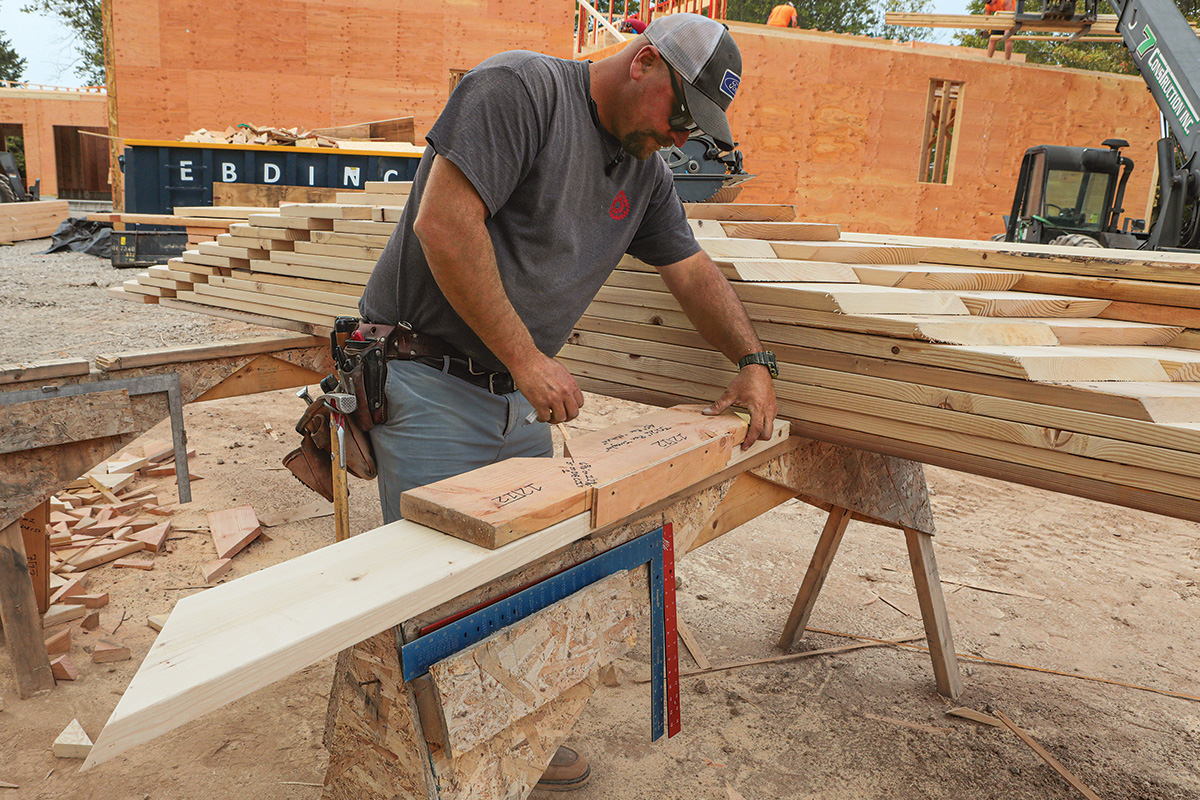
Once you’ve calculated every rafter on the house and double-checked your figures, the fun part starts. My work station is a set of extralong, heavy-duty sawhorses, with places to hold my various squares and notebook, and notches in the top to hold rafters on edge for cutting extreme bevels. The various lumber I’ll need is as close as possible without being in the way. I cut everything with a cordless sidewinder because it’s light and easy to handle; it takes days of long hours to cut a large, complicated roof, and I prefer not to wear my arm out. I run 9-amp-hr. batteries to get extended run time, and usually go through four a day. I try to set up in the shade in the summer, and in the sun or inside in the winter. We recently got a conditioned shop, which has made winter cutting far more enjoyable and productive.
Pick a starting point
When it’s time to cut, I pick a side of the house to start from and work in one direction, usually left to right facing the front of the house (this is also the way I try to organize the notebook so I don’t have to flip back and forth to find the section I’m working on next). Breaking the cut down ridge by ridge is the fastest and most effective way I have found. In doing so you can keep things organized not only on the ground but also in your head.
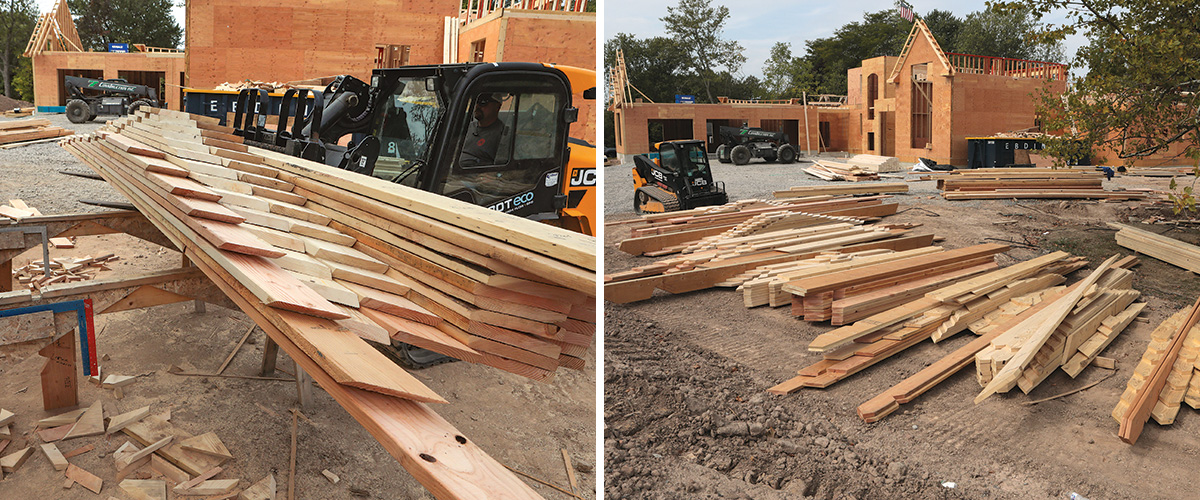
For a given section of roof, I cut the pieces and pile them up in the order they get assembled to make it easy on whoever’s nailing it together. Once I’ve finished cutting a section, I use a forklift to move the pile to where I’m staging the parts of the roof. On this particular job, because of the way the lot was graded, I had to think ahead, because the sections of roof I cut first were going to get boxed in behind the parts I cut later.
Start each roof section with the ridge
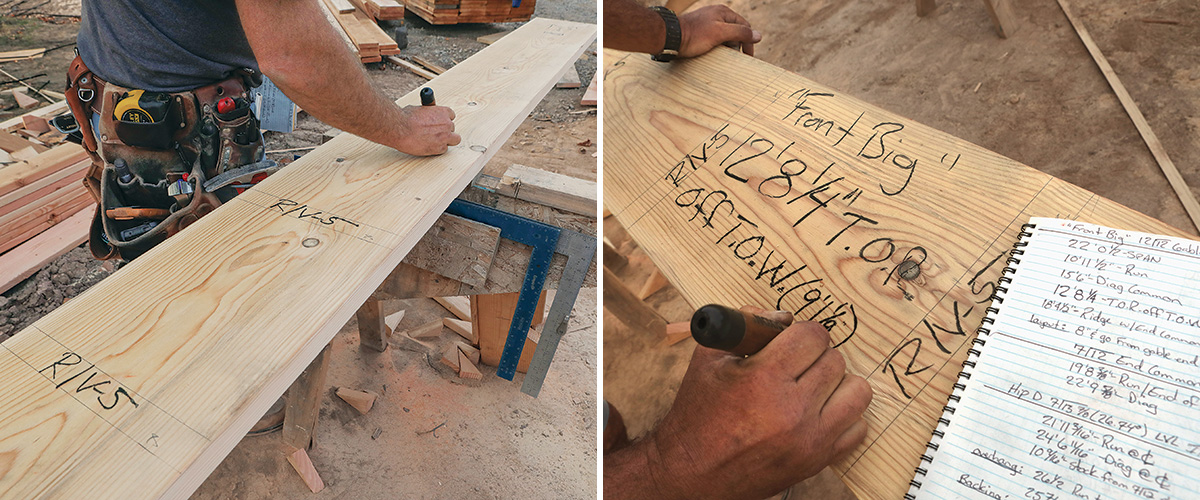
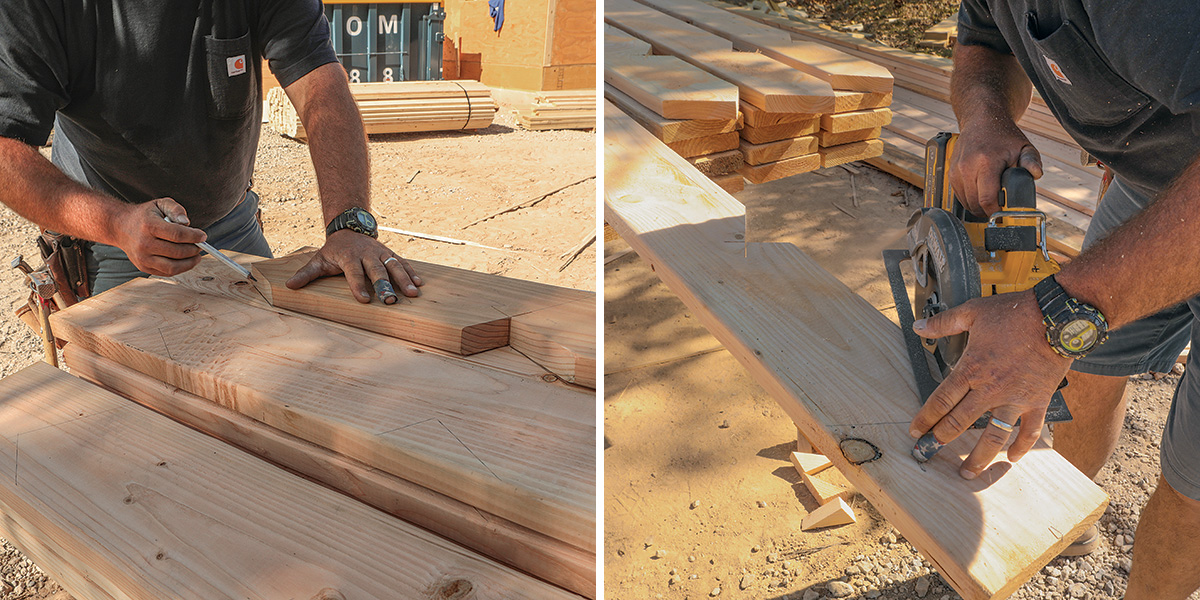
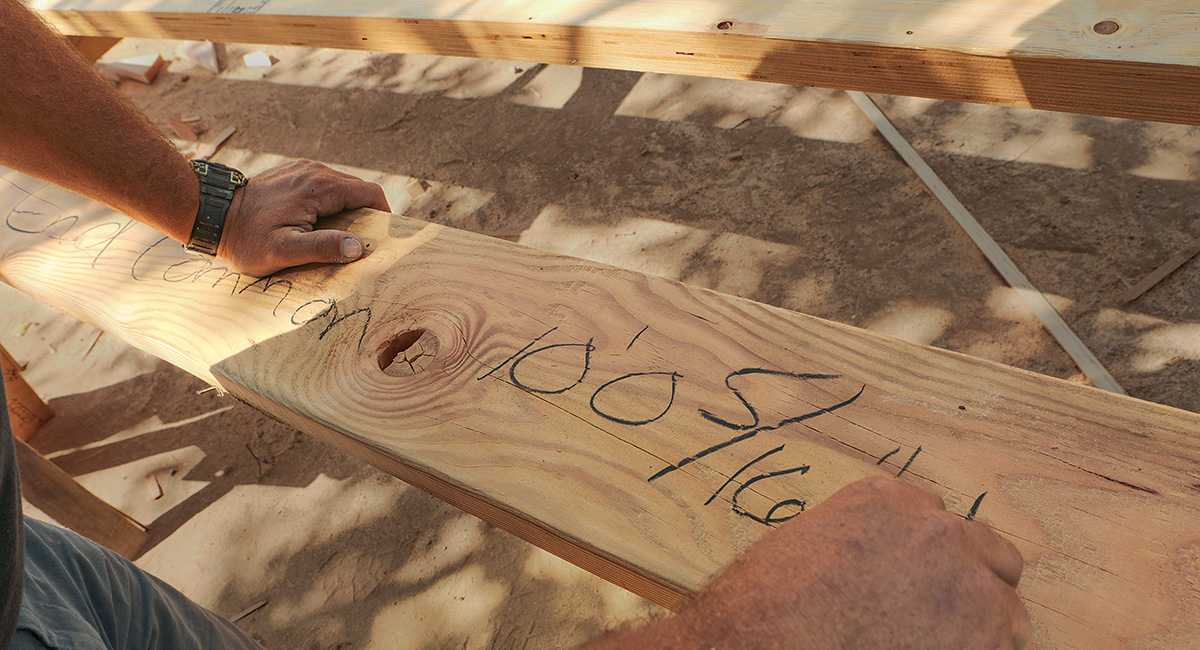
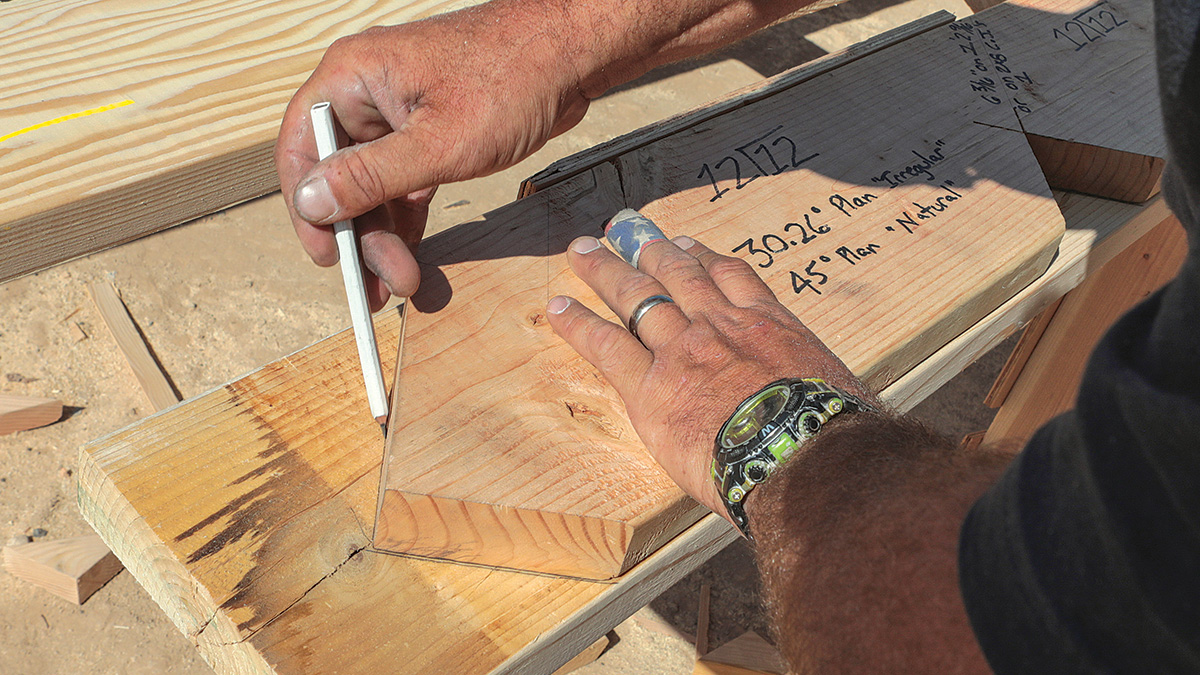
I always cut the ridge for a section first and mark it up on both sides with the layout of the parts that attach to it and other helpful information. I do this for a few reasons. First, it allows me to double-check the quantities of common rafters, ridge-to-valley jacks, and so on that I’ve calculated. Second, marking the locations of intersecting roof planes, wall lines, corners, and other reference features helps when stacking (assembling) the roof. Finally, marking the ridge up provides the exact locations of where the hips, valleys, and other intersecting ridges are supposed to connect to it. A ridge board tells the story of the house and its lines.
Continue with commons, hips, and jacks
After the ridge, I move on to the common rafters. I’ve never gotten into gang-cutting common rafters, but it’s a good idea if you build a lot of gable roofs. The roofs I work on don’t usually have very many common rafters, and the time to set up for gang cutting doesn’t make sense for me. Instead, I start by laying out and cutting one common to use as a pattern for a given section of roof. After cutting that pattern, I move four pieces of rafter material onto the horses and use the pattern to mark them. Then I add four more on top of those and mark them, continuing until I have all the commons for that section laid out and stacked on the horses. Then I make all the cuts for the top four rafters at one end of the stack, move to the other end and make those cuts, then move that layer to a pile at one end of the horses. I work my way through, four at a time, until all the cut commons are stacked neatly.
After that I cut the hip rafters and their corresponding jacks, and the valleys and theirs, marking every piece in lumber crayon as I go so it’s easily identifiable. I always bevel-cut the tops of the hip and valley rafters because it makes it easier to line everything up when you’re assembling the roof, and because I think it planes better. It’s not hard to do. For irregular roofs, I get the backing angles from the plan-view drawing; it also shows the plumb-line shift for the irregular hip rafters, which get an unusual bevel because the center of the material isn’t the same as the center of an irregular hip. Before cutting an irregular hip or valley rafter, crown and check the lumber and label the pitch each side is going to carry to make it easy to keep the cuts straight.
 |
 |
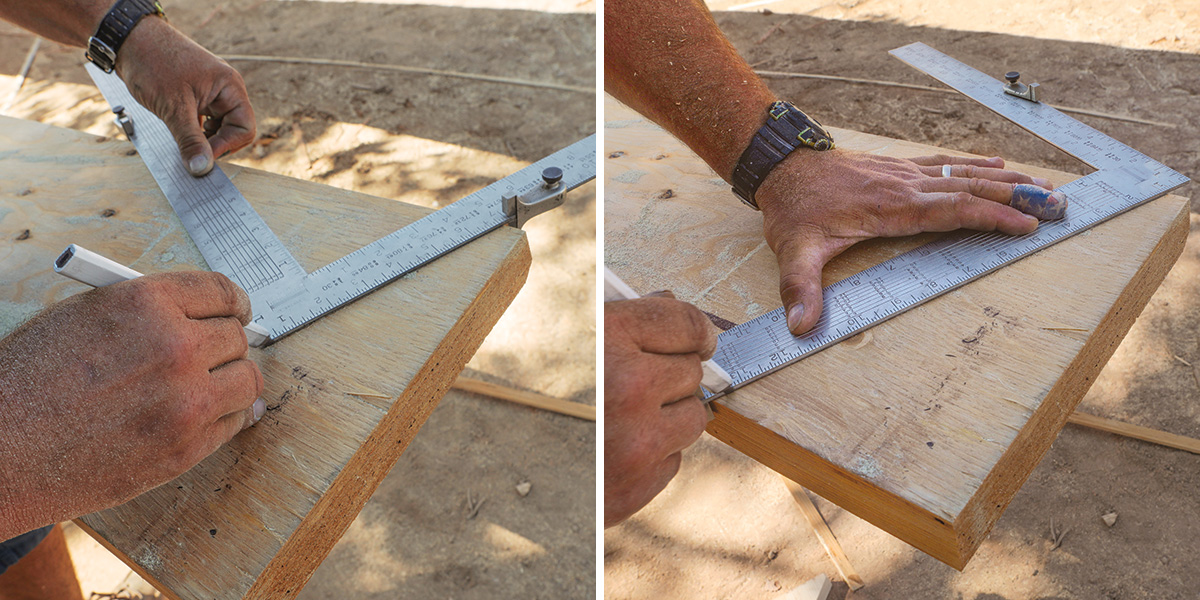
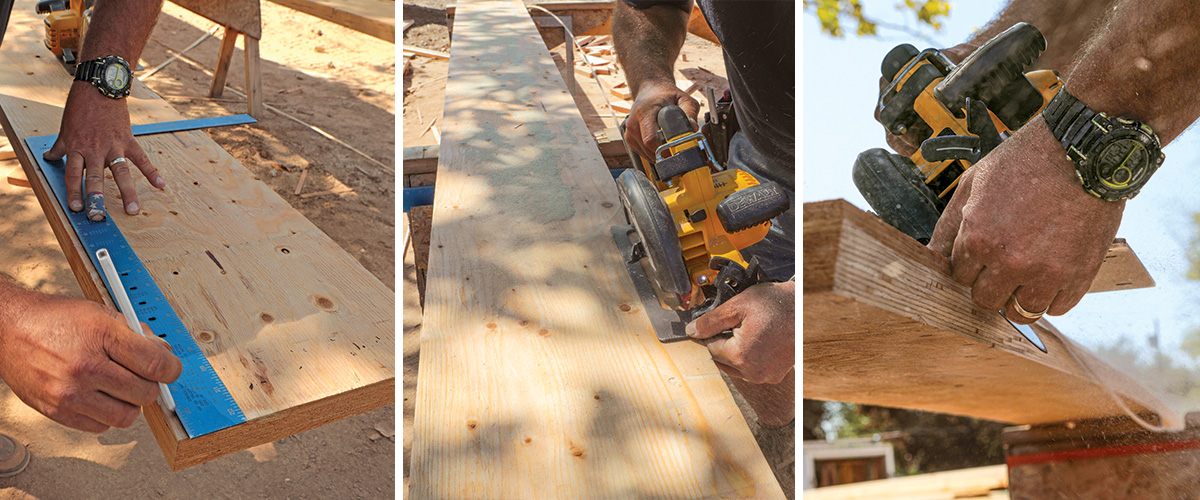
Once I’ve cut the back bevels on a hip or valley, I lay out the ridge plumb cut with a framing square and stair gauges and cut it, and then use my utility knife to cut a notch at the top of the plumb cut, where the bevels intersect, to hook my tape to. The notch ensures that the length I pull down the rafter will be spot on. At the other end of the hip or valley, I lay out the birdsmouth, then the tails, with a framing square and make the cuts. Before stacking them on the edge of the horses, I make sure to label them.
For the hip jacks, I figure their lengths to the long point and create patterns for the birdsmouths and tails using 2x material and plywood. The patterns are marked to align with the calculated line length from the long point to the birdsmouth plumb cut, so all I have to do is pull the length along the top of the jack, mark the length on the top of the rafter, and then use the pattern to lay out the birdsmouth and tail. I cut jacks in pairs using lumber sized to the longest jack and start with the longest, working to the shortest. I use the offcuts for shorter jacks to minimize waste. Valley jacks don’t get tails and don’t need patterns, but I cut them in pairs as well, labeling the valleys they connect to before adding them to the pile.
Ryan Smith is a lead carpenter for 7 Construction in North Tonawanda, N.Y.
Photos by Matthew Millham
From Fine Homebuilding #302
To read the entire article, please click the View PDF button below
Fine Homebuilding Recommended Products
Fine Homebuilding receives a commission for items purchased through links on this site, including Amazon Associates and other affiliate advertising programs.

Protective Eyewear
Stabila Extendable Plate to Plate Level

Speed Square
