
Find Air Leakage With the Minneapolis Blower Door
Builder Bryan Uhler explains why he started doing air-leakage tests on his own, what they accomplish, and how to use this popular equipment to get the job done.
Many new-construction homes are now required by a local energy code to have their building envelopes tested for air leakage, which is intended to demonstrate whether a house has exceeded a maximum amount of allowable airflow between the indoors and outdoors. The leakier a house, the more energy is expended heating up or cooling down outdoor air to the desired indoor-air temperature. Think of a hot tub with a number of holes in it—it would have to constantly receive water to replace what’s lost, which would then have to be brought to temperature.
I was motivated to start doing my own leakage testing for a few reasons. One was to give myself a deeper understanding of building behavior. I also had a negative experience with an envelope-leakage tester that led me to realize dishonesty could be a factor depending on the scrupulousness of those I work with. This experience, coupled with advice in a trade journal to basically “stop thinking about it and just buy one,” stuck in my mind until I finally pulled the trigger and bought a setup.
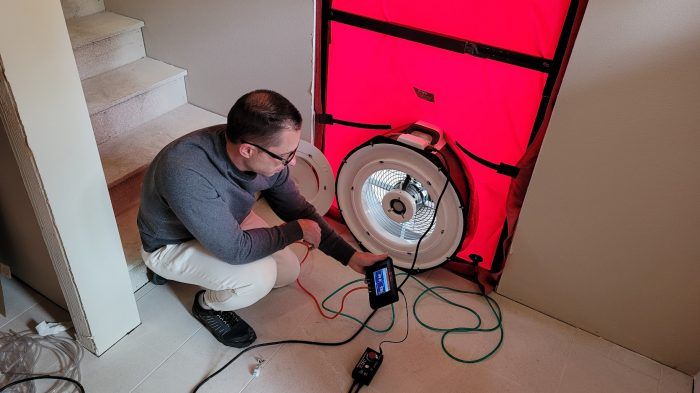
To test the envelope tightness of our homes at Pioneer Builders, I use the blower-door equipment from The Energy Conservatory (TEC). TEC refers to the entire system as “the blower door,” and this article breaks the kit down into its components: the frame and panel, the fan, and the manometer.
The frame and panel (the door part of the system)
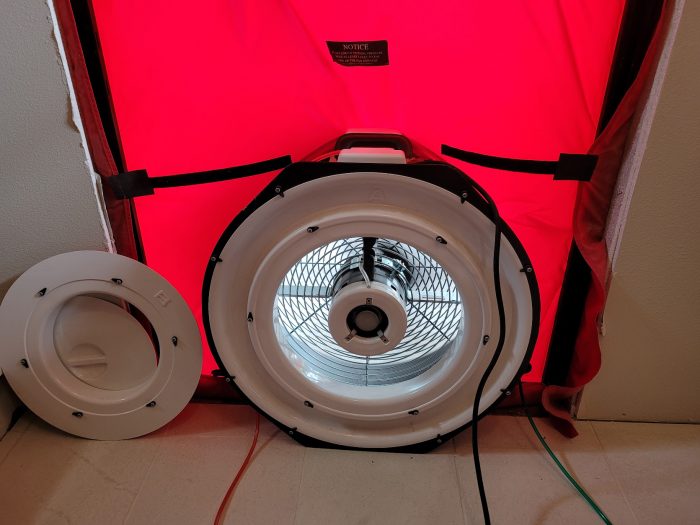
The blower door is the part of the system that fits into a door frame. In this case, I use the Minneapolis Blower Door, which is comprised of a series of black, metal, adjustable “rails and stiles” with a red canvas-style covering. The complete door setup adjusts to fit the opening and the goal is to fill up the door opening to simulate a closed door. It takes me less than five minutes to set this up.
The fan
The blower-door panel has a circular opening for the fan to fit into. The fan will be oriented to blow air into a building (positively pressuring the house) or you can turn the fan around and it will blow air out of the building (depressurizing a house). I’ve never heard of a code official specifically requiring a test be performed via pressurization, depressurization, or both, but you might want to confirm that locally. You’ll almost always get two different numbers from pressurizing or depressurizing the house. Pressurizing usually gives the higher number because objects such as louvers from things like exhaust fans will open from the air pushing on them. But the most common method of testing is depressurizing the house. This might be true because this method is more likely to give a lower number, but it’s also easier to feel leaks and then try to stop them.
The fan is controlled by a fan-speed controller that can ramp up and down by a hand dial or be connected to the manometer (explained below) which can also modulate the fan speed.
The fan has various-sized inlet rings that are selected based on the leakiness of the house. A house with a leakier building envelope may require the fan to be wide open. On the other hand, the amount of air coming through the envelope may be so low that a smaller-diameter inlet must be used (the unit won’t work properly without the right opening size, and it will alert you to that).
The manometer
The brain of the operation is the manometer, and the one I use is the TEC DG-1000. I think the easiest way to understand the manometer is to explain how it’s set up, and for the purpose of this example, we’ll depressurize the house. The DG-1000 has two channels (A and B) that read pressure differences. To set up a depressurization test, you connect a tube to the left tap of channel A, which is then run through a hole in the blower door to the outside. The right tap on channel A remains open to the inside of the house. This configuration allows the manometer to read the pressure difference between the outside and the inside of the house. Another tube is connected at the left tap of channel B at one end and at the top of the fan at the other end. The right tap of channel B is again left open to the house. This configuration allows the manometer to read the pressure difference between the house and the flow sensor on the fan.
This setup will give you two numbers. On the left side of the gauge, you will see the building pressure during the test (typically 50 Pascals). On the right side of the gauge will be the leakage of the building in CFMs (cubic feet per minute). It’s important to have the manometer be set to the correct inlet ring or you won’t get an accurate reading.
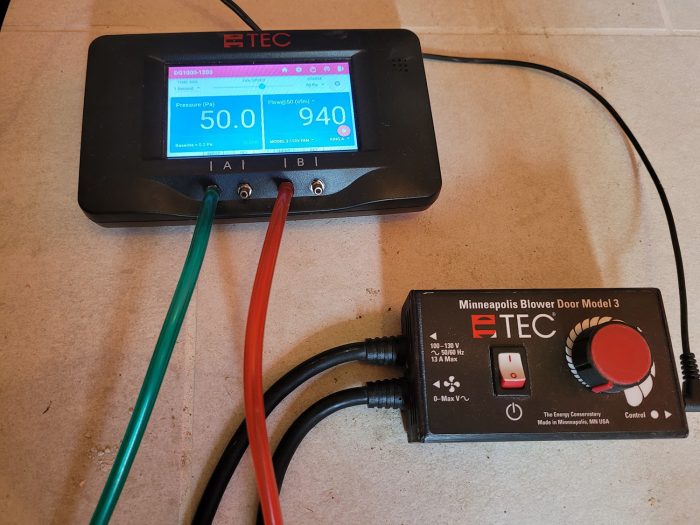
To begin the test, you first allow the manometer to read the difference in air pressure between the outside and inside, without the fan running. On a non-windy day, this might be just a few Pascals (a Pascal is a unit of pressure). This baseline is then factored in during the stage the fan is running. Once you’ve confirmed the baseline, you start running the fan. The code-required building pressure we have to achieve is 50 Pascals. You can adjust the fan speed manually by turning the dial or via the communication cable running from the DG-1000 to the fan controller until the building pressure is achieved. Once your fan is holding a steady building pressure around 50 Pascals on channel A, you will be able to see the leakage airflow from channel B.
Now you need to know the cubic volume of the house to get the air-changes side of the equation. The idea here is for the cubic volume of air to flow through the fan a certain number of times per hour, or less, at the difference in pressure between the inside and outside that we’ve already achieved (50 Pascals).
A nice feature of the DG-1000 is that you can input the cubic volume of the house and it will calculate your ACH50 automatically (you can see this number on channel B). The idea behind this equation is that you take the CFMs and convert that to cubic feet per hour (CFH) by multiplying the CFM by 60. Then you divide the CFH by the cubic volume of the home. As an example, if a manometer is reading 1500 CFM, multiplying that by 60 gives you 90,000 CFH. Dividing that by a home with 15,000 cu. ft. of volume gives you 6 ACH50 or 6 air changes per hour at 50 Pascals of pressure. In most regions, this would not pass an envelope-leakage test. For example, in the colder climates of the Midwest and Northeast, 3 ACH50 or less is generally required while milder Southern and Western climates typically require 5 ACH50 or less.
One last point on performing the test: Ensure you follow the protocols as enumerated in the applicable building code. Closing off items that should be open, and leaving items open that should be closed, will lead to an incorrect result.
Closing thoughts
These setups aren’t cheap. This blower-door system is listed at $3755 on TEC’s website. However, the manometer has more functionality than just envelope-leakage testing, so it can be used for multiple diagnostic tests. We use it for duct leakage-testing as well as exhaust-fan testing. On the financial side of things, say we would normally pay $300 per test. After 13 houses, you have paid for the setup. Plus, you’ll really understand where leakage happens and be able to put systems in place for higher-performing homes.
Earlier in the article, I talked about energy efficiency as the primary purpose of blower-door testing. However, in the past few years there has been a shift toward recognizing the value of comfort. If you build for occupant comfort, then efficiency follows, and you’ll end up with a more comfortable homeowner. The focus has also recently shifted to include health safety. For example, in a desire to limit viral transmission, multifamily dwellings need to better partition living spaces in order to mitigate the spread of disease. And with perennial forest fires, limiting the infiltration of smoke is becoming a higher priority as well. Other benefits include quieter homes and less vermin infiltration.
Note, too, that you should confirm with your local authority having jurisdiction (AHJ) that you are allowed to perform your own test. I also use my phone camera to record the results and have location tagging turned on. No inspector has asked to see this level of verification, but I will say that we have excellent relationships with the inspectors we work with.
Having a TEC Minneapolis Blower Door has, simply put, made me a better builder, and I hope that this article has helped you gain a better understanding of envelope leakage and how to test for it.
Photos: Bryan Uhler
RELATED LINKS


View Comments
What's another $300 added to cost of a house? Chump Change for any regular "Joe Middleclass" trying to scrape up $50,000 to $100K for a down payment on a shack.