FHB Logo Facebook LinkedIn Email Pinterest Twitter X Instagram Tiktok YouTube Plus Icon Close Icon Navigation Search Icon Navigation Search Icon Arrow Down Icon Video Guide Icon Article Guide Icon Modal Close Icon Guide Search Icon Skip to content
Subscribe
Log In
  • How-To
  • Design
  • Tools & Materials
  • Restoration
  • Videos
  • Blogs
  • Forum
  • Magazine
  • Members
  • FHB House
  • Podcast
Log In

Fine Homebuilding Project Guides

Plumbing

Guide Home
  • Plumbing Basics
  • Bathrooms
  • Kitchens
  • Roughing In
  • Water Heaters, Washers, and More
  • Maintenance and Repair

Installing a Vanity with Drawers

Follow these steps to install a vanity sink and cabinet combo that features a shallow sink bowl and a drain-trap design that allows room for large drawers.

By Steve Cory
  • X
  • facebook
  • linkedin
  • pinterest
  • email
  • add to favorites Log in or Sign up to save your favorite articles
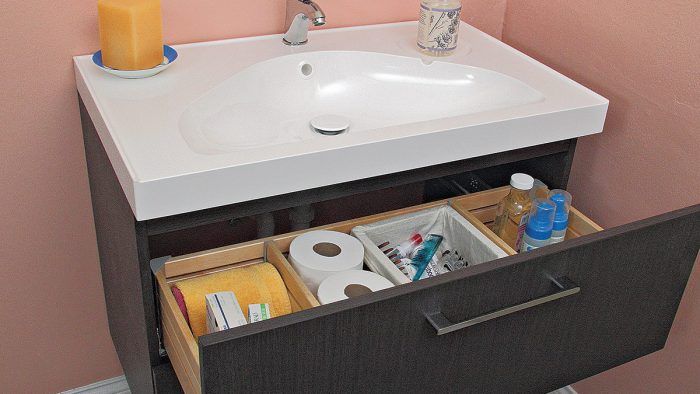
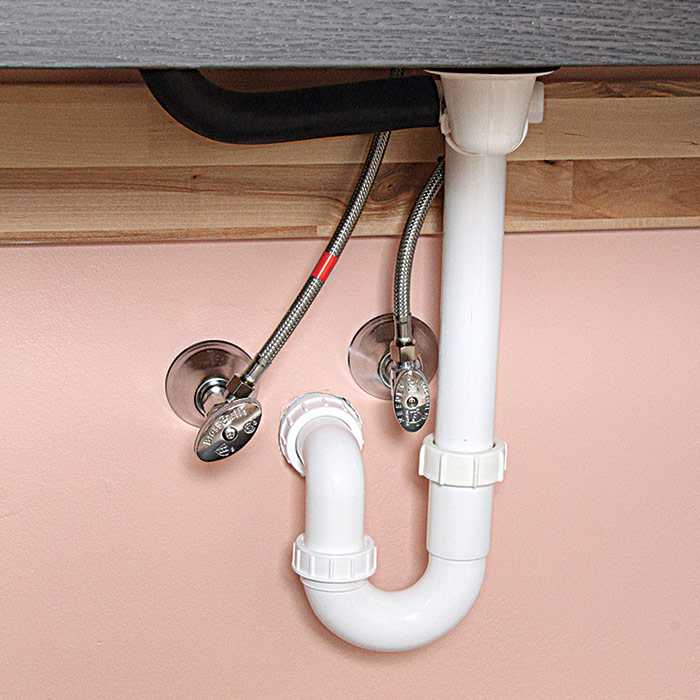
DRAWERS ARE BETTER. The sink’s low profile and serpentine drain trap assembly make it possible to include capacious drawers, turning this vanity into a serious storage unit.

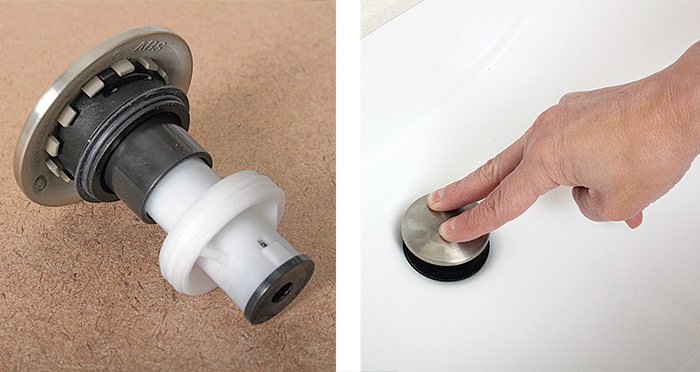
Most vanities provide below-sink storage space that is difficult to reach and partially blocked with plumbing. The type of vanity sink and cabinet combo shown here, sold at IKEA, features a shallow sink bowl and a drain trap that snakes cunningly just under the sink, then snugs against the wall. That allows room for large drawers, which provide storage that is ample and easy to access. This system does not have a pop-up assembly, which would get in the way of the drawers. Instead, it has a drain stopper with a spring that pops up and down when you press on it.

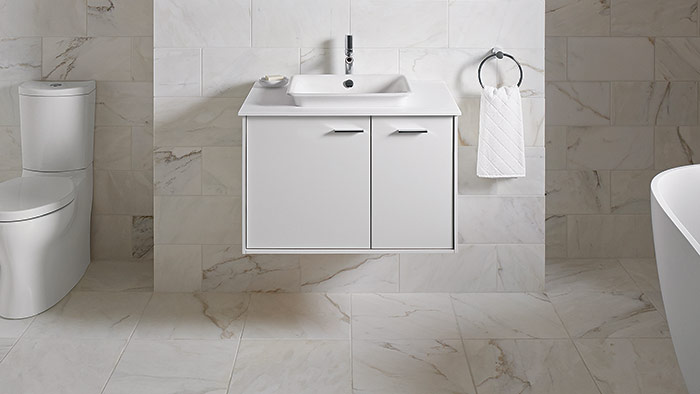
The sink and cabinet come as a two-part ensemble. The model shown here has a pair of legs to support the cabinet in the front. Other models are “floating,” meaning that there are no legs and the cabinet is held in place with strong screw connections at the wall.

floating vanity with drawers
FLOATING VANITY. This style of vanity has no legs and the cabinet is held in place with strong screw connections at the wall.


ASSEMBLE THE CABINET
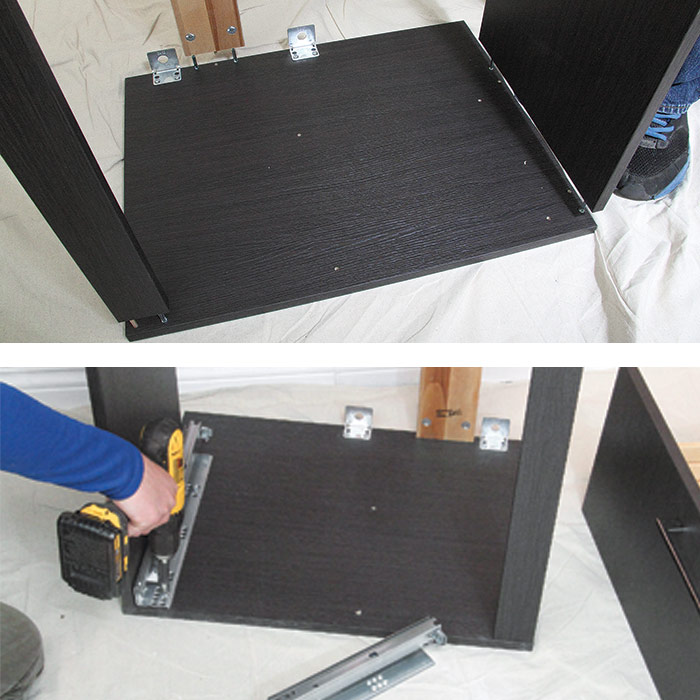
1 — ASSEMBLE THE CABINET. This type of cabinet typically requires assembly, which calls for no special skills but will take some time. Following the manufacturer’s instructions, slip in wood dowels and metal connectors, attach braces, and assemble with fastening nuts (top). Drive screws to attach the drawer glides (above).


ATTACH THE VANITY TO THE WALL
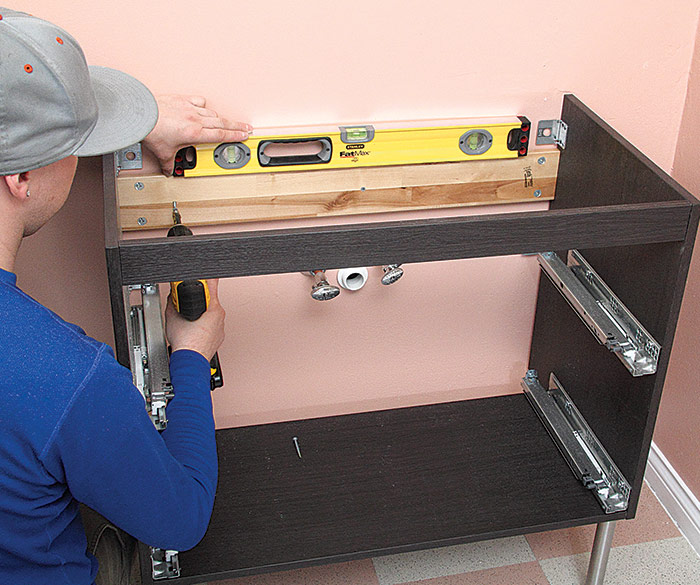
2 — ATTACH THE VANITY TO THE WALL. Use a stud finder or rap on the wall and drill test holes to find the wall studs and mark their locations. Position the vanity against the wall. Check for level in both directions; you may need to adjust the height of one or both of the legs. Once you’ve achieved level, drive 2-in. or longer screws through the vanity’s back brace into wall studs.


INSTALL THE OVERFLOW FITTING
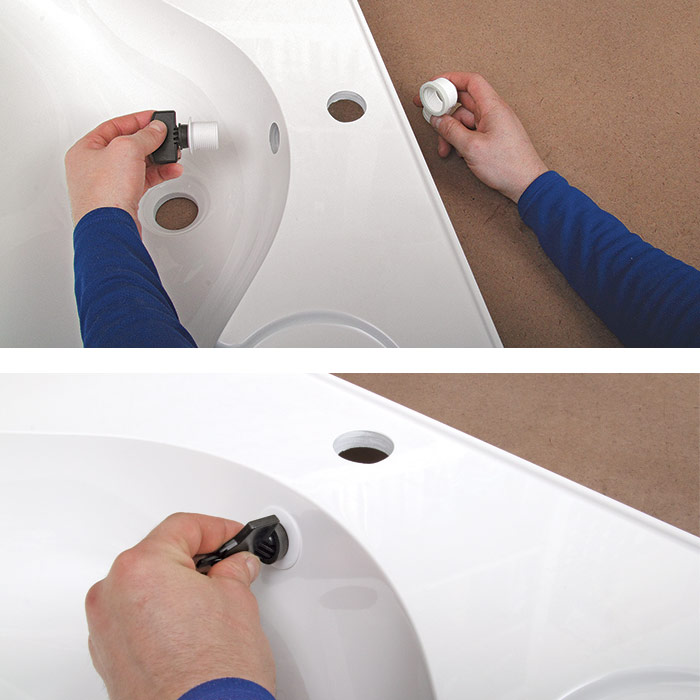
3 — INSTALL THE OVERFLOW FITTING. The overflow assembly has a front and back part (top). Hold the back part in place as you screw in the front part (above). In this case, a special tool has been supplied for this purpose.


SLIP ON THE OVERFLOW HOSE
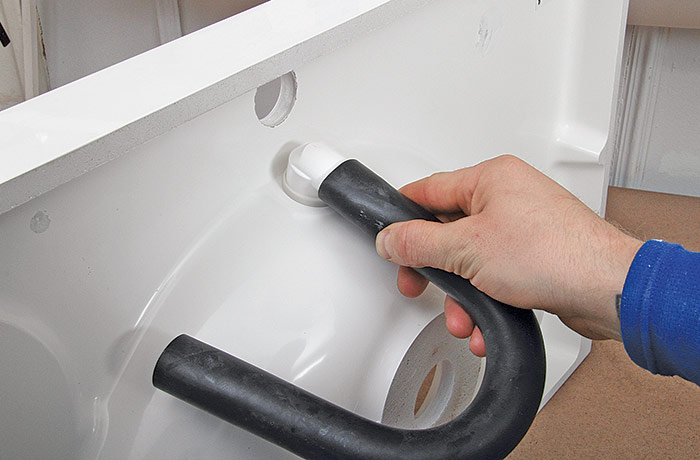
4 — SLIP ON THE OVERFLOW HOSE. From the back of the sink, slip the rubber hose onto the overflow fitting. It can be swiveled as needed.


PREPARE THE DRAIN LINE
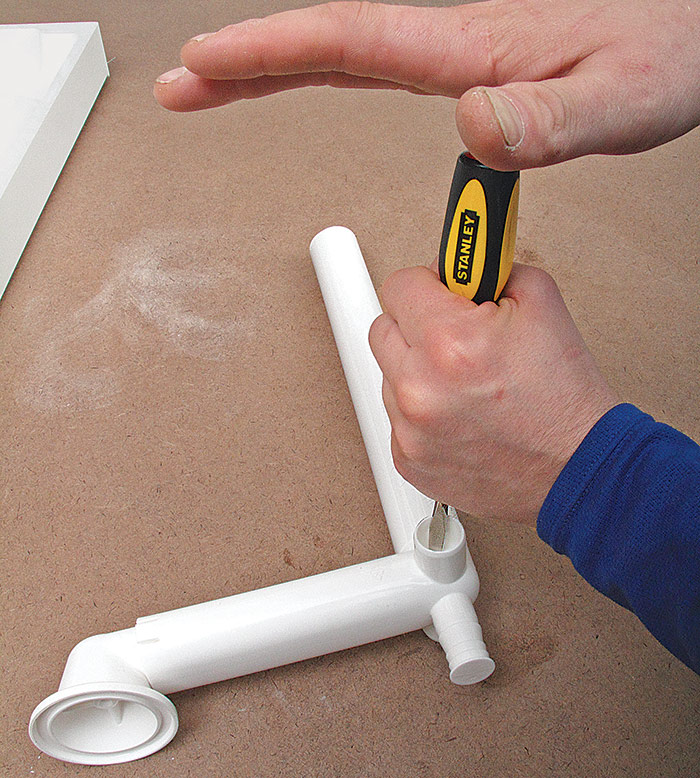
5 — PREPARE THE DRAIN LINE. The rubber overflow hose can be attached to either side of the drain line. Decide which side is more convenient, and use a large screwdriver to punch out the removable tab in that side. Use pliers to remove the tab.


ATTACH THE DRAIN TO THE SINK
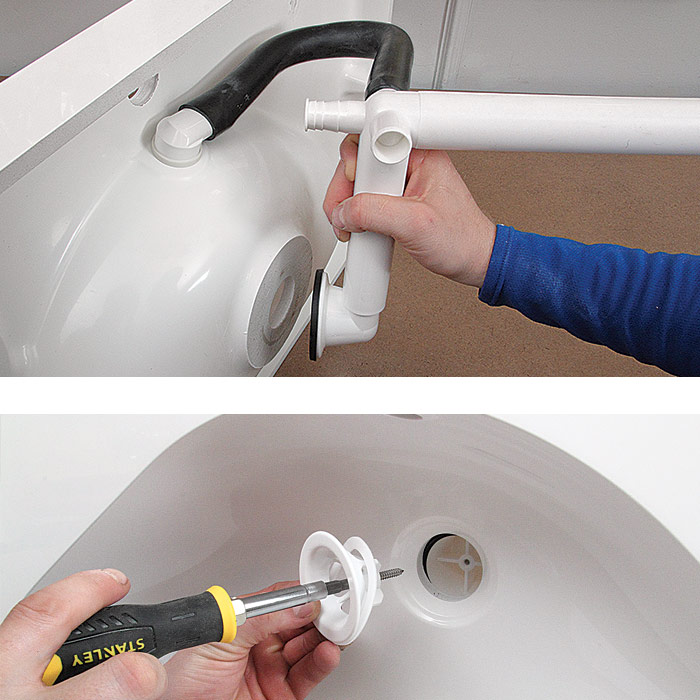
6 — ATTACH THE DRAIN TO THE SINK. From under the sink, place a rubber gasket on the drain line’s opening and press it against the sink’s drain hole (top). From inside the sink, attach the drain flange to the drain line by driving a screw (above).


Pop-Up Stopper: Instead of a pop-up assembly with a lift rod, some vanity sinks have stoppers that work simply by fitting tightly. A better solution, shown here, is a unit that closes or opens when you press down and release.
Pop-Up Stopper


INSTALL THE FAUCET
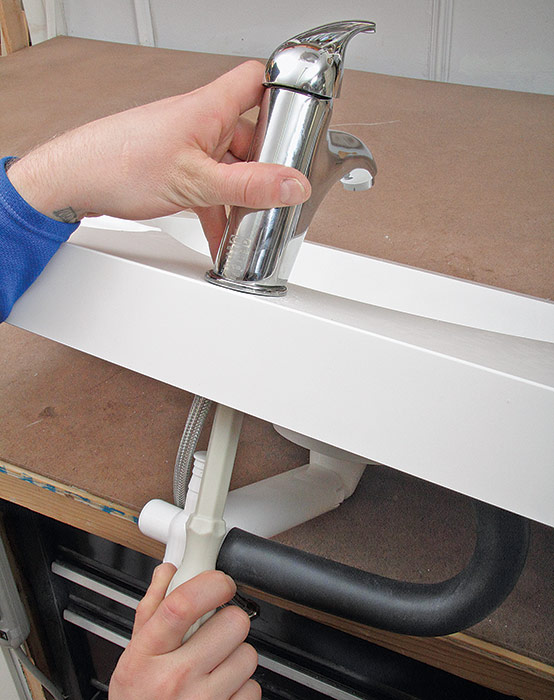
7 — INSTALL THE FAUCET. This sink has only one hole, and there will not be a pop-up assembly. Here, the manufacturer has supplied a plastic wrench for attaching the faucet. Make sure the faucet’s inlets are long enough to reach your stop valves, or purchase supply tubes that are long enough and that have the same size fittings as your stop valves (either 3⁄4 in. or 1⁄2 in.).


CUT DRAIN TRAP PIECES TO FIT
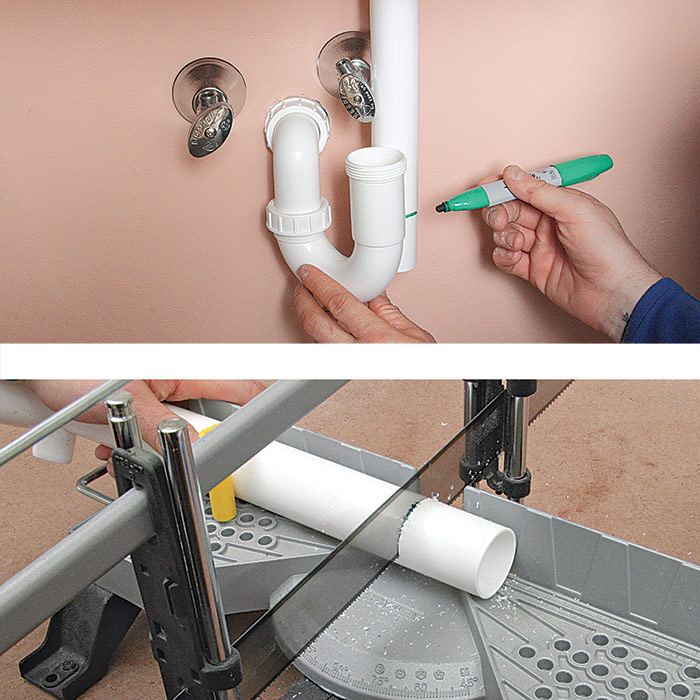
8 — CUT DRAIN TRAP PIECES TO FIT. Set the sink in place and determine which trap pieces need to be cut. Mark with a felt-tipped pen, and cut with a miter saw or a hacksaw.


INSTALL THE TRAP AND SUPPLIES
9 — INSTALL THE TRAP AND SUPPLIES. Attach the supply tubes to the stop valves. Assemble and install the trap with all the washers facing the right direction. Restore water pressure and check for leaks.


TIP: As shown here, the instructions show installing where the wall’s trap adapter (into which the trap is installed) is near the center of the cabinet. If your trap adapter is significantly off center, you will need to purchase trap arms and extensions so the drain trap can travel sideways as needed.


Excerpted from Plumbing (The Taunton Press, 2016) by Steve Cory.

Previous: Replace Your Vanity Next: Replacing a Bathroom Faucet

Guide

Plumbing

Chapter

Bathrooms

Sign up for eletters today and get the latest how-to from Fine Homebuilding, plus special offers.

Signing you up...

This site is protected by reCAPTCHA and the Google Privacy Policy and Terms of Service apply.
See all newsletters
See all newsletters

Log in or create an account to post a comment.

Sign up Log in

Become a member and get full access to FineHomebuilding.com

Plumbing

Plumbing

Trusted, comprehensive guidance from the pros for tackling any plumbing project

View Project Guide

View All Project Guides »

Become a member and get unlimited site access, including the Plumbing Project Guide.

Start Free Trial

Plumbing Basics
  • Plumbing Systems
  • Materials
  • Plumbing Tools
Bathrooms
  • Sinks
  • Showers & Tubs
  • Toilets
Kitchens
  • Kitchen Sinks
  • Water Filtration
  • Appliances
Roughing In
  • Layout
  • Installation
  • Copper Pipe
  • PEX Tubing
  • PVC Drainpipe
Water Heaters, Washers, and More
  • Water Heaters
  • Whole-House Filters
  • Sump Pumps
  • Washers
  • Sprinkler Systems
Maintenance and Repair
  • Sinks
  • Toilets
  • Showers & Tubs
  • Systems

Fine Home Building

Newsletter Sign-up

  • Fine Homebuilding

    Home building tips, offers, and expert advice in your inbox.

  • Green Building Advisor

    Building science and energy efficiency advice, plus special offers, in your inbox.

  • Old House Journal

    Repair, renovation, and restoration tips, plus special offers, in your inbox.

Signing you up...

This site is protected by reCAPTCHA and the Google Privacy Policy and Terms of Service apply.
See all newsletters

Follow

  • Fine Homebuilding

    Dig into cutting-edge approaches and decades of proven solutions with total access to our experts and tradespeople.

    Start Free Trial Now
    • Facebook
    • Instagram
    • X
    • LinkedIn
  • GBA Prime

    Get instant access to the latest developments in green building, research, and reports from the field.

    Start Free Trial Now
    • Facebook
    • YouTube
  • Old House Journal

    Learn how to restore, repair, update, and decorate your home.

    Subscribe Now
    • Facebook
    • Instagram
    • X

Membership & Magazine

  • Online Archive
  • Start Free Trial
  • Magazine Subscription
  • Magazine Renewal
  • Gift a Subscription
  • Customer Support
  • Privacy Preferences
  • About
  • Contact
  • Advertise
  • Careers
  • Terms of Use
  • Site Map
  • Do not sell or share my information
  • Privacy Policy
  • Accessibility
  • California Privacy Rights

© 2025 Active Interest Media. All rights reserved.

Fine Homebuilding receives a commission for items purchased through links on this site, including Amazon Associates and other affiliate advertising programs.

  • Home Group
  • Antique Trader
  • Arts & Crafts Homes
  • Bank Note Reporter
  • Cabin Life
  • Cuisine at Home
  • Fine Gardening
  • Fine Woodworking
  • Green Building Advisor
  • Garden Gate
  • Horticulture
  • Keep Craft Alive
  • Log Home Living
  • Military Trader/Vehicles
  • Numismatic News
  • Numismaster
  • Old Cars Weekly
  • Old House Journal
  • Period Homes
  • Popular Woodworking
  • Script
  • ShopNotes
  • Sports Collectors Digest
  • Threads
  • Timber Home Living
  • Traditional Building
  • Woodsmith
  • World Coin News
  • Writer's Digest
Active Interest Media logo
X
X
This is a dialog window which overlays the main content of the page. The modal window is a 'site map' of the most critical areas of the site. Pressing the Escape (ESC) button will close the modal and bring you back to where you were on the page.

Main Menu

  • How-To
  • Design
  • Tools & Materials
  • Video
  • Blogs
  • Forum
  • Project Guides
  • Reader Projects
  • Magazine
  • Members
  • FHB House

Podcasts

  • FHB Podcast
  • ProTalk

Webinars

  • Upcoming and On-Demand

Podcasts

  • FHB Podcast
  • ProTalk

Webinars

  • Upcoming and On-Demand

Popular Topics

  • Kitchens
  • Business
  • Bedrooms
  • Roofs
  • Architecture and Design
  • Green Building
  • Decks
  • Framing
  • Safety
  • Remodeling
  • Bathrooms
  • Windows
  • Tilework
  • Ceilings
  • HVAC

Magazine

  • Current Issue
  • Past Issues
  • Magazine Index
  • Subscribe
  • Online Archive
  • Author Guidelines

All Access

  • Member Home
  • Start Free Trial
  • Gift Membership

Online Learning

  • Courses
  • Project Guides
  • Reader Projects
  • Podcast

More

  • FHB Ambassadors
  • FHB House
  • Customer Support

Account

  • Log In
  • Join

Newsletter

Get home building tips, offers, and expert advice in your inbox

Signing you up...

This site is protected by reCAPTCHA and the Google Privacy Policy and Terms of Service apply.
See all newsletters
See all newsletters

Follow

  • X
  • YouTube
  • instagram
  • facebook
  • pinterest
  • Tiktok

Join All Access

Become a member and get instant access to thousands of videos, how-tos, tool reviews, and design features.

Start Your Free Trial

Subscribe

FHB Magazine

Start your subscription today and save up to 70%

Subscribe

You have 1 free article remaining.

Get complete site access, including thousands of videos, how-to tips, tool reviews, and design features.

Start your FREE trial

Already a member? Log in

We hope you’ve enjoyed your free articles. To keep reading, become a member today.

Get complete site access to expert advice, how-to videos, Code Check, and more, plus the print magazine.

Start your FREE trial

Already a member? Log in

Privacy Policy Update

We use cookies, pixels, script and other tracking technologies to analyze and improve our service, to improve and personalize content, and for advertising to you. We also share information about your use of our site with third-party social media, advertising and analytics partners. You can view our Privacy Policy here and our Terms of Use here.

Cookies

Analytics

These cookies help us track site metrics to improve our sites and provide a better user experience.

Advertising/Social Media

These cookies are used to serve advertisements aligned with your interests.

Essential

These cookies are required to provide basic functions like page navigation and access to secure areas of the website.

Delete My Data

Delete all cookies and associated data