FHB Logo Facebook LinkedIn Email Pinterest Twitter X Instagram Tiktok YouTube Plus Icon Close Icon Navigation Search Icon Navigation Search Icon Arrow Down Icon Video Guide Icon Article Guide Icon Modal Close Icon Guide Search Icon Skip to content
Subscribe
Log In
  • How-To
  • Design
  • Tools & Materials
  • Restoration
  • Videos
  • Blogs
  • Forum
  • Magazine
  • Members
  • FHB House
  • Podcast
Log In

Fine Homebuilding Project Guides

Plumbing

Guide Home
  • Plumbing Basics
  • Bathrooms
  • Kitchens
  • Roughing In
  • Water Heaters, Washers, and More
  • Maintenance and Repair
How-To

How to Rough in a Toilet Flange

Master plumber Rex Cauldwell explains how to lay out, cut the hole for, and fasten a toilet flange to the subfloor.

By Rex Cauldwell
  • X
  • facebook
  • linkedin
  • pinterest
  • email
  • add to favorites Log in or Sign up to save your favorite articles

Roughing in a toilet flange involves measuring for its location from the finished wall, cutting the hole for the toilet flange, and fastening the flange to the floor. The standard location of the center of the flange is a minimum of 12 in. from any finished wall. In addition, the bottom of the flange should be level with the finished floor. If you plan to lay tile, the flange needs to be attached to the subfloor before the tile goes in, but be sure to shim the flange up by the combined thickness of the tile and mortar.

TIP: Picking a toilet flange Toilet flanges are like plungers, there are all kinds of them, but there’s only one you need. It’s all plastic (no rotating parts), it’s open in the center (no knockouts), and has two small horseshoe cutouts on each side. Ignore the crescent-shaped slots for the bowl bolts; they can let the bolts spin when you try to turn the nuts.

different toilet flanges
There are myriad flanges to confuse you, yet you need only one—the one in the very center, which is called a 4-in. by 3-in. flange.


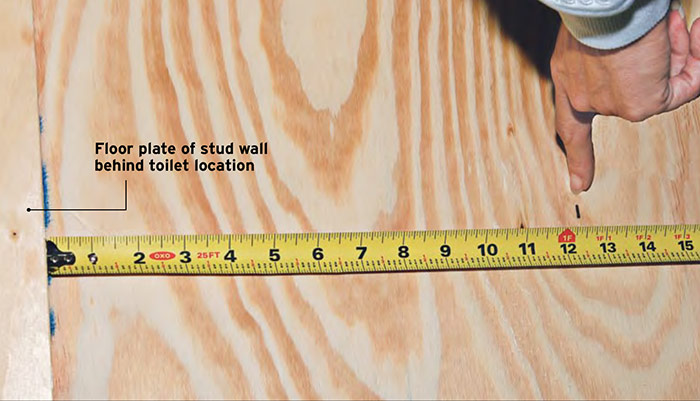
To start, locate the centerline of the flange, then measure and mark a point 12 in. from the bottom plate, plus the thickness of any finished wall you haven’t installed yet. This measurement will typically total 12 1⁄2 in. (assuming 1⁄2-in. drywall). That mark represents the center of the hole for the flange pipe that goes through the floor.

locate the centerline of the flange
1. Measure out 12 in. from the stud wall then add the thickness of the finished wall, here a total of 12 1⁄2 in.

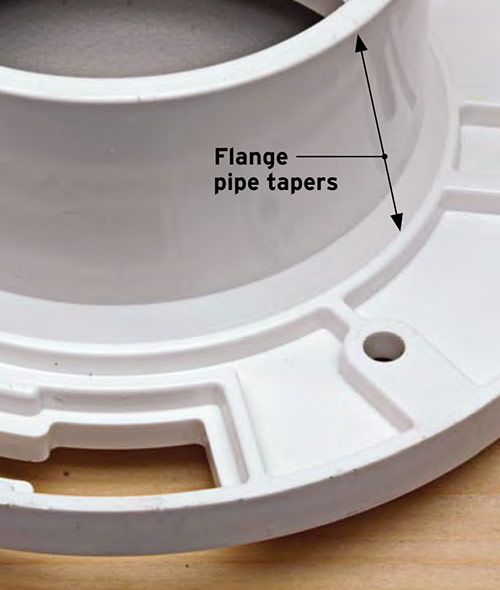
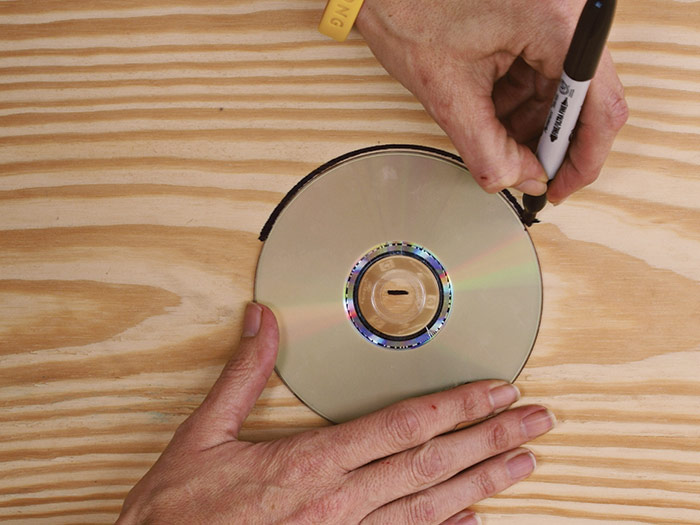
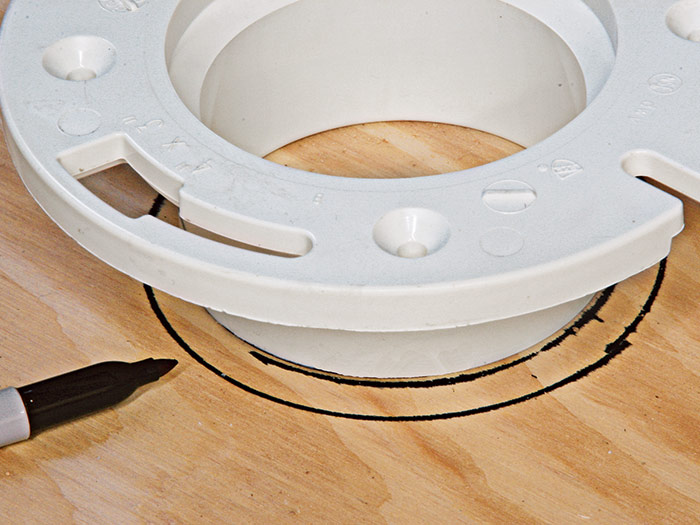
If the hole’s too small, the pipe won’t fit. If it’s too large, you won’t have any wood to hold the screws 1. A CD is close to the proper diameter and makes an easy template. In fact, if you’re using a 3-in. pipe flange (the most common), and the flange pipe bevels, the outside diameter where it meets the floor is about 4 3⁄4 in.—the diameter of a CD 2. For flanges without a bevel, use the CD to make a reference circle, then center your flange inside that circle to mark the pipe diameter 3.

tapered-flange
2. If the flange pipe tapers, you’ll need a 4 3⁄4-in. hole, the size of a compact disc (CD).
Use a CD as a flange template
3. Use a CD as a template and draw a circle for the flange pipe hole.
outline the flange
If the circle is too big, center the pipe inside the CD mark and outline it.

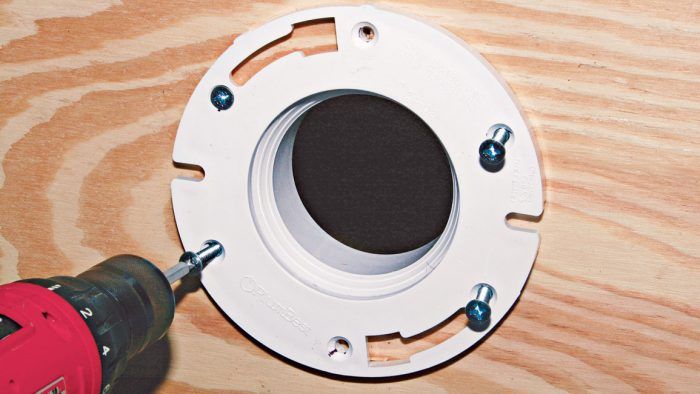
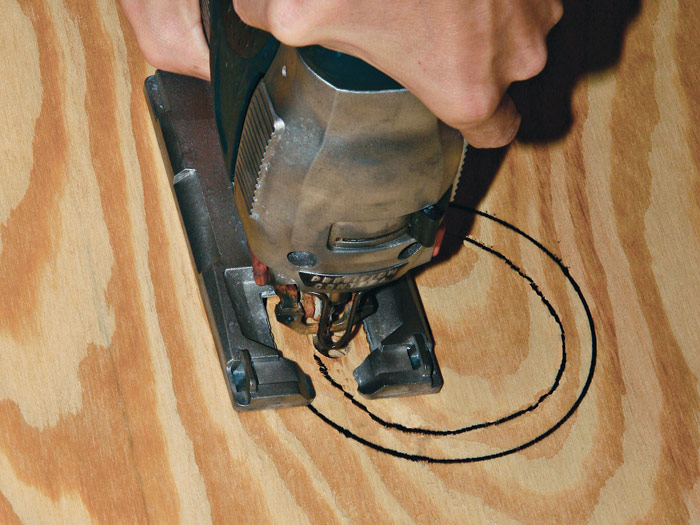
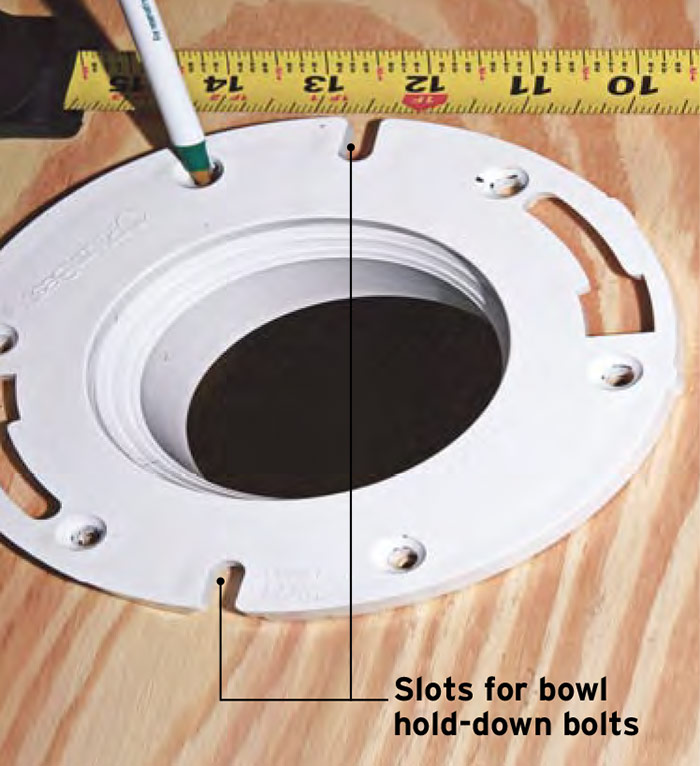
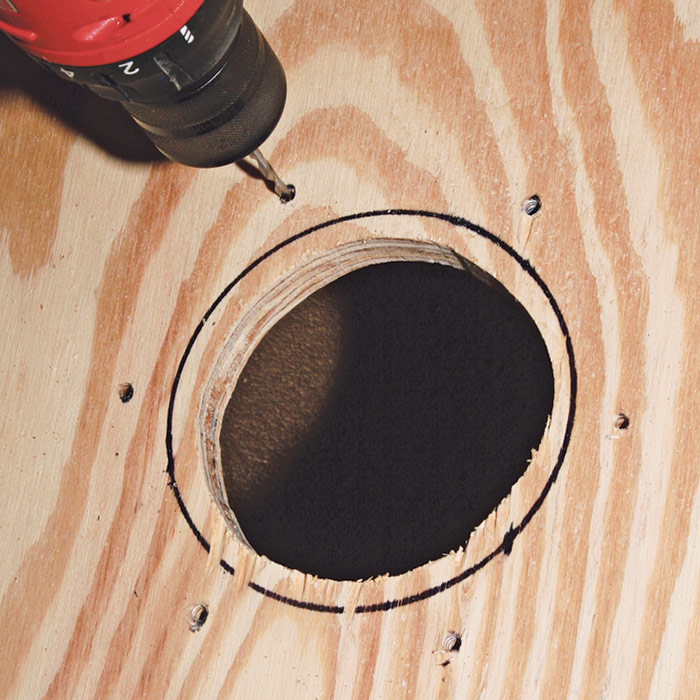
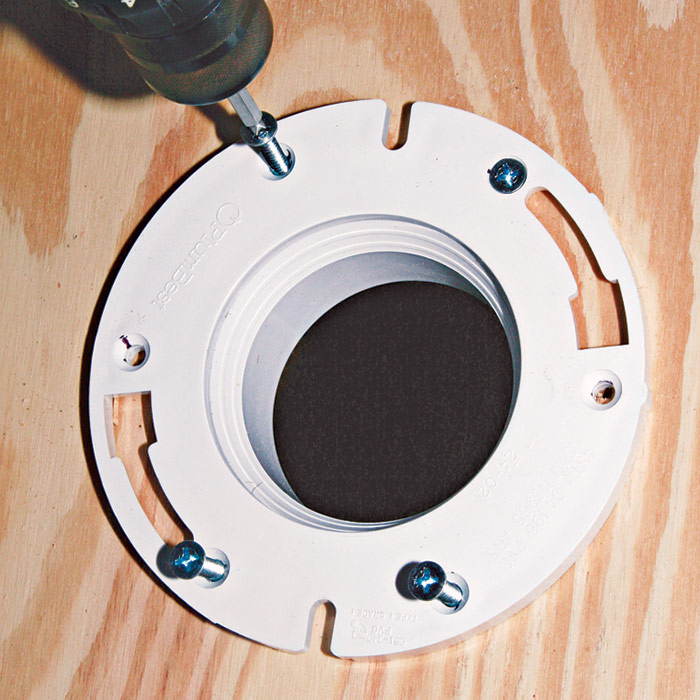
Drill a 3⁄8-in. hole with a twist drill so its edge falls just on the inside edge of the circle, then insert a rough-cut jigsaw blade and carefully cut the circle out, turning the saw constantly to keep the blade on the line 4. Insert the flange to verify the proper hole diameter. Orient the flange so the horseshoe-shaped cutouts on each side are at dead center—each 12 1⁄2 in. from the wall behind the toilet. Holding the flange in place, mark the location of the flange screws 5. Don’t use the arced cutouts on the flange; they can allow the bowl hold-down bolts to spin when you try to remove them at some later date. Remove the flange and, using a drill bit about half the diameter of a #12 by 1 1⁄2-inch flat-head wood screw, predrill the holes at your marks

cut the hole in the subfloor.
4. Using a jigsaw, cut the hole in the subfloor.
mark the screw holes
5. Align the hold-down slots and mark the screw holes.

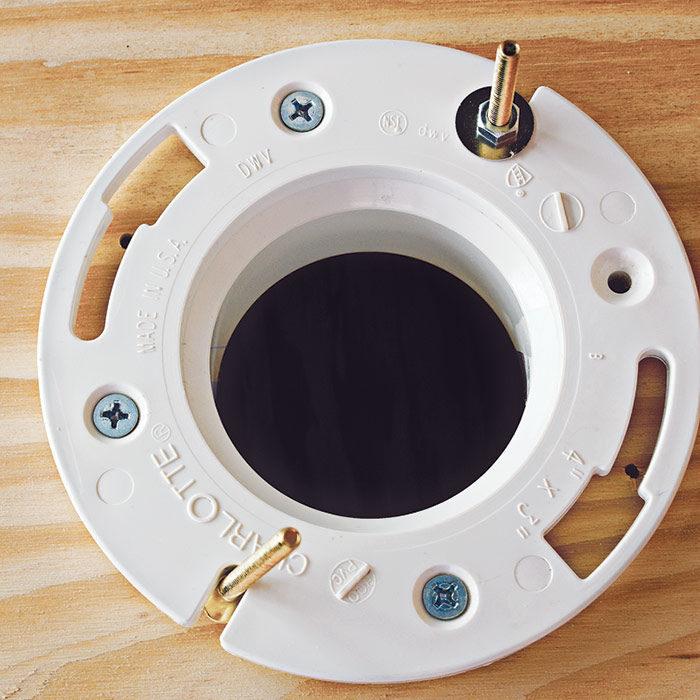
6. Predrilling makes driving the screws easier and keeps the wood from splitting. Line up the flange so the mounting holes match with the bowl hold-down slots parallel to the back wall, and drive in the screws with a cordless drill 7. Install any remaining fixtures and the finished wall and floor. Rather than sliding the bowl hold-down bolts into their slots and having them fall over as you try and drop the bowl on the flange, keep them vertical with a washer and nut 8. Then mount the toilet.

predrill the holes
6. Remove the flange and predrill the holes for the flange screws.
secure the flange
7. Drive heavy duty flat-head screws into the floor to secure the flange.
Keep the bowl hold-down bolts from falling over
8. Keep the bowl hold-down bolts from falling over with a washer and nut (top).


Taunton's Plumbing Complete bookExcerpted from Taunton’s Plumbing Complete by Rex Cauldwell.

Available at Amazon.com.

Previous: Toilet Bowl Gaskets

Guide

Plumbing

Chapter

Bathrooms

Sign up for eletters today and get the latest how-to from Fine Homebuilding, plus special offers.

Signing you up...

This site is protected by reCAPTCHA and the Google Privacy Policy and Terms of Service apply.
See all newsletters
See all newsletters

Log in or create an account to post a comment.

Sign up Log in

Become a member and get full access to FineHomebuilding.com

Plumbing

Plumbing

Trusted, comprehensive guidance from the pros for tackling any plumbing project

View Project Guide

View All Project Guides »

Become a member and get unlimited site access, including the Plumbing Project Guide.

Start Free Trial

Plumbing Basics
  • Plumbing Systems
  • Materials
  • Plumbing Tools
Bathrooms
  • Sinks
  • Showers & Tubs
  • Toilets
Kitchens
  • Kitchen Sinks
  • Water Filtration
  • Appliances
Roughing In
  • Layout
  • Installation
  • Copper Pipe
  • PEX Tubing
  • PVC Drainpipe
Water Heaters, Washers, and More
  • Water Heaters
  • Whole-House Filters
  • Sump Pumps
  • Washers
  • Sprinkler Systems
Maintenance and Repair
  • Sinks
  • Toilets
  • Showers & Tubs
  • Systems

Fine Home Building

Newsletter Sign-up

  • Fine Homebuilding

    Home building tips, offers, and expert advice in your inbox.

  • Green Building Advisor

    Building science and energy efficiency advice, plus special offers, in your inbox.

  • Old House Journal

    Repair, renovation, and restoration tips, plus special offers, in your inbox.

Signing you up...

This site is protected by reCAPTCHA and the Google Privacy Policy and Terms of Service apply.
See all newsletters

Follow

  • Fine Homebuilding

    Dig into cutting-edge approaches and decades of proven solutions with total access to our experts and tradespeople.

    Start Free Trial Now
    • Facebook
    • Instagram
    • X
    • LinkedIn
  • GBA Prime

    Get instant access to the latest developments in green building, research, and reports from the field.

    Start Free Trial Now
    • Facebook
    • YouTube
  • Old House Journal

    Learn how to restore, repair, update, and decorate your home.

    Subscribe Now
    • Facebook
    • Instagram
    • X

Membership & Magazine

  • Online Archive
  • Start Free Trial
  • Magazine Subscription
  • Magazine Renewal
  • Gift a Subscription
  • Customer Support
  • Privacy Preferences
  • About
  • Contact
  • Advertise
  • Careers
  • Terms of Use
  • Site Map
  • Do not sell or share my information
  • Privacy Policy
  • Accessibility
  • California Privacy Rights

© 2025 Active Interest Media. All rights reserved.

Fine Homebuilding receives a commission for items purchased through links on this site, including Amazon Associates and other affiliate advertising programs.

  • Home Group
  • Antique Trader
  • Arts & Crafts Homes
  • Bank Note Reporter
  • Cabin Life
  • Cuisine at Home
  • Fine Gardening
  • Fine Woodworking
  • Green Building Advisor
  • Garden Gate
  • Horticulture
  • Keep Craft Alive
  • Log Home Living
  • Military Trader/Vehicles
  • Numismatic News
  • Numismaster
  • Old Cars Weekly
  • Old House Journal
  • Period Homes
  • Popular Woodworking
  • Script
  • ShopNotes
  • Sports Collectors Digest
  • Threads
  • Timber Home Living
  • Traditional Building
  • Woodsmith
  • World Coin News
  • Writer's Digest
Active Interest Media logo
X
X
This is a dialog window which overlays the main content of the page. The modal window is a 'site map' of the most critical areas of the site. Pressing the Escape (ESC) button will close the modal and bring you back to where you were on the page.

Main Menu

  • How-To
  • Design
  • Tools & Materials
  • Video
  • Blogs
  • Forum
  • Project Guides
  • Reader Projects
  • Magazine
  • Members
  • FHB House

Podcasts

  • FHB Podcast
  • ProTalk

Webinars

  • Upcoming and On-Demand

Podcasts

  • FHB Podcast
  • ProTalk

Webinars

  • Upcoming and On-Demand

Popular Topics

  • Kitchens
  • Business
  • Bedrooms
  • Roofs
  • Architecture and Design
  • Green Building
  • Decks
  • Framing
  • Safety
  • Remodeling
  • Bathrooms
  • Windows
  • Tilework
  • Ceilings
  • HVAC

Magazine

  • Current Issue
  • Past Issues
  • Magazine Index
  • Subscribe
  • Online Archive
  • Author Guidelines

All Access

  • Member Home
  • Start Free Trial
  • Gift Membership

Online Learning

  • Courses
  • Project Guides
  • Reader Projects
  • Podcast

More

  • FHB Ambassadors
  • FHB House
  • Customer Support

Account

  • Log In
  • Join

Newsletter

Get home building tips, offers, and expert advice in your inbox

Signing you up...

This site is protected by reCAPTCHA and the Google Privacy Policy and Terms of Service apply.
See all newsletters
See all newsletters

Follow

  • X
  • YouTube
  • instagram
  • facebook
  • pinterest
  • Tiktok

Join All Access

Become a member and get instant access to thousands of videos, how-tos, tool reviews, and design features.

Start Your Free Trial

Subscribe

FHB Magazine

Start your subscription today and save up to 70%

Subscribe

We hope you’ve enjoyed your free articles. To keep reading, become a member today.

Get complete site access to expert advice, how-to videos, Code Check, and more, plus the print magazine.

Start your FREE trial

Already a member? Log in

Privacy Policy Update

We use cookies, pixels, script and other tracking technologies to analyze and improve our service, to improve and personalize content, and for advertising to you. We also share information about your use of our site with third-party social media, advertising and analytics partners. You can view our Privacy Policy here and our Terms of Use here.

Cookies

Analytics

These cookies help us track site metrics to improve our sites and provide a better user experience.

Advertising/Social Media

These cookies are used to serve advertisements aligned with your interests.

Essential

These cookies are required to provide basic functions like page navigation and access to secure areas of the website.

Delete My Data

Delete all cookies and associated data