FHB Logo Facebook LinkedIn Email Pinterest Twitter X Instagram Tiktok YouTube Plus Icon Close Icon Navigation Search Icon Navigation Search Icon Arrow Down Icon Video Guide Icon Article Guide Icon Modal Close Icon Guide Search Icon Skip to content
Subscribe
Log In
  • How-To
  • Design
  • Tools & Materials
  • Restoration
  • Videos
  • Blogs
  • Forum
  • Magazine
  • Members
  • FHB House
  • Podcast
Log In

Fine Homebuilding Project Guides

Finish & Trim Carpentry

Guide Home
  • Trim Design
  • Tools and Materials
  • Interior Trim Basics
  • Window and Door Casings
  • Baseboard and Crown Molding
  • Wainscot and Paneling
  • Mantels and Fireplace Surrounds
  • Coffered Ceilings
How-To

Making Mitered Window Casing

Contractor Greg Kossow shares a fast and foolproof method for creating mitered casing.

By Greg Kossow
  • X
  • facebook
  • linkedin
  • pinterest
  • email
  • add to favorites Log in or Sign up to save your favorite articles

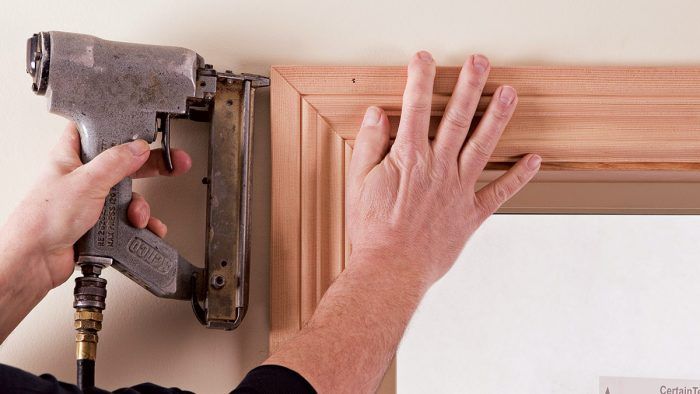
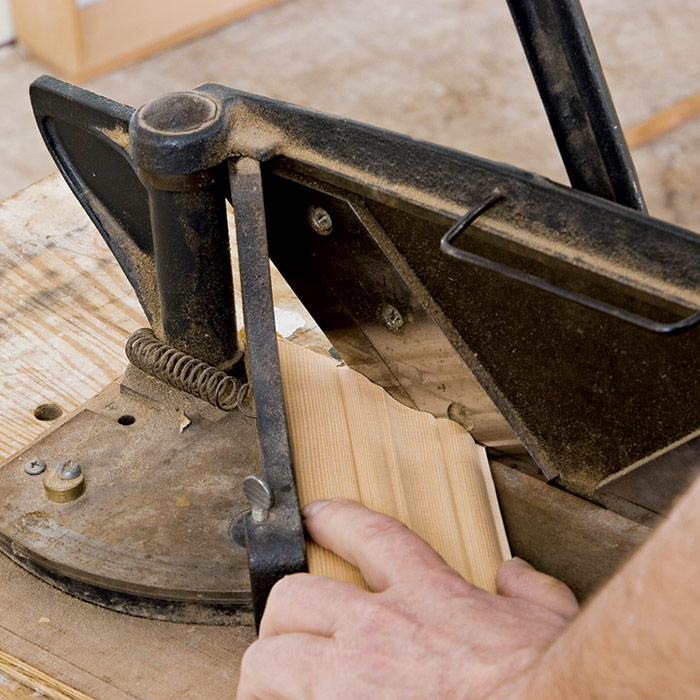
Though there are many strategies for creating mitered casing, I find that the method shown here tends to be faster and more accurate and error-free than most. It takes advantage of the precision cutting action of the miter-trimmer and the chopsaw to allow you to shave the casings to final fit quickly and precisely. Because the miter trimmer is easily portable, you can bring it right next to the window you’re working on, saving time and effort when fitting joints.

A tape measure is useful to determine rough lengths of the individual casings (I pre-cut all the casings for each window adding 1 ⁄ 8 in. to the overall length for trimming the joints to fit)—but the most accurate and efficient way to get the final fit is to mark the pieces in place after you’ve fit the first joint. You’ll fit the joint on one end of each casing to the previous one, then mark the piece to length using the opposite reveal mark.

While preassembling mitered window casings speeds up the installation process, it’s only appropriate when all the jambs are flush to the wall surface. Otherwise, if you have to adjust the casings to fit around either a protruding jamb or wall, the joints may open up as you work on it.

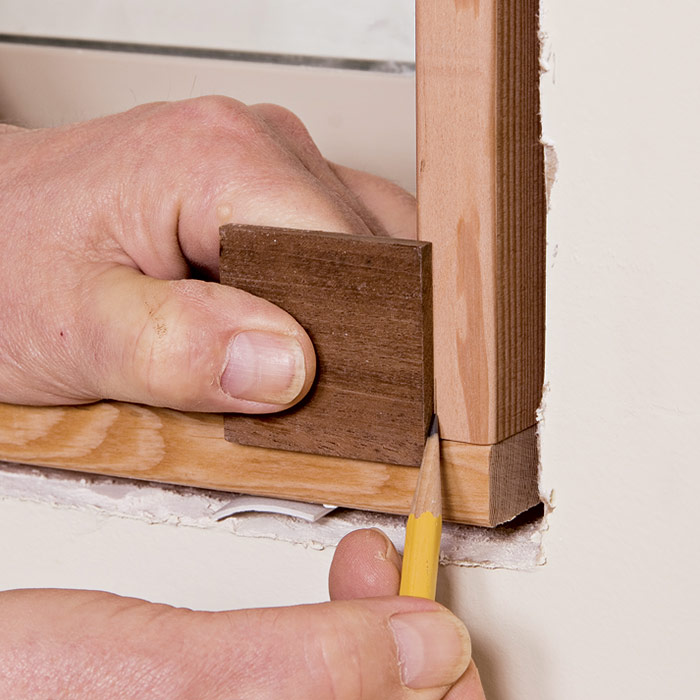
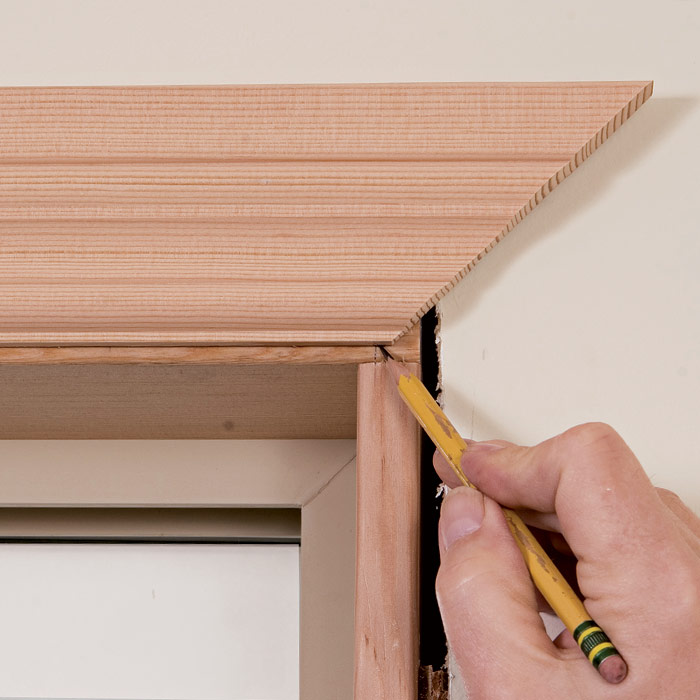
Begin by marking the reveals on the jambs by tracing around a reveal gauge at each corner ❶. Now measure between the reveal marks, add about 1 ⁄ 8 in., and then pre-cut miters on one or both ends of each of the casing pieces to create a trim “package” for that window. If you have other windows to do, for the sake of efficiency go ahead and make packages for them now as well.


reveal gauge
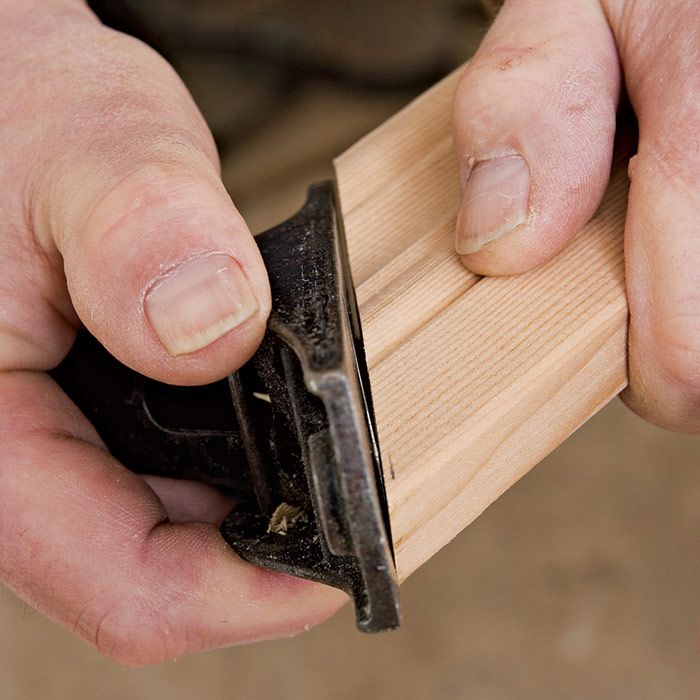
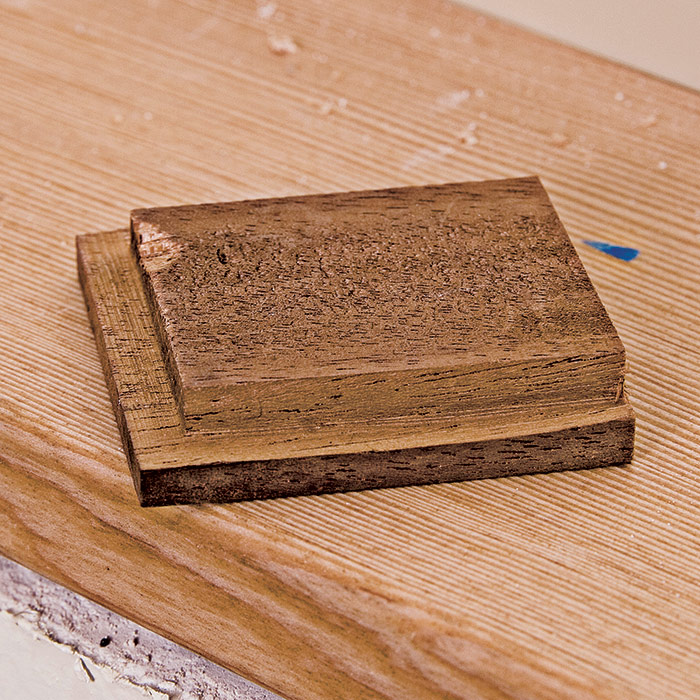
A reveal gauge can easily be made from scrap lumber using a tablesaw or a router with a rabbeting bit. Use at least a foot-long length of stock for safety and you’ll get two gauges. Cut rabbets along one side and both edges. If you don’t have the right size router bit, use a larger size. Adjust the rabbet by ripping and crosscutting equal amounts at the edge of the rabbet. cut the gauge to a handy size.


Trace around the margin gauge
1. Trace around the margin gauge at each corner to mark reveals.

Mitered end of first piece
2. Mitered end of first piece installed to reveal mark.

Mark the opposite end
3. Mark the opposite end for length.

Hold the second piece up to miter
4. Hold the second piece up to miter to check for fit.
Making Mitered Window Casing
5. Reinforce the miter by cross-nailing through the edges.

Hold the inside corner of the first piece of casing on the corner mark of the first miter ❷ and mark the other inside corner for length ❸. Cut this piece to length and nail it in place. Line the next piece up on the reveal marks and check the fit of the joint ❹. Trim if necessary.

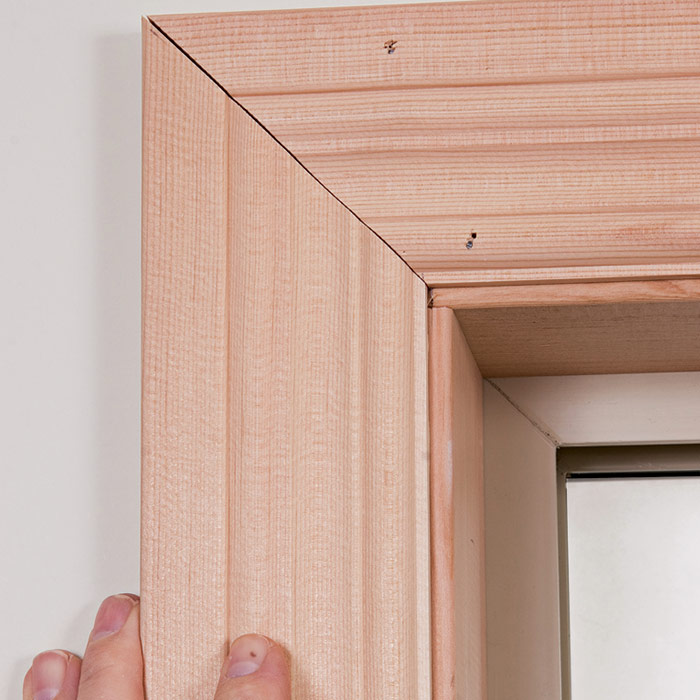
Line up the piece again and mark the next inside corner for length and cut the miter. Brush a thin coat of glue on the joint and nail the casing permanently in place to prevent the miters from opening up as you work your way around the window ❺. Repeat this process for the third piece. If the walls and jambs aren’t flush, you may need to make adjustments to get a tight-fitting joint.

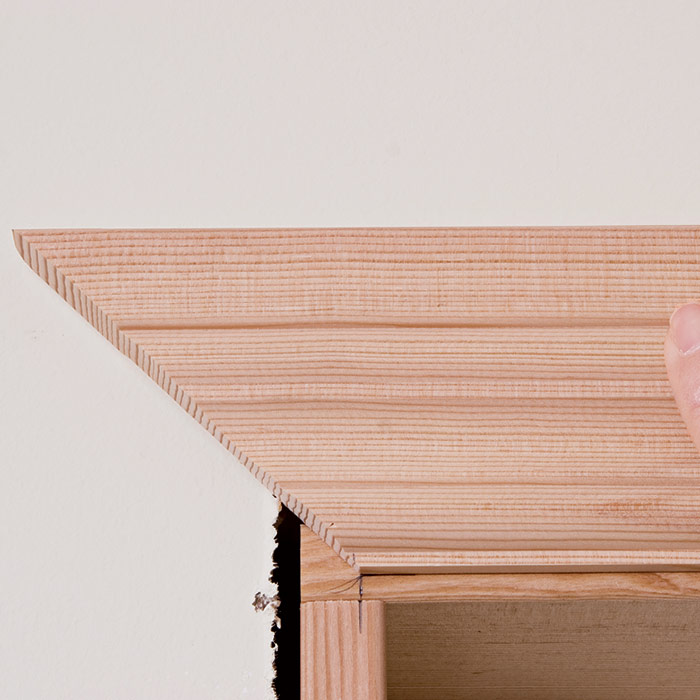
The last piece is the most challenging to install, as you need to fit a miter precisely on both ends. Begin by fitting the miter at the third corner while allowing the other end to overlap the casing at the final corner. Be sure to keep the overlap even with the corner of the first installed piece as you check and correct the fit with the trimmer. Now repeat this at the final corner, letting the casing overlap the third as you check the fit. When the final corner fits, keep the same angle set on the trimmer or chopsaw and slowly shave back the last miter until the piece slips perfectly into place.


THREE WAYS TO TRIM MITERS

block plane
A block plane with a sharp blade makes fine adjustments.

chop saw
A chop saw quickly removes material.

miter trimmer
A miter trimmer, although primitive, makes extremely accurate cuts.

Trim Complete

Excerpted from Trim Complete: Expert advice from start to finish by Greg Kossow

Available in the Taunton Store and at Amazon.com.

Previous: Trimming Windows Next: Precision Window Trim

Guide

Finish & Trim Carpentry

Chapter

Window and Door Casings

Sign up for eletters today and get the latest how-to from Fine Homebuilding, plus special offers.

Signing you up...

This site is protected by reCAPTCHA and the Google Privacy Policy and Terms of Service apply.
See all newsletters
See all newsletters

Log in or create an account to post a comment.

Sign up Log in

Become a member and get full access to FineHomebuilding.com

Finish & Trim Carpentry

Finish & Trim Carpentry

Trusted, comprehensive guidance from the pros for creating perfect trim details in any room of the house

View Project Guide

View All Project Guides »

Become a member and get unlimited site access, including the Finish & Trim Carpentry Project Guide.

Start Free Trial

Trim Design
  • Trim Style and Design
Tools and Materials
  • Tools
  • Materials
Interior Trim Basics
  • Tips and Tricks
  • Techniques
  • Using Jigs
Window and Door Casings
  • Windows
  • Doors
Baseboard and Crown Molding
  • Baseboard
  • Crown Molding
  • Specialty Crown Situations
Wainscot and Paneling
  • Beadboard Wainscot
  • Paneled Wainscot
  • Chair Rails
  • Wall Treatments
Mantels and Fireplace Surrounds
  • Design
  • Installing Mantels and Surrounds
Coffered Ceilings

Fine Home Building

Newsletter Sign-up

  • Fine Homebuilding

    Home building tips, offers, and expert advice in your inbox.

  • Green Building Advisor

    Building science and energy efficiency advice, plus special offers, in your inbox.

  • Old House Journal

    Repair, renovation, and restoration tips, plus special offers, in your inbox.

Signing you up...

This site is protected by reCAPTCHA and the Google Privacy Policy and Terms of Service apply.
See all newsletters

Follow

  • Fine Homebuilding

    Dig into cutting-edge approaches and decades of proven solutions with total access to our experts and tradespeople.

    Start Free Trial Now
    • Facebook
    • Instagram
    • X
    • LinkedIn
  • GBA Prime

    Get instant access to the latest developments in green building, research, and reports from the field.

    Start Free Trial Now
    • Facebook
    • YouTube
  • Old House Journal

    Learn how to restore, repair, update, and decorate your home.

    Subscribe Now
    • Facebook
    • Instagram
    • X

Membership & Magazine

  • Online Archive
  • Start Free Trial
  • Magazine Subscription
  • Magazine Renewal
  • Gift a Subscription
  • Customer Support
  • Privacy Preferences
  • About
  • Contact
  • Advertise
  • Careers
  • Terms of Use
  • Site Map
  • Do not sell or share my information
  • Privacy Policy
  • Accessibility
  • California Privacy Rights

© 2025 Active Interest Media. All rights reserved.

Fine Homebuilding receives a commission for items purchased through links on this site, including Amazon Associates and other affiliate advertising programs.

  • Home Group
  • Antique Trader
  • Arts & Crafts Homes
  • Bank Note Reporter
  • Cabin Life
  • Cuisine at Home
  • Fine Gardening
  • Fine Woodworking
  • Green Building Advisor
  • Garden Gate
  • Horticulture
  • Keep Craft Alive
  • Log Home Living
  • Military Trader/Vehicles
  • Numismatic News
  • Numismaster
  • Old Cars Weekly
  • Old House Journal
  • Period Homes
  • Popular Woodworking
  • Script
  • ShopNotes
  • Sports Collectors Digest
  • Threads
  • Timber Home Living
  • Traditional Building
  • Woodsmith
  • World Coin News
  • Writer's Digest
Active Interest Media logo
X
X
This is a dialog window which overlays the main content of the page. The modal window is a 'site map' of the most critical areas of the site. Pressing the Escape (ESC) button will close the modal and bring you back to where you were on the page.

Main Menu

  • How-To
  • Design
  • Tools & Materials
  • Video
  • Blogs
  • Forum
  • Project Guides
  • Reader Projects
  • Magazine
  • Members
  • FHB House

Podcasts

  • FHB Podcast
  • ProTalk

Webinars

  • Upcoming and On-Demand

Podcasts

  • FHB Podcast
  • ProTalk

Webinars

  • Upcoming and On-Demand

Popular Topics

  • Kitchens
  • Business
  • Bedrooms
  • Roofs
  • Architecture and Design
  • Green Building
  • Decks
  • Framing
  • Safety
  • Remodeling
  • Bathrooms
  • Windows
  • Tilework
  • Ceilings
  • HVAC

Magazine

  • Current Issue
  • Past Issues
  • Magazine Index
  • Subscribe
  • Online Archive
  • Author Guidelines

All Access

  • Member Home
  • Start Free Trial
  • Gift Membership

Online Learning

  • Courses
  • Project Guides
  • Reader Projects
  • Podcast

More

  • FHB Ambassadors
  • FHB House
  • Customer Support

Account

  • Log In
  • Join

Newsletter

Get home building tips, offers, and expert advice in your inbox

Signing you up...

This site is protected by reCAPTCHA and the Google Privacy Policy and Terms of Service apply.
See all newsletters
See all newsletters

Follow

  • X
  • YouTube
  • instagram
  • facebook
  • pinterest
  • Tiktok

Join All Access

Become a member and get instant access to thousands of videos, how-tos, tool reviews, and design features.

Start Your Free Trial

Subscribe

FHB Magazine

Start your subscription today and save up to 70%

Subscribe

We hope you’ve enjoyed your free articles. To keep reading, become a member today.

Get complete site access to expert advice, how-to videos, Code Check, and more, plus the print magazine.

Start your FREE trial

Already a member? Log in

Privacy Policy Update

We use cookies, pixels, script and other tracking technologies to analyze and improve our service, to improve and personalize content, and for advertising to you. We also share information about your use of our site with third-party social media, advertising and analytics partners. You can view our Privacy Policy here and our Terms of Use here.

Cookies

Analytics

These cookies help us track site metrics to improve our sites and provide a better user experience.

Advertising/Social Media

These cookies are used to serve advertisements aligned with your interests.

Essential

These cookies are required to provide basic functions like page navigation and access to secure areas of the website.

Delete My Data

Delete all cookies and associated data