FHB Logo Facebook LinkedIn Email Pinterest Twitter X Instagram Tiktok YouTube Plus Icon Close Icon Navigation Search Icon Navigation Search Icon Arrow Down Icon Video Guide Icon Article Guide Icon Modal Close Icon Guide Search Icon Skip to content
Subscribe
Log In
  • How-To
  • Design
  • Tools & Materials
  • Restoration
  • Videos
  • Blogs
  • Forum
  • Magazine
  • Members
  • FHB House
  • Podcast
Log In
How-To

How to Space and Install Pergola Rafters

Jeremy Kassel offers expert tips for cutting and spacing rafters for a long-lasting pergola.

Sponsored by Simpson Strong-Tie

  • X
  • facebook
  • linkedin
  • pinterest
  • email
  • add to favorites Log in or Sign up to save your favorite articles
How to Space and Install Pergola Rafters
Video Player is loading.
Current Time 0:00
/
Duration 0:00
Loaded: 0%
0:00
Stream Type LIVE
Remaining Time -0:00
 
1x
    • Chapters
    • descriptions off, selected
    • captions settings, opens captions settings dialog
    • captions off, selected

      This is a modal window.

      Beginning of dialog window. Escape will cancel and close the window.

      Text
      Background
      Window
      Font Size
      Text Edge Style
      Font Family

      End of dialog window.

      This is a modal window. This modal can be closed by pressing the Escape key or activating the close button.

      This is a modal window. This modal can be closed by pressing the Escape key or activating the close button.

      Jeremy Kassel explains how to get precision results when cutting and spacing pergola rafters. His tips include creating a rafter template for consistency, ganging rafters together for easy marking, installing outside rafters first for precision, and more. Every detail counts when it comes to rafter spacing, so it’s important to mark and measure often.

      Orange button with white text that reads "watch the full series."

      Here’s the Transcript:

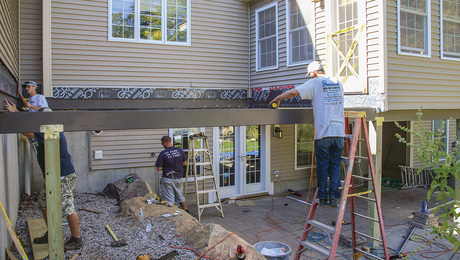
      Before I cut my rafters, I’m just double-checking the measurements between the outside of these 6×6 posts. OK, we’re good. Set it down for me, please, because we need to crown every single rafter. The crown is up here. We’re going to be cutting 12 rafters, and we want all of them to be the same.

      We’re starting with the straightest piece of lumber, making a template or pattern, making sure we like it, and then tracing it onto the next 11 rafters. Start by squaring up one end of the board. Now I’m pulling my tape from this end all the way out to 14 ft.

      Now we’re ready to cut our tail detail, just like our beam detail. All the rafters will have the same type of diagonal cut. We’ll have a 5½-in.-wide tail and a 45° cut knocking off that lower corner. We can now cut that off and go down to where we started to cut the other detail.

      Photo of Jeremy Kassel ganging together eleven pergola rafters.

      What do you have from the outer edge of your post to the outer edge of your rafter tail? 22 and 16. OK, it’s got to slide ½ in. Scribe a line on the inside of the post. Let’s see if we can get rid of that hole on the top. Looks like we can’t. I want to flush the bottom because that’s what’s going to bear on the beams. Now we’ll scribe our lines and cut them off with the saw.

      Great, now we just have to do this 10 more times. Having one pattern rafter and using the same technique for cutting each one ensures accurate, repeatable cuts.

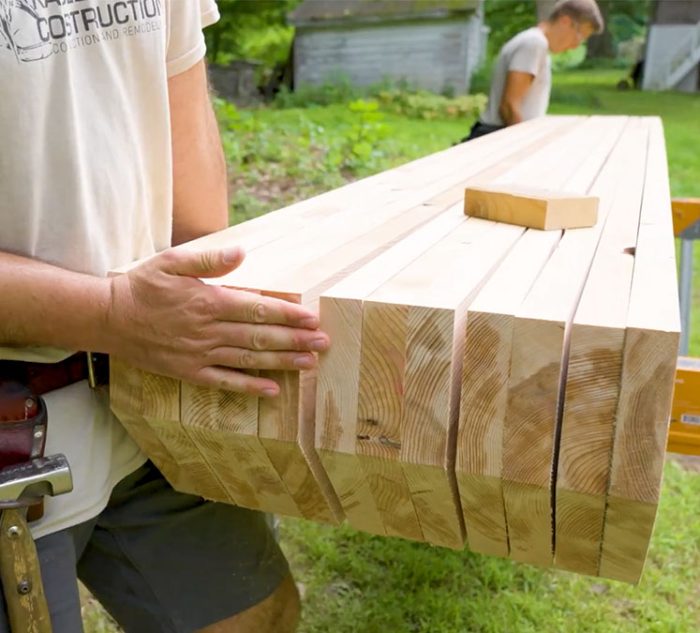
      Next, we’re going to take all our cut rafters and gang them up next to each other on end. Let’s try to flush these up now so we don’t have to knock them around later. Now that we have our rafters ganged up nicely, we’ll mark where our lattice strapping is going to go. I made my first mark for the first piece of strapping, and I’ll continue the layout 8 in. on center all the way down.

      Now, with the framing square, we’ll transfer our lines over the tops of the rafters. I drew a line across all of the ganged-up rafters, marking one side for where the strapping will be installed. I’ll do this all the way down. When we laid out our initial marks, the wood was dry, but it looks different now after that heavy rainstorm.

      Marking these rafters down on the sawhorses saves us from marking them later on ladders. It’s safer and faster this way. Normally we’d wax all of these end cuts, but due to the rain, the material is still too wet. We’ll install them on the beams and let them dry before waxing them later. We scribed a mark on this first one where the 6×6 will go, and we’ll do the same for the other rafter on the opposite end of the pergola.

      All right, let’s get these up. Bring it to your mark. Perfect. I’m right on my layout line. Let me grab this clamp so the material doesn’t roll. Good. Let’s get our hardware. We’re using those deck joist ties again. They’re decorative and structural, tying the top rafter to the side of the 6×6 post. We’re using a 5½-in. wood screw at the top since we’re applying a 1½-in. rafter onto a 5½-in. post.

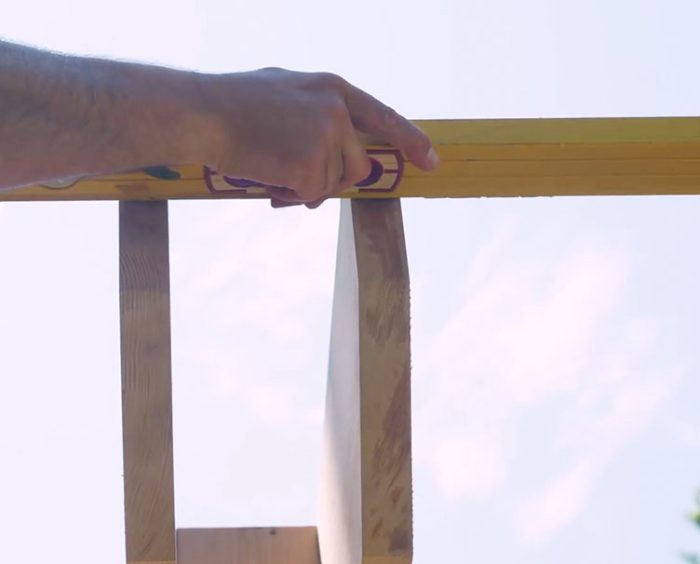
      Now I can remove the temporary clamp. We started with the outer two rafters so we could establish layout lines and fasten them to the post. Now we have fixed points to pull a string line from end to end and run the rest of our field rafters to that line. You’re going to hold that tight, and I’ll walk around and guide the string up, around the middle of the width of the tail—roughly 2¼ in. down. I’m pulling it really tight.

      Now we’ll work together to bring it close to the line and fine-tune it. Can you hit it with a block and a hammer? Little more—good, right there, that’s it. When we install the rafters, we’ll start with the ones that capture the posts. That way, we have enough working room for our shoulders and tools to install the hardware. After that, we can install our field rafters.

      Photo of Jeremy Kassel ensuring the pergola rafters are level and evenly spaced.

      Next, we’re going to infill the field rafters—the independent rafters that fit between the ones housing the 6x6s. We need to make sure they’re evenly spaced. Take the end of your tape on top of the outermost beam. Mark at 20⅛, then mark 1½ in. further for the thickness of the rafter. Repeat this process on the other side. The spacing should be roughly 20⅛. Darken those marks so they’re easier to see. I’ll use the speed square.

      Now we’ll take our ornamental bracket and pre-fasten it to the layout line. When we bring the rafter in, we can bump it right to that bracket, making sure the tall leg is facing up. These ornamental brackets from the Simpson Outdoor Accents line have that same mission detailing, and we’ll connect them with black connector screws. Once the rafter is in place, we’ll capture it on the other side with another piece of hardware.

      Right now, we’re marking layout on top of the beam for our last rafter. This rafter is different because we no longer have an established string line. So we’ll take a long straightedge, line it up on the edge of the rafters we just installed, and work this last rafter to that straightedge.

      RELATED STORIES

      • Marking Angles with a Rafter Square
      • Dummy Rafter Tails
      • What’s the Difference: Trellis, Arbor, and Pergola

      Sign up for eletters today and get the latest how-to from Fine Homebuilding, plus special offers.

      Signing you up...

      This site is protected by reCAPTCHA and the Google Privacy Policy and Terms of Service apply.
      See all newsletters
      See all newsletters
      ×

      Get home building tips, offers, and expert advice in your inbox

      Signing you up...

      This site is protected by reCAPTCHA and the Google Privacy Policy and Terms of Service apply.
      See all newsletters
      See all newsletters

      Videos in the Series

      • Designing a Pergola

        Jeremy Kassel shares how to design and build a pergola step-by-step.

      • How to Lay Out Post Bases for a Pergola

        Learn how to build a strong foundation to make your pergola last longer.

      • Raising and Bracing Pergola Posts

        It's important to prepare pergola posts properly before raising them.

      • Building and Installing Pergola Beams

        Learn how to transform hemlock boards into durable beams for a long-lasting pergola.

      • How to Space and Install Pergola Rafters

        Jeremy Kassel offers expert tips for cutting and spacing rafters for a long-lasting pergola.

      • Angle Bracing for a Pergola

        Angle bracing enhances the visual appeal and durability of a pergola.

      • Finish a Pergola with Strapping

        Jeremy Kassel installs straps over pergola beams for added visual appeal.

      New Feature

      Fine Homebuilding Forums

      Ask questions, offer advice, and share your work

      • X
      • facebook
      • linkedin
      • pinterest
      • email
      • add to favorites Log in or Sign up to save your favorite articles

      About This Video Series

      Sponsored by Simpson Strong-Tie In this video series, Jeremy Kassel of Kassel Construction walks through every step of building a pergola from start to finish. He shares expert tips throughout every phase of the process, including design advice, suggestions for sourcing lumber, guidance on making precision cuts, and more. Start watching now to get expert recommendations that will help you transform any outdoor space with a sturdy and durable pergola. More about this Video Series

      Log in or create an account to post a comment.

      Sign up Log in

      Become a member and get full access to FineHomebuilding.com

      Up Next

      Video Shorts

      Featured Story

      Podcast Episode 685: Patching Drywall, Adding Air Barriers, and Rotted Walls

      Listeners write in about running a profitable contracting business and ask questions about patching drywall, adding air barriers, and fixing a patio poured against the house.

      Featured Video

      Builder’s Advocate: An Interview With Viewrail

      Learn more about affordable, modern floating stairs, from design to manufacturing to installation.

      Related Stories

      • FHB Podcast Segment: Repairing an Old Home While Maintaining Its Integrity
      • Tall Deck on a Sloped Lot
      • Ranch Redux
      • English Arts & Crafts Sensibility at Rumford Hall

      Discussion Forum

      Recent Posts and Replies

      • |
      • |
      • |
      • |
      • |
      • |
      View More Create Post

      Highlights

      Fine Homebuilding All Access
      Fine Homebuilding Podcast
      Tool Tech
      Plus, get an extra 20% off with code GIFT20

      "I have learned so much thanks to the searchable articles on the FHB website. I can confidently say that I expect to be a life-long subscriber." - M.K.

      Get home building tips, offers, and expert advice in your inbox

      Signing you up...

      This site is protected by reCAPTCHA and the Google Privacy Policy and Terms of Service apply.
      See all newsletters
      See all newsletters

      Video

      View All Videos
      • How to Space and Install Pergola Rafters
      • How to Lay Out Post Bases for a Pergola
      • Angle Bracing for a Pergola
      • Raising and Bracing Pergola Posts
      View All

      Outdoor Spaces

      View All Outdoor Spaces Articles
      • Tall Deck on a Sloped Lot
      • Ranch Redux
      • English Arts & Crafts Sensibility at Rumford Hall
      View All Outdoor Spaces Articles

      Fine Homebuilding Magazine

      • Issue 331 - June 2025
        • A More Resilient Roof
        • Tool Test: You Need a Drywall Sander
        • Ducted vs. Ductless Heat Pumps
      • Issue 330 - April/May 2025
        • Deck Details for Durability
        • FAQs on HPWHs
        • 10 Tips for a Long-Lasting Paint Job
      • Issue 329 - Feb/Mar 2025
        • Smart Foundation for a Small Addition
        • A Kominka Comes West
        • Making Small Kitchens Work
      • Issue 328 - Dec/Jan 2024
        • How a Pro Replaces Columns
        • Passive House 3.0
        • Tool Test: Compact Line Lasers
      • Issue 327 - November 2024
        • Repairing Damaged Walls and Ceilings
        • Plumbing Protection
        • Talking Shop

      Fine Home Building

      Newsletter Sign-up

      • Fine Homebuilding

        Home building tips, offers, and expert advice in your inbox.

      • Green Building Advisor

        Building science and energy efficiency advice, plus special offers, in your inbox.

      • Old House Journal

        Repair, renovation, and restoration tips, plus special offers, in your inbox.

      Signing you up...

      This site is protected by reCAPTCHA and the Google Privacy Policy and Terms of Service apply.
      See all newsletters

      Follow

      • Fine Homebuilding

        Dig into cutting-edge approaches and decades of proven solutions with total access to our experts and tradespeople.

        Start Free Trial Now
        • Facebook
        • Instagram
        • X
        • LinkedIn
      • GBA Prime

        Get instant access to the latest developments in green building, research, and reports from the field.

        Start Free Trial Now
        • Facebook
        • YouTube
      • Old House Journal

        Learn how to restore, repair, update, and decorate your home.

        Subscribe Now
        • Facebook
        • Instagram
        • X

      Membership & Magazine

      • Online Archive
      • Start Free Trial
      • Magazine Subscription
      • Magazine Renewal
      • Gift a Subscription
      • Customer Support
      • Privacy Preferences
      • About
      • Contact
      • Advertise
      • Careers
      • Terms of Use
      • Site Map
      • Do not sell or share my information
      • Privacy Policy
      • Accessibility
      • California Privacy Rights

      © 2025 Active Interest Media. All rights reserved.

      Fine Homebuilding receives a commission for items purchased through links on this site, including Amazon Associates and other affiliate advertising programs.

      • Home Group
      • Antique Trader
      • Arts & Crafts Homes
      • Bank Note Reporter
      • Cabin Life
      • Cuisine at Home
      • Fine Gardening
      • Fine Woodworking
      • Green Building Advisor
      • Garden Gate
      • Horticulture
      • Keep Craft Alive
      • Log Home Living
      • Military Trader/Vehicles
      • Numismatic News
      • Numismaster
      • Old Cars Weekly
      • Old House Journal
      • Period Homes
      • Popular Woodworking
      • Script
      • ShopNotes
      • Sports Collectors Digest
      • Threads
      • Timber Home Living
      • Traditional Building
      • Woodsmith
      • World Coin News
      • Writer's Digest
      Active Interest Media logo
      X
      X
      This is a dialog window which overlays the main content of the page. The modal window is a 'site map' of the most critical areas of the site. Pressing the Escape (ESC) button will close the modal and bring you back to where you were on the page.

      Main Menu

      • How-To
      • Design
      • Tools & Materials
      • Video
      • Blogs
      • Forum
      • Project Guides
      • Reader Projects
      • Magazine
      • Members
      • FHB House

      Podcasts

      • FHB Podcast
      • ProTalk

      Webinars

      • Upcoming and On-Demand

      Podcasts

      • FHB Podcast
      • ProTalk

      Webinars

      • Upcoming and On-Demand

      Popular Topics

      • Kitchens
      • Business
      • Bedrooms
      • Roofs
      • Architecture and Design
      • Green Building
      • Decks
      • Framing
      • Safety
      • Remodeling
      • Bathrooms
      • Windows
      • Tilework
      • Ceilings
      • HVAC

      Magazine

      • Current Issue
      • Past Issues
      • Magazine Index
      • Subscribe
      • Online Archive
      • Author Guidelines

      All Access

      • Member Home
      • Start Free Trial
      • Gift Membership

      Online Learning

      • Courses
      • Project Guides
      • Reader Projects
      • Podcast

      More

      • FHB Ambassadors
      • FHB House
      • Customer Support

      Account

      • Log In
      • Join

      Newsletter

      Get home building tips, offers, and expert advice in your inbox

      Signing you up...

      This site is protected by reCAPTCHA and the Google Privacy Policy and Terms of Service apply.
      See all newsletters
      See all newsletters

      Follow

      • X
      • YouTube
      • instagram
      • facebook
      • pinterest
      • Tiktok

      Join All Access

      Become a member and get instant access to thousands of videos, how-tos, tool reviews, and design features.

      Start Your Free Trial

      Subscribe

      FHB Magazine

      Start your subscription today and save up to 70%

      Subscribe

      Enjoy unlimited access to Fine Homebuilding. Join Now

      Already a member? Log in

      We hope you’ve enjoyed your free articles. To keep reading, become a member today.

      Get complete site access to expert advice, how-to videos, Code Check, and more, plus the print magazine.

      Start your FREE trial

      Already a member? Log in

      Privacy Policy Update

      We use cookies, pixels, script and other tracking technologies to analyze and improve our service, to improve and personalize content, and for advertising to you. We also share information about your use of our site with third-party social media, advertising and analytics partners. You can view our Privacy Policy here and our Terms of Use here.

      Cookies

      Analytics

      These cookies help us track site metrics to improve our sites and provide a better user experience.

      Advertising/Social Media

      These cookies are used to serve advertisements aligned with your interests.

      Essential

      These cookies are required to provide basic functions like page navigation and access to secure areas of the website.

      Delete My Data

      Delete all cookies and associated data