FHB Logo Facebook LinkedIn Email Pinterest Twitter X Instagram Tiktok YouTube Plus Icon Close Icon Navigation Search Icon Navigation Search Icon Arrow Down Icon Video Guide Icon Article Guide Icon Modal Close Icon Guide Search Icon Skip to content
Subscribe
Log In
  • How-To
  • Design
  • Tools & Materials
  • Restoration
  • Videos
  • Blogs
  • Forum
  • Magazine
  • Members
  • FHB House
  • Podcast
Log In

Fine Homebuilding Project Guides

Windows & Doors

Guide Home
  • Choosing Windows
  • Installing Windows In New Walls
  • Retrofitting Windows
  • Window Repairs
  • Door Basics
  • Interior Doors
  • Exterior Doors
How-To

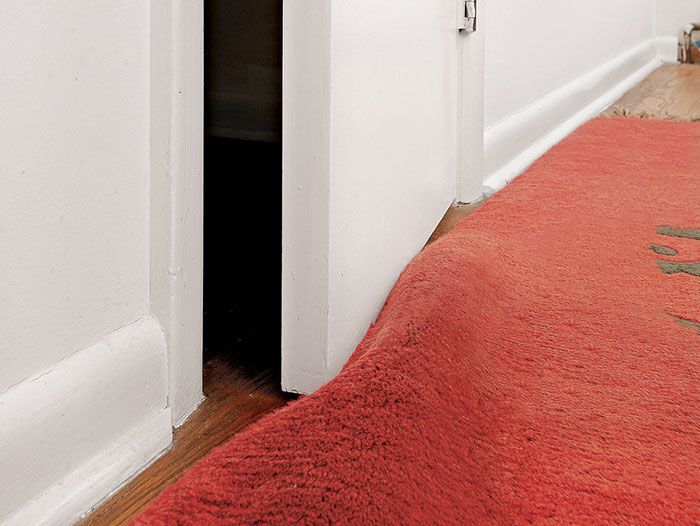
How to Trim the Bottom of a Door

When you need to cut the bottom of a door, use a straightedge, a circular saw, and these tips for an accurate and clean job.

By John Ross Issue 185
  • X
  • facebook
  • linkedin
  • pinterest
  • email
  • add to favorites Log in or Sign up to save your favorite articles

Do you know the difference between “hanging a door” and “installing a door?” Though these terms often are used interchangeably, today, there is a distinction. Before the rise of prehung doors, carpenters used to install the door frame, and then “hang” the door within the frame. The skill set to hang a door included, trimming and beveling the door, mortising hinges, and installing passage sets, lock sets, and deadbolts, among other things. Today, it’s more common to just “install” prehung doors. Still, there are lots of reasons why you may need to trim a door, reasons that often pop up during remodeling projects.

The necessity of trimming a door goes along with remodeling projects where the floor rises because of added carpeting, new tile, or extra layers of subflooring (or in my case, whenever my penchant for area rugs gets the best of me). As someone who has remodeled other people’s homes as well as my own, I have tackled this project over and over. To trim a door problem-free, I call on the same skills I use for other finish-carpentry projects, such as built-ins, wainscoting, and countertops.

Although you can use straight-edge guides, track saws, and zero-clearance throat plates to cut finished work, I use a 4-ft. level clamped to the door and a thin-kerf blade in my circular saw for a task like this. I also use a utility knife to score the door and some masking tape to protect the surface of the door. Finally, I need a gauge block, which I usually make from a piece of thin plywood. Here’s a step-by-step look at my process for trimming a door bottom:

Step 1: Mark the door for the cut. At the bottom of the door, I put a piece of tape on both the hinge side and the strike side (the side with no hinges). I place the rug against the closed door and mark both pieces of tape 1/4 in. above the rug using a scribing compass. If you were preparing to install tile or another type of flooring, you could lay down a piece of the material in front of the door to make your marks. If it is tile, remember to account for the thickness of the thinset.
Mark and score where you'll cut the door


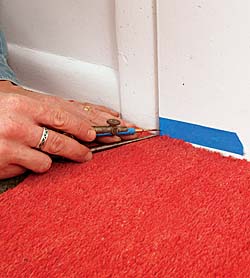
Step 2: Draw the cutline. With the door taken off of the hinges and set on sawhorses, I connect the two marks with tape, then use the level to draw a straight line between them. Draw the cutline


Score the cut to prevent tearout
Tape and score the end of the door where the circularsaw blade will exit


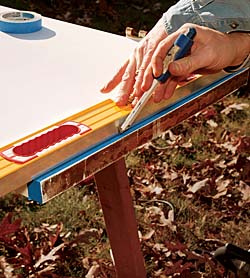
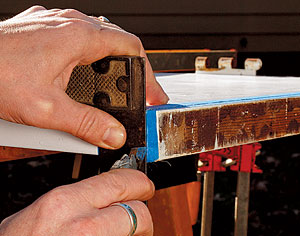
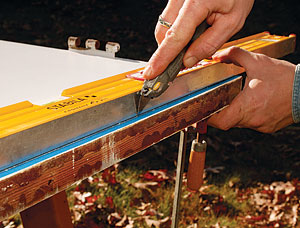
Step 3: Score the cut to prevent tearout. Clamped to the door, the level works well as a guide while I make several shallow passes with a utility knife to score the cutline. As an extra precaution, I tape and score the end of the door where the saw’s blade will exit.


Make a gauge block 
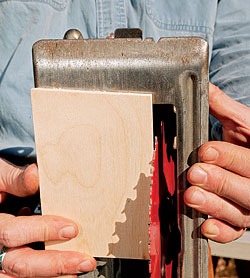
Step 4: Make a gauge block. This scrap of wood is cut at the exact distance from the edge of the blade to the edge of the saw’s baseplate.
Use the gauge block to set the level back from the cutline
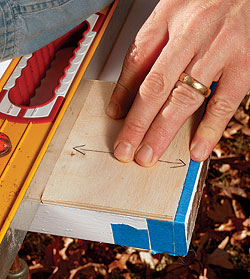
Step 5: Use the gauge block to set the level back from the cutline. The block should just cover the scored line. The level is secured to the door with two clamps.


Step 6: Tape the door, not the saw. To avoid marring the door, I put down two layers of tape next to the level. I tape the work because it’s faster than taping the bottom of the saw and because it’s easier to clean up.
To avoid marring the door, put down two layers of tape next to the level
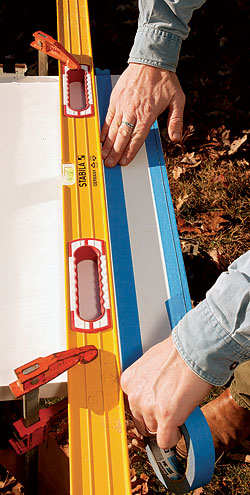
Step 7: Make the cut. I set the cutting depth so that the blade just cuts through the door and focus on the baseplate when making the cut. The baseplate edge stays in contact with the level while the bottom runs flat on the door. To prevent the blade guard from dragging on the door, I hold it retracted during the cut. Cutting the door


Ease the edge using a small block plane
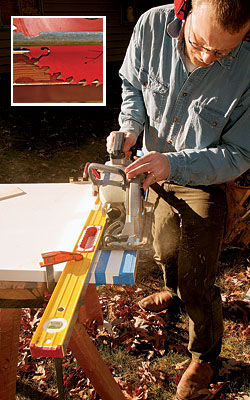
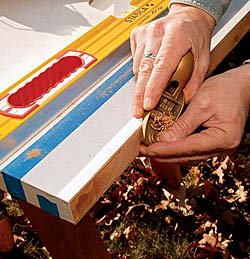
Step 8: Ease the edge. To prevent the bottom of the door from splintering over time, I ease the edge using a small block plane. Some 80-grit sandpaper wrapped around a sanding block works just as well.
The trimmed door clears the rug easily and doesn’t look awkward
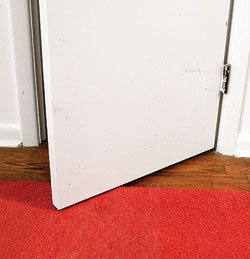
Step 9: The payoff. Hang the door back on the hinges, The trimmed door should clear the rug easily and operate smoothly.

The right blade for a clean cut

For general finish work, I use a sharp thin-kerf blade in my circular saw. It removes less material, so it’s easier on the saw. I’ve had good results with Freud’s Diablo 24-tooth framing blade (D0724X), which costs about $10 (www.freudtools.com). Although you can buy pricier finish-cutting blades with more carbide-tipped teeth, this framing blade delivers smooth cuts and doesn’t overwork the saw.

Freud’s Diablo 24-tooth framing blade (D0724X)

Photo: Courtesy of Freud

Photos by: Charles Bickford, except where noted

Previous: Cutting a Door Next: How to Trim a Hollow-Core Door to Height

Guide

Windows & Doors

Chapter

Door Basics

Sign up for eletters today and get the latest how-to from Fine Homebuilding, plus special offers.

Signing you up...

This site is protected by reCAPTCHA and the Google Privacy Policy and Terms of Service apply.
See all newsletters
See all newsletters

View Comments

  1. saundersdixon | May 30, 2017 10:06pm | #1

    just buy a festool tracksaw. it seems expensive before you buy it, but you can trim that door with no tape, no level, no clamps, no need to draw the cut line. mark the end points, lay down the track, make the cut. done. you will use this thing for the rest of your career. it is expensive on the day you buy it, and worth it, every day after that.

  2. CohoHandyman | Aug 06, 2017 05:37am | #2

    Seal the cut edge with some primer after cutting to keep moisture out. I keep a small can of 123 water based primer and a bunch of chip brushes in truck. Just be sure to let it dry before fitting, especially with carpet.

  3. ct_yankee | Jul 13, 2024 10:30pm | #3

    Keep in mind that today's cheap hollow core doors have little wood at the bottom. I trimmed ~1" off a bathroom door and found nothing left reinforcing the skins at the door's bottom.

Log in or create an account to post a comment.

Sign up Log in

Become a member and get full access to FineHomebuilding.com

Windows & Doors

Windows & Doors

Trusted, comprehensive guidance from the pros for choosing, installing, replacing, and repairing windows and doors on any house

View Project Guide

View All Project Guides »

Become a member and get unlimited site access, including the Windows & Doors Project Guide.

Start Free Trial

Choosing Windows
  • Window Types
  • Design and Materials
  • Energy-Efficient Windows
Installing Windows In New Walls
  • Installation, Start to Finish
  • Head Flashing for Windows
  • Video Series: Nail-Fin Window over Zip System Sheathing
  • Video Series: Nail-Fin Window over Exterior Rigid-Foam Insulation
  • Video Series: Nail-Fin Window over Housewrap
  • Video Series: Nail-Fin Window over Peel-and-Stick Housewrap
  • Video Series: Nail-Fin Window over a Fluid-Applied WRB
  • Video Series: Weatherproof Window Installation
Retrofitting Windows
  • Removing the Old, Installing the New
  • Video Series: How to Replace a Window
  • Video Series: Install a Full-Frame Replacement Window in a Brick Wall
  • Video Series: Install an Insert Replacement Window in a Brick Wall
  • Video Series: Retrofit a Flanged Window
Window Repairs
  • Restoring Old Windows
  • Repairs and Upgrades
Door Basics
  • Tools & Jigs for Door Hanging
  • How to Install Doors
  • Hinges
  • Handles, Knobs, and Locksets
  • Fixing Door Problems
Interior Doors
  • Prehung Doors
  • Pocket Doors
  • Other Types of Doors
  • Custom-Built Doors
Exterior Doors
  • Door Choices and Design
  • Installing Entry Doors
  • Building Exterior Doors
  • Installing French Doors
  • Replacing a Door
  • Adding Weatherstripping and Sweeps

Fine Home Building

Newsletter Sign-up

  • Fine Homebuilding

    Home building tips, offers, and expert advice in your inbox.

  • Green Building Advisor

    Building science and energy efficiency advice, plus special offers, in your inbox.

  • Old House Journal

    Repair, renovation, and restoration tips, plus special offers, in your inbox.

Signing you up...

This site is protected by reCAPTCHA and the Google Privacy Policy and Terms of Service apply.
See all newsletters

Follow

  • Fine Homebuilding

    Dig into cutting-edge approaches and decades of proven solutions with total access to our experts and tradespeople.

    Start Free Trial Now
    • Facebook
    • Instagram
    • X
    • LinkedIn
  • GBA Prime

    Get instant access to the latest developments in green building, research, and reports from the field.

    Start Free Trial Now
    • Facebook
    • YouTube
  • Old House Journal

    Learn how to restore, repair, update, and decorate your home.

    Subscribe Now
    • Facebook
    • Instagram
    • X

Membership & Magazine

  • Online Archive
  • Start Free Trial
  • Magazine Subscription
  • Magazine Renewal
  • Gift a Subscription
  • Customer Support
  • Privacy Preferences
  • About
  • Contact
  • Advertise
  • Careers
  • Terms of Use
  • Site Map
  • Do not sell or share my information
  • Privacy Policy
  • Accessibility
  • California Privacy Rights

© 2025 Active Interest Media. All rights reserved.

Fine Homebuilding receives a commission for items purchased through links on this site, including Amazon Associates and other affiliate advertising programs.

  • Home Group
  • Antique Trader
  • Arts & Crafts Homes
  • Bank Note Reporter
  • Cabin Life
  • Cuisine at Home
  • Fine Gardening
  • Fine Woodworking
  • Green Building Advisor
  • Garden Gate
  • Horticulture
  • Keep Craft Alive
  • Log Home Living
  • Military Trader/Vehicles
  • Numismatic News
  • Numismaster
  • Old Cars Weekly
  • Old House Journal
  • Period Homes
  • Popular Woodworking
  • Script
  • ShopNotes
  • Sports Collectors Digest
  • Threads
  • Timber Home Living
  • Traditional Building
  • Woodsmith
  • World Coin News
  • Writer's Digest
Active Interest Media logo
X
X
This is a dialog window which overlays the main content of the page. The modal window is a 'site map' of the most critical areas of the site. Pressing the Escape (ESC) button will close the modal and bring you back to where you were on the page.

Main Menu

  • How-To
  • Design
  • Tools & Materials
  • Video
  • Blogs
  • Forum
  • Project Guides
  • Reader Projects
  • Magazine
  • Members
  • FHB House

Podcasts

  • FHB Podcast
  • ProTalk

Webinars

  • Upcoming and On-Demand

Podcasts

  • FHB Podcast
  • ProTalk

Webinars

  • Upcoming and On-Demand

Popular Topics

  • Kitchens
  • Business
  • Bedrooms
  • Roofs
  • Architecture and Design
  • Green Building
  • Decks
  • Framing
  • Safety
  • Remodeling
  • Bathrooms
  • Windows
  • Tilework
  • Ceilings
  • HVAC

Magazine

  • Current Issue
  • Past Issues
  • Magazine Index
  • Subscribe
  • Online Archive
  • Author Guidelines

All Access

  • Member Home
  • Start Free Trial
  • Gift Membership

Online Learning

  • Courses
  • Project Guides
  • Reader Projects
  • Podcast

More

  • FHB Ambassadors
  • FHB House
  • Customer Support

Account

  • Log In
  • Join

Newsletter

Get home building tips, offers, and expert advice in your inbox

Signing you up...

This site is protected by reCAPTCHA and the Google Privacy Policy and Terms of Service apply.
See all newsletters
See all newsletters

Follow

  • X
  • YouTube
  • instagram
  • facebook
  • pinterest
  • Tiktok

Join All Access

Become a member and get instant access to thousands of videos, how-tos, tool reviews, and design features.

Start Your Free Trial

Subscribe

FHB Magazine

Start your subscription today and save up to 70%

Subscribe

You have 1 free article remaining.

Get complete site access, including thousands of videos, how-to tips, tool reviews, and design features.

Start your FREE trial

Already a member? Log in

We hope you’ve enjoyed your free articles. To keep reading, become a member today.

Get complete site access to expert advice, how-to videos, Code Check, and more, plus the print magazine.

Start your FREE trial

Already a member? Log in

Privacy Policy Update

We use cookies, pixels, script and other tracking technologies to analyze and improve our service, to improve and personalize content, and for advertising to you. We also share information about your use of our site with third-party social media, advertising and analytics partners. You can view our Privacy Policy here and our Terms of Use here.

Cookies

Analytics

These cookies help us track site metrics to improve our sites and provide a better user experience.

Advertising/Social Media

These cookies are used to serve advertisements aligned with your interests.

Essential

These cookies are required to provide basic functions like page navigation and access to secure areas of the website.

Delete My Data

Delete all cookies and associated data