FHB Logo Facebook LinkedIn Email Pinterest Twitter X Instagram Tiktok YouTube Plus Icon Close Icon Navigation Search Icon Navigation Search Icon Arrow Down Icon Video Guide Icon Article Guide Icon Modal Close Icon Guide Search Icon Skip to content
Subscribe
Log In
  • How-To
  • Design
  • Tools & Materials
  • Restoration
  • Videos
  • Blogs
  • Forum
  • Magazine
  • Members
  • FHB House
  • Podcast
Log In
How-To

How to Hang Drywall

A good finished look starts with properly hung panels, which reduces the work of taping, mudding, and sanding

By Myron R. Ferguson Issue 196
  • X
  • facebook
  • linkedin
  • pinterest
  • email
  • add to favorites Log in or Sign up to save your favorite articles
Video Player is loading.
Current Time 0:00
/
Duration 0:00
Loaded: 0%
Stream Type LIVE
Remaining Time -0:00
 
1x
    • Chapters
    • descriptions off, selected
    • captions settings, opens captions settings dialog
    • captions off, selected

      This is a modal window.

      Beginning of dialog window. Escape will cancel and close the window.

      Text
      Background
      Window
      Font Size
      Text Edge Style
      Font Family

      End of dialog window.

      This is a modal window. This modal can be closed by pressing the Escape key or activating the close button.

      This is a modal window. This modal can be closed by pressing the Escape key or activating the close button.

      I love working with drywall. That’s not normally the sentiment you hear because, let’s face it, hanging drywall is hard, dusty work. But there are ways to make it easier.

      A good finished look starts with properly hung panels, which reduces the work of taping, mudding, and sanding. I try to use the biggest sheets possible to limit the number of seams I have to cover. If I’m working by myself, I can use 4-ft. by 12-ft. sheets. When I have a helper, I use 16-ft.-long sheets, if they are available at the supply store.

      After I finish hanging the ceiling in a room (see Handling Big Sheets of Drywall from Fine Homebuilding issue #106), I hang the walls. I start where I can hang a full sheet without cutting it. Then I move to abutting walls where smaller pieces are required. This method limits the number of seams, which saves time and reduces waste. If my fastener misses a stud and finds nothing but air while I’m securing a sheet, I remove the fastener right then so there is no chance it will create a blemish on the finished wall.

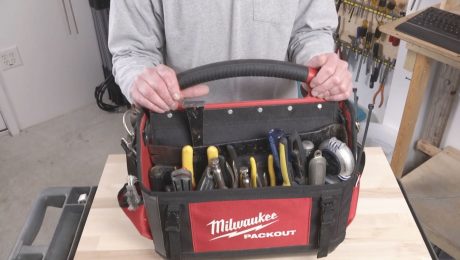
      Even if you are hanging just a few sheets, invest in a heavy-duty T-square to guide your cuts and a stiff-bladed keyhole saw to cut holes for outlet boxes and plumbing penetrations. Also, I use a fixed-blade utility knife called the Rasp-N-Knife that has a useful rasp built into the handle (www.warnertool.com).

      Hang from the top down

      (Upper Sheet)
      Mark the studs before you lift.
      Position the drywall directly below where it will be installed. With a builder’s crayon or pencil, mark each stud’s location 7 in. down from the top edge.

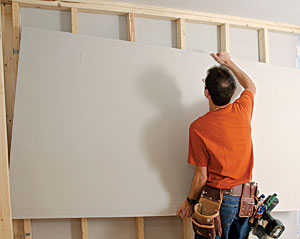
      Raise the top sheet into place. I use my left hand to lift and my right hand to stabilize. This way, my free hand can grab the cordless screwdriver when the sheet is in place.

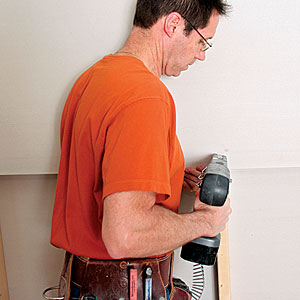
      The crucial moment. When working alone, lifting and fastening a sheet at the same time can be awkward. I hold up the sheet with my left hand and brace it with my shoulder while I drive the first screw.

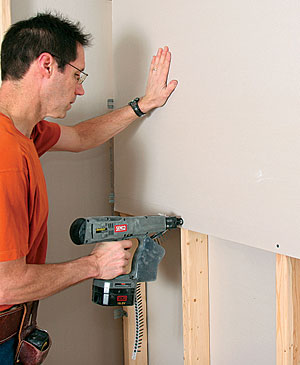
      Secure from the center out. I drive the bottom center screw first and then move out, first along the bottom edge, then up each stud at 16 in. on center. I use 11/4-in. fasteners for drywall thicknesses of 5/8 in. or less.

      Tip: Avoid problems later. Most settling happens where the top plate meets the studs. To prevent cracks and fastener pops, I start my screw pattern 7 in. down from the top edge.
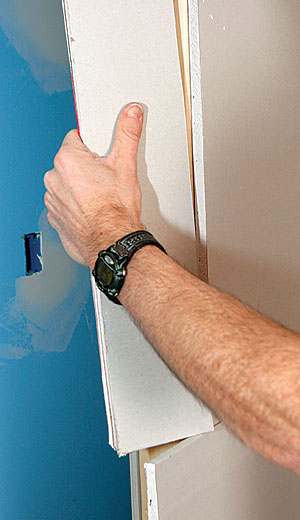
      (Lower Sheet)
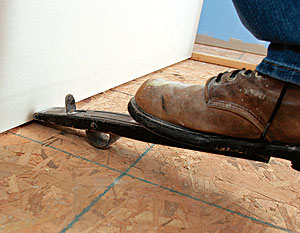
      Lift the lower panel into place.
      I lever the lower panel up against the upper panel’s bottom edge with a drywall-lifting tool (www.hydetools.com).

      Driving Solo

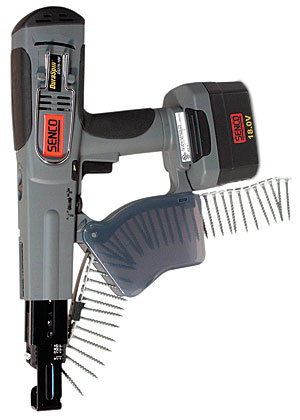
      Courtesy of Senco Products

      I used to hang drywall by lifting the sheet and securing the perimeter with nails. Then, to secure the field, I had two free hands: one to hold the screw and one to hold the driver. Of course, I needed a third hand to manage the cord.

      That all changed when I bought a cordless driver with collated fasteners. Senco’s 18v DuraSpin driver (www.senco.com) hangs on my belt within easy reach. It weighs about the same as a corded driver, but it doesn’t have a cord to contend with.

      As on my corded driver, the internal clutch releases before the screw is overdriven and can break the drywall board’s surface. The best feature is the collated strip of fasteners that enables me to drive screws with one hand while my other hand holds or braces the drywall. The strip holds enough 11/4-in. screws to secure one sheet.

      The DuraSpin costs $260 and also comes in a 14v model.

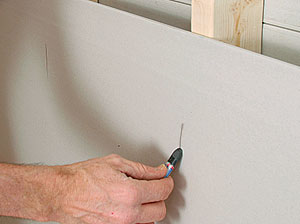
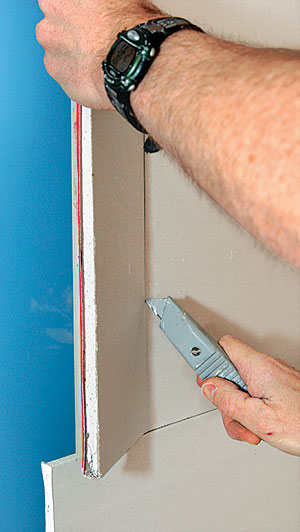
      Use a T-square to cut a full sheet

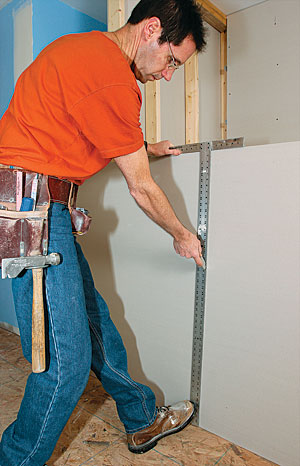
      Hold the T-square in place while you cut. Make the cut in the panel’s good side. For safety, keep your top hand well off to the side and out of the path of the cutting blade. I use my foot to keep the bottom of the T-square in place. I start at the bottom and make the score in one motion.

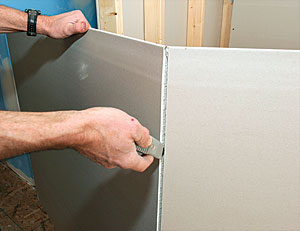
      Finish the cut. I snap the board by lifting the center and pulling the board toward me. Then I insert my utility knife in the break and cut the paper on the back.

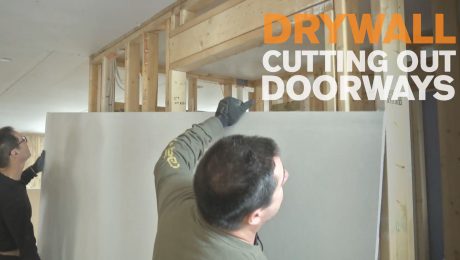
      Cut the drywall in place to save time

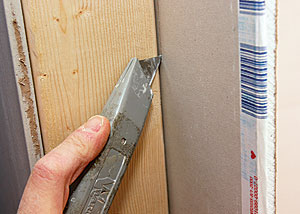
      Score the back first. If there is scrap left in door and window openings, score the back of the sheet flush with the opening. Then break the scrap to the inside.

      Work from the smooth side to complete the cut. With the scrap pulled toward me to create a crease, I score the paper the full length. To ensure a clean edge, I push the scrap away from me to break the paper.

      Photos by: John Ross, except where noted.

      For information on finishing drywall, check out these two articles.

      How to Finish Drywall and Not Make a Total Mess

      Flawless Drywall Finish (excerpt below for nonmembers)

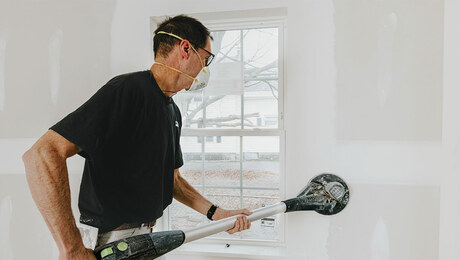
      If your drywall is to be wallpapered, textured, or painted with flat paint, a Level 4 finish is perfectly acceptable. But at this level of finish, any joints and imperfections can show when they’re under a coat of glossy paint or flooded with bright light.

      Another problem with a Level 4 finish occurs when sanding: The compound becomes smooth, but the drywall’s paper facing gets rough. If that weren’t enough, there are areas of the drywall that don’t get sanded, so every sheet ends up with three different textures and porosities. Each reflects light differently, which produces an inconsistent wall surface.

      You can solve these problems by moving up to a Level 5 finish, which the Gypsum Association recommends for areas with severe lighting or glossy paint. A Level 5 finish has an additional skim coat of compound spread over the entire wall to give the wall a uniform surface and to make joints disappear.

      There are several ways to get to a Level 5 finish, but perhaps the simplest is to skimcoat over a Level 4 finish with watered-down joint compound. The compound can be applied either by trowel or with a 1⁄2-in.-nap paint roller. The compound is then immediately removed with a wide knife.

      There are also primer surfacers made by several drywall and paint companies. These superthick coatings are applied in a single heavy layer (typically 15 mils to 20 mils wet) over a sanded Level 4 finish.

      These primer surfacers offer both a Level 5 finish and a primed, ready-for-paint surface. While a product like USG’s Sheetrock Tuff- Hide (www.usg.com) is more expensive than conventional primer, it costs less than a handapplied Level 5 finish and one coat of primer.

      Sign up for eletters today and get the latest how-to from Fine Homebuilding, plus special offers.

      Signing you up...

      This site is protected by reCAPTCHA and the Google Privacy Policy and Terms of Service apply.
      See all newsletters
      See all newsletters
      ×

      Get home building tips, offers, and expert advice in your inbox

      Signing you up...

      This site is protected by reCAPTCHA and the Google Privacy Policy and Terms of Service apply.
      See all newsletters
      See all newsletters

      New Feature

      Fine Homebuilding Forums

      Ask questions, offer advice, and share your work

      • X
      • facebook
      • linkedin
      • pinterest
      • email
      • add to favorites Log in or Sign up to save your favorite articles

      View Comments

      1. home craftsman | Nov 07, 2017 08:24pm | #1

        Just to let people know, my local CT. inspector tells me in no uncertain terms that walls must be back nailed or screwed every 12". He actually made me go back and add more when I had used less. Who knew???

      Log in or create an account to post a comment.

      Sign up Log in

      Become a member and get full access to FineHomebuilding.com

      Up Next

      Video Shorts

      Featured Story

      Podcast Episode 685: Patching Drywall, Adding Air Barriers, and Rotted Walls

      Listeners write in about running a profitable contracting business and ask questions about patching drywall, adding air barriers, and fixing a patio poured against the house.

      Featured Video

      SawStop's Portable Tablesaw is Bigger and Better Than Before

      The 10-in. Jobsite Saw PRO has a wider table, a new dust-control port, and a more versatile fence, along with the same reliable safety mechanism included in all SawStop tablesaws.

      Related Stories

      • FHB Podcast Segment: Patching Drywall Near a Shower
      • An Easier Method for Mitered Head Casings
      • A Practical Approach to Exterior Insulation
      • Making and Installing Wood Wall Paneling

      Discussion Forum

      Recent Posts and Replies

      • |
      • |
      • |
      • |
      • |
      • |
      View More Create Post

      Highlights

      Fine Homebuilding All Access
      Fine Homebuilding Podcast
      Tool Tech
      Plus, get an extra 20% off with code GIFT20

      Video

      View All Videos
      • Podcast 454: PRO TALK With Greg Palese of Klein Tools
      • Angle Your Drywall Knife for Best Results
      • Must-Have Hand Tools for a Remodeler's Kit
      • Cutting Out Drywall for Doorways
      View All

      Interior Wall Finish

      View All Interior Wall Finish Articles
      • A Decorated Interior Endures
      • Fastening Outside Corner Bead
      • Finishing Drywall With Seamless Results
      View All Interior Wall Finish Articles

      Fine Homebuilding Magazine

      • Issue 331 - June 2025
        • A More Resilient Roof
        • Tool Test: You Need a Drywall Sander
        • Ducted vs. Ductless Heat Pumps
      • Issue 330 - April/May 2025
        • Deck Details for Durability
        • FAQs on HPWHs
        • 10 Tips for a Long-Lasting Paint Job
      • Issue 329 - Feb/Mar 2025
        • Smart Foundation for a Small Addition
        • A Kominka Comes West
        • Making Small Kitchens Work
      • Issue 328 - Dec/Jan 2024
        • How a Pro Replaces Columns
        • Passive House 3.0
        • Tool Test: Compact Line Lasers
      • Issue 327 - November 2024
        • Repairing Damaged Walls and Ceilings
        • Plumbing Protection
        • Talking Shop

      Fine Home Building

      Newsletter Sign-up

      • Fine Homebuilding

        Home building tips, offers, and expert advice in your inbox.

      • Green Building Advisor

        Building science and energy efficiency advice, plus special offers, in your inbox.

      • Old House Journal

        Repair, renovation, and restoration tips, plus special offers, in your inbox.

      Signing you up...

      This site is protected by reCAPTCHA and the Google Privacy Policy and Terms of Service apply.
      See all newsletters

      Follow

      • Fine Homebuilding

        Dig into cutting-edge approaches and decades of proven solutions with total access to our experts and tradespeople.

        Start Free Trial Now
        • Facebook
        • Instagram
        • X
        • LinkedIn
      • GBA Prime

        Get instant access to the latest developments in green building, research, and reports from the field.

        Start Free Trial Now
        • Facebook
        • YouTube
      • Old House Journal

        Learn how to restore, repair, update, and decorate your home.

        Subscribe Now
        • Facebook
        • Instagram
        • X

      Membership & Magazine

      • Online Archive
      • Start Free Trial
      • Magazine Subscription
      • Magazine Renewal
      • Gift a Subscription
      • Customer Support
      • Privacy Preferences
      • About
      • Contact
      • Advertise
      • Careers
      • Terms of Use
      • Site Map
      • Do not sell or share my information
      • Privacy Policy
      • Accessibility
      • California Privacy Rights

      © 2025 Active Interest Media. All rights reserved.

      Fine Homebuilding receives a commission for items purchased through links on this site, including Amazon Associates and other affiliate advertising programs.

      • Home Group
      • Antique Trader
      • Arts & Crafts Homes
      • Bank Note Reporter
      • Cabin Life
      • Cuisine at Home
      • Fine Gardening
      • Fine Woodworking
      • Green Building Advisor
      • Garden Gate
      • Horticulture
      • Keep Craft Alive
      • Log Home Living
      • Military Trader/Vehicles
      • Numismatic News
      • Numismaster
      • Old Cars Weekly
      • Old House Journal
      • Period Homes
      • Popular Woodworking
      • Script
      • ShopNotes
      • Sports Collectors Digest
      • Threads
      • Timber Home Living
      • Traditional Building
      • Woodsmith
      • World Coin News
      • Writer's Digest
      Active Interest Media logo
      X
      X
      This is a dialog window which overlays the main content of the page. The modal window is a 'site map' of the most critical areas of the site. Pressing the Escape (ESC) button will close the modal and bring you back to where you were on the page.

      Main Menu

      • How-To
      • Design
      • Tools & Materials
      • Video
      • Blogs
      • Forum
      • Project Guides
      • Reader Projects
      • Magazine
      • Members
      • FHB House

      Podcasts

      • FHB Podcast
      • ProTalk

      Webinars

      • Upcoming and On-Demand

      Podcasts

      • FHB Podcast
      • ProTalk

      Webinars

      • Upcoming and On-Demand

      Popular Topics

      • Kitchens
      • Business
      • Bedrooms
      • Roofs
      • Architecture and Design
      • Green Building
      • Decks
      • Framing
      • Safety
      • Remodeling
      • Bathrooms
      • Windows
      • Tilework
      • Ceilings
      • HVAC

      Magazine

      • Current Issue
      • Past Issues
      • Magazine Index
      • Subscribe
      • Online Archive
      • Author Guidelines

      All Access

      • Member Home
      • Start Free Trial
      • Gift Membership

      Online Learning

      • Courses
      • Project Guides
      • Reader Projects
      • Podcast

      More

      • FHB Ambassadors
      • FHB House
      • Customer Support

      Account

      • Log In
      • Join

      Newsletter

      Get home building tips, offers, and expert advice in your inbox

      Signing you up...

      This site is protected by reCAPTCHA and the Google Privacy Policy and Terms of Service apply.
      See all newsletters
      See all newsletters

      Follow

      • X
      • YouTube
      • instagram
      • facebook
      • pinterest
      • Tiktok

      Join All Access

      Become a member and get instant access to thousands of videos, how-tos, tool reviews, and design features.

      Start Your Free Trial

      Subscribe

      FHB Magazine

      Start your subscription today and save up to 70%

      Subscribe

      We hope you’ve enjoyed your free articles. To keep reading, become a member today.

      Get complete site access to expert advice, how-to videos, Code Check, and more, plus the print magazine.

      Start your FREE trial

      Already a member? Log in

      Privacy Policy Update

      We use cookies, pixels, script and other tracking technologies to analyze and improve our service, to improve and personalize content, and for advertising to you. We also share information about your use of our site with third-party social media, advertising and analytics partners. You can view our Privacy Policy here and our Terms of Use here.

      Cookies

      Analytics

      These cookies help us track site metrics to improve our sites and provide a better user experience.

      Advertising/Social Media

      These cookies are used to serve advertisements aligned with your interests.

      Essential

      These cookies are required to provide basic functions like page navigation and access to secure areas of the website.

      Delete My Data

      Delete all cookies and associated data