FHB Logo Facebook LinkedIn Email Pinterest Twitter X Instagram Tiktok YouTube Plus Icon Close Icon Navigation Search Icon Navigation Search Icon Arrow Down Icon Video Guide Icon Article Guide Icon Modal Close Icon Guide Search Icon Skip to content
Subscribe
Log In
  • How-To
  • Design
  • Tools & Materials
  • Restoration
  • Videos
  • Blogs
  • Forum
  • Magazine
  • Members
  • FHB House
  • Podcast
Log In

Fine Homebuilding Project Guides

Framing

Guide Home
  • Introduction to Framing
  • Framing Tools, Techniques, and Materials
  • Framing Floors
  • Framing Walls
  • Framing Stairs
  • Framing Roofs
  • Efficient Framing Methods
  • Timber Framing
Building Skills

Frame a Door Rough Opening

A pro carpenter teaches you his 3 simple rules for framing door rough openings efficiently.

By Scott Grice Issue 201
  • X
  • facebook
  • linkedin
  • pinterest
  • email
  • add to favorites Log in or Sign up to save your favorite articles

If you can cut a 2×4 and drive a nail, then you have all the skills you need to frame door rough openings. As with most home-building tasks, however, there’s a fine line between getting it done and doing it efficiently, without causing headaches down the line.

This process works for any project

Whether framing for a door in a new home or on a remodeling project, I follow the same sequence. I always frame rough openings before I install the surrounding studs. This gives me plenty of room to nail the trimmers to the king studs and the king studs to the header. If the wall is load-bearing, I refer to the plans for the proper header size. If not, a 2×4 on the flat replaces the header. In this case, the plans called for a double 2×8 header. I added a 1/2-in. piece of plywood between the 2x8s so that the header width matches the 2×4 stud thickness.

Frame-a-door-rough-opening-drawing


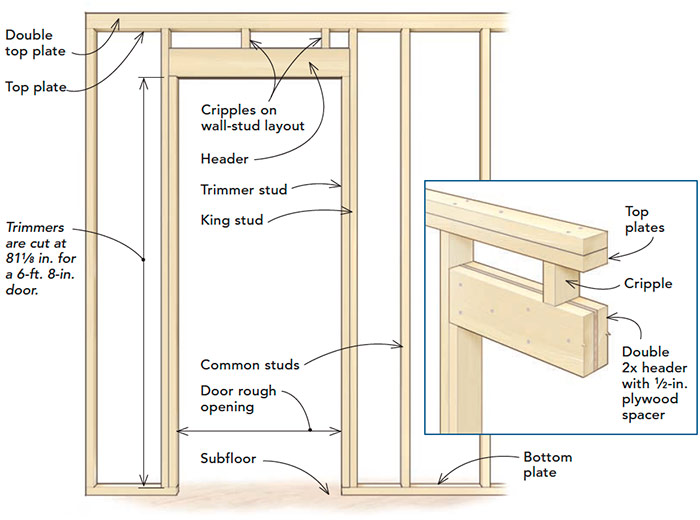
Most new doors are 6 ft. 8 in. tall. Add 3/4 in. for the jamb, 3/4 in. for finish flooring, 3/8 in. for underlayment, and 3/4 in. for wiggle room at the top of the door, and the top of the trimmer (the bottom of the header) needs to be 82 5/8 in. above the subfloor. This height can vary slightly in a remodeling project depending on what’s happening with the existing floors. Door widths vary, but an easy way to size the rough opening is to use the door width plus 5 in. as the distance between the king studs.

There are three simple rules to framing rough openings efficiently: Minimize layout marks; maintain a simple, consistent nailing pattern; and avoid toenailing when possible.

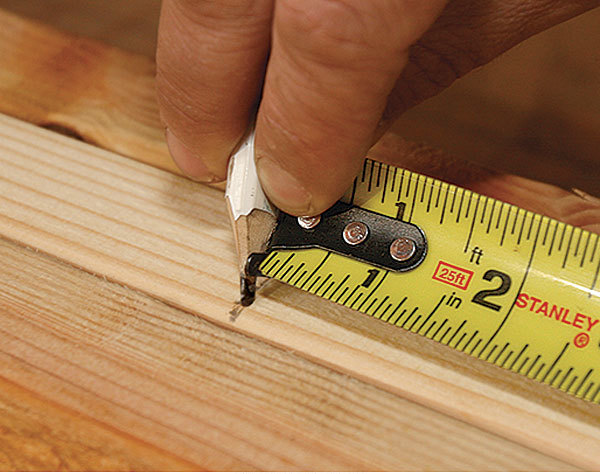
1. Mark all the plates at once


Measure the distance between the king studs
Measure the distance between the king studs (door width plus 5 in.). For efficiency, I mark only the inside edge of the king studs on the bottom and top plates. To the inside of the marks, I write T for trimmer. To the outside, I mark an X to indicate the king stud.
Mark and measure at the same time
Mark and measure at the same time. The rectangular shape of a carpenter’s pencil makes it easy to hold against the end of the tape.
Mark the cripple locations.
Mark the cripple locations. I save myself a little time and the potential confusion of too many lines by marking the cripple locations only on the top plate. The crow’s foot indicates the layout mark, and the X tells me which side of the line to locate the cripple. Later, I transfer these marks to the header.


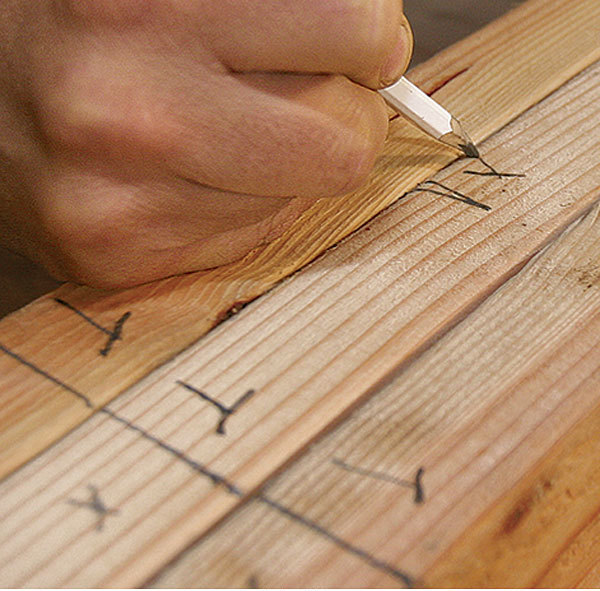
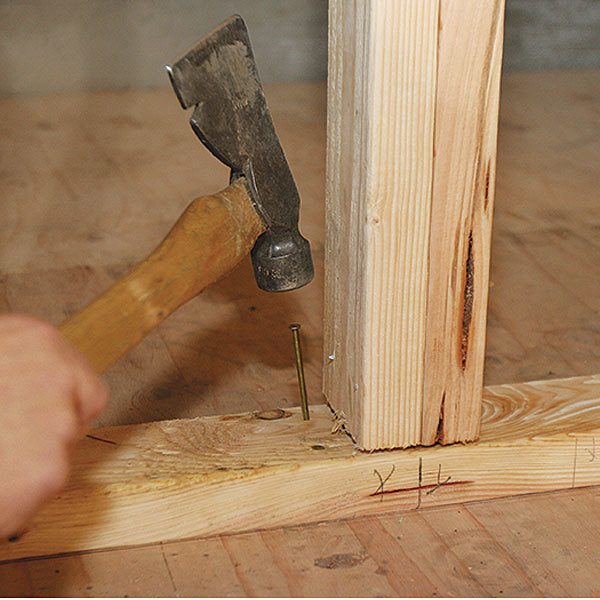
2. Assemble the parts, then transfer the layout


Keep edges flush
Keep edges flush. When assembling the king studs, the trimmers, and the header, I use my fingers, my eyes, and a Speed Square to keep all the edges flush. I alternate pairs of nails with single nails (like the #5 pattern on a domino) when nailing along the length of the trimmer or header. I separate nails by 16 in. for studs and by 8 in. for headers.
Transfer the layout marks to the header.
Transfer the layout marks to the header. Before nailing the header in place, I align it with the king-stud marks I made on the top plate and transfer the cripple locations to the header.


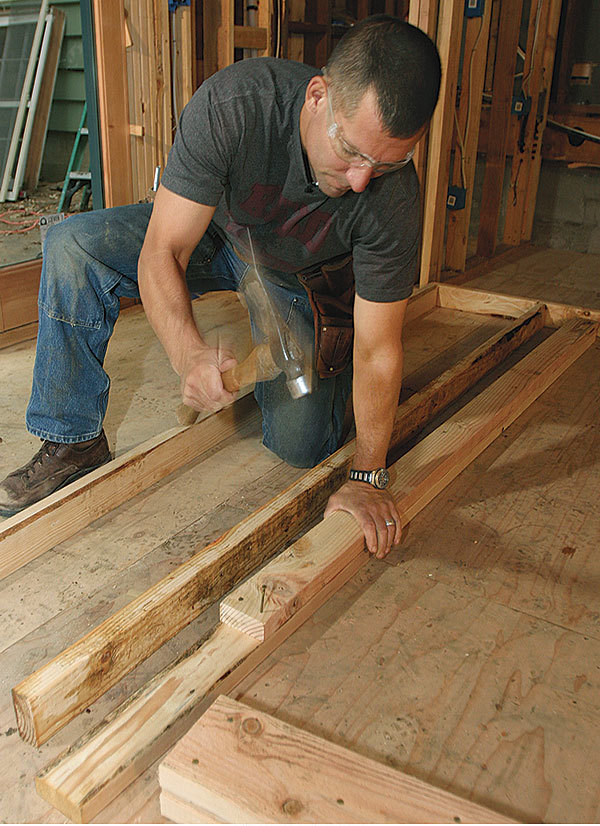
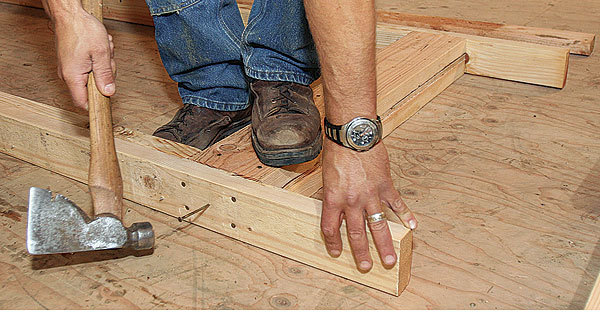
3. Sequence assembly to avoid toenailing


fasten the header to the king stud
First, fasten the header to the king stud. Before installing any adjacent studs or the top plate, I connect the header to the king stud. Again, I use the #5 domino nailing pattern. To stay friends with the finish carpenter and to avoid creating bumps in the wall, I keep the edges flush.
Add the cripples before the double top plate.
Add the cripples before the double top plate. Through-nailing is faster, stronger, and tidier than toenailing. Before adding the double top plate, I can through-nail into the king studs and the cripples. I nail the king studs on each side of the door before adding the cripples.
Nail the plate next to the studs.
Nail the plate next to the studs. To save the plumbers and the electricians from ruining their drill bits, I keep nails close to the studs when fastening the bottom plate to the floor.


video of framing a door rough opening

Bonus feature:

Watch a video of Scott framing this rough opening where he:

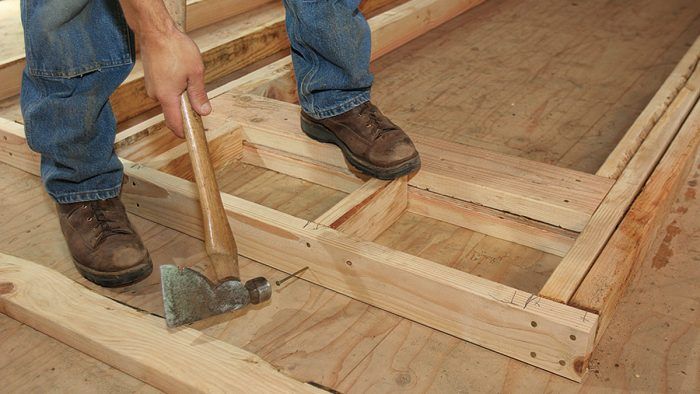
  • Explains why he uses a rigger’s hatchet instead of a regular hammer
  • Gives an overview of the anatomy of a wall so that you are familiar with all of the framing parts
  • Demonstrated the entire rough-opening framing process detailed in this article

Just a hammer, please

Vaughan Bluemax 21-oz. hammerPhoto: Krysta S. Doerfler

Is framing with a hatchet not for you? There are hundreds of hammers on the market with everything from skulls and crossbones on the side to $180 price tags. If you’re looking for a straight-up framing hammer with good features and no frills, the Vaughan Bluemax (www.vaughanmfg.com) should fit the bill. The 21-oz. hammer has a strong fiberglass shank with a curved handle designed to resist arm fatigue. If your aim isn’t perfect, there is a high-impact overstrike guard under the head to protect the shank. The head itself has straight claws for prying and striking framing lumber. The oversize striking face comes smooth or milled with a nail-gripping waffle pattern. A magnetic nail holder is incorporated into the head to help you start nails with one hand when you’re stretched out on a ladder. The hammer costs about $35, which should leave a little money left over to buy some nails.

—John Ross is an associate Web editor.


Photos by: John Ross, except where noted; drawing by: Dan Thornton

More on Door Framing:

Not-So-Rough Openings – Framing exterior openings precisely will make installing the windows and doors a breeze.

11 Golden Rules of Framing – Test yourself: How many do you know? How many do you use?

10 Golden Rules of Framing – Editors distill their favorite nuggets of framing wisdom from 36 years of Fine Homebuilding.

10 Rules for Framing – Veteran framer Larry Haun has been building house for over 50 years. And having started out in the housing tracts of Southern California, he has learned to be as efficient as possible about the process. Here he distills his experience down to 10 fundamental rules.

Troubleshooting a Prehung Door Installation – If you know where things go wrong, you can install a door that will swing the way it’s meant to for years to come.

Plumb Perfect Prehung Doors – Believe it or not, you need the level only once, and that’s before you ever touch the door.

Fine Homebuilding Recommended Products

Fine Homebuilding receives a commission for items purchased through links on this site, including Amazon Associates and other affiliate advertising programs.

Stabila Classic Level Set

Plumb and level are the hallmarks of good craftsmanship, so having a complete set of professional levels on the job is crucial to success.
Buy at Amazon

Leather Tool Rig

This is tool rig is heavy duty, professional, and well-thought-out for tool storage — plus it can help reduce fatigue throughout the day.
Buy at Amazon

Guardian Fall Protection Pee Vee

This tool is a gem! You can use it to align plates with your snapped lines, and it’s especially helpful when working alone.
Buy at Amazon

Sign up for eletters today and get the latest how-to from Fine Homebuilding, plus special offers.

Signing you up...

This site is protected by reCAPTCHA and the Google Privacy Policy and Terms of Service apply.
See all newsletters
See all newsletters
Previous: How to Frame a Door Opening Next: The Right Header for Every Wall

Guide

Framing

Chapter

Framing Walls

View Comments

  1. WrightAndreas29 | Oct 11, 2017 11:12pm | #1

    I am sure you'll learn how to make it if you'll read Wood Prix HANDBOOKS from cover to cover :)

Log in or create an account to post a comment.

Sign up Log in

Become a member and get full access to FineHomebuilding.com

Framing

Framing

Trusted, in-depth guidance from the pros for framing a durable, code-compliant house

View Project Guide

View All Project Guides »

Become a member and get unlimited site access, including the Framing Project Guide.

Start Free Trial

Introduction to Framing
  • House Framing Concepts, Tips, and More
Framing Tools, Techniques, and Materials
  • Tools
  • Techniques
  • Framing Lumber
  • Steel
Framing Floors
  • Floor Framing
  • Engineered Floors
  • Floor Sheathing
Framing Walls
  • Wall Framing Basics
  • Layout
  • Wall Assembly
  • Raising and Straightening Walls
  • Framing Rough Openings
  • Blocking
Framing Stairs
  • Stair Layout
  • Building Stairs
Framing Roofs
  • Roof-Framing Basics
  • Roof Design
  • Laying Out and Cutting Rafters
  • Framing Valleys
  • Working with Trusses
  • Dormers
  • Special Situations
Efficient Framing Methods
  • Advanced Framing
  • Double-Stud Walls
Timber Framing
  • Timber-Frame Construction
  • Timber-Frame Design

Fine Home Building

Newsletter Sign-up

  • Fine Homebuilding

    Home building tips, offers, and expert advice in your inbox.

  • Green Building Advisor

    Building science and energy efficiency advice, plus special offers, in your inbox.

  • Old House Journal

    Repair, renovation, and restoration tips, plus special offers, in your inbox.

Signing you up...

This site is protected by reCAPTCHA and the Google Privacy Policy and Terms of Service apply.
See all newsletters

Follow

  • Fine Homebuilding

    Dig into cutting-edge approaches and decades of proven solutions with total access to our experts and tradespeople.

    Start Free Trial Now
    • Facebook
    • Instagram
    • X
    • LinkedIn
  • GBA Prime

    Get instant access to the latest developments in green building, research, and reports from the field.

    Start Free Trial Now
    • Facebook
    • YouTube
  • Old House Journal

    Learn how to restore, repair, update, and decorate your home.

    Subscribe Now
    • Facebook
    • Instagram
    • X

Membership & Magazine

  • Online Archive
  • Start Free Trial
  • Magazine Subscription
  • Magazine Renewal
  • Gift a Subscription
  • Customer Support
  • Privacy Preferences
  • About
  • Contact
  • Advertise
  • Careers
  • Terms of Use
  • Site Map
  • Do not sell or share my information
  • Privacy Policy
  • Accessibility
  • California Privacy Rights

© 2025 Active Interest Media. All rights reserved.

Fine Homebuilding receives a commission for items purchased through links on this site, including Amazon Associates and other affiliate advertising programs.

  • Home Group
  • Antique Trader
  • Arts & Crafts Homes
  • Bank Note Reporter
  • Cabin Life
  • Cuisine at Home
  • Fine Gardening
  • Fine Woodworking
  • Green Building Advisor
  • Garden Gate
  • Horticulture
  • Keep Craft Alive
  • Log Home Living
  • Military Trader/Vehicles
  • Numismatic News
  • Numismaster
  • Old Cars Weekly
  • Old House Journal
  • Period Homes
  • Popular Woodworking
  • Script
  • ShopNotes
  • Sports Collectors Digest
  • Threads
  • Timber Home Living
  • Traditional Building
  • Woodsmith
  • World Coin News
  • Writer's Digest
Active Interest Media logo
X
X
This is a dialog window which overlays the main content of the page. The modal window is a 'site map' of the most critical areas of the site. Pressing the Escape (ESC) button will close the modal and bring you back to where you were on the page.

Main Menu

  • How-To
  • Design
  • Tools & Materials
  • Video
  • Blogs
  • Forum
  • Project Guides
  • Reader Projects
  • Magazine
  • Members
  • FHB House

Podcasts

  • FHB Podcast
  • ProTalk

Webinars

  • Upcoming and On-Demand

Podcasts

  • FHB Podcast
  • ProTalk

Webinars

  • Upcoming and On-Demand

Popular Topics

  • Kitchens
  • Business
  • Bedrooms
  • Roofs
  • Architecture and Design
  • Green Building
  • Decks
  • Framing
  • Safety
  • Remodeling
  • Bathrooms
  • Windows
  • Tilework
  • Ceilings
  • HVAC

Magazine

  • Current Issue
  • Past Issues
  • Magazine Index
  • Subscribe
  • Online Archive
  • Author Guidelines

All Access

  • Member Home
  • Start Free Trial
  • Gift Membership

Online Learning

  • Courses
  • Project Guides
  • Reader Projects
  • Podcast

More

  • FHB Ambassadors
  • FHB House
  • Customer Support

Account

  • Log In
  • Join

Newsletter

Get home building tips, offers, and expert advice in your inbox

Signing you up...

This site is protected by reCAPTCHA and the Google Privacy Policy and Terms of Service apply.
See all newsletters
See all newsletters

Follow

  • X
  • YouTube
  • instagram
  • facebook
  • pinterest
  • Tiktok

Join All Access

Become a member and get instant access to thousands of videos, how-tos, tool reviews, and design features.

Start Your Free Trial

Subscribe

FHB Magazine

Start your subscription today and save up to 81%

Subscribe

This is your last free article.

Don't miss another expert tip or technique from building pros. Start your free trial today.

Start your FREE trial

Already a member? Log in

We hope you’ve enjoyed your free articles. To keep reading, become a member today.

Get complete site access to expert advice, how-to videos, Code Check, and more, plus the print magazine.

Start your FREE trial

Already a member? Log in

Privacy Policy Update

We use cookies, pixels, script and other tracking technologies to analyze and improve our service, to improve and personalize content, and for advertising to you. We also share information about your use of our site with third-party social media, advertising and analytics partners. You can view our Privacy Policy here and our Terms of Use here.

Cookies

Analytics

These cookies help us track site metrics to improve our sites and provide a better user experience.

Advertising/Social Media

These cookies are used to serve advertisements aligned with your interests.

Essential

These cookies are required to provide basic functions like page navigation and access to secure areas of the website.

Delete My Data

Delete all cookies and associated data