FHB Logo Facebook LinkedIn Email Pinterest Twitter X Instagram Tiktok YouTube Plus Icon Close Icon Navigation Search Icon Navigation Search Icon Arrow Down Icon Video Guide Icon Article Guide Icon Modal Close Icon Guide Search Icon Skip to content
Subscribe
Log In
  • How-To
  • Design
  • Tools & Materials
  • Restoration
  • Videos
  • Blogs
  • Forum
  • Magazine
  • Members
  • FHB House
  • Podcast
Log In
How-To

Cutting and Bending Curved Floor Parts

Whether you achieve your curve with a saw or by lamination, a homemade template and jig ensure a tight fit.

By Howard Brickman Issue 198
  • X
  • facebook
  • linkedin
  • pinterest
  • email
  • add to favorites Log in or Sign up to save your favorite articles

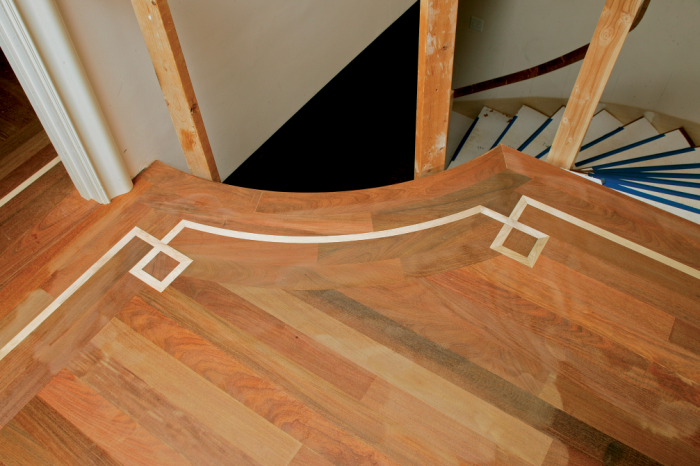
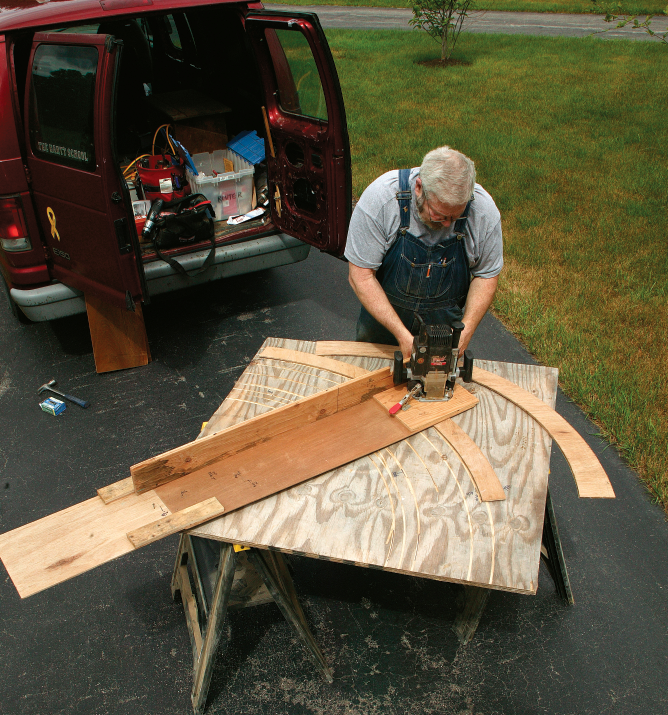
If you work with wood long enough, eventually you will hit a curve. Probably the two most-common ways of making a curve are either to saw the shape from a bigger piece of wood or to bend a board. As a flooring installer, I’ve had to use both methods. For wide boards, I use a jigsaw and a router to cut the shape; for decorative accents, I laminate thinner strips. On jobs like the one shown here, I use both methods. I cut, trim, and install the wider pieces, then use them as forms for the decorative laminations.

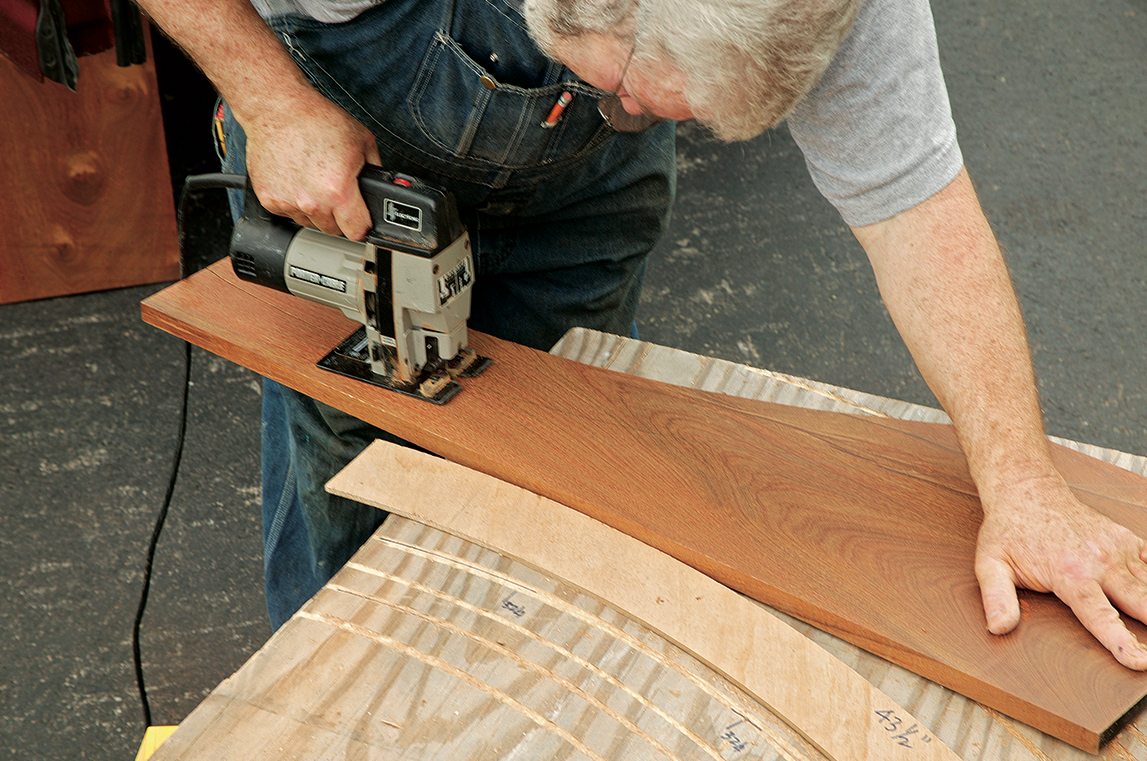
Rough it out, then trim precisely

A router attached to a trammel is the most precise method for cutting curves (see “Fair curves, every time”). The problem is that cutting cleanly through 1-in.-thick stock with a router requires several passes, so I use the router only in the final stage.

After tracing the curve on the board, I rough-cut the stock with a jigsaw, leaving about 1/8-in. excess that I trim with a router and trammel. I’d figured out the radii I needed for this job, so it was simply a matter of determining the placement of the pivot pin on the trammel. I trim one side of the piece, then move the pivot point on the trammel a distance equal to the finished width of the board and trim the other side. If I didn’t change the trammel’s pivot-point location but moved the piece, the radii wouldn’t be concentric.

Align rips for a seamless curve

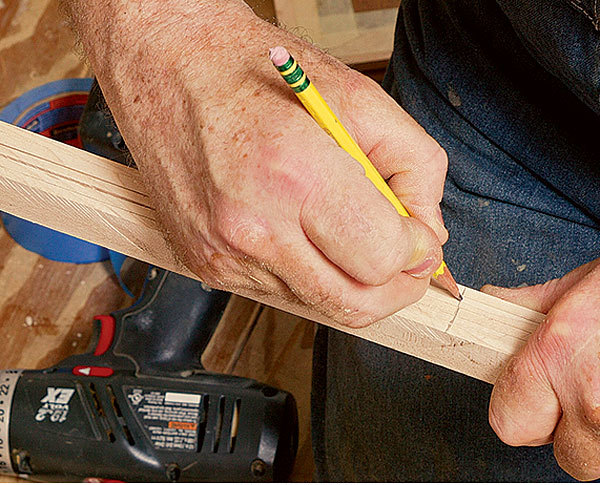
Steam-bending has been an accepted practice for centuries. In my line of work, though, it’s usually easier to laminate a curve by reassembling a board that has been ripped into pliable strips. I first select a clear, straight-grained piece of stock, wide enough to contain all the strips for the curve and about 10 in. to 12 in. longer than necessary. The straight grain helps to prevent breakage when the narrow strips are flexed. The strips’ width is determined by the least number of rips that will still be flexible enough to be bent. These laminations ended up at about 5/32 in. I used a sharp 50-tooth combo blade on my tablesaw to keep the cuts smooth.

Two ways to clamp laminations

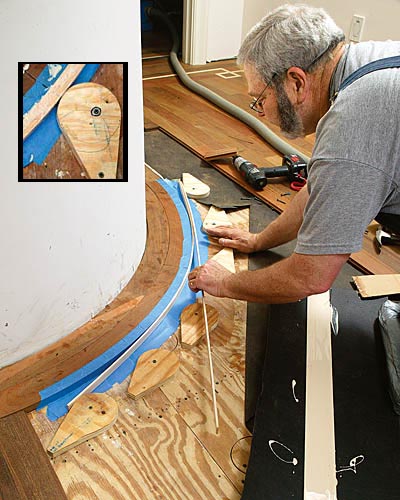
After I’ve installed the wider curved boards, I use them as a form to laminate the accent strip. I cover the subfloor and the flooring with painter’s tape so that the laminated piece can be removed and cleaned up after the glue dries.

I’ve tried two methods of clamping laminations. The first consists of several sets of opposing wedges set against plywood blocks screwed into the subfloor. I apply glue to one side of each lamination and reassemble them.

The method shown here uses plywood cams set every 8 in. to 12 in. I do a dry run so that I’m confident the pieces will lie flat; any final adjustments can be made without the hindrance of oozing glue. I use Titebond III glue (www.titebond.com), but any high-strength glue works. The important factors are color match and sufficient open time.

Three steps to a sawn curve

Step 1: Start with a plywood template. To get curved pieces that fit snugly, I first make a template from 1/4-in. plywood by measuring the radius of the location and then cutting the template with my router and trammel. Once I’m satisfied with the fit, I trace the template on a piece of wide stock and rough-cut the shape with a jigsaw.

Step 2: Next, I screw each end of the stock into the plywood platform to immobilize the piece, and I trim to the line with multiple passes of my router.

Step 3: After cutting them to length, I install the pieces. In this case, I used flooring mastic to glue the pieces; plywood blocks screwed to the subfloor immobilized the piece until the adhesive set.

Accents, bent in place

Reference marks keep order. Before ripping the board into strips, I mark a perpendicular line at the center and diagonal marks at one end. The centerline keeps the grain looking approximately the same as it bends, and the end marks keep the pieces in proper sequence.

Site-made cams do the clamping. To make the cams, I cut out teardrop-shaped pieces of 3/4-in. plywood (inset photo) and sand the sides smooth. The cams are screwed through 1/4-in.-dia. holes to the floor; the off-center hole allows the cam to swing freely. After the strips are glued up and in the bending form, I start at the center cam and turn it against the laminations until it’s tight, then drive a screw into the tail to hold it in place. I work my way along, alternating from left to right of center. I tap the strips flat with a softer wood that will not damage the pieces and, if necessary, attach hold-downs.

Fair curves, every time

A router and trammel allow you to cut precise arcs, individually or on a production basis. Because I’m thrifty, I used scraps to make this trammel jig. I took a long piece (approximately 6 ft. long by 1 ft. wide) of 1/4-in.-thick plywood, cut a hole at one end, and attached the router base with recessed screws. Thin stock is better because I can use a standard-length bit to trim the 3/4-in. stock. I reinforced the area around the router base with 3/4-in. plywood and attached a strongback along the length for rigidity. The pivot pin is a 12d common nail. After measuring from the bit, I drilled and marked the reference holes at the trammel’s opposite end. The pivot is seated in a small 3/4-in. hardwood block attached to the table.

Magazine extra: Watch a video of Howard Brickman creating curved flooring.

Photos by: Charles Bickford

Sign up for eletters today and get the latest how-to from Fine Homebuilding, plus special offers.

Signing you up...

This site is protected by reCAPTCHA and the Google Privacy Policy and Terms of Service apply.
See all newsletters
See all newsletters
×

Get home building tips, offers, and expert advice in your inbox

Signing you up...

This site is protected by reCAPTCHA and the Google Privacy Policy and Terms of Service apply.
See all newsletters
See all newsletters

New Feature

Fine Homebuilding Forums

Ask questions, offer advice, and share your work

  • X
  • facebook
  • linkedin
  • pinterest
  • email
  • add to favorites Log in or Sign up to save your favorite articles

Log in or create an account to post a comment.

Sign up Log in

Become a member and get full access to FineHomebuilding.com

Up Next

Video Shorts

Featured Story

Podcast Episode 684: Masonry Heaters, Whole-House Ventilation, and Porch Flooring

Listeners write in about fireplaces and ask questions about whole-house ventilation, traditional porch flooring, and gutter sealants.

Featured Video

Micro-Adjust Deck-Baluster Spacing for an Eye-Deceiving Layout

No math, no measuring—just a simple jig made from an elastic band is all you need to lay out a good-looking deck railing.

Related Stories

  • FHB Podcast Segment: Designing and Building an Efficient Slab-On-Grade Home
  • A Modern Texture With Historical Roots
  • The Twister
  • Mastering Floor Design and Construction: Tips from Industry Experts

Discussion Forum

Recent Posts and Replies

  • |
  • |
  • |
  • |
  • |
  • |
View More Create Post

Highlights

Fine Homebuilding All Access
Fine Homebuilding Podcast
Tool Tech
Plus, get an extra 20% off with code GIFT20

"I have learned so much thanks to the searchable articles on the FHB website. I can confidently say that I expect to be a life-long subscriber." - M.K.

Get home building tips, offers, and expert advice in your inbox

Signing you up...

This site is protected by reCAPTCHA and the Google Privacy Policy and Terms of Service apply.
See all newsletters
See all newsletters

Video

View All Videos
  • FHB Podcast Segment: Designing and Building an Efficient Slab-On-Grade Home
  • FHB Podcast Segment: Sealing a Floor Cavity in a Slab-on-Grade House
  • Podcast 606: Foam Slabs, Gaps in Click Flooring, and Board and Batten Rainscreens
  • Podcast 587: Members-only Aftershow—Basement Flooring
View All

Floors and Coverings

View All Floors and Coverings Articles
  • A Modern Texture With Historical Roots
  • The Twister
  • Mastering Floor Design and Construction: Tips from Industry Experts
View All Floors and Coverings Articles

Fine Homebuilding Magazine

  • Issue 331 - June 2025
    • A More Resilient Roof
    • Tool Test: You Need a Drywall Sander
    • Ducted vs. Ductless Heat Pumps
  • Issue 330 - April/May 2025
    • Deck Details for Durability
    • FAQs on HPWHs
    • 10 Tips for a Long-Lasting Paint Job
  • Issue 329 - Feb/Mar 2025
    • Smart Foundation for a Small Addition
    • A Kominka Comes West
    • Making Small Kitchens Work
  • Issue 328 - Dec/Jan 2024
    • How a Pro Replaces Columns
    • Passive House 3.0
    • Tool Test: Compact Line Lasers
  • Issue 327 - November 2024
    • Repairing Damaged Walls and Ceilings
    • Plumbing Protection
    • Talking Shop

Fine Home Building

Newsletter Sign-up

  • Fine Homebuilding

    Home building tips, offers, and expert advice in your inbox.

  • Green Building Advisor

    Building science and energy efficiency advice, plus special offers, in your inbox.

  • Old House Journal

    Repair, renovation, and restoration tips, plus special offers, in your inbox.

Signing you up...

This site is protected by reCAPTCHA and the Google Privacy Policy and Terms of Service apply.
See all newsletters

Follow

  • Fine Homebuilding

    Dig into cutting-edge approaches and decades of proven solutions with total access to our experts and tradespeople.

    Start Free Trial Now
    • Facebook
    • Instagram
    • X
    • LinkedIn
  • GBA Prime

    Get instant access to the latest developments in green building, research, and reports from the field.

    Start Free Trial Now
    • Facebook
    • YouTube
  • Old House Journal

    Learn how to restore, repair, update, and decorate your home.

    Subscribe Now
    • Facebook
    • Instagram
    • X

Membership & Magazine

  • Online Archive
  • Start Free Trial
  • Magazine Subscription
  • Magazine Renewal
  • Gift a Subscription
  • Customer Support
  • Privacy Preferences
  • About
  • Contact
  • Advertise
  • Careers
  • Terms of Use
  • Site Map
  • Do not sell or share my information
  • Privacy Policy
  • Accessibility
  • California Privacy Rights

© 2025 Active Interest Media. All rights reserved.

Fine Homebuilding receives a commission for items purchased through links on this site, including Amazon Associates and other affiliate advertising programs.

  • Home Group
  • Antique Trader
  • Arts & Crafts Homes
  • Bank Note Reporter
  • Cabin Life
  • Cuisine at Home
  • Fine Gardening
  • Fine Woodworking
  • Green Building Advisor
  • Garden Gate
  • Horticulture
  • Keep Craft Alive
  • Log Home Living
  • Military Trader/Vehicles
  • Numismatic News
  • Numismaster
  • Old Cars Weekly
  • Old House Journal
  • Period Homes
  • Popular Woodworking
  • Script
  • ShopNotes
  • Sports Collectors Digest
  • Threads
  • Timber Home Living
  • Traditional Building
  • Woodsmith
  • World Coin News
  • Writer's Digest
Active Interest Media logo
X
X
This is a dialog window which overlays the main content of the page. The modal window is a 'site map' of the most critical areas of the site. Pressing the Escape (ESC) button will close the modal and bring you back to where you were on the page.

Main Menu

  • How-To
  • Design
  • Tools & Materials
  • Video
  • Blogs
  • Forum
  • Project Guides
  • Reader Projects
  • Magazine
  • Members
  • FHB House

Podcasts

  • FHB Podcast
  • ProTalk

Webinars

  • Upcoming and On-Demand

Podcasts

  • FHB Podcast
  • ProTalk

Webinars

  • Upcoming and On-Demand

Popular Topics

  • Kitchens
  • Business
  • Bedrooms
  • Roofs
  • Architecture and Design
  • Green Building
  • Decks
  • Framing
  • Safety
  • Remodeling
  • Bathrooms
  • Windows
  • Tilework
  • Ceilings
  • HVAC

Magazine

  • Current Issue
  • Past Issues
  • Magazine Index
  • Subscribe
  • Online Archive
  • Author Guidelines

All Access

  • Member Home
  • Start Free Trial
  • Gift Membership

Online Learning

  • Courses
  • Project Guides
  • Reader Projects
  • Podcast

More

  • FHB Ambassadors
  • FHB House
  • Customer Support

Account

  • Log In
  • Join

Newsletter

Get home building tips, offers, and expert advice in your inbox

Signing you up...

This site is protected by reCAPTCHA and the Google Privacy Policy and Terms of Service apply.
See all newsletters
See all newsletters

Follow

  • X
  • YouTube
  • instagram
  • facebook
  • pinterest
  • Tiktok

Join All Access

Become a member and get instant access to thousands of videos, how-tos, tool reviews, and design features.

Start Your Free Trial

Subscribe

FHB Magazine

Start your subscription today and save up to 81%

Subscribe

This is your last free article.

Don't miss another expert tip or technique from building pros. Start your free trial today.

Start your FREE trial

Already a member? Log in

We hope you’ve enjoyed your free articles. To keep reading, become a member today.

Get complete site access to expert advice, how-to videos, Code Check, and more, plus the print magazine.

Start your FREE trial

Already a member? Log in

Privacy Policy Update

We use cookies, pixels, script and other tracking technologies to analyze and improve our service, to improve and personalize content, and for advertising to you. We also share information about your use of our site with third-party social media, advertising and analytics partners. You can view our Privacy Policy here and our Terms of Use here.

Cookies

Analytics

These cookies help us track site metrics to improve our sites and provide a better user experience.

Advertising/Social Media

These cookies are used to serve advertisements aligned with your interests.

Essential

These cookies are required to provide basic functions like page navigation and access to secure areas of the website.

Delete My Data

Delete all cookies and associated data