911 – Is this shower valve set correctly?
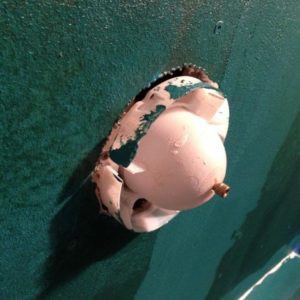
I was applying the waterproofing to a new shower tonight and had an “oh shoot” moment. I’m wondering if this shower valve is set to the correct depth? The blocking it’s fastened to is flush with the face of the stud. The cement board is 1/2″ thick. I know the valve is a kohler, but I’m not sure which one.


Replies
waterproofing?
it depends on the thickness of the tile you are using. The outer ring of the valves plaster guard looks like it has a depth of about 3/4"; the finished wall can usually end up flush with the front or back of that ring, or anywhere in between. Check the valves install instructions, they should give you the min & max finished wall surface in relationship to the valves protusion. What type of tile backer board is that, and will that water proofing bridge the joints without cracking?
In the photo the back edge of the ring looks to be roughly flush with the face of the sheathing. I'll check tonight and see if it's actually like that or not. The tile will be a thin ceramic, maybe 3/8" thick installed?
I used 1/2" Hardiboard for the tile backer. The Mapei waterproofer/crack isolation material is not able to bridge the joints. For each joint, I used fiberglass tape and then troweled on thinset over the joint. In the photo, there is a joint immediatly below the shower valve. I really liked the waterproofer. It rolled on very easily and quickly, had enough for two coats. So long as no serious cracks appear, this shower will be 100% water proof.
As user.... says, you have a range that allows the finish surface to be anywhere between the front and back edges of the plastic spacer. Check your installation instructions to verify.
I went to Kohler's website and grabbed a cut sheet for a shower valve. Might not be the exact right model, but their pressure balancing valves all mount the same. Looks like the valve was installed in the wrong plane and should have been set back further. I guess I see two options: We either cut the wall open and reset the valve or we laminate the wall so it's thicker. The second option would be easier, but I'm going to guess that it won't work with the fiberglass shower pan.
Install the trim kit for the valve temporarily and see how much clearance you really need. Sometimes you have a lot of latitude.
Yep, I'll be doing that tonight for sure.
A coworker also suggested that if the trim ring doesn't fit, maybe I do a "accent" around the valve. The accent area would allow me to pad out the backerboard with a thicker piece of stone. I really like that idea because I wouldn't have to rip apart what's already been done.
Well, the trim ring just barely fit. When I get the tile on, it'll definetly fit. Whew. Dodge the bullet on that one!
Sometimes it's actually best to RTFM before you actually install the thing.