OK, so I finally have a deck design that the Mrs. has approved. It’s fairly simply in plan, but the framing is a real b…well complicated. The lower level is the large square area and it measures 17′-0″ wide by 15′-0″ high. I’m planning on spanning this portion horizontally with 2×6’s @ 16″ oc framed into a center beam running the short axis. The right and bottom sides are supported by the existing rim joist. The left side will have a perimeter beam. Both beams will be supported by posts set as required (ie-I haven’t calculated the beam size yet). The circular area is raised one step and is 10′-0″ in diameter. I’m figuring on using 2×6 subframing over the lower level for a 5 1/2″ high step. Two steps would be nice, but then I’ll need a railing and that is something I’d rather avoid. The deck will probably be 1 1/2″ #1 treated. Sorry, but I can’t afford exotic and I’m not a fan of synthetic.
Question: How on earth would somebody go about framing the circular portion? I’d really appreciate it if somebody would do some sketches and post them for me.
Certified boat fetish.


Replies
In my area, MA, a deck needs to be 30" off the ground to require a railing.
5/4 PT is about $1/ft, I can get 3/4" Ipe for $2/ft, you don't need 5/4 since it is so strong. It would double your board costs but the look and less maintanence is worth it to me. Call some of your lumber yards, most builders here don't send the money for Ipe, they use 1x4 mahogany decking. I think it is cambarra or meranti. Check some other options before you settle for PT.
The circular portion of your deck presents a framing problem because of your intended layout of decking. If the boards were running all in the same direction. then you could simply build a loose square deck with the joists running wild, find your centre point, and use a string and pencil from that point to mark your circle.
I bet this don't help a bit because your Mrs. is set on that fancy little design.
>>Two steps would be nice, but then I'll need a railing and that is something I'd rather avoid.
You can have 2 Rises without a railing, or as DDay pointed out 30" from deck to deck or deck to ground. (2) rises have 1 tread. When you go to the 3rd rise you will need a rail. I always hated this about stair code. I had a case where the deck was 18" and no rail and the stair had (3) rises at 6" and the inspector made me have a rail on the steps. I put the rail up with screews and after all was said and done the home owner removed the stair rail.
If you build a deck with P.T. decking, be sure to take a picture as soon as you drive the last screew or nail. That's as good as it will ever look!!!!!!
k
View Image
Thanks for the sketch, but how are you supporting the ends of the decking?
Certified boat fetish.
supporting the ends of the decking
Might ought to frame the round like an octagon "gazebo" floor, as that would give you nice "radial" girt/purlin/joists from which to block in for the flooring pattern.
Might be good to do that "first," too, then frame the rest of the deck to that structure. That makes the rest of the deck a framing scheme defined by the two constraints--the round and the existing rim joist. That could be much simpler than trying to cipher how to add a round shape to a square deck.
Maybe.
For sure check your local codes, too. The "stair" rules can "trump" the deck height rules for railings. Note, too, that not all places use 30" as the "must rail" height--I've seen it as low as 18" unless there's a continuous step(s) down in lieu of the rail (and the "steps" option is not always allowed, either, too).Occupational hazard of my occupation not being around (sorry Bubba)
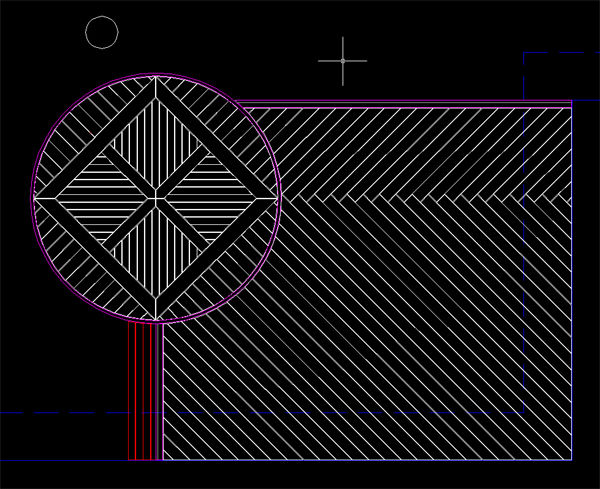
I think you hit on it. I did a little sketching and this is what I came up with. The colors didn't scan as well as I had hoped, so I appolgize for this being hard to read. I have the lower level deck conventinally framed until we get to the circular part. There I have a octagional frame which is at the same height as the main platform. I then over framed the round part (red) which got the cantilevers I needed. I then added framing (green) as needed to support the ends of the decking. The final product actually turned out simpler than I had conceived. Thoughts?
Regarding the steps. Two steps will really complicate the design as I can't just overframe the round part, but now I'll need to support it on posts. We need a handrail when there are 3 or more steps. We need a guard rail when the platform is 24" and over. When I do a guard rail, my max opening will be 4". Because this deck will be located in a sight line, we absolutly do not want a guard rail. With just one step up, we'll be right at 24", in fact a little grading might be needed to ensure the deck stays under 2' above grade.
Certified boat fetish.
Thoughts?
Looks cool to me. The boatbulider in me wants to see a "joggle plank" where the boards "herringbone"--but that's an un-necessary complication for your deck (it's not a boat after all <g>).
The architect in me wonders about not having a 'repeat' of the "herringbone" mirrored on the closer half of the deck, but, again, that's an un-neccessary complication for a surface that will be covered in furniture.
After posting before, I thought about what sort ocomplications there'd be to just "wart" the framing for the round off the rectangular structure--but the need for posts to support it just muddied up my thinking.Occupational hazard of my occupation not being around (sorry Bubba)
Oh, my gosh. The joggle plank is a great idea - but it's definetly beyond my skills! Techinically, the herrinbone patter would come off the bottom of the circle. I could move the steps out further to pick up the pattern. I'd have to debate if it's worth the added complexity. Thanks for the suggestions!
Certified boat fetish.
Circular built-up rim joist.
4 layers 1/2 marine CDX 10' x pi / 4 long. 7'9"??? Offset skarf joints after the first layer.
edit: This square framing needs 1 post outside the rectangular deck. An octogon will need 3.
SamT
Edited 6/14/2006 6:27 pm by SamT
That's a pretty ambitious (sp?) deck plan.
Re framing the round portion - 3 words: Lots of blocking.
One thing though. Look at the attached pic. These boards were cut snug, but this is what happened after they dried and shrank. They are #1 2x6 PT, but actually it will happen with just about any PT decking. The boards in the pic are in a covered location and may not even be fully dry yet.
Boy that sure sucks to have the heels open up like that. To be honest, everybody always said to space the boards apart with a nail, but I've started to butt them tight together. The wood we are getting shrinks a good 1/8"-1/4" in width which, when butted tight together, leaves a real nice, even gap when dried. I first realized the amount of shrinkage when a person in a wheel chair was rolling over a deck at his home. He was gripping because they didn't set the boards as he instructed. Well they actually did follow his instructions, but the boards shrank so much that his front tires were now catching the gaps!
Certified boat fetish.
Space any decking except pressure treated. The pressure treated is something like 120% moisture content, so it will dry and thus shrink a lot. Everyone always butts them tight and within days they start to dry and open up. You'll end up with a normal gap once its dry. The only ones I see space them are the DIYer's and after a year some gaps get up to 1/2" wide.
Good point, but from here the rounded edges make the boards look like 5/4 not 2x.
Were the mitres tight before?
The 2x6s edges were routed. The miters were tight when the boards were installed. I did not do the work, but questioned the owner of the property. Really, the pic I showed is not even that extreme. I've seen some that were way worse.
All: spacing of deck boards is a separate issue than the one I'm addressing, although I run my PT deck boards tight and shrinkage takes care of the lengthwise gapping.
Butt joints are always better for PT than miters for the reason shown in the previous pic.