Just another stairway….however this is the largest stairs that I will have to remove from my stairshop in one piece. I did build a larger one back in 2001 that had to be built…disassembled …then reassembled onsite….as it was too big to haul down the road.
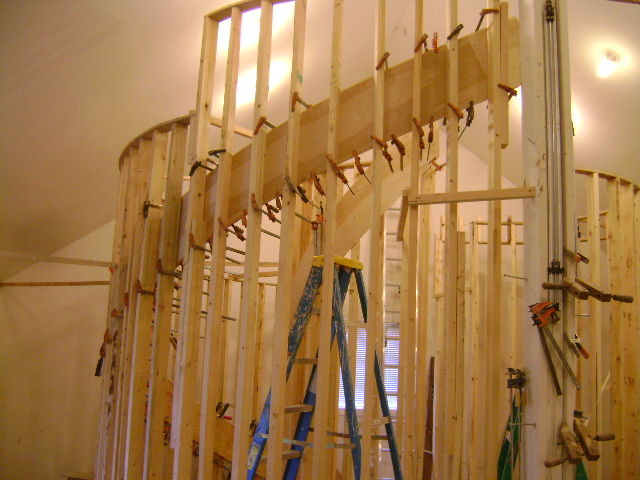
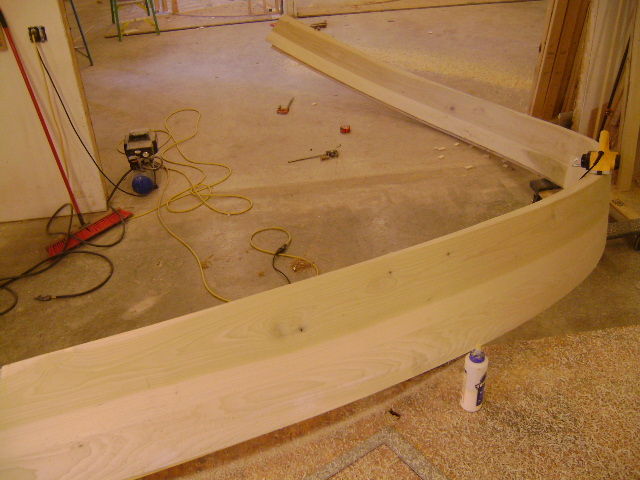
This is a 25 foot long poplar clad laminated stringer. It took 3 guys to lift this down and moved over to my workbench to plane and route on it. Next week the inside stringer will be glued up.
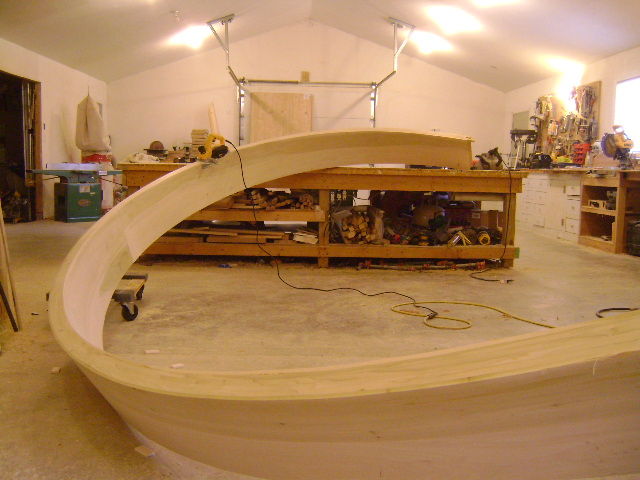
Cherry treads and iron balusters are going into this stairs. It is freestanding…almost. By almost I mean this outside stringer will be attached at one discreet point on the wall it comes tangent to.
Stay tuned….much more to come….
Stan


Replies
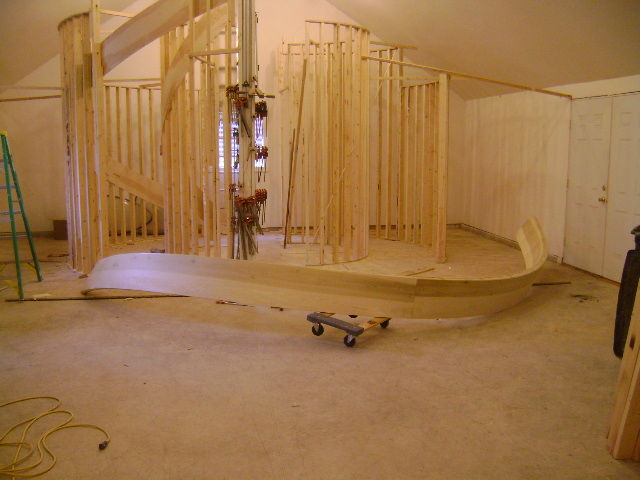
more pictures of the outside stringer being put back into place...then the start of the lamination process for the inside stringer.
Stan
My wrist got tendonitis just thinking of cranking all them Jorgy's down. I'd lose the handles and weld a nut on the screw and use an impact driver..LOLSpheramid Enterprises Architectural Woodworks
Repairs, Remodeling, Restorations
"If Brains was lard, you couldn't grease much of a pan"Jed Clampitt
View Image
More questions...How thick-thin are the pieces of poplar being laminated? What is your glue? Plain old yellow I'm guessing.Do you cut the housings for the T&R on site? And when you do, how do you compensate for the curve affecting the cut depth? Custom cut shoe for the router?You are one of the big highlights of BT. Thanks.
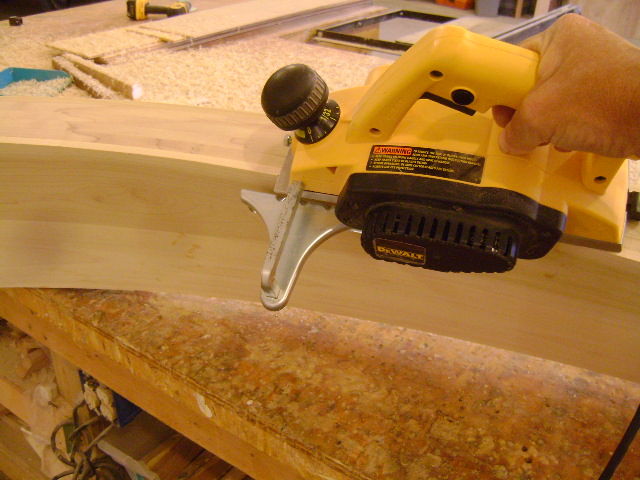
Jer- The poplar inside and outside skins are 5/16 thick...covering up the layers of plywood.
Plain ol titebond glue applied with a roller.
After the inside stringer is laminated...taken out and planed and rounded over etc...then its back in the forms where all the treads and risers will be layed out...and then routed in my shop.
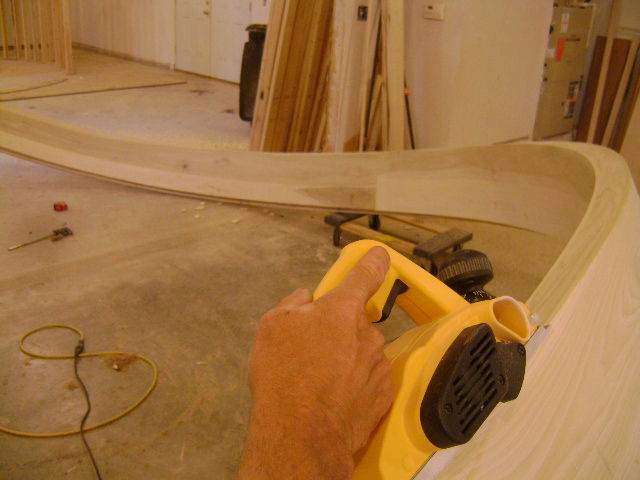
The base of the router is warped...the routing jig is nothing but 3/4 inch plywood ..kerfed every 2 inches vertically...and screwed to the stringers where it wont show.
Stan
Got it. I knew it was something like that. Thanks.
It's interesting how little support your forms need. They look tied together, but I don't see them braced anywhere else.
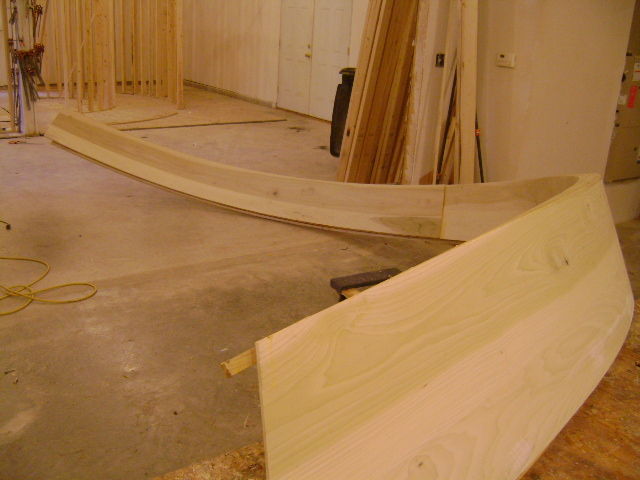
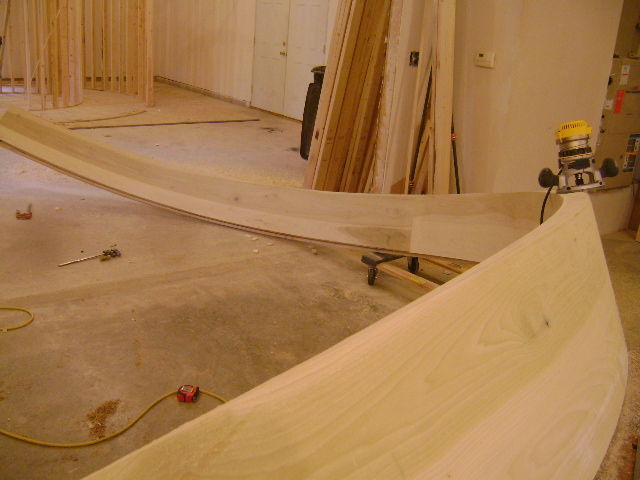
This is the inside curb stringer getting processed on my bench. The last two shots show the rabbet for the plastered belly later on.
Stan
Stan,
Just wondering, You & the Mrs. in the quiet of the night ever hear a loud SPROING!!! come from the shop, LOL
Seriously, your stairs always amaze me, there sure is a graceful beauty in the sweeping curves of those stingers. Look forward to seeing the rest of the stairs going together.
My 7 yr old daughter was just here with me looking at the pictures & was impressed by the curves in the wood & told me to go out behind our shed & look at the fence, It has some curved wood too!, Kids come up with the best lines.
I also showed her your copter pictures & explained that you were building that too,
Shes very concerned that the tail is just open framing & that you better fill that in!
Thanks for the updates, always look forward to them
Paul
No one should regard themselve as "God's gift to man." But rather a mere man whos gifts are from God.
Paul- I appreciate your comments.....thanks.
I am going to be mortising the stringers to receive the treads and risers the next two days. I will post pictures.
Stan
I routed the outside stringer today...It only takes about an hour to mortise the 16 treads and risers.
Stan
Here are some more shots of this stairs going together. I am leaving the forms in place as they will be used to glue up the inside and outside curved handrails.
Stan
As always, awonderful job would love to see it in person but,I am kind of like the Amish gentleman would sure hate to get shot. Have a Super Memorial weekend.
Stan,
When you make up the treads, do you cut them with a router & pattern to match the curves of the stringers?
Also, what percentage of paint grade verses stain grade stairs do you build & what types of wood have you been asked to use.
Thanks,
Paul No one should regard themselve as "God's gift to man." But rather a mere man whos gifts are from God.
Paul- I glue up typically 28 inch by 48 inch treads...some wider...some longer...but anyway...I bullnose both sides then cut diagonally through to get two treads. I would say half my stairs are painted skirts and risers with stained treads.
I make a posterboard template and cut my treads to that....slightly oversize...then place them in their mortises and mark exactly.
Stan
I am trying everyday to upload new pictures. I was able to load this one...but that is all that I can do. I am out of here till tomorrow when I will try again!!
Stan
Edited 6/3/2009 8:12 pm ET by StanFoster
I had just enough space for that last picture...but it says I have exceeded my limit........
Stan
Here---- I have this same title of a thread....over on my rotorcraft forum where I have uploaded thousands of pictures.
http://www.rotaryforum.com/forum/showthread.php?t=20742
There....I see that worked.....so if everyone doesnt mind skimming through the comments from my fellow rotorheads....I have gotten around this picure dilema. Plus its much better....the pictures automatically are up.....and its in a much easier to read timeline. That site does it all for me...just what I need. Like I said...I have posted thousands of pictures there...and never have any trouble...or didnt have to spend lots of time learning how to do it.
This site is where I spend 90% of my online time.
Stan
Edited 6/5/2009 10:56 pm ET by StanFoster
Edited 6/5/2009 11:00 pm ET by StanFoster
Stan,
How do you over bend the inside rail when you use the same wall forms?
and what is your secret to get 45 minutes of working time with tite bond glue?
It's never been that long for me. :)~
and how do you lift the stringers back into the forms ? by yourself?
You da man!
Mike
Mike- If you look closely....the outside rail has 2 x 2 rips underneath the behind the bending mould. This tightened he radius up 1.5 inches. It sprang back almost perfect.....However...on that outside rail....it terminates between to columns...so I can easily cut it extra long to bow it tighter...or cut it short to tension it some to straighten it out a little. But...I had a good springback,,,,and very little fiddling will be necessary.
Now...on the inside rail....the inside face of the curb is set on three 1/4 inch layers of luan..or 3/4 of an inch. I screwed the bending mould right to the studs...and in effect bent the rail to a radius that was 3/4 of an inch tighter than the curb. I will find out Monday how that turned out. My guess is it will be real close. Now on this inside rail,,,they sit on newel posts ...so I can still tension them or add a little to tighten the curve.
I use an excess amount of glue which buys me sometime. I usually am all done with the 100 or so clamps in less than 30 minutes...but if I have trouble...which I occasionally do....I have about 45 minutes to get er done.
Its a lot of fun coming up with ways to deal with these details!
Stan
Edited 6/5/2009 11:33 pm ET by StanFoster
I removed the inside forms today. You can see the inside rail is sitting on the curb stringer.
Sorry about the link...thats the only way I can post pictures.
http://www.rotaryforum.com/forum/showthread.php?t=20742&page=4
Stan
I can post pictures again....Stan
Great work as always Stan. Hopefully the site will give you the ability to post pictures again. What I would be interested in seeing would be the dirty work before you even cut a peice of wood. Where does one start when figuring out a curved stair. How do you get a rise and run, what needs to be figured in because its curved.
How, what, where, why, who whatever you feel like expanding upon I would find very interesting. I for the life of me wouldnt know where to start. I do a few stairs a year but they are straight forward and simple, mostly deck stairs. As I do more of them I find the challenge of stairs to be addicting I jump at the chance.
danno- I used to type way lots more information ...I just kind of post progress pictures now. It seems to me most of the interest on this site has gone to the political threads....there is far less hands on how to do it posts now....at least thats my perception. I actually get more questions and comments on my rotorcraft site than I do here. I love to explain what little I know..but I have to be primed....
Stan
I was going to upload a bunch of pictures here...but only one is allowed.
I will try again later....from now on if anyone is interested ...just kindly click on to http://www.stansstairways.com
Thanks for all the nice comments here on Breaktime...its been a long run.....but I am not going to mess around trying to upload here again.
Stan
Edited 6/19/2009 8:59 pm ET by StanFoster
Edited 7/4/2009 8:34 am ET by StanFoster
Latest pictures of this stairway hatching out.
I decided on this one to go ahead and layout the iron balusters...and pre-install them beforehand. I have only done this a few times in the past.....but the home is way behind....and I just thought I would get way ahead.
Can anyone explain to me how to have my pictures come up automatically in my posts? If its very involved, my eyes glaze over and it wont sink in. I found its far easier building the stuff that the pixels capture, than trying to move those pixels around!
Stan
I have windows xp and all I have to do is right-click copy, and paste
View ImageView Image
View Image
View Image
Edited 7/4/2009 9:12 am by Huck
ok....I am trying to learn how to cut and paste. I havent done that since kindergarten. I am not obviously pushing the right buttons. I opened a picture,,,,and hit copy...then nothing happens.
Let me explain something about my computer skills. I was getting so frustrated trying to post U-tube links to my flying threads on the rotary forum. I never was able to do that...and asked repeatedly how to do so. After 2 years...one guy came down to my level and said "Stan, in case you are not kidding...just go up in the address box....highlight it in blue.....hit control and X....then go post your address by hitting control and V." It worked and I thought I had learned the biggest tidbit in life!
Now I am asking to talk down to me and walk me through this cut and paste thing. I am not faking it saying I am ignorant here....and it doesnt bother me admitting it as there are other areas I definately am not ignorant in.....but this is another tidbit I need help on.
Wouldnt it be a feather in someones cap here if they finally said the correct set of instructions to educate my computer illiterate brain here?
Stan
Wouldnt it be a feather in someones cap here if they finally said the correct set of instructions to educate my computer illiterate brain here?>>>>>>>>>>>>..
That sounds familiar!!
Nice looking stairs, by the way!!
Someday it will become easy for us computor illiterate soles to use our computors. I just wish it will happen before I die!>G<
Well, not all operating systems react the same, so I'll just tell you what happens when I do it. I put my cursor over the picture, and right click my mouse. A menu comes up, and I click "copy". Nothing observable happens, but my computer has now stored the image for me to access from my mouse.
Then I go to the box I want to put the picture in (the box you type your message in before you post it), and right click my mouse again. When the menu box comes up, I click "paste". That's it.
View ImageView Image
when I want to imbed my own pics, I create a post and attach files, the same as you always do. But instead of clicking "post", I click the "preview" box, and when the preview comes up, I click the link below the little yellow icon. I get the picture, and I copy it, as I described above. Then, I click "revise", and it takes me back to my post. Now I can "paste", as described above, and the picture is embedded in my message. Then I click "post", and it shows up as you see below.
View Image
View Image
Edited 7/4/2009 9:55 am by Huck
OK, now to get really tricky (not really). Lets say I want to post a picture here from a website, but I can't upload it to taunton, because its not my picture. Well, there are ways of "stealing" the picture and getting it in my computer, but I don't have to do that.
I can just go the website, and right-click on the picture, and a menu comes up. At the bottom of the menu it says "properties', and I click on that. A box pops up, with some technical information. One of the things on it is "Address: (URL)" - I right click copy the address (starts with http://)
Then I go to my message, click "source" below the box, and add this
<img src="the URL address I just copied"/>, and when I click back on WYSIWYG, I see this (picture below). So now I can click post, and share the picture with the world.
Since I'm using the picture from another website, I make the picture link back to that website. Again, its easy to do. I just add <a href="the website I took the picture from (again, starts with http://)"> before the image code, and finish by adding </a> after it. Then when you click on the picture, it takes you to the website I got it from.View Image
That's a good piece of information to wrap your brain around, because its so very useful. I can make a link out of a word or words, or any picture, by doing the same. For example, I write <a href="any website or URL I choose"> before my word, words, or picture, and finish with </a> after it, and bingo, I have created a link. Now, when people click the words or picture, it takes them to the website I want them to go to.
Like this Stan's Cool New Website.
or this
View Image
View Image
Edited 7/4/2009 10:24 am by Huck
Huck- I am trying to have my picture come up using your instructions.View Image
Huck- I am trying every button I can push. Please dont waiste too much time trying to explain how to get the picture to come up with my post.
Stan
trying againView Image
yeee-hah!View Image
Huck_ I finally was successful! You deserve a hardy handshake...a slap on the back...the warm glow of victory...and $1000.00! .......er....how about the first 3?
I have finally learned how to do this.
Stan
Huck- This day goes down in history for me. Because of your simple explanation...you connected through my pig head and this was the first time I had a picture come up on its own.
A big heart felt thank-you!
I am still chewing on the other tidbits you gave me...and look somewhat like the RCA dog with his head tilted 20 degrees.
But I am less of an illiterate as of today.
Stan
Well, you're welcome! - to me, that's what breaktime is all about. View Image
View Image
How do you spread the glue? roller? sprayer? what type glue?
I finished laminating this inside curb style stringer Friday. Tomorrow I will take it out of the forms..and plane the top of the curb down...round over the edges...and sand it. The underside that shows will also be attended to.
Then it will be back in the forms and both inside and outside stringers will be laid out for the tread and riser mortises.
Stan
Stan,How do you handle mortising curved stringers?Could you come over to my shop and show my employees your method?Could you fax me a copy of your client list?Will you do free estimates for me on weekends??could you sub-contract stairs for me for 10 cents on the dollar??c];o).
.
"After the laws of Physics, everything else is opinion" -Neil deGrasse Tyson
.
.
.
If Pasta and Antipasta meet is it the end of the Universe???
.
.
.
according to statistical analysis, "for some time now, bears apparently have been going to the bathroom in the woods."
not sure what all the fuss is about, all the 2Xs I get these days look like those stringers ...