 Problem- contractor failed to support an acrylic/fiberglas tub installation with any underneath- the- tub mortar slurry (it has small 4 position bump out tiny legs at bottom but maker “recommends” leveling with mortar). Now when tub is filled with water (50 gallons = maybe 400 pounds or so) the tub depresses downwards and the the lip is pulled down and away from the caulked tile to tub flange intersection leaving a good sized and unsightly gap all along the top tub perimiter. But, then when the water is drained out the caulk seems to go back into place and assume a normal appearance. Floor was solid enough to begin with and a layer of dens-shield was added and tub went in seemingly level on top of that backerboard.
Nevertheless, I need a fix for this reappearing gap that could allow water into the wall over time. I could open up a section of floor underneath the tub from the crawl space and try to inject mortar (or expanding foam maybe-risky) under the tub base but that seems like overkill and fairly inaccessible with under layment reconstruction effort a difficult task and a chance the mortar doesn’t even setlle in to the right spots anyway because of the reduced accessibility –or surrounds the drain assembly which I don’t want to be impacted. So any ideas on how to keep this gap from forming every time the tub is used? I used a polyseamseal white caulk twice now with poor (unstabilizing) results but I don’t feel that any other caulk would fair any better with this expansion/contraction issue. Incidentally, I’ve seen other acrylic tubs before and they seem much beefier all around than this Maax product and am wondering if these manufacturers are also creating part of the flexing problem by cutting down on materials used in order to get larger internal surface areas at the expense of a stable/strong product. The Maax firm has had some review issues that I’ve seen blogged about on line.


Replies
tc
If the contractor won't come back and reset properly and you can't stabilize from underneath or through end wall access......
Remove all old caulk and clean surface well.
Fill with water and hop in.
Recaulk with something not silicone that will accept more movement and better adherence.
Let caulk cure long enough.
maybe you'll get lucky.
replying to Calvin: "Maybe you'll get lucky?"
Calvin. I don't mean to degrade your comment, but it seems to me that caulk, even cured sil. caulk is not the answer. The poor owner will have to sit in a tub full of water for several days! ...just kiddink...but you get the point :)
Not only is flex. s- caulk likely to bulge out as soon as weight is relieved, but it invites the accumulation of molds and grime. As you say, maybe the owner will get lucky. Maybe not. He could try your suggestions and proceed to a full tear-out if it does not work.
Mel
Of course he'll get out after caulking.
He won't drain water till caulk cures.
and no way to 100% silicone caulk. I don't like it and never use it on an acrylic install.
he's caulked it twice more already, what's to lose?
and yes, the original contractor should come back and redo his job. Let the school of hard knocks fall on that "contractor".
Who is liable for an incorrect installation?
Once you confirm improper installation, which includes mechanical fasteners along the top flanges, the cost of replacement falls on the original installer. If more than a year has passed, you may find it difficult to hold the installer legally responsible.
Acrylic tubs are manufactured in different ways. The better ones are beefed up at points of stress, and have thicker fiberglass skins. Most installations I am familiar with require a bed of thinselt mortar in stretegic locations. If manufacturer's specs were not followed, the manuf. will not assume responsibility for the problem you describe.
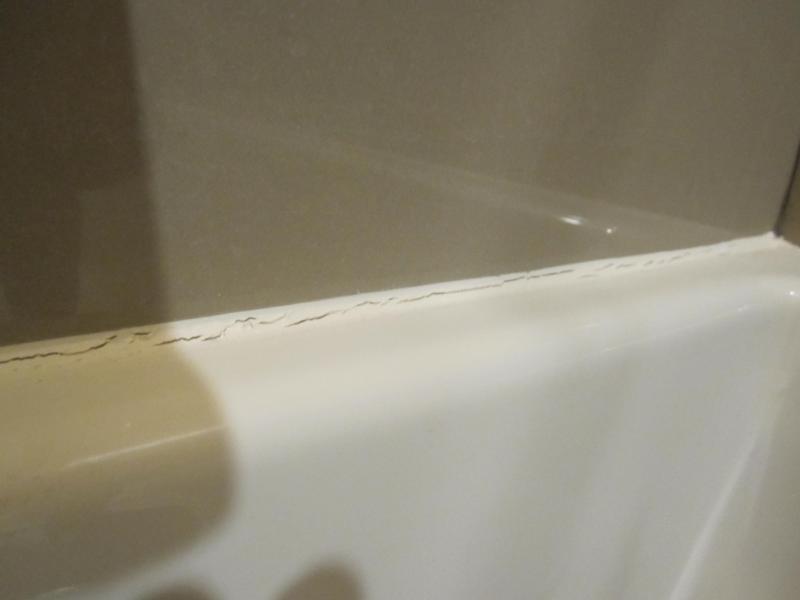
I tend to believe you are dealing with faullty installation. The continuous crack along the front edge suggests a lack of shimming.Unless you can get a bed of mortar into the correct locations (which I doubt is do-able) the whole shebang needs to come out.. Spray foam is not (structurally speaking) an answer. Talk to your installer and see what he/she recommends. Before you proceed with a tear-out seek the (possibly paid) advice of another reputable installer. A call to the manufacturer may prove helpful.
Assuming incorrect installation -something you will have to carefully document at the time the tub is torn out- a small claims court may be your last recourse. I am sorry to not have better news. Maybe others in this forum can advise differently. For me, when there is a problem, I prefer to get to the root of it.
It looks like you have quite a lot of movement. Polyurethane will elongate about 35% but do you realy think you can find something that will keep up with that can of cycling everytime you take a bath (at least once a day right?) I actually think the sprayfom idea has merit. Once it sets it can take a heck of a lot of compressive weight and it will be far, far easier than trying to set the tub on mortar or structo-lite
Do understand than an acrylic tub itself will flex a substantial amount, even if evenly supported from below. It's hard to guess from here how much of your flex is due to this inherent flex vs due to poor support underneath.
Hopefully your tub is on an inside wall. If it is remove the baseboard on the opposite side and drill some 1/2" holes along the length of the tub just above the bottom plate. Fill the tub to the overflow and leave it full. Get 3 or 4 cans of Large Gap spray foam and a couple of feet of 1/4" tubing. Tape some stiff wire to the tube to make it easy to guide. Stick the tubing through one of the holes, insert thre spray foam nozzle in the tube and let it rip. Let the foam cure for 2 or 3 days before you drain the water. Re-install the baseboard and pat yourself on the back.
Yes, I've done this and it worked like a charm.
contractor is to return to evaluate coming week. Don't believe a fix from the underneath crawl space floor is practical -too difficult to place mortar or foam without major opening subfloor between joists but then no place for the mortar to reside with an open floor and drain pipe area could be over flowed and captured as well, making future plumbing work difficult or impossible as well. Best approach would be to open adjoining room wall low down on the wall between stud bays and some how pour/place mortar around accessible part of acrylic base of the tub (that inside part of tub is open). That would necessitate wall repair but that's minor if tub becomes soild in place.
In the meantime I filled the tub full of water (what would that be --400 pounds of weight?) and pushed white thinset (only slightly off in color from the tub) mixed with concrete admix liquid to strengthen the emulsion. Appied two coats of this stuff in the crack along the entire length of flanges, let sit for a couple of days with the tub filled, then let the water out and have no visible cracking out over the last few days of tub filling and letting water out. Maybe I've found a less draconian fix as it creates a rigid line of material along the flexible acrylic flange that doesn't seem to move around when water and body weight is added and subtracted. Think I'll try to coat with a final clear line of Loctite tub caulk to create a water barrier which perhaps the thinset itself won't provide. Then I'm inclined to charge back to the contractor for my time and his large cost/time relief. Just want to make sure this fix is good for years not weeks....
"Just want to make sure this fix is good for years not weeks....
" Just want to make sure this fix is good for years not weeks...."
With due respect, you won't know until years have passed. I fear your fix will crack with time...because the underlying problem has not been addressed. When the crack re-appears it's back to caulking. Very unfortunately, from a legal perspective once a fix is made it becomes an add-on to the original problem. It would have been better if you had waited until after the contractor meets with you. I wish you the very best outcome.