FHB Logo Facebook LinkedIn Email Pinterest Twitter X Instagram Tiktok YouTube Plus Icon Close Icon Navigation Search Icon Navigation Search Icon Arrow Down Icon Video Guide Icon Article Guide Icon Modal Close Icon Guide Search Icon Skip to content
Subscribe
Log In
  • How-To
  • Design
  • Tools & Materials
  • Restoration
  • Videos
  • Blogs
  • Forum
  • Magazine
  • Members
  • FHB House
  • Podcast
Log In

Discussion Forum

Discussion Forum

Adding a second wall switch

| Posted in General Discussion on May 8, 2006 06:40am

I need to add a second wall switch at a spot where there is already a single-gang box and switch. What is the best/easiest way to do this? Do I remove the single-gang box (if so, how) or is there a way to easily attach a second, single-gang box side-to-side to the existing box? I’m concerned that a standard double switch wall plate won’t cover 2 side-by side boxes. Thanks for the help.

Reply
  • X
  • facebook
  • linkedin
  • pinterest
  • email
  • add to favorites Log in or Sign up to save your favorite articles

Replies

  1. chile_head | May 08, 2006 06:51pm | #1

    I have this situation at my house: I'm planning to replace a duplex switch (if that's the proper term) with two single switches.

    My plan, which of course I haven't gotten around to yet, is to use a jigsaw to cut the nails holding the box to the stud, take the box out, and replace it with a double "old work" plastic box.

    I wish I could tell you how it worked, but that's one of those "when I get around to it" projects, which probally means it'll happen about a week from never, or as soon as one of the light switches dies, whichever comes later.

  2. User avater
    McDesign | May 08, 2006 06:51pm | #2

    Gary - you're right, a double plate won't cover two boxes.  So -

    I would assume your existing box is nailed to the stud.  Reach in with just a hacksaw blade between the box and the stud, and cut the nails flush with the stud (don't hit the wires!)  Then trim out the drywall opening to fit a new double "old work" blue plastic box - the kind with the swing-out ears.  Feed the wire(s) through, and Bob's your uncle.

    Alternatively, leave the existing box, move TWO spaces over, and put in a single old work box through the drywall,  then purchase or assemble a TRIPLE wall plate with a blank center position, and glue dummy screws in the middle pair of holes.  A triple blank plate won't work; the screw holes are in the "box" rather than "device" position.

    Forrest

    1. Gary | May 08, 2006 06:59pm | #4

      Got it. Thanks. I do have a sawzall. What blade would be used to cut the nails? Or is that too much horsepower for a simple problem?

      1. FastEddie | May 08, 2006 08:47pm | #5

        Use a metal cutting blade.  The one with the small teeth that looks like a hacksaw blade.  You might need to tap a screwdriver between the box and the stud to make a little room to get the sawzall blade in there. 

        "When asked if you can do something, tell'em "Why certainly I can", then get busy and find a way to do it."  T. Roosevelt

      2. PenobscotMan | May 08, 2006 10:50pm | #9

        Plaster walls or DW? If plaster, Sawzall vibration will produce lots of cracks where you don't want them, and a nice, calm hand-held hacksaw blade would be better.

  3. DanH | May 08, 2006 06:58pm | #3

    Is the wall open or closed?

    If the wall is open (or will be opened), and you're living right, you may have a extendable metal box. This has a screw that lets you remove one side and attach a similar box (with it's side removed) to create a double-gang box.

    Otherwise it's best to remove/replace the existing box, or place a new one about two inches away so they can use separate plates.

    The separate box is easiest when you don't want to open the wall: Just get an "old work" box that includes clamps to hold it in the wall, cut the appropriate hole (being sure to leave space between boxes for the flanges of the cover plates), trial-fit the box and remove it, fish wires into the wall and pull them through the hole, insert wires in box, push box into wall and tighten clamps.

    To replace the existing box (working through wallboard), you need to widen the hole to roughly the size of the double-gang box, then use a prybar and/or Sawzall to free the box from the stud. Remove wires from old box, insert wires in new box, install new box.

    The trick here is installing the new box. Often the available "old work" boxes have projections on the sides that prevent them from being easily installed next to studs, so you may need to fasten a regular box to the stud somehow. The most effective way to do this is screws through the side of the box, but there is some question as to whether this is "code".

    If Tyranny and Oppression come to this land, it will be in the guise of fighting a foreign enemy. --James Madison
    1. User avater
      xxPaulCPxx | May 08, 2006 09:55pm | #7

      "The most effective way to do this is screws through the side of the box, but there is some question as to whether this is "code"."

      Why would it not be to code?Rebuilding my home in Cypress, CA

      Also a CRX fanatic!

      1. DanH | May 08, 2006 11:06pm | #10

        I think there's something somewhere saying that fasteners are only allowed in the back 1/2" or so of the box. It's not clear, though, whether this means screws simply through one side, or, eg, nails used to install the box that go all the way through the box from one side to the other (as is done for some styles of steel boxes).
        If Tyranny and Oppression come to this land, it will be in the guise of fighting a foreign enemy. --James Madison

        1. User avater
          BillHartmann | May 10, 2006 12:29am | #15

          There is also out a relatively new approved box with bosses on the side for angle screwing through the box.Forgot the name.Also most of the plastic old work boxes have flippers on the top and bottom tht will work.And a steel box can be installed with Madison clips.

  4. JohnSprung | May 08, 2006 09:23pm | #6

    If I understand this correctly, there's one switch now, and you want two.  In that case, the easiest thing is to leave the box and drywall alone, and simply put in a single gang duplex switch.  If you can fish the romex, you might get away with no patch and paint work at all.  


    -- J.S.


    1. Gary | May 08, 2006 10:10pm | #8

      Great suggestion. I hadn't thought of that option. Unfortunately the wife just vetoed it for aesthetic reasons. Dang. Well, if the power goes out in the Midwest today, that was me.

  5. jrnbj | May 09, 2006 02:44am | #11

    All those replies beg the question of what, exactly, is the second switch going to do, and how are you fishing wires to it!!!

    1. Gary | May 09, 2006 04:36am | #12

      Second switch is for a bedroom ceiling light fixture (~100 watts) probably will end up on a dimmer (TBA). Already placed box in ceiling and fished wires down through the top plate into the appropriate stud bay. Existing switch has hot, neutral, and ground going into its box, so I'm just going to pigtail into those upstream of the existing switch. Thanks to everyone for the advice.

      1. jrnbj | May 09, 2006 05:08am | #13

        Great suggestion. I hadn't thought of that option. Unfortunately the wife just vetoed it for aesthetic reasons. Dang. Well, if the power goes out in the Midwest today, that was me.Make the wife do it.....what's wrong with a duplex switch.....oh, nevermind...I'm remembering the lady client who burst into tears when we couldn't find a four way slide dimmer and had to substitute a rotary one.....

      2. JohnSprung | May 09, 2006 09:22pm | #14

        The dimmer eliminates the duplex option, you'll have to cut the wall and use a 2-gang box.  Go ahead and put it in to start with.  In addition to the obvious romantic lighting, it's also nice to be able to have enough light to see with and yet let the other person sleep.

        My favorite trick for cutting box holes is a diamond blade hand grout saw.  It works for both plaster and drywall.  With some care, you might get away with no patch and paint to do.   


        -- J.S.


Log in or create an account to post a comment.

Sign up Log in

Become a member and get full access to FineHomebuilding.com

Video Shorts

Categories

  • Business
  • Code Questions
  • Construction Techniques
  • Energy, Heating & Insulation
  • General Discussion
  • Help/Work Wanted
  • Photo Gallery
  • Reader Classified
  • Tools for Home Building

Discussion Forum

Recent Posts and Replies

  • |
  • |
  • |
  • |
  • |
  • |
View More Create Post

Up Next

Video Shorts

Featured Story

Rescuing Old Hardware

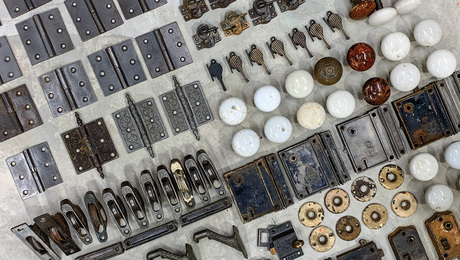
Whether it’s already in your house or picked up at a flea market, vintage hardware almost always needs help.

Featured Video

A Modern California Home Wrapped in Rockwool Insulation for Energy Efficiency and Fire Resistance

The designer and builder of the 2018 Fine Homebuilding House detail why they chose mineral-wool batts and high-density boards for all of their insulation needs.

Related Stories

  • Keeping It Cottage-Sized
  • Townhouse Transformation
  • Mortar for Old Masonry
  • Grout-Free Shower Panels

Highlights

Fine Homebuilding All Access
Fine Homebuilding Podcast
Tool Tech
Plus, get an extra 20% off with code GIFT20

"I have learned so much thanks to the searchable articles on the FHB website. I can confidently say that I expect to be a life-long subscriber." - M.K.

Get home building tips, offers, and expert advice in your inbox

Signing you up...

This site is protected by reCAPTCHA and the Google Privacy Policy and Terms of Service apply.
See all newsletters
See all newsletters

Fine Homebuilding Magazine

  • Issue 332 - July 2025
    • Custom Built-ins With Job-Site Tools
    • Fight House Fires Through Design
    • Making the Move to Multifamily
  • Issue 331 - June 2025
    • A More Resilient Roof
    • Tool Test: You Need a Drywall Sander
    • Ducted vs. Ductless Heat Pumps
  • Issue 330 - April/May 2025
    • Deck Details for Durability
    • FAQs on HPWHs
    • 10 Tips for a Long-Lasting Paint Job
  • Issue 329 - Feb/Mar 2025
    • Smart Foundation for a Small Addition
    • A Kominka Comes West
    • Making Small Kitchens Work
  • Issue 328 - Dec/Jan 2024
    • How a Pro Replaces Columns
    • Passive House 3.0
    • Tool Test: Compact Line Lasers

Fine Home Building

Newsletter Sign-up

  • Fine Homebuilding

    Home building tips, offers, and expert advice in your inbox.

  • Green Building Advisor

    Building science and energy efficiency advice, plus special offers, in your inbox.

  • Old House Journal

    Repair, renovation, and restoration tips, plus special offers, in your inbox.

Signing you up...

This site is protected by reCAPTCHA and the Google Privacy Policy and Terms of Service apply.
See all newsletters

Follow

  • Fine Homebuilding

    Dig into cutting-edge approaches and decades of proven solutions with total access to our experts and tradespeople.

    Start Free Trial Now
    • Facebook
    • Instagram
    • X
    • LinkedIn
  • GBA Prime

    Get instant access to the latest developments in green building, research, and reports from the field.

    Start Free Trial Now
    • Facebook
    • YouTube
  • Old House Journal

    Learn how to restore, repair, update, and decorate your home.

    Subscribe Now
    • Facebook
    • Instagram
    • X

Membership & Magazine

  • Online Archive
  • Start Free Trial
  • Magazine Subscription
  • Magazine Renewal
  • Gift a Subscription
  • Customer Support
  • Privacy Preferences
  • About
  • Contact
  • Advertise
  • Careers
  • Terms of Use
  • Site Map
  • Do not sell or share my information
  • Privacy Policy
  • Accessibility
  • California Privacy Rights

© 2025 Active Interest Media. All rights reserved.

Fine Homebuilding receives a commission for items purchased through links on this site, including Amazon Associates and other affiliate advertising programs.

  • Home Group
  • Antique Trader
  • Arts & Crafts Homes
  • Bank Note Reporter
  • Cabin Life
  • Cuisine at Home
  • Fine Gardening
  • Fine Woodworking
  • Green Building Advisor
  • Garden Gate
  • Horticulture
  • Keep Craft Alive
  • Log Home Living
  • Military Trader/Vehicles
  • Numismatic News
  • Numismaster
  • Old Cars Weekly
  • Old House Journal
  • Period Homes
  • Popular Woodworking
  • Script
  • ShopNotes
  • Sports Collectors Digest
  • Threads
  • Timber Home Living
  • Traditional Building
  • Woodsmith
  • World Coin News
  • Writer's Digest
Active Interest Media logo
X
X
This is a dialog window which overlays the main content of the page. The modal window is a 'site map' of the most critical areas of the site. Pressing the Escape (ESC) button will close the modal and bring you back to where you were on the page.

Main Menu

  • How-To
  • Design
  • Tools & Materials
  • Video
  • Blogs
  • Forum
  • Project Guides
  • Reader Projects
  • Magazine
  • Members
  • FHB House

Podcasts

  • FHB Podcast
  • ProTalk

Webinars

  • Upcoming and On-Demand

Podcasts

  • FHB Podcast
  • ProTalk

Webinars

  • Upcoming and On-Demand

Popular Topics

  • Kitchens
  • Business
  • Bedrooms
  • Roofs
  • Architecture and Design
  • Green Building
  • Decks
  • Framing
  • Safety
  • Remodeling
  • Bathrooms
  • Windows
  • Tilework
  • Ceilings
  • HVAC

Magazine

  • Current Issue
  • Past Issues
  • Magazine Index
  • Subscribe
  • Online Archive
  • Author Guidelines

All Access

  • Member Home
  • Start Free Trial
  • Gift Membership

Online Learning

  • Courses
  • Project Guides
  • Reader Projects
  • Podcast

More

  • FHB Ambassadors
  • FHB House
  • Customer Support

Account

  • Log In
  • Join

Newsletter

Get home building tips, offers, and expert advice in your inbox

Signing you up...

This site is protected by reCAPTCHA and the Google Privacy Policy and Terms of Service apply.
See all newsletters
See all newsletters

Follow

  • X
  • YouTube
  • instagram
  • facebook
  • pinterest
  • Tiktok

Join All Access

Become a member and get instant access to thousands of videos, how-tos, tool reviews, and design features.

Start Your Free Trial

Subscribe

FHB Magazine

Start your subscription today and save up to 70%

Subscribe

Enjoy unlimited access to Fine Homebuilding. Join Now

Already a member? Log in

We hope you’ve enjoyed your free articles. To keep reading, become a member today.

Get complete site access to expert advice, how-to videos, Code Check, and more, plus the print magazine.

Start your FREE trial

Already a member? Log in

Privacy Policy Update

We use cookies, pixels, script and other tracking technologies to analyze and improve our service, to improve and personalize content, and for advertising to you. We also share information about your use of our site with third-party social media, advertising and analytics partners. You can view our Privacy Policy here and our Terms of Use here.

Cookies

Analytics

These cookies help us track site metrics to improve our sites and provide a better user experience.

Advertising/Social Media

These cookies are used to serve advertisements aligned with your interests.

Essential

These cookies are required to provide basic functions like page navigation and access to secure areas of the website.

Delete My Data

Delete all cookies and associated data