I have Andersen thinline vinyl windows on our second floor. I’m trying to remove a window sash from the inside so that I may be able to clean the outside of the window from inside the house. However, i can’t for the life of me figure out how to remove them. Anyone out there have a suggestion?
Discussion Forum
Discussion Forum
Up Next
Video Shorts
Featured Story
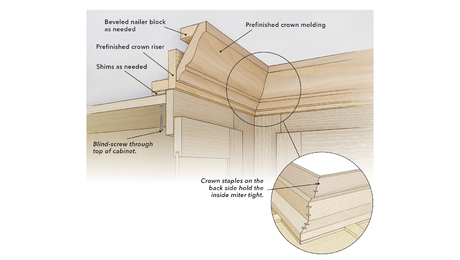
Use these assembly techniques when installing crown risers and molding to minimize visible gaps and nail holes.


Highlights


"I have learned so much thanks to the searchable articles on the FHB website. I can confidently say that I expect to be a life-long subscriber." - M.K.
Fine Homebuilding Magazine


Fine Home Building
Follow
-
Fine Homebuilding
Dig into cutting-edge approaches and decades of proven solutions with total access to our experts and tradespeople.
Start Free Trial Now -
GBA Prime
Get instant access to the latest developments in green building, research, and reports from the field.
Start Free Trial Now
- Home Group
- Antique Trader
- Arts & Crafts Homes
- Bank Note Reporter
- Cabin Life
- Cuisine at Home
- Fine Gardening
- Fine Woodworking
- Green Building Advisor
- Garden Gate
- Horticulture
- Keep Craft Alive
- Log Home Living
- Military Trader/Vehicles
- Numismatic News
- Numismaster
- Old Cars Weekly
- Old House Journal
- Period Homes
- Popular Woodworking
- Script
- ShopNotes
- Sports Collectors Digest
- Threads
- Timber Home Living
- Traditional Building
- Woodsmith
- World Coin News
- Writer's Digest

Replies
mirepoix,
We don't use Anderson but I found a site for the 400 line. Ought to be similar.
http://www.hammerzone.com/archives/window/finish/andersen/400_series/stained.htm
KK
Many of the andersens windows are not tilt and clean. if your slides have crisp edges and cannot be pressed in away from the window then you have the non-tilt.
Call 1-888-888-7020
the Narroline doublehung sashes are removable, but do take some work.
Look at the window from the inside. Slide the lower sash all the way up. On the left side jamb liner, you'll see some screws.
remove the screws, and gently pull the jamb liner out. Then pull the lower sash back down until it clears the upper jamb liner.
Pull the sash towards you, and carefully remove the sash cords. Be VERY careful with those, because they are under tension, and will retract quickly if not held onto tightly. The plastic pins on the ends can break if they retract too quickly.
Repeat for the upper sash.
Once clean, reverse directions to re-install the sashes.
But now that I've told you how to do it, I have to say that unless its a difficult place to access from the outside, you're better off just putting a ladder up to wash the windows.
Shep - that's for the Anderson wood sash.I _think_ with the Anderson vinyl sash the side guiderails "float" and you can push them 'outward' (to the sides) enough to remove the sash - or even tilt it, but if that screws something up - don't blame me.
With my mouth I will give great thanks to the Lord; I will praise Him in the midst of the throng. For He stands at the right hand of the needy, to save them from those who would condemn them to death.
- Psalms 109:30-31
I guess the OP should give more detail on which windows he has- Narroline, Tilt-Wash, casement, etc.
The tilt-wash have little plastic clips that slide down the jamb liners, pushing the liner away from the sashes and allowing them to tilt.
>>> The tilt-wash have little plastic clips that slide down the jamb liners, pushing the liner away from the sashes and allowing them to tilt.
This is true on the 400 series. The 200 series has plastic locks on top of the sash that disengages it from the jambs liners.
BTW I made a mistake on the narroline, I was thinking series 200 which has both tilt-wash and Narroline (which is not tilt-wash.) You are right on that. will go back and edit earlier post.
Agree with you that the OP could give us more detail before we keep guessing.
I haven't used the 200 series since the 400 came out. I thought both had the same mechanism for tilting the sash. I guess I was wrong.
This thread can go nowhere until we get more from the OP.
Not that that has ever stopped a thread before <G>
>>> Not that that has ever stopped a thread before
That's right. We never let real facts get in the way of a strong opinion.
All of Andersen's double hung sash are wood!!!! They do not make a vinyl
sash for any of their windows. The narroline window does not tilt, nor was it designed to be removed for cleaning. By the time you remove the sash you could get on a ladder and clean 4 -5 windows!!! BAD IDEA
The OP said "thinline", is that the same as Narrowline? I am NOT familiar with "thinline" if such a thing exists.
IF the OP meant Narrowline, they ARE tilt-wash. To the OP: You don't need to remove the sashes to clean them. I advise you NOT to do it.
EDIT, narroline is NOT tilt-wash, sorry. Some of the series 200 windows (teh ones with strings) ARE tilt-wash, they have tabs/locks on top that disengage sash from liner so they can be tilted out.
Edited 5/9/2007 8:25 pm ET by sharpblade
The old narrowlines aren't tilt wash.
I've got them in my own house.
Andersen came out with the tilt=wash long after most other window manufacturers did.
Andersen does not manufacture a "thinline".
Prhaps you meant Narrowline?
J. D. Reynolds
Home Improvements
Yes to all concerned,
I mistakenly referred to the windows as thinline/
Narrowline is the model and they were installed 9 years ago.
Theses are tall double hung windows that are not easily cleaned
also, i went through Andersen's website and found that they make a conversion kit but it sounds like I have to discard the old window sashes and install new sashes with new jamb liners. The counter balance cord is a worrisome detail in the jamb removal.
Has anyone done this?
Edited 5/11/2007 6:30 am ET by mirepoix
Edited 5/11/2007 6:32 am ET by mirepoix
If you're installing TW Conversion kits, after removing the lower right jamb liner, just push both sashes all the way to the bottom of the frame and cut the balancer strings at the top. The sashes will come right out. Then remove the rest of the jamb liners and FOLLOW THE INSTRUCTIONS for installation.'View Image
I just replaced 5 narroline units with the replacement tilt wash sashes two weeks ago. Took a total of 3 hours for all 5 windows. As long as the existing frames are square and true, the replacements go in amazingly easy. I upgraded to thicker glass and a better overall sash along with the tiltwash jambs. I did not have low-e glass before and now I do. Along with their new E-4 coating which is supposed to keep the outside of the glass cleaner somehow- verdict is still out on the effectiveness of that. Took me a little over 40 minutes for the first one following the very clear directions every step of the way. By the time I got to the last one, I had the old sashes and jambs out, window replaced, and was cleaning up in under 20 minutes. You slide both sashes all the way down, take out a screw or two from the top of the left bottom jamb liner. Then slide both sashes all the way up, take the rest of the screws out of the left bottom jamb liner. Now the left bottom jamb liner comes out, you slide down and remove the sashes one at a time. The sash cord is no problem as when you slide the sashes down to remove them, you cut the cords at the head jamb and they retract into the frame. Trim the head jamb a hair, install the new side jambs and sashes and you are off to the races. . . .Aside from some basic hand tools, all you need is a tube of silicone caulk to seal the new side jambs to the old frame. I looked at other replacement options, but this option was the easiest to do, allowed me to work from INSIDE the house, and my local Andersen dealer was great. I think this option is nice too because you lose VERY little glass area. With some replacement windows you lose an awful lot of glass area. Edited to add- the replacments were (to my mind) a little expensive. But I got to upgrade to low E glass and compression jambs in the process. If you already have Low E or High performance glass (some of the etched logos show Xi - that's the low e glass) I wouldn't think you would want to spend the money just for tilt sashes.
Edited 5/11/2007 3:47 pm ET by frontiercc2
Thanks,
This is great info and I'm encouraged . We live on a dirt road where the road dust really kicks up and makes the entire house coated with a fine coat of dirt that seems to never go away. Our windows are 2'8"X6' tall and will require a bit of maneuvering and probably 2 people to execute.
Thanks again.
The plastic jamb that the sash rest in are "springy". Push in on one side while you top of the sash out of that track, repeat for other side. The window should now be pivoting on the pins (right term?). Now look where the pin rests in, there is a springy piece of metal that you push in with a screwdriver, nailset or similar. It is impt. that the sash is in horizontal position, then lift up, repeat for other side.
I hope this makes sense.