*
I’ll be placing 2×4 stud walls around my foundation walls. However, due to the presence of expansive soils the basement slab floats, so I have to allow for possible movement. No problem, the technique I’ve seen around here (Colorado) is to hang the stud wall from the joists, and use spikes to pin it to a treated 2×4 that’s nailed to the slab, with a 1.5” space between the framed wall and the slab 2×4. The pins go in about every 2 feet, so that’s all that anchors the wall laterally. Now here’s the question: What’s a good way to frame around baseboard hot-water radiators? The radiators, 2-1/2” thick, are screwed to 2×4 blocks that are glued(?) to the foundation wall, so they stand out 4” from the wall. I really do not want to cut the plumbing and move them out so the framing will fit behind them. If I just frame around them that will be a >4’ run that’s not pinned to the floor; my concern is that it would be a bit wombly. Maybe just glue the framing to the foundation wall?
Thanks in advance for your suggestions.


Replies
*
hubert- If it were me, I'd go to the trouble to remove the bb heater and set it up with a union and shut-off valve while you have it open this far. My reason would be to allow for future replacement/repair of the unit itself. Who knows how old the unit is right now let alone years from now when the electricity goes out and a leak might occur? As for framing, why not just do a low header arrangement where the area immediately behind the heater could be 'suspended' from ground contact yet rigid enough to keep from being an issue with structural integrity. It wouldn't be that big of a deal to set the plumbing up like I describe and you'll be soooo glad you did when the inevitable happens. Hope this helps. Good luck.
*Seems a little ass backwards to me.I'd reverse the process and leave the flexible connections at the top of the framed walls between the top plate and the underside of the joists.This is very common with metal stud construction between concrete slab floors. This allows for regular movement without cracking the drywall.Of course this begs the question, why not use rigid insulation against your exterior walls without the studs?You can fasten the SM with strapping and tapcons and leave a gap at the bottom for movement.Gabe
*I'm intrigued by both possibilities. With the expansion joint at the top, I don't see how to tape and mud the wall and ceiling drywall joint. Can you describe this a little? I think I remember an article on this in FH, I'll go look it up.But eliminating all that framing, now there's a thought. Do you mean the rigid foam sheets that are about 1-1/2 thick, come in baby pink or blue? Again, could you be kind enough to provide some info on how that's firmly attached to the walls, and how I screw the sheetrock to it? Thanks for the suggestions.
*Thanks. My plumbing experience consists of sweating a couple of joints. To reveal my ignorance completly, a union? For the 1/2" copper pipe that the heater is plumbed with? There is such a thing? What a world. Is it like a kind of quick disconnect for an air hose? Thanks for the suggestion.
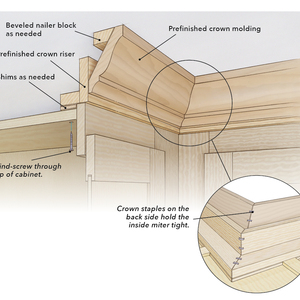
*Hubert,The gap at the top is closed with a crown molding attached to the ceiling only. This allows the wall to move up and down without so much as cracking the paint.The second suggestion is the best of course.SM baseclad is designed specifically for basements. The sheets have a recess cut into them on the lenght and this allows a 1x2 or 1x3 strapping to be installed flush with the SM. Then you just screw the drywall to the strapping.You can do it with regular SM by simply strapping the insulation to the concrete walls with tapcon screws or gripcon nails. The SM also acts as a vapor barrier and makes your basement that much more confortable to use.Gabe
*hubert- Absolutely! The union would have to be sweated on wherever you cut the pipe and had access to get a wrench on it. It would then allow removal and replacement of the unit. It's mainly a matter of prep. Cut the pipe. Clean both cut ends with emory paper until the copper is shiny. Clean both ends of the union likewise. Apply flux to both pipe ends and insides of union ends, put together, then apply the heat to the union until the solder melts. Once you get the hang of it, it's pretty simple.