Arbor/pergola post: concrete or post brace
N_Lacher
| Posted in Construction Techniques on
Hello,
I am designing a arbor/pergola for our new patio and am trying to pick which would be the best way to set the posts. I originally was going to use ss post braces, but after some thought and some time spent on the Simpson strong tie web site they do not recommend their post braces for fences or arbors since they can not be sure to resist lateral loads.
My design (a picture of which I’ve tried to load with this post) consists of just a series of post set in line with a pergola top. I’m going to use pt 6×6 for the posts, 8′ tall.
So should I just have the posts set 3′ deep into concrete (I’m in NE Ohio)? How can I keep the posts from rotting?
Thank you for your help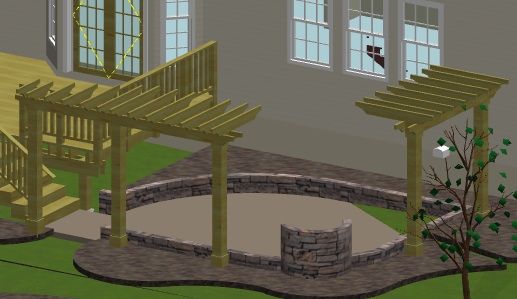


Replies
Post
To keep post from rotting, don't use wood buried in the ground.
What I did (over simplified). Concrete pier or slab. Bolt 4" sq. steel tube columns to concrete. Case out steel columns with wood. Overhead structure bolted to steet columns.
Use concrete if you want to be sure of stability, and don't sink the 6 x 6s into the concrete or they will decay. You will probably require 12 inch concrete columns to a depth below the frost level which may be 3 feet in your area but you can check with the local building department. You can check the Simpson Strong-tie on-line catalogue for adjustable galvanized or Z-Max post bases which are either inserted into the concrete when it is poured, or holes can be drilled into the cured concrete and post bases inserted with concrete epoxy. The epoxy method might give you more time to line up and square the post bases. The wooden columns are then set onto the bases. Using adjustable post bases also lets you nudge them into place in case you didn't get the holes lined up correctly. The concrete columns should also be above soil level (minimum requirement of 6 inches in my area), to avoid possible soil build up that will eventually decay the bottom of the posts. Simpson also has hidden and architectural post bases depending on the aesthetics you desire. I have also called Simpson and found their advice about connectors very helpful.
I have seen plastic post covers advertised into which the posts are inserted and concrete is poured around the posts and plastic. The plastic is supposed to prevent decay; however, I have never used them or seen any reports to their long-term success.
Their is a good video about deck building which shows concrete piers and bases https://www.finehomebuilding.com/how-to/video/series-build-a-desk.aspx?nterms=127604 (I hope that address is correct as I had to type it in. For some reason I can't copy and paste to this forum).
Schrickker- that was my original design but Simpson does not recommend using their post bases in this kind of application- but in my research most contractors do recommend them. Do you have any experience seeing how they perform without lateral bracing?
Same goes for encasing the posts into concrete- so far the contractors I've had bidding on the job want to set the posts in concrete but this forum tends to regard this as crazy talk.
My great concern is the lateral load that the Simpson post bases will have to resist- my engineer husband would never let me live down a structural failure. Then again posts set in concrete have a limited lifespans and replacing them would be a pain.
Maybe my best bet would be to set metal columns in to the concrete and just cover them in wood.
Arbor/pergola post
My understanding about lateral bracing, in talking to Simpson, is that the bases by themselves will not prevent twisting of the posts; for example, if using them for fencing or free-standing. But, based on your design, you have lateral bracing at the top so that shouldn't be a problem. I built a pergola two years ago that is similar to yours with bracing at the top except I bolted the posts to existing posts that are attached to concrete piers in the way I described in my previous response. No twisting has occurred and wind force hasn't been a problem because there isn't a large 'sail' for the wind to catch.
If you decide to sink metal columns they should be galvanized because even coated metal columns will eventually rust in concrete. Of course, it will probably take 10 or more years depending on the water table and drainage. A final option, which I usually use, is to hire an engineer to do the structural design. It's usually less than a few hundred dollars and offers peace of mind. Maybe your husband has some structural engineer friends.
Thank you for your help. I am actually an architect taking time off to build the next generation. So when I design it's during nap times and in a vacuum- no real opportunity to toss design ideas off of colleagues. Being that my husband is a (metallurgical) engineer I like to double check my designs before they have a chance to fall down and then I will never hear the end of it. I have two more contractors that are bidding on the job so I will see what they would recommend and then take all advice given- (well except for the laminated ullity poles, while thinking outside of the box that is to far from what my small town contractors could handle, never mind my budget.) and then make my best professional decision. Hopefully I will be able to post pictures in June.
Unless you use substantial steel supports, you should not have an offset load like that that lacks lateral bracing.
If you could somehow counter-balance the offset load it would be OK, or if you could add some sort of lateral bracing.
post
Balancing the load is good as far as it goes, but even when balanced, wind loads can be a significant on structures like this and need to be addressed.
We wood workers are always reluctant to use anything that we can't drive a nail into.
But, unless there's a strong prevailing wind, wind load is intermittent and so will not contribute substantially to "creep". But an unbalanced load will both bend the wood posts and cause the footing to shift over time.
Post
If a good strong intermittent gust comes along, you might see you arbor/pergola creeping over into your neighbors yard. :-)
I don't know about your area, but around here, the AHJ are concerned about these type structures becoming missiles.
Around here anything with a roof must be "permitted", due to the flying roof hazard. But it's not clear that a pergola would trip the bar for our guys, since there's nothing to act like a kite.
There is one interesting option that might work nearly as well as steel but still look sorta good: Laminated utility poles. They're designed for direct burial and are much stiffer than plain wood.
But I have no idea whether they're available in such a small size at a reasonable price.
I don't see any significant lateral loads. A heavy post base with substantial fasteners should work fine if the beams are attached well at the top. If in doubt add some knee braces from the posts to the beams.
But what I do want to know is how the heck the cantilevered joists are attached to the beams????
Arbor/Pergola post
This morning on This Old House a paintable solid cellular PVC product was used to make a gate and pergola. Since it was solid cellular PVC the posts were put three feet into the ground and concrete poured around them. The manufacturer wasn't mentioned and the product hasn't shown up on the TOH site yet. I thought I would mention it because it could be a solution. Try http://www.turnkeymillwork.com/pvc_or_vinyl.php
I'm guessing that the PVC would be subject to creep from the off-center load.
It's not solid PVC
Dan would be guessing correctly --if the material were solid or cellular PVC. However PVC itself is not (at least currently) being marketed as structurally reliable framing material. Amongst other shortcomings, PVC is a thermoplatic material that can begin to deform when surface temperatures reach 130 degrees. It can also become brittle in cold weather with the addition of proprietary platicizing agents However making the material less brittle involves more potential creep . So, as with most anything, you're not getting a free lunch with PVC's superb weatherability.
In fact, if you go to Turnkey Millwork's FAQ section you will find this statement: Question: "Can unreinforced cellular PVC be used in structural applications? Answer: "No".
So the earlier post that stated Turnkeys Millwork was "solid PVC" is inaccurate. Turnkey uses structural aluminum in combination with the PVC to make their PVC clad components structural. The takeaway from that if your are using Turnkey componets in a structural manner, then you'd better be careful on how you make your structural connections. My guess is that you cannot simply attach post and beams as if they solid pieces of structural lumber but rather must properly engage the structural aluminum section. Turnkey apparently can do this for you in kits... or by a customization process. That means (IMO) you are engaging the services of a professional engineer with your purchase --which is smart.
Yes, I saw that too this morning. I thinking I'm going to do what I saw in another episode of TOH- Tom took the same ice block adhesive strips that he uses to flash out a window and wrapped the post in them before setting them on top of 2" of gravel and then incasing them in concrete. I thought of this before and to see Tom do it makes me pretty confident that it will work.
Consult a structural engineer
First of all, you must think of these pergola posts as cantilevered beams if they are resisting any lateral load whatsoever. Since the intention seems to be that they function in real life (and not just a drawing) they will have real dead load mass, will be asked to resist actual lateral wind loads, will resist ( large eccentric) loading conditions of the pergola beams, and thus function as cantilevered beams. That cantievered load and overturing moment needs to be resoved by the footing whether you anchor the post directly into the ground.. or design a resolving connection in dissimilar material (like steel or concrete, or both) which transfers into a longer lasting footing connection. In either case there isn't a IRC prescriptive code design for your structure and I recommend you consult an engineer that knows what he/she is doing (if you don't). The load and connections are not as simple as they are depicted in the drawing.
Second, you have to address the connection of the multiplecantilevered joists/beams to the main girder beams. The beams are exerting an eccentric loading condition that results in a large moment arm that must be resolved through that connecton and into the posts. As I said before, this eccentric load is also actively working to overturn the cantivlevered posts and results in much larger moment and shear values than most simple post and beam structures.
Thank you for your thoughts, I've done the math, drawn my shear and moment diagrams and had it all checked by my former structures prof. It will work, it will stand- I will post pictures when it is all finished.
maybe....
It appeared from your original post that you were in the process of detailing/designing this structure. Now (suddenly) you seemed to have resolved the structure and checked it for bending and shear with an engineer (your professor). That's great.
Since you posted the original question, can you share with us how you resolved your connections; particularly how you are connecting your cantilevered beams to the girder?
Arbor / pergola post
Now that you mention, it I did the same thing a couple of years ago with fence posts; I used ground contact pressure treated, wrapped them in self-adhesive shield and put the posts into 4 foot deep holes. We live in an area that is mostly glacial gravel deposits so drainage isn't an issue. I'll let you know in 15 years whether the posts are still intact. I'm looking forward to your final solution and pictures.
I would question wrapping the posts, as this would capture surface water and hold it against the wood.
That's a good consideration. I thought that if the water shield would keep water out of a house it should keep it off the posts. The posts are also ground contact in gravel (no concrete). As I said previously, it may be 15 years before I know whether this was the right move.
It's the chemicals doing the work
Since your posts are rated for ground contact it really doesn't matter much if they're wrapped with regard to moisture penetration. It is the chemical preservatives (poisons) in ground contact lumber that are doing most of the protecting. Moisture doesn't rot wood persay. Rather, it's the microrganisms living in a damp ecosystem (the ground) that devore cellulose (as a food source) thereby wasting the post materail. However, they will find the same wood far less appetizing when treated with well dispersed poisons injected under high heat and pressure. That's why ground contact lumber made from normally vulnerable wood lasts longer; not because it's kept dry with sealing tape. Almost any wood will last a long, long time if kept dry. This preserving phenomena in wet wood can be observed naturally in species (like locust and osage orange) that have natural presevatives (in the form of resins) which are deposited in its cell structure as it ages.
The reason we associate moisture with rotting wood is that moisture needs to be present (generally 19% Moisture content or greater) in order for these microrganisms to survive and propogate. Just like us humans, they need food and water to live. Actually the wrap may help longevity in a more tangential way than is readily apparent. That is it may prevent the chemicals from leaching out of the wood prematurely, thereby extending their protective lifespan. So it's certainly not going to hurt to have them wrapped. My guess is you'll get at least 20 years out of 'em either way.
You can paint the bottoms of the posts ,the below grade bit with karnack flashing paint and this will make them last as long as you can stand to look at the pt lumber tops
Have you built yet?
A few months back you said you'd engineered and had proofed your footing questions for a cantilevered pergola. I'm looking to do something similiar. Have you constructed it yet. Cab you share your details and perhaps some pictures? Thanks...Ray
project finished
Yes! it is finished. I have pictures I just have to have the husband get them off his fancy camera. I will harrass him tonight and hope to post pics and information tomorrow. It all turned out great and I'm currenty in the process of making custom trellis to hang on the posts.
Nancy
Here is pictures of the finished project. I painted on the flashing weather proofing as suggested in one of the comments. The contactor set the posts in concrete 36" deep and 16" in diameter. He toe nailed in the rafters with screws. So far everything is is holding up fine. I am making trellis that will go on the posts and hopefully in 2-3 years will have climbing roses providing shade and privacy.
In two weeks I will be posting more pictures and details on my blog: Lacherdesignstudio.blogspot.com if you need more information.
Thanks everyone for their suggestions.
Nancy