New thread here, now that I’ve moved inside after the “Triumph of the Geometry” thread http://forums.taunton.com/tp-breaktime/messages?msg=82119.1 got me up and into the residence. There, I built a temporary access stair and dormer cut into the attic
Clients have engaged me to repair / refloor / rewall / re-HVAC / reinsulate the existing attic rooms, so the kids(s) can live safely in there while larger additions & renovations happen downstairs. Existing rooms were built on 2×6 ceiling joists below; rock was installed, taped once and painted probably 30 years ago.
Basically, I am moving East to West; installing new joists, new subfloor, new knee walls, and replacing the live knob-and-tube wiring (!). Hip (roof) planes will be strapped for flatness before DW.
But – having some trouble with a neighbor – “Police Came” http://forums.taunton.com/tp-breaktime/messages?msg=83450.1 and “Got a Stop Work Order” http://forums.taunton.com/tp-breaktime/messages?msg=84020.1
In our county, this is the type of work, an “internal repair”, where the form, fit, or function has not changed, and no permanant exterior changes are made to the fabric of the house, that has never required a permit. The exterior stair (all screwed together) will be dis-assembled; the ACQ has already been spoken for; the dormer will be enclosed in a permitted addition this summer.
Attic wiring had three circuits; one for outlets, one for lighting, one for downstairs overheads. They still exist, and have the same function, but with new wire – traditionally done here with no permit.
Our town no longer issues building permits; the town P&Z board looks over a single sheet called a “development permit”, for setbacks, mostly, and the contractor or homeowner takes this to the county for a building permit if one is required. In this case, I am in a dispute over the requirement for this “development permit”. My reading of the statute, and eight years of working here does not indicate one is required. P&Z is being pushed by a nosy neighbor; noone is saying I need a “building” permit from the county.
I, and my clients, are too much Libertarian in outlook to jump through regulatory hoops just because some “might” apply. Clients are being great; have given me the go ahead to push back as hard as I want.
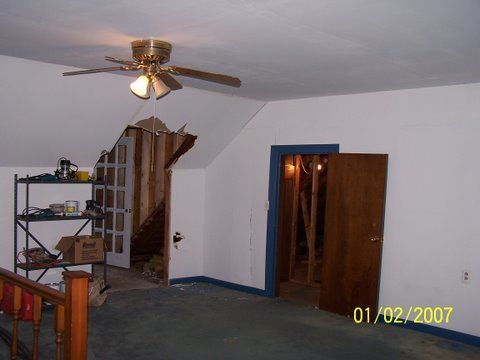
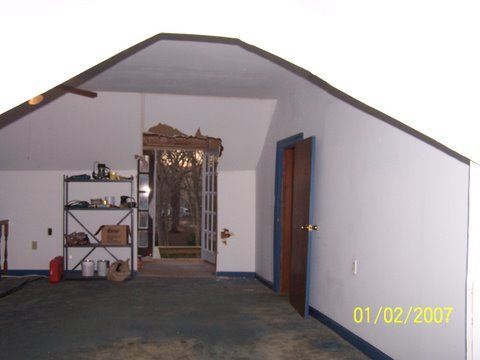
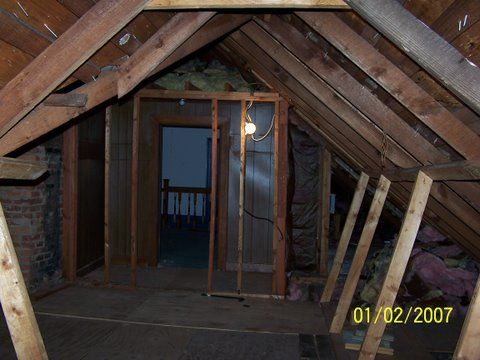
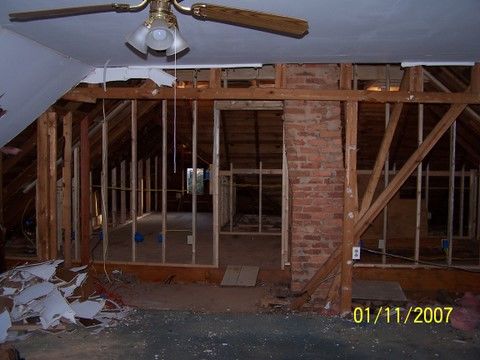
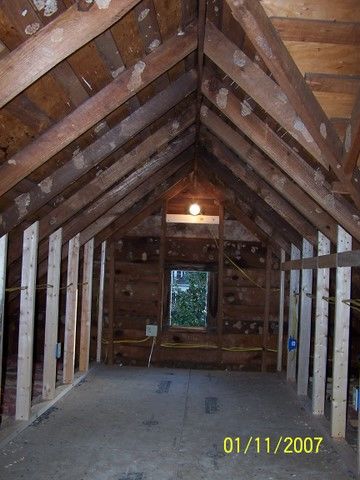
Anyway, here are some interior during photos:
Here I’ve cut through the wall to get to the dormer –
Old attic storage room looking back into main room –
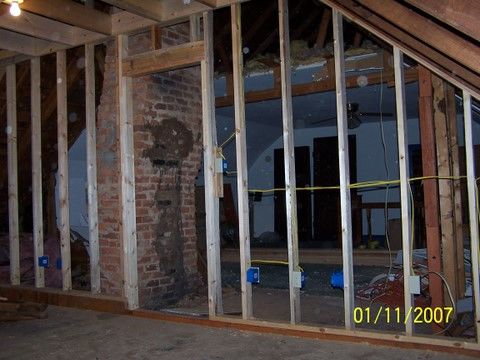
Side of main room removed; looking into repaired area to the east –
Repaired area –
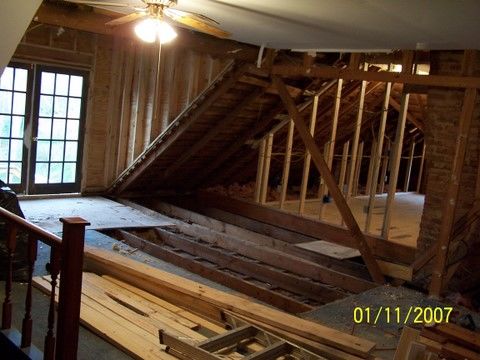
More wall removal and temp. bracing in main room
Forrest – fighting the good fight
Edited 1/11/2007 6:20 pm by McDesign
Edited 1/11/2007 6:20 pm by McDesign
Edited 1/11/2007 6:21 pm by McDesign
Edited 1/11/2007 6:21 pm by McDesign
Edited 1/11/2007 6:21 pm by McDesign
Edited 1/11/2007 6:27 pm by McDesign


Replies
Is the addition permit complete and in hand?
Jon Blakemore
RappahannockINC.com Fredericksburg, VA
Forrest,
Looks good. Are you doing the electrical?
Can you add modern wiring downstream from ball and knob? (Our house is full of it and we are slowly replacing as renovations occur/require. First thing we did was a 400 amp service).
Looking forward to "Attic Recovery"
Chuck S.
<Can you add modern wiring downstream from ball and knob?>
No. As I understand it, you have to start at or work back to the panel. In this case, when a modern panel was put in in the '70s, 12-2 w/g romex was run to feed these existing knob and tube circuits hidden in the walls and insulation and between the original and dropped ceilings. Since I'm pulling up the attic floors, I'm replacing that junk back to the '70s Romex.
Forrest
Forrest,
Same deal here in Columbus. 1920's Bungalo. Heart pine floors. Third owner. Slowly rewiring everything.
Chuck Slive, work, build, ...better with wood
Good lord, what are you powering with a 400 amp service?Rebuilding my home in Cypress, CA
Also a CRX fanatic!
Forrest,
Does the chimney stay? Looks loke it needs some work where an old thimble used to be. Just wondering. Glad to see more of your work.
Walter
Chimneys will stay - I've got a place called "Chimney Mischief" coming out from Atlanta to quote on rebuilding / repairing. They did all our house work 15 years ago, and it's still the best I've seen.
Worked some more today - Here you can see I've shortened one door another 1-1/2" - that old back wall had sunk nearly 3" relative to the center wall of the house.
View Image
Chimney will be repaired, rough plastered, and left exposed in the attic room
View Image
Here is my scheme for re-powering the 1st-floor ceiling wiring. The single box hooks to the old wire; it will be replaced as I get to that section - no access now.
View Image
Another pic of the storage room to-be
View Image
Looking forward onto the existing floor that I'm slowly re-joisting and replacing
View Image
Tiny doorway and stair - why I had to build the outside staircase
View Image
Downstairs view of same door. The stairway was originally from a back porch; I closed it in for the previous owner some years ago.
View Image
These cabinets I had built to enclose the stair -
View Image
Forrest
Edited 1/15/2007 6:05 pm by McDesign
Edited 1/15/2007 6:05 pm by McDesign
Edited 1/15/2007 6:07 pm by McDesign
Edited 1/15/2007 6:08 pm by McDesign
Edited 1/15/2007 6:09 pm by McDesign
Edited 1/15/2007 6:09 pm by McDesign
Edited 1/15/2007 6:10 pm by McDesign
Edited 1/15/2007 6:11 pm by McDesign
Forrest,
Looking good.
Will you rebuild the stairs to the attic? When the kids are teens this new space will become a hang out.
Nice cabs below stairs for the previous owner.
Chuck S.
Still rockin. Dry throat.live, work, build, ...better with wood
Stairs will be rebuilt and widened significantly; and slid toward the rear of the house 6-8', to come up from the as-yet-unbuilt family room addition.
Above the family room, and adjoining thru the new French doors, will be the two girls' bedrooms. The big room will be their common room.
Assuming the police don't come back!
Forrest
More work screwing and gluing today. Finished out around my rear dormer - some of the old joists dropped 3" in 15'-6" - see how much trimmed the bottoms of the doors are! The new floor is "laser-flat". Triple 2x8 joists under the little wing walls supporting the dormer sides
View Image
View Image
Also did some demo around the existing front-facing gable. Going to replace that center "window" (really a hinged piece of Plexiglass) with a real circle-top to match the exterior trim
View Image
Forrest
Edited 1/16/2007 5:34 pm by McDesign
Edited 1/16/2007 5:35 pm by McDesign
Edited 1/16/2007 5:37 pm by McDesign
Looks like good progress. Did you calibrate the laser level? Mine was off and had a surveyer buddy do it with his transit.
Are you going to build the new circular transom(window top)?
Chuck S.live, work, build, ...better with wood
calibration - I just set it up either end of about 80' - seemed to agree.
I might build the circle top - got that book reprint "Circular Work in Carpentry and Joinery" - itchin' to use it!
Forrest
you're making me feel guilty . . . have an attic just like that that i keep putting off :Pquestion: are you sistering new joists to beef up the structure, or to level the floor (or both)?
Edited 1/17/2007 10:10 am ET by draftguy
Levelling and support both. Old ceiling joists are SYP true 2x6s; 24" OC; spanning 15'6. Some sag as much as 3" in the middle, plus the tops of the downstairs walls are not level. Old attic room floor was T&G 1x8, 1/4" ply, and cheap carpet
I'm putting in new 2x8s, 12" OC, as well as tying every other one to the sagged joist, so those doubled ones are probably 10" deep in the middle. Decided on no blocking, because of the 12" OC.
Darned satisfying project, to carve straight level space where there was crap before! having to work my way across, to support the roof as I go - it has some 22' long 2x4 rafters!
Client is pleased.
Forrest
Edit - original plaster ceilings (11') are in bad shape; lowered drywall ceiling was put in at 9', 20-30 years ago. Eventually, I'll go room-by-room and redo the original ceilings and moldings
Edited 1/17/2007 12:09 pm by McDesign
Forest,I'm a homeowner with a similar old house attic, 2x6 floor joists. Obviously replacing the joists is not a DIY project. I'd be interested in knowing (ballpark) what the cost of this project is.We also have a tight attic stairway, 22". Did you have to replace the stairway in order to meet code? Thanks for a great post.
Thanks for the encouragement. I'm not sure it's not a DIY project. I've done several of these, and developed a pretty good sequence that is not too bad to do. I just sister the old joists (screws), and add some more joists and good subfloor. Getting materials (sheet goods, especially) in and out is always difficult, which is why on this job I required that I build an exterior stair and French doors first.
Usually, old joists are notched where they sit on the top plates, so a new joist with no notches usually clears all the plaster squeeze-out and mess. I use lots of screws and glue, and my new impact driver!
With a bath and a few skylights and HVAC and inexpensive finishes, figure about $45-50 per square foot. Lots of labor in that, obviously.
Stairway we were able to ignore, because the house had a "finished" room up there. I'm just gutting and re-building the space - it was already in use. Eventually, the house will get a new stair.
Forrest
<<<Stairway we were able to ignore, because the house had a "finished" room up there. I'm just gutting and re-building the space - it was already in use. Eventually, the house will get a new stair.>>>>Are you telling me that if an attic is finished already that you do not need a building permit to sister in new joists?? And the narrow stairway is grandfathered in even though it does not meet code??
Yes. Here, we only have to update house to meet code if you increase the value of it more than 50%.
Forrest
Looks like someone had a goodly battle with mud daubers up there.
View Image
jt8
"Holding on to anger is like grasping a hot coal with the intent of throwing it at someone else; you are the one getting burned."
-- Buddha
It's mud dauber heaven! I've got to scrape the side of every joist before I sister it. With that and the squirrels and mice and rats, it's Wild Kingdom.
View Image
Forrest
Edited 1/17/2007 6:49 am by McDesign
I'd much rather deal with 'em in January than July.
I've been trying to talk my BIL and sister into finishing their attic for about 3 years now. They've got a 12-12 roof, so probably have around 1200 sq ft up there that would be useable. It has two full sized windows on either end and a small dormer window on the west side. Regular staircase to get up there ("U" shaped with a landing) with a door at the bottom.
Just a waste not to utilize that space. Maybe I'll direct them to this thread.
jt8
"Holding on to anger is like grasping a hot coal with the intent of throwing it at someone else; you are the one getting burned."-- Buddha
Not so fast, t8...
That space would also require HVAC, Electrical and, while you're at it, Bathroom.
Carrying costs include insurance, taxes (higher) and cost per cubic foot to keep temperate.
Future cost may be that the neighborhood won't support that size house and the addition won't help much in resale value.
PLUS...
They may not need it.
Attic space is valuable as storage.... where ya gonna put your stuff after it's finished out?
I like the idea of useful space, but make sure of the use. I could easily fill up our 1500' garage/basement with something other than cars (read tools), but I insist that the garage space must be used by cars/truck.Troy Sprout
Socialism in general has a record of failure so blatant that only an intellectual could ignore or evade it."-- Thomas Sowell
That space would also require HVAC, Electrical and, while you're at it, Bathroom.
Previous owner put a sub-panel up there, so electrical wouldn't be hard. A 1/2 BA would be easy to include, and a full ba with some work. Of course you'd be tapping into the cast iron soil pipe...which is always a good time.
For HVAC, I think I'd rather setup an independant system for the attic space. The 1st & 2nd floors have radiators that can barely keep up. BIL blew some insulation into the walls, which helped, but I'm still not impressed with the performance. I think a very well insulated attic could be climate controlled much easier on its own.
Carrying costs include insurance, taxes (higher) and cost per cubic foot to keep temperate.
I doubt they would advertise to the tax man that they added 1200 sq ft. Especially since they just had their full blown inspection a couple months ago (guy toured the whole house with his tape measure and clip board). Insurance might go up, but I'm not sure what kind of jump you're talking to go from 3k-ish sq ft to 4200-ish.
Assuming a separate system for the attic, it might decrease the load on the main system because currently the attic only has insulation between the floor joists and the door leading to the attic isn't an insulated door (so they're currently losing a lot of heat to the attic). But yes, the overall cost would be higher.
Future cost may be that the neighborhood won't support that size house and the addition won't help much in resale value.
Right now they are about middling in their area. There are some smaller bungalows, but also some houses larger than theirs. They have a big, brick Italianate right across the street from them.
Attic space is valuable as storage.... where ya gonna put your stuff after it's finished out?
I sometimes suspect that my sister and mom could live in a 500 sq ft house.... just as long as it had 2500sq ft of closet attached to it ;)
I think the initial plan had been to put the ceiling in around 8-9' and make storage above that. Off the top of my head, I don't know what that would translate to...maybe 4-600 sq ft-ish? Currently they are only using a portion on the attic because the previous owner pulled up the t&G floor to jam fiberglass batts between the floor joists. He had only gotten about 1/4 of the floor back down prior to selling.
Plus they have a full basement. Plus each BR has a walk in closet. And besides which, I think you could give my sister 10k sq ft of storage space and 5-10 years later she would still complain about "not having anyplace to store stuff."
But it isn't my call or my $$. :)
jt8
"Holding on to anger is like grasping a hot coal with the intent of throwing it at someone else; you are the one getting burned."-- Buddha
Did some more deom and two trips to the dump today; got lumber for tomorrow before the sleet tonight. This section has 2x6 24" OC spanning nearly 17', so huge sag. I'm going with 2x8s on 8" centers (don't want to raise the floor too much to mess up the stair)
View Image
View Image
View Image
Also replaced this vent
View Image
With this window knocked together from scrap and a piece of old glass
View Image
Forrest
Edited 1/17/2007 6:53 pm by McDesign
Edited 1/17/2007 6:53 pm by McDesign
Edited 1/17/2007 6:54 pm by McDesign
Edited 1/17/2007 6:54 pm by McDesign
Edited 1/17/2007 6:56 pm by McDesign
Forrest,
Your picks did not show up. You can imbed them without editting your post.
Chuck S.
Just like magic. They are there. You can hit preview, open pic, copy, back, revise and paste. YOU taught me how.
BTW looking good up there. Ready for the Ice?
Chuck S
live, work, build, ...better with wood
Edited 1/17/2007 7:00 pm ET by stevent1
Kids just got this new computer with win XP, and if I go to "preview", it won't let me back. Office computer, 95SE, still works fine, but there's food and wine in here and it's warm.
Forrest
Warmth, food, and wine. Sounds like a song.
That gable end with the new window looks good. Is that your work?
Chuck S.live, work, build, ...better with wood
No - I think the gable end is original - 'teens, I believe. I will be duplicating that twice on the addition, so we'll see how mine turns out.
As an additional note, this house was the setting for episode #88 (I think) of In The Heat of the Night - trying to find some pix from the previous owner. Some bits in other episodes as well, and some movies.
Forrest
Forrest,Nice work there on that window. That's the kind of design spirit I was talking about in the other thread.Question for you about your sistering method. Do you find the screws and glue to work better than nails? I've got a project coming up that's going to require some joist bolstering and was led to the impressions that: screws are a no-no because they risk having the heads snap off under stress, and the added benefit of the glue wasn't worth the effort. What's your opinion on that?Best,
SteveTua res agitur, paries cum proximus ardet ~ Horace
Structurally, I use the #9 x 3-1/2" Grip-Rite deck screws (about $80 for 25# at HD), and I can't break them, even with my handy new Makita impact driver. I did some fooling around where I screwed 2x4 blocks flat to some installed Advantech, and beat them laterally with a 8# sledge until the screws ripped out or the 2x4s split - never broke a screw, though I bent some. I don't want to use nailing with old plaster hanging below - a nailgun shakes 'em less, but doesn't pull things together like hand nails (or screws).
I can see where a glue like the Liquid Nails I use can creep, and thus not really help compared to a solidifying glue like resourcinol, but I feel like it helps fill voids between rough old wood and new wood.
Same with gluing down Advantech to new joists with screws (#8 x 1-5/8") - kind of belt-and-suspenders, but it can't hurt, and is easy enough to do.
Forrest
Thanks, that makes sense to me. I don't have room to hand nail, but the screws might be a good call for the impact driver. At least until Piffin sees this and gives me a hard time for thinking about screws :)
What do you think about a poly glue like Gorilla instead of the Liquid Nails?
Oh, by the way, there was an article on celebrating Robert Burns in the paper today. One of the selections was Cock-a-Leekie Soup. Leeks and whisky, how bad could it be? http://www.washingtonpost.com/wp-dyn/content/article/2007/01/16/AR2007011600321.htmlTua res agitur, paries cum proximus ardet ~ Horace
I think officially the best glue is that kind you mix with water, that sets up hard as a rock. Never used it, tho'. I think PL Premium is polyU like gorilla, and expands, and is probably a lot easier to dispense (normal 10 oz tube). haven't used it; some guys swear by it
Forrest - I just like the smell of Liquid Nails. oh - and Gorilla Glue makes me break out in a rash on my trunk and arms and legs and neck and face and stuff
I'll give the PL a try. Count me among those who'd like to avoid a rash.Thanks for the info. Sorry for the hijack.Tua res agitur, paries cum proximus ardet ~ Horace
I think PL Premium is polyU like gorilla, and expands.
Quite different animals, although both are poly. I'm not a big fan of the foaming poly like Gorilla. PL Premium guns on a lot like any const. adhesive, no foaming, but dries pretty dogone ridgid and holds like crazy. I used it for first time recently to sister joists in saggy bath floor and was a little bit surprised at the ridigity...not rubbery at all. Seems like a perfect application.
You might want to give it a squirt just to see what it's like. Only caution is the same as Gorilla...don't get it on ya unless you want to wear it for a while.PJ
Everything will be okay in the end. If it's not okay, it's not the end.
Forrest,You really ought to try the PL Premium. It has very low odor compared to the PL400 or the solvent-based Liquid Nails, which can make me woozy indoors. And it sticks much better. I did destructive tests of 2x4 short scraps glued to exterior brick back in 1991 when the Premium was pretty new, and those tests convinced me it is better. It also does not skin over quickly like the 400 can.If you get it on your skin, you can remove it if you get it before it cures. A bottle of rubbing alcohol and a rag or two in your pouch does the trick. Second rag is only if you are accident prone.Construction mastics are not true structural adhesives, but they do not need to be, either. In your application, the glue is helping to share loads, and keeping things squeak-free. It also lets each sister joist reinforce its partner against splitting, something the screws don't really do. The screws transmit the primary load and the glue helps everything work together. The screws won't creep under the load, so the glue isn't going anywhere either.Nice project. Keep the pictures coming.Bill
I've come late to this thread, but I want to echo the PL Premium support. I started using it to assemble melamine cabinets when I couldn't locate the white melamine glue. Someone on this BT suggested it. I've used since for all sorts of applications, including some very elegant transome mirrors where the mirrors had to stay put with glue only! There is not enough acid in this PL Premium to eat through the silver backing and several years later, the mirrors still look great. I use PL premium whenever time is not issue, and it needs to stay put! Great stuff.BTW, I have switched to Sumo Glue from gorrilla glue...stronger by far and 1/2 the expansion. check it out!!"The nearest thing to eternal life we will ever see on this earth is a governmental program" -Ronald Reagan
"At least until Piffin sees this"I'd use structural screws with PL premium for the ame thing here. Nails would loosen too much of the plaster below.
Welcome to the Taunton University of Knowledge FHB Campus at Breaktime. where ... Excellence is its own reward!
Thanks Piffin.No plaster here, only drywall. It's going to be screwed n' glued tomorrow.You have a preference on the Grip Rite vs. Deck Mate?Glad to see not even an innocuous comment like that gets by you :)Tua res agitur, paries cum proximus ardet ~ Horace
I use GRK screws - not familiar withthe others.Even with SR below, the banging with nails would give you pops in the surface to repair.
Welcome to the Taunton University of Knowledge FHB Campus at Breaktime. where ... Excellence is its own reward!
I never had luck with the Grip Rites, using the 3" self drilling points. The ones I was using were #8 though, not #9. I broke probably 10% of them driving them in.
I have had no problems with the "Phillips Deck Mate Square Driv" screws, in #8 3" and #9 3.5", though neither have the #17 self drilling point.
With those #9 3.5" screws, its easy to overdrive deep into the wood. Until I got used to it, I could bury those screws at least an inch into the wood - Douglas Fir, BTW. Never broke off a head.
I could also tear a 16ga. Simpson strap of them - again, the screw would not break!
Unfortunatly, McFeely's just stopped making their round washer head 2 7/8 Promax screws - they had only 1.5" of thread. They are perfect for pulling together 2x and will NOT SPLIT WOOD, like regular flathead types do. I just bought the last 500 thay had. Other star drive companies make similar screws though, I haven't beat them up yet though.Rebuilding my home in Cypress, CA
Also a CRX fanatic!
Enjoying this thread VERY much. Type of project that is right up my alley.
Heading to "Triumph" now. Working backwards, oh well.
Watching your project, too.
Here's a catchup here at lunch (job is across the street!)
Got this done Saturday - had to go with 8" OC, because of 16'5 clear span and 2x8s.
View Image
Pulled up the old flooring and junk from the last of the main room
View Image
Got the sistering of the last four joists done; now I'll go back and fill in after lunch - gotta put some transverse ductwork in under the floor as well.
View Image
Here you can see the centers of the old 2x6 joist are 2-3 inches down - they are together with the new ones at the plates!
View Image
Forrest
Edited 1/22/2007 11:53 am by McDesign
Edited 1/22/2007 11:54 am by McDesign
Edited 1/22/2007 11:54 am by McDesign
Edited 1/22/2007 11:56 am by McDesign
I'm amazed (though I shouldn't be) that the house only had 24" O.C. 2x6 to start with. I guess that space was never intended to be occupied by more that Christmas ornaments.
Pre or Postwar construction??? You might have already said.
How much wiring did you have to address prior to your sister act??
Looks like you've given them a floor with some integrity now. Keep up the good work.
1/2" ice on everything here in the mtns. today, guess I'll try to teach myself some Sketchup so I can design my next project.
1920's construction, I think. Very typical for around here. The stairway up there is original, so I assume it was always used as an upstairs room. Interestingly, it came off the back porch, not from inside the house. Students at the college down the street (became Emory University) would board with townspeople, and many old house had this exterior-only access.
Did some more after lunch - rest of the joists in, jiggered my spacing a little to make two chases for 8" R6 Flex to get HVAC to the far side of the attic.
View Image
Temporary props wedged in, down to new joists and subfloor; fragment of old knee wall to be removed.
View Image
Floor and stud knee wall in new location
View Image
Hopefully get this end done tomorrow.
Forrest
Edited 1/22/2007 6:03 pm by McDesign
Edited 1/22/2007 6:04 pm by McDesign
Edited 1/22/2007 6:05 pm by McDesign
Forrest,
That's a lot of good looking work. Many houses of that era in the south have underbuilt roof systems. No snow load issues.
What type of bearing will be below your new knee walls?
Chuck Slive, work, build, ...better with wood
Bearing under the knee walls in the main room is double or triple joists, depending on the place. The side sections, with the 7' roof peak, are just a toeplate on Advantech, transverse over the new joists (12" OC)
Forrest
Is this a real thread or a figment of my imagination?
I checked - today was real.
Finished joists and subfloor in little bay / niche area. Client wanted to push the knee walls back, and build in windowseat storage on either side, 20" deep out to the 6' wide entry opening and new window trim.
View Image
View Image
Cleared the area for new double 16' LVL beam for transverse wall (reaches 13' at the peak). This upstairs room is about 20" wider on each side than the downstairs room (where all the pretty new joists end). Need to go to the dump with that pile; too muddy today.
View Image
Installed and braced the beam. It's deeper than it needs to be; this end gets notched down to floor level for a doorway.
View Image
Forrest - got a date with planning and zoning tonight . . .
Edited 1/23/2007 6:13 pm by McDesign
Edited 1/23/2007 6:13 pm by McDesign
Edited 1/23/2007 6:13 pm by McDesign
Edited 1/23/2007 6:17 pm by McDesign
Forrest,Nice!Building from the top down.Chuck S.
live, work, build, ...better with wood
<Building from the top down.>
You know it - in a plaster house, I'd always rather work that way!
Forrest - scored at P&Z tonight
How'd the P&Z go?
jt8
"Holding on to anger is like grasping a hot coal with the intent of throwing it at someone else; you are the one getting burned."-- Buddha
Forrest,
I get tired just looking at all the work you are doing by yourself!
Nice looking work- what great usable space that will be when you're done.
Keep those pictures coming.
Walter
>>>>>>>>>I get tired just looking at all the work you are doing by yourself!Yeah, looking thru this thread, I keep making calculations about how many trips up and down those stairs with a load.http://logancustomcopper.com
http://grantlogan.net/
It's like the whole world's walking pretty and you can't find no room to move. - the Boss
I married my cousin in Arkansas - I married two more when I got to Utah. - the Gourds
Grant,
That was my thought exactly. All that material had to come up those stairs WOW!
Thank God for Reiman-Georger power ladders for us roofers
>>>>>Thank God for Reiman-Georger power ladders for us roofersI sold mine 10 years ago. It was never very useful for the type of work I get. Now, telehandlers and boomlifts are another story. If I was Forrest, I'd have rented a lift rather than built the stairs. http://logancustomcopper.com
http://grantlogan.net/
It's like the whole world's walking pretty and you can't find no room to move. - the Boss
I married my cousin in Arkansas - I married two more when I got to Utah. - the Gourds
"If I was Forrest, I'd have rented a lift rather than built the stairs. "
Or Hose A and Hose B..
Spheramid Enterprises Architectural Woodworks
The secret to a long life is knowing when its time to go. M. Shocked
Grant,
I hear ya,but for my work they are priceless.
Looking to get an 80' boom next week to scope out twin steeples on a Church here.
Will post pics of that when we get them.
Walter
Slateman - in college I painted steeples and replaced slate using a 100' retired ladder (fire) truck - that was my first summer building, and I got over my fear of heights within a few weeks.
I wish I had some pictures - that was cool work. The local paper would come out whenever we set up a job.
Treat every person you meet like you will know them the rest of your life - you just might!
You could probably go to the local library and check out their archives to find the old pics.
View Image
http://cgi.ebay.com/ebaymotors/Fire-truck-ladder_W0QQitemZ140083933889QQihZ004QQcategoryZ6737QQssPageNameZWDVWQQrdZ1QQcmdZViewItemjt8
"One of the fondest expressions around is that we can't be the world's policeman. But guess who gets called when suddenly someone needs a cop." -- Colin Powell
Couldn't help but notice there's a FIRETRUCK in my thread! You know, what starts with "F", ends in "K", and rhymes with "duck"?
Gonna get me busted . . .
;-)
Anyway, not to pull your focus. No pix today. Wiring (with the electrician); replacing lots of old first floor overhead feeds; adding some switch legs for some o'heads that didn't have 'em.
Planned the attic circuitry; decided to add a 125-Amp sub panel in the new laundry room. I need 14 positions, and didn't want to fish down 8-9 home runs, and that main panel will have to move when the bedroom it's in becomes a bathroom.
Now I just need a 1/0 sub-feed set (4 conductors, I know, I know) to a single big breaker in the main panel. Got a GE; got it mounted in a wall more than 6' high.
Put (5) keyless nekkid bulbs and a couple of switches in the unfinished areas of the attic (through the two short doorways I framed yesterday).
Got a new pressure gage; pressurized the water supplies, no bleed down in the first 4 hours - let it sit all weekend.
Forrest - fixin' our dishwasher tonight, gonna' get the car back on the road this weekend. Gotta babysit now while DW goes to self-defense class . . .
Supplies and DWV held pressure all weekend; screwed and glued down the last subfloor.
View Image
The bathroom ceiling will have a small flat at the 10'6 level, just large enough to enclose the exhaust fan and the DWV vent, and make the penetrations to the rear roof plane.
View Image
New sub panel goes here - in the upstairs utility / laundry room. Yes, I took out the ground / neutral jumper bar!
View Image
Forrest
Edited 2/12/2007 5:33 pm by McDesign
Edited 2/12/2007 5:33 pm by McDesign
Edited 2/12/2007 5:34 pm by McDesign
Forrest,
I have been following this thread and would like to add my compliments to your work. Nice job.
Slight hijack.
Since you work alone, (and get way more done in a day than I can) I wondered if you could share any tricks or tips for installing t&g sub-floor solo? Is there anything that you do to make it go faster?
I have a project coming up that will be ~400 sqft. of subfloor and it seems like it would be a little tedious by myself. I have decked several new houses before but we always had 1 guy gluing, 1 guy swinging sheets and 1 guy screwing.
If you have a better way, I would love to hear it.
Thanks
<installing t&g sub-floor solo>
Here's a quickie diagram and a 6-step program (twice as easy as a 12-step program).
View Image
For whacking it, all I really use is an 18" piece of 2x6, end wise (it's harder), and a 2# hammer. I put it on top of of the tongue, and it bears against the ~1/4" of the sheet above the tongue. Keep it square, and don't kill it with the hammer. If it doesn't go in well, there is some other problem. I've made grooved pices, but they seem to split.
Make sure the groove is clear (I drag a speed square along it), and the tongue is undamaged - trim it with a knife if needed.
The glue (make sure it doesn't extend beyond the sheet; less clean-up later) makes the sheet slide pretty well - I usually have one foot on the new sheet, pushing it along the right way.
I definitely make sure the piece will fit the first time - no fun picking up the gluey mess by myself!
Forrest - hoping I'm helping
Edited 2/13/2007 12:29 pm by McDesign
You're doing renovation, so I thought rule #1 was to trim it to length so that it would fall on the joist?
I was going to use a sledge and a block of wood for mine (getting into the groove), but couldn't remember who I loaned my sledge to, so have been using a 4lbs hammer instead.
jt8
Who ever borrowed my sledge, I WANT IT BACK.
Nah, I lay out the joists so I don't have to trim!
Much . . .
This is just to get the tongue and groove to engage solo.
Forrest
I usually do screw no-glue, but this time around dieselpig talked me into adhesive & ring shanks (via the Hitachi coil framer) (more sq ft this time than I usually do). So far I've liked it. Seems like a nice solid floor. I use the sacrificial 2x4 and 4lbs hammer to tap it into place and then pop a couple nails to hold it there. If the joist doesn't line up on one of the printed lines, sometimes I'll laser the joist to give myself a nailing reference (takes about 10-20 seconds to get the laser line lined up).
I'm slow at putting it down, but I'd be even slower if I was screwing it. If you're screw & adhesive, you've probably got a rock solid floor. jt8
"One of the fondest expressions around is that we can't be the world's policeman. But guess who gets called when suddenly someone needs a cop." -- Colin Powell
Forrest,
Thanks for sharing and for taking the time to draw. One question, why the screw in step 5?
The screw in #5 is just to quickly pin the sheet, so you don't get it half-screwed in and realize it shifted as you started!
Forrest - done that
thanks
i do it similar to forrest but i fasten it at his #5 first and stand on previously nailed sheet at #1 and pick up slightly on the sheet and slam it home!! no sledge and much faster. just my 2 cents. don't want to step on any ones toes though
thanks
Okay - two days of learning to strip.
Kind of fun, once you get in the groove!
View Image
View Image
View Image
Here you can see where the DWV vent sneaks out. The vent fan duct will exit just to the right of that penetration (straight "down" in the picture)
View Image
Forrest
Edited 2/14/2007 6:20 pm by McDesign
Edited 2/14/2007 6:20 pm by McDesign
Edited 2/14/2007 6:20 pm by McDesign
Edited 2/14/2007 6:22 pm by McDesign
I love seein' the work, Forrest.
Why did you use 1x instead of ripped 3/4 ply? Around here you can buy the AC ply MUCH cheaper than the yellow pine.
BTW I think (don't know 'cause I ain't there) that I'd give up some height for a lower exit on that DWV so's it'd be less visible from the front facade.
Notice how I mixed "Southern Drawl" and Latin in the same sentence... edumacated redneck I is.
FWIW I use cleats and pony clamps on LONG pipe to draw decking together... ain't hit a sheet with a maul yet. ;-)Troy Sprout
Socialism in general has a record of failure so blatant that only an intellectual could ignore or evade it."-- Thomas Sowell
<Why did you use 1x instead of ripped 3/4 ply?>
Don't know - I'm a newby at this. (20) 1x4x8's cost about $24 at HD today (that one bath / laundry room took 35 pieces) - hard to fault that price, and I think the YP is stiffer, maybe?
That vent is on the back roof plane, but I will paint it gray, because it is visable (bright white) from the side
Forrest - learnin'
Forrest,Looking good.
I agree, 3/4" plywood rips would be "bouncy" to nail into, fine for screwing.What are you doing to reinforce the existing rafters since sheetrock and insulation is a lot of weight? Is the barrel vault still a go?Chuck Slive, work, build, ...better with wood
Dunno about the vault. I'm thinking! This room and the storage room on the other are easier - just sistering with 2x4s.
Forrest
Forrest,I saw the 2x4's. How are you reinforcing the load at the ridge? Thank the heavens we don't have to deal with snow loads.Our house was also built in in the 20's and I figured 2-1/2 to 3 weeks to get the roof load and bearings to the foundation worked out.Chuck Slive, work, build, ...better with wood
In this room, as well as the storage to be ceilinged next, there's really only a foot or two of actual ridge - the rest are hip ridges. I'm just ignoring the main ridge in the big room for now!
Forrest - thinking
Did some last couple of days - got all the wiring completed for the old house; most of the new in. Got the first (bath / laundry) skylight installed. Met with my HVAC guy; he's got a plan, and we knmow where the ducts will go. We're shooting for the install in a couple of weeks. 2-1/2 Ton Heat Pump; still pricing the different SEER choices.
View Image
View Image
View Image
Forrest
Edited 2/17/2007 6:28 pm by McDesign
Edited 2/17/2007 6:28 pm by McDesign
Edited 2/17/2007 6:29 pm by McDesign
Forrest,
Nice work.
Skylite looks like it will add a lot of light. Is it a Velux?
I put 2 Velux in the loft of my shop that open/with screens.
Chuck Slive, work, build, ...better with wood
Yes, Velux - all I'm comfortable with. Love installing them with the EDL flashing kit. I mounted that one flush with the wall; the DW goes smoothly up the wall into the DW receiver slot.
The big room gets (3) 22x54" ones - all these are FS series; fixed/ventilated
Forrest
I've built more than a few industrial control panels, and I gotta say that the service box meets any I've seen built. I am impressed.
BTW That's how they should ALL be assembled.Troy Sprout
Socialism in general has a record of failure so blatant that only an intellectual could ignore or evade it."-- Thomas Sowell
Thank you!
I really like wiring - probably too slow, but I'm confident in it.
Forrest - I mean, the elctrician says this
Going back a few steps to your knee walls - I saw some verticals, under the beams. Did you put in short horizontal nailers at the top of the walls or use a different method for strength in that area? Curious why you didn't put horizontals all the way across, then knee walls under them.
BTW - Can you send me some of the energy you've got. Mine's always missing.
Don K.
EJG Homes Renovations - New Construction - Rentals
The rafters were just too inconsistant to put a plate under them. Doing the studs individually meant I could at least start with a true, plumb knee wall.
Forrest - just found out I don't have any ice cream for bedtime
What's going on here? We're starting to get pic withdrawl. Where's our pic fix?
jt8
"The cynic is one who knows the price of everything and the value of nothing." --Oscar Wilde
Sorry man! Back to work Monday; HVAC sub to get his stuff done.
Family vacation this week - skiiing in NC.
Kids loved it (3, 6, 9; first time), but geez, man, skiing -what a waste of money and time and energy for adults.
Forrest - not seeing the point
where did ya go?Boone or Blowing Rock if you went to Boone I paid for a lot of the new additions to Appalachian St. university- well I feel like I did anyway.
Went to Cattaloochee (Maggie Valley). Super weather - 62 degrees Wednesday & Thursday afternoon - cooler and a bit rainy Tuesday.
Kids never got cold (not used to snow, ya' know)
Forrest
Skiing is great, when you ain't waiting for someone to keep up. ;)Troy Sprout
Socialism in general has a record of failure so blatant that only an intellectual could ignore or evade it."-- Thomas Sowell
Man, I never even strapped in. Skiied once about twenty years ago at Keystone, and that week was fine.
Don't see why I'd do it again.
Forrest - making' stuff is ALL there is
Okay - catch-up pics.
Finished last of re-wiring old K&T. Each box cover has a diagram in Sharpie
View Image
Floored in further attic area for HVAC air handler; CPVC coming up to HWH; PVC HWH pan drain going down - condensate drain will tie in, no doubt. HVAC guy to decide where disconnect goes.
View Image
Wing wall for stair
View Image
Skinning both sides of the short wing with 3/4" makes it bomb-proof - hate wiggly half-walls.
View Image
Furring and strapping the front bay - just starting tonight.
View Image
HVAC starts tomorrow - 80 degrees up in there today!
Forrest
Edited 2/27/2007 7:20 pm by McDesign
Edited 2/27/2007 7:21 pm by McDesign
Edited 2/27/2007 7:21 pm by McDesign
Edited 2/27/2007 7:22 pm by McDesign
Edited 2/27/2007 7:24 pm by McDesign
Forrest,
Looking good. Do you mastic the plywood to the wing wall?
I sometimes carriage bolt the corners into the joist structure below before decking, similar to a newel post, for rigidity.
Does this project require any MEPS inspections?
Chuck S.
live, work, build, ...better with wood
Edited 2/27/2007 9:34 pm ET by stevent1
Some subfloor adhesive. What's MEPS? Mechanical, Electrical, Plumbing, Structural?
Nah.
This is off the radar 'cuz it's in the house. Later additions will be normally permitted.
Forrest
Coming together nicely Forrest. How much K&T did you leave connected, and do you just make your junctions in a box as usual or is there a special connector.
David--full of dumb questions.Live in the solution, not the problem.
No K&T left connected. Ran Romex all thge way down into mew wall switches, receptacles, or into the ceiling light boxes.
There actually are two pieces of old black - 2-conductor wire feeding the lights to the room made from the closed-in back porch, but that's probably '40s-'50s work. Seems okay, just no ground. I can't get to it to replace it, but that room will come off soon as part of the larger additions.
All K&T is pulled out. Don't know of a connector - does anyone? I could see it being handy, but might be a liability.
Forrest
More stuff today
Straightening the old rafter planes - 3"of perpindicular; 2" out of level in 12'.
View Image
Back side
View Image
HVAC guys working - one usual guy was in jail . . .
View Image
Front bay finished strapping
View Image
Side finished strapping
View Image
Forrest
Edited 2/28/2007 5:29 pm by McDesign
Edited 2/28/2007 5:30 pm by McDesign
Edited 2/28/2007 5:30 pm by McDesign
Edited 2/28/2007 5:30 pm by McDesign
Edited 2/28/2007 5:31 pm by McDesign
Forest,
Thanks for taking the time to post all the photos - good stuff. I'm a DIYer considering doing a similar attic conversion. I'm getting quite an education from your post. Looks like you get along well with the plumber and electrican :-)
Please excuse my ignorance. I was wondering how you aligned the sistered rafters to be in one plane. Are you stretching a string line(s) across? What is the process.
Thanks,
Mike K - Old house remodeler - Aurora, IL
Thanks!
Lets see - to align rafters, I establish my level "crease line" where the wall bends to the ceiling hip. All rafters start there for that wall. To establish the a ridge top intersection (like yesterday), I make a horizontal string line, once I establish each end by dropping a plumb line to the center line drawn on the floor. Of course, then I make sure it's level.
If the hip rafters go up to an as-yet undetermined point, I establish a story stick; like "at 78 inches in from the knee wall the bottom of the rafter is exactly 102-1/4" off the floor.
I do all the complete rafter sisters first, then some strapping extended toward the corners, and eyeball along the mounted strap to project where it should mount on the extended end.
Kind of finicky, my first time doing this, but as Mike Smith said "It's just so civilized" (said with pinky bent just so)
Back to work - got to go around THREE HVAC guys today - AD's out of jail.
Forrest
Here's more from today.
Almost finished the strapping in the storage room - tedious but fun; strings and sighting.
View Image
Air flow-wise, we needed to get air to both sides of the storage room, so we have this "moose crossing" over the dormer.
View Image
But, I was able to turn it into a plus (a change order). The dormer was already a couple of feet wider than planned, to line up over rafters, okay? I boxed in the duct verticals, and added a shallow closet (with cabinet above) onto each side. Client had wanted some small closets, so this was perfect. Overhead will get a false beam down 4"; matched with a similar false beam at the intersection of the dormer shed roof with the main 10/12 roof - needed to hide some meat in there, anyway.
View Image
Airhandler installed; just needs to be plumbed tomorrow - maybe even cranked up if time permits.
View Image
HVAC decided we needed to overpressure this storage room (two 6" one one side, and one 8" supply on the other)
View Image
Then vent it through the ceiling out into the main, vaulted room, where there are three distributed returns.
View Image
Here, the supply for the front bay will be built into my windowseat cabinets (actually one bay to the left, to wash the outside wall)
x
Edited 3/1/2007 7:08 pm by McDesign
Edited 3/1/2007 7:09 pm by McDesign
Edited 3/1/2007 7:09 pm by McDesign
Edited 3/1/2007 7:09 pm by McDesign
Edited 3/1/2007 7:12 pm by McDesign
Edited 3/1/2007 7:13 pm by McDesign
Edited 3/1/2007 7:14 pm by McDesign
Forrest that's coming along nicely.Question for you...you do the strapping/stripping so that the drywall isn't attached directly to the rafters, thus; it's not subject to the expansion/contraction of the roof and therefore shielding against the drywall seams opening up, yes?A very long winded way of saying strap = no crack :)Thanks,
SteveTua res agitur, paries cum proximus ardet ~ Horace
I'm doing the strapping for two reasons - to create flat planes out of this really crooked and hilly roof, and to tie everything together before the DW tries to do it. I guess the DW isn't really "isolated", but at least any point stresses are spread out by the screwed-on strapping.
I'll use just 1/2" DW, and my finisher can do arrow straight joints if I get all the intersections right.
Forrest - hopin' for no cracks, since it's across the street from my house!
Forgot that last pic of the front bay -
View Image
Also notice how they make the rigid have a "dead" cushion of a couple of feet after the flex pull-offs. Say this measureably increases airflow. More work for them, so I guess it works!
Forrest
Edited 3/1/2007 9:08 pm by McDesign
My guy said the same thing when he did my brother's house. I stupidly asked if I could tap the end-cap in the trunk if I needed an extra 6" for the kitchen. He said only if I wanted to kill the whole system. I had always thought that the blower did all the work when actually it's pressure.Live in the solution, not the problem.
HVAC guys plumbed it, cranked it up, cleaned up, and were out of here by late lunch today. All I need to do is install the stack of grills & registers when the DW and paint is finished.
Can't say enough good about 'em. 2-1/2 days for a fairly ductwork-intensive job, all in the littles attic spaces around the three big rooms. be nice to dry the DW mud with the air circulating.
Forrest
This is true...pressure is everything. Been doing duct for 30 years and rarely saw a end cap tapped, that is until I checked out the one I currently own.
Bozo put 2 - 6" taps in the cap. Might as well just left the end cap off.
Good day today - got those HVAC guys out from underfoot!
After some thinking, here's my sequence for the main roof. I needed to get the skylights in (which meant cutting lots of purlins, and stiffness), and take out all the old bracing. I decided to build temporary walls of 2x4x10s, resting UNDER each rafter, so I'd be free to sister either side as I needed. Measured, got to depo, built my props, and removed all the old bracing before lunch.
Looks like a church
View Image
View Image
Now, up on top, I transferred my layout through, and removed the shingles wider than my RO. Removed the old ventilator mushroom; scabbed in a piece of decking.
View Image
Then cut out the ROs
View Image
Then set the three skylights
View Image
Then put on the self-stick underlayment all around
View Image
Finished up left side, woven in with that wonderful Velux EDL flashing
View Image
Finished up right side the same. Piffin will notice I haven't yet swept my roof membrane up the 10/12 pitch - that's next, now that I know where the skylights are.
View Image
Still need to address the awful chimney flashing on all three chimneys - lots o' leaks
View Image
Here's the inside - will need to move that rafter (I centered the skylight)
View Image
All 4 visible with no walls DWed
View Image
From the side yard - (4) skylights, vent fan hood, and DWV vent. Pretty well hidden from most views.
View Image
All done by 6!
Forrest - a happy kind of tired
Edited 3/5/2007 6:41 pm by McDesign
Edited 3/5/2007 6:42 pm by McDesign
Edited 3/5/2007 6:42 pm by McDesign
Edited 3/5/2007 6:42 pm by McDesign
Edited 3/5/2007 6:43 pm by McDesign
Edited 3/5/2007 6:43 pm by McDesign
Edited 3/5/2007 6:44 pm by McDesign
Edited 3/5/2007 6:44 pm by McDesign
Edited 3/5/2007 6:45 pm by McDesign
Edited 3/5/2007 6:45 pm by McDesign
Edited 3/5/2007 6:46 pm by McDesign
Edited 3/5/2007 6:47 pm by McDesign
Edited 3/5/2007 6:52 pm by McDesign
Forrest,
Is that chimney as crooked on the inside as it looks in the photo?
Marc
Yes! Most chimneys here are corbelled over to penetrate the roof at at the ridge or center of a hip. Looks kind of scary.
Forrest
First one I've seen. Thanks
Wow, you had one he!!uva productive day. Must be that lack of travel time. You're right, that Velux flashing should be the model by which all flashings are made!Live in the solution, not the problem.
Another good day -
String line to establish underside of ridge line; centered in room and 150" off the subfloor.
View Image
New 2x8 SYP rafters just above line; intersect knee wall at 47" off subfloor. Because the original ridge was not centered over the house, my ridge line is moved 2-1/2" toward the back of the house, which allows me to just run my rafters long and attach also to the other side. Lots of space for insulation on that, the south, side - like 12"!
View Image
Blocking around the "hanging" rafters
View Image
Really warped old rafter that sat on the chimney
View Image
Blocking and new joists around chimney
View Image
West side of house front finished and strapped
View Image
East side of front finished and strapped
View Image
Still need to create the intersections with the front bay, and then do this on the back plane with all the sklights and the intersection with my shed dormer.
My InsulWeb roll will be delivered Friday; wanna' get it right up!
Forrest
Edited 3/7/2007 6:19 pm by McDesign
Edited 3/7/2007 6:19 pm by McDesign
Edited 3/7/2007 6:19 pm by McDesign
Edited 3/7/2007 6:20 pm by McDesign
Edited 3/7/2007 6:20 pm by McDesign
Edited 3/7/2007 6:21 pm by McDesign
Edited 3/7/2007 6:24 pm by McDesign
You gonna blow cellulose?http://logancustomcopper.com
http://grantlogan.net/
It's like the whole world's walking pretty and you can't find no room to move. - the Boss
I married my cousin in Arkansas - I married two more when I got to Utah. - the Gourds
I plan to blow JM "Spider"; chopped fiberglas, if I can convince the company I've used to do the Mooney/mesh thing.
Forrest
Forrest,
Looks good up there.
Still in tornado clean-up mode in Columbus.
That existing roof system is typical of construction in Georgia. No ridge board.
Are you planning on any wind braces or rafter ties? How do you plan on keeping the outside walls from spreading with the additional weight of sheetrock and insulation?
Chuck Slive, work, build, ...better with wood
Spreading, I'm confident that the new floor joists and new subfloor will act as a giant tension diaphram. Also, the knee walls will help. Also, the shed dormer in back and gable bay in front will help absorb thrust. Also the shed-roofed porches that wrap the house will help absorb lateral thrust.
Forrest - not rationalizing. Really!
ps - hope you had no tornado damage?
Forrest,
No damage in our neighborhood but severe damage a mile North.
The 2X8 SYP you added to the roof system is certainly an improvement on the existing. Probably outlast all of us.
Keep up the good work and posts.
Chuck Slive, work, build, ...better with wood
Thanks - got your e-mail, but no newspaper link included - glad you're okay. I was working in the attic last week with the HVAC guys when we got the tornado watch, and they decided I'd put so much wood up there it was safer than a basement.
There's a '60s brick ranch a couple of miles from here that I remember my folks taking me to in 1972-ish to see the mostly intact roof sitting in some trees about 300 feet from the mostly intact house.
I show the kids the house now, but it's just a normal house, anymore!
Forrest
just got a new roll of InsulWeb from Regal.... $123 including UPS
sure beats my local $160...
keep on keeping on... it's looking goodMike Smith Rhode Island : Design / Build / Repair / Restore
That is a big day. Man, you're killin that thing! I don't envy the little task of tying all those "intersections" together though. Way tedious, nearly impossible to be productive. Iffn anybody can figger out how though, It'd be Forrest.Live in the solution, not the problem.
Thanks - it comes and goes. The first pic in that post, the only one dated 6 March, shows a string. One day's work; mount a string line. Next day, hang a bunch of wood.
Forrest - DW says I need your abs!
Great work Forrest, thanks for showing us. I'm particulary interested because I'll be finishing an attic project I started at my own house. Much smaller than yours. Still busy emptying it from 7 years of storage stuff.
I have no experience using a string line on such a long dimension. Wouldn't there be a bow in the line from its own weight, preventing it from being 100% straight? Negligeable? I was thinking about rigging up a lazer line to do same.
thanks again.
charles
Nah - just pull it really tight. It won't sag more than the thickness of a snapped line. Braided line will take quite a bit of tension. My laser was gonna' be hard to set up there, and it was easy to hold the new rafters just above my line.
Today, I used the fact that I put the top piece of strapping right on the line, so I could rest the back side rafters on it - much easier!
Here's the way I built the headered opening "after the fact", and moved that one rafter across the middle skylight.
View Image
Here you can see the criss-crossed new rafters - easy with no ridge board
View Image
Here is the cool chimney view through one skylight. Once the chimney is restored, it'll be gorgeous -
View Image
Forrest - gotta finish ALL strapping tomorrow! That'll be it for framing - FINALLY!
Edited 3/8/2007 5:52 pm by McDesign
Edited 3/8/2007 5:52 pm by McDesign
Edited 3/8/2007 5:53 pm by McDesign
Almost finisged framing today - just a couple of intersections to do; just to bushed by 5:30 - had to clean up.
Here's some extra tricky blocking so they ceiling planes can wrap the crooked old chimney
View Image
Here's the nice and tight intersection with the other gable wall. by dropping my ceiling planes, I hid the fact that my room is a few feet wider than the unhipped main ridge.
View Image
Here's the final intersection with the shed dormer and all the blocking around the skylights to pick up the DW - this time it WILL fit in the darn slots, perfectly!
View Image
Forrest - ready for the weekend!
Edited 3/9/2007 5:36 pm by McDesign
Edited 3/9/2007 5:36 pm by McDesign
Edited 3/9/2007 5:37 pm by McDesign
Strapping info needed (notice i didn't call it "stripping"
Do I need to "picture frame" block around skylight wells like this?
View Image
Do I need to make a solid edge at the edge of the ceiling plane like this?
View Image
I tried to engage you in a mind-meld today, but was unsuccessful . . .
Forrest -did it anyway
Edited 3/9/2007 5:39 pm by McDesign
Edited 3/9/2007 5:40 pm by McDesign
you don't NEED to do it...but i like to do it
just like you don't NEED to make solid inside corners.. you can use metal drywall "clips" for your corners.... but why ?
i love furring... piffen loves furring.. and now you love furring ... is this a national trend ?Mike Smith Rhode Island : Design / Build / Repair / Restore
Thank you, kind sir!
To quote a John Turturro movie about a builder, "There's two ways to do this - the right way, and my way. And they're both the same!"
Forrest - feelin' like I need a little more blocking
>>>>>"There's two ways to do this - the right way, and my way. And they're both the same!"Is that in "Box Full of Moonlight" or something like that?http://logancustomcopper.com
http://grantlogan.net/
It's like the whole world's walking pretty and you can't find no room to move. - the Boss
I married my cousin in Arkansas - I married two more when I got to Utah. - the Gourds
This one
http://www.imdb.com/title/tt0104783/plotsummary
Forrest
Forrest,
Looks like you are rebuilding that house from the inside out.
Nice work!
Chuck Slive, work, build, ...better with wood
<Looks like you are rebuilding that house from the inside out.>
Yes, I think about the "big picture" sometimes, and wonder if I approached it right, but I did it all myself, without waiting on anyone else, the roof's never been off or leaked due to my work, and the family has been COMPLETELY undisturbed, so I guess it was the right way to do it. Never had to stockpile lots of lumber; yadda yadda
lots o' darn wood, tho'!
Forrest - ArachniHombre
Update time.
Started to stretch on the InsulWeb - got my quote today, looks good, try to do it Monday - along with another job ('60s ranch attic re-insulate) for a previous client
View Image
Ceiling, too - to DW needed before loose fill
View Image
Put off the front bay intersection till I had to do it - so crooked before . . . And it really is the focal point of the room. Basically, I just established a string line at the theoretical intersection and worked to it. Only 18,523 pieces of wood.
Here's the left side ready for fabric
View Image
Here's the right side just starting
View Image
Here's the darn thing, finished
View Image
DWed the skylight shafts to prep for the blown-in. One skylight shaft is 8" deep, one is 10" deep, and one is 12" deep. MY ceiling is straight - the roof isn't!
View Image
Here's the finished shed dormer area - boxed in the overhead duct; framed the twin closets with cabinets above. For lighting, I used (6) 4" IC can lights I got at a rummage sale. They only take a 50w r-20 lamp, so that's why so many - plus it looks cool.
View Image
Moved the original stairwell door off the last step; moved it about 18" over on the landing to center it under the new knee wall. From above -
View Image
From below - also put in two small stairwell fixtures
View Image
Forrest
Edited 3/14/2007 7:58 pm by McDesign
Edited 3/14/2007 7:58 pm by McDesign
Edited 3/14/2007 7:59 pm by McDesign
Edited 3/14/2007 7:59 pm by McDesign
Edited 3/14/2007 7:59 pm by McDesign
Edited 3/14/2007 8:00 pm by McDesign
Edited 3/14/2007 8:00 pm by McDesign
Edited 3/14/2007 8:00 pm by McDesign
Edited 3/14/2007 8:01 pm by McDesign
Forrest,
Looks good up there.
Are you using the white 'Elmer's as Mike Smith recomends for the insulweb?
Chuck Slive, work, build, ...better with wood
Yes - I bought a gallon, and a selection of little foam rollers - haven't experimented yet; maybe tomorrow.
Forrest
I think You have more than patience, I think you seek perfection in an unperfect world,
Chuck Slive, work, build, ...better with wood
Wish ya lived local. I'm sure I could keep you busy for a while.jt8
"The flower that follows the sun does so even on cloudy days."--Robert Leighton
Can't wait to see this thing drywalled, although It'll be a shame to cover up all your fine work. Like you, I've learned that the finished product will only be as good as the substrate. It definitely pays to take the pains now in order to prevent them later.Live in the solution, not the problem.
Thanks! DW guy came this AM to measure; they'll stock it (55 sheets) Tuesday and hang Thursday (assuming insulation Monday). I'll get the Class 5 finish, where they spray the entire job with a heavy surfacer - makes the sheen consistant with the real oblique light we're going to have - more on that below.
Finished Insulmeshing on the street side - see the (5) ceiling boxes?
View Image
Other side - see the (5) more ceiling boxes? They're at 110" off the floor
View Image
The reason for the ten light fixtures; I sold them on my lighting design (clap-clap!). I was concerned about the giant ceiling being too dark at night, and I like indirect but even light. We'll use ten of these fixtures below, which are opaque ceramic sconces - upwash only - no light comes through, and only a tiny crescent downwards. the idea is that each row of five bounces off the opposite side's ceiling plane, and from thence to a shadowless floor. Should be cool, and we can get lots of lumens/sq. ft. without hotspots. This is a kids' study room, after all.
View Image
Another thing - Finalizing light fixtures today, the client said, "wouldn't it be cool if the vanity light could mount on the chimney? Oh well . . ." Then he went to work. Here's my solution. Dug out the morter; encased 12-2 Romex in 1/2" square steel tubing. I'll use a metal 90 transition to get in the back of the pancake box, and screw the box to the brick Once the square conduit gets into the roof plane, the wire comes out to the switch on the side wall. The whole conduit will get encased in that high heat fireplace caulk. Chimney will be plastered and painted later.
View Image
Close up - mock-up only! I know the electricalmetricians are going to yell at me . . .Yes, it's hot. I only work that way. It's more sporting.
View Image
Added some sconces locations here in the front bay - they'll be good lights to leave on and make the three-part window glow from the street.
View Image
Forrest - tired of holding my arms above my head!
Edited 3/15/2007 7:20 pm by McDesign
Edited 3/15/2007 7:20 pm by McDesign
Edited 3/15/2007 7:20 pm by McDesign
Edited 3/15/2007 7:21 pm by McDesign
Edited 3/15/2007 7:22 pm by McDesign
Edited 3/15/2007 7:28 pm by McDesign
Clean up and kneee walls today. My concept worked.
I used the 1/2" foil-faced foam (foil out). This will form a backer to blow the "sticky fiberglas" against. Did it bay-by-bay; reached around and nailed with the plastic-washered nails.
View Image
Also put in baffles to keep the "dry" blown-in the rafter bays from sliding down.
View Image
View from the back side
View Image
All seams and the baffles Great-Stuffed in place from the back side.
View Image
Forrest
Edited 3/16/2007 6:12 pm by McDesign
Edited 3/16/2007 6:13 pm by McDesign
Edited 3/16/2007 6:13 pm by McDesign
Edited 3/16/2007 6:14 pm by McDesign
More done tonight - finally ready for insulators. Finished the 1/2" foam; lots of hours and 3 gallons of glue rolled on the strapping
View Image
View Image
View Image
View Image
Forrest - tired
Edited 3/18/2007 10:17 pm by McDesign
Edited 3/18/2007 10:17 pm by McDesign
Edited 3/18/2007 10:17 pm by McDesign
Edited 3/18/2007 10:18 pm by McDesign
Looks good. Did you get the insulation blown in?
jt8
"The flower that follows the sun does so even on cloudy days."--Robert Leighton
Tomorrow (Wed) at noon, according to the dispatcher. I'll take pix and post tomorrow PM.
Forrest
Fun day today - up at 5, working on guv'mint projects in the shop, then the insulators show up. Here's the whole sequence (sorry, dial-uppers!).
Needed to cut "windows" thru the knee wall so they could blow a blanket on the old ceiling.
View Image
Pieces cut out and numbered
View Image
Flanged with scrap and more Elmers
View Image
Batts in new shed dormer - how 20th century!
View Image
Dead space area with new blanket
View Image
16" total insulation depth!
View Image
Pieces re-installed in prep for JM Spider
View Image
Another snow picture
View Image
Guy on the right is blowing in the JohnsManville Spider "sticky 'glas"; the guy on the left is vacuuming with the return hose.
View Image
Working away -
View Image
Front bay all fluffed; un-trimmed
View Image
Trimmed alleyway to gable
View Image
Shaving the front bay - upwardly-rotating carpet-covered roller. Can't be too tough; he's on the phone!
View Image
Close-up of the glue injector that sprays along with the chopped 'glas - two fan nozzles
View Image
Sweeping the DW attachment faces with a cut-down corn broom
View Image
Blowing dry fluff again, into the roof planes
View Image
Finished! Quiet in here!
View Image
Blow truck
View Image
Blow truck interior
View Image
Forrest - tired from watching!
Edited 4/18/2007 6:23 am by McDesign
Forrest,
That's pretty slick. When they shave it, it the materiel recycled? You may have mentioned earlier but what is the R-Value at 16" ?
Chuck Slive, work, build, ...better with wood
<When they shave it, it the material recycled?>
Yeah - the suction hose goes back into the hopper in the truck. With the same amount of air coming and going, it doesn't really get too dusty in the work area.
Not sure about the total R-value - what I pay for is an "R-38 blanket" on top of whatever old insualtion might be there. They always appear to overfill, so I guess they anticipate some settling in these free areas.
Forrest
Forrest,
You oughta be tired from posting! It would take me 2 hours to put that much stuff on BT. Thanks for taking the time.
Is the insulation plan yours, or did you consult someone, or maybe get what you needed right here at good old Breaktime? Live in the solution, not the problem.
Thanks! I usually sit here and post as I'm eating dinner.
I read about JM's Spider product either in FH or JLC a few years ago, and have tried to use only it ever since - great stuff, and I like this company - Wilson Insulation; couple locations in Atlanta. I like that the glue can be turned on or off, so it's just one product in attics or open stud cavities.
The ceiling / roof insulation scheme here sort of grew out of the Mooney Wall thread. I came up with the foil-coated foam board backer for the knee walls. Yesterday, just that really kept it noticeably cooler in there.
Forrest
Forrest-
thanks for the updates. job looks great, and the HOs should be pleased.
You have any idea on how much longer you're going to be on this job, or are ya planning on working there until retiring? <G>
( a long job for me these days is only a week or two)
It better be three weeks or less - I've got another to start!
Forrest
Geeze-us man....doing and photoizing is hard enuff, then posting the pics takes some more effort..and ya gotta eat.
Thanks, I can appreciate the effort...(G) .
Looking sweet. So? when was it you were coming up to KY? LOLInmate # 40735 At Taunton Federal Penitentiary.
Hey - more today - is there a get-together in KY? Do we bring jelly?
Got the tub and shower riser in and drain plumbed - the plumber did, I mean.
View Image
Got the split studs stretched from 6'8 to 7' and installed
View Image
DW delivery guys had to get between the tree, the overhead branch, and the septic tank! Curved branch at the knuckle eventually fell on his head . . .
View Image
Easy as pie - just could stretch far enough to the cart
View Image
Stocked and ready to go tomorrow!
View Image
Forrest - designing tomorrow on the next job, while real DW guys do their stuff
Edit - DW guy even brought some trick 135º corner bead for the entry angle into the front bay - he wanted metal there, seeing as it was a kids room!
Edited 4/18/2007 6:24 am by McDesign
Dry Wall? Heck I have a radiused copper pan that might could fit it....
No kidding, you rock on man...nice job.
Inmate # 40735 At Taunton Federal Penitentiary.
What kind of pocket door frame are you using? I haven't seen one like that before. I use Johnson pocket door frames.
John
J.R. Lazaro Builders, Inc.
Indianapolis, In.
Stanley, I think. I've got a few of them in our house, 10-15 years old, do fine, and I can get them at HD.
Forrest
Hey, thanks for the pics. I've not seen that system before. It's foreign to this area, AFAIK.http://logancustomcopper.com
http://grantlogan.net/
"We have enough youth, how about a fountain of smart?"
I'll have to check them out. Locally here at 84 Lumber they stock these Johnsons we've used for years.
Also I was meaning to ask why you use the FG insulation vs. cellulose? Just curious. I got away from the FG attic insulation because of air movement through it vs. cellulose being more dense and stopping air movement. John
J.R. Lazaro Builders, Inc.
Indianapolis, In.
I've heard bad things about applying DW right over thick, wet cellulose. Also, my DW guy says cellulose bulges out the ceiling mesh - he was happy to see that the FG doesn't seem to. I also like that they can just turn the glue on and off - stud bays and ceilings
This FG is pretty dense tho'
Forrest
I use Johnson kits, which look just like what Forrest has there, but I can order them with longer legs that don't need to be stretched as he did.
Welcome to the Taunton University of Knowledge FHB Campus at Breaktime. where ... Excellence is its own reward!
We use Johnson kits also. I think we may need to revisit the one we use, but it seems to be the only one that is readily available around here.
This is the one we use:
2700
PREFABRICATED POCKET DOOR FRAMES
MAX DOOR SIZE: 36" x 80" x 1-3/8" [914mm x 2032mm x 35mm]
MAX DOOR WEIGHT: 200lbs. [91kg]*
click here for details
Pre-fabricated pocket door frame delivered factory assembled. The 2700 is manufactured to a finish thickness of 3-1/2" (90mm) and will accept doors up to 1-3/8" (mm) thick. Removable .055 6063T6 aluminum track with convex rails, rust resistant steel reinforced timber split studs, jump proof three wheel 3/4" (19mm) dia. hangers. 14-16 gauge zinc dichromate plated steel components. *Heavy duty track/hanger combination available for doors weighing up to 200 lbs. (91 kg.)John
J.R. Lazaro Builders, Inc.
Indianapolis, In.
Yours is pre-assembled.
mine use same head track, and include the steel wrapped 'studs' like Forrest shows in his photo The standard package comes with the right length for a 6'8" dopor, but I can special order for a 7' door. johnson also has a more heavy duty track for doors weighing over ___#s. I don't remember the load exactly.Forrest linked to this thread from another one about spider insulation is what found me here and I saw that door comments
Welcome to the Taunton University of Knowledge FHB Campus at Breaktime. where ... Excellence is its own reward!
we use johnson too.... sometimes the standard kit... sometimes the heavy duty
in either case we screw 1/2" plywood to the steel studs, both sides , ....or we throw the steel studs away and use 2x4 flat
the ply makes a wall one inch thicker than normal... the 2x4 makes the wall 2 inch' thicker than normal
we had too much trouble with sheet rock screws / warping / trim with just the regular kit studsMike Hussein Smith Rhode Island : Design / Build / Repair / Restore
"we had too much trouble with sheet rock screws"yah, then there is the door I riddled with about 18 finish nails from my Paslode installing waniscot ....
Welcome to the Taunton University of Knowledge FHB Campus at Breaktime. where ... Excellence is its own reward!
that makes me feel better about the 1 door I shot & repaired 3 different times.
seems like you'd have run out of four letter words the second time. Did you have to dig into your reserve verbiage the third time around? or just throw a BFH threw a window?;)
Welcome to the Taunton University of Knowledge FHB Campus at Breaktime. where ... Excellence is its own reward!
used 'em all up th e1st time. Was humble the 2nd two. got real good at fixing/hiding them in 3 sesions though.
in either case we screw 1/2" plywood to the steel studs, both sides
I'm picking up all kinds of your bad habits. Two "Smith-isms" in one pic.jt8
The creative individual has the capacity to free himself from the web of social pressures in which the rest of us are caught. He is capable of questioning the assumptions that the rest of us accept. -- John Gardner
you got it.... makes it pretty nice, no ?Mike Hussein Smith Rhode Island : Design / Build / Repair / Restore
I can honestly say that we've never had problems with the unit we use even though it seems a bit flimsy. We anchor it very well and it is nice that it remains only 3-1/2" thick. It's the only unit we see so it must be a regional preference. The only downside is that it is size specific. It would be nice to have one that could easily be adjusted.John
J.R. Lazaro Builders, Inc.
Indianapolis, In.
Rockin' today - what can I say about it? The guys do a crisp job; they said all the angles were tough!
I spent 3 hours measuring the house downstairs, and some hours on the computer drawing "as-built" drawings, and some speculative sketches to leave with the client over the weekend.
View Image
View Image
View Image
View Image
View Image
View Image
View Image
Forrest
Edited 4/18/2007 6:24 am by McDesign
Yowlll..that is nice rock'n work. My upstairs is sooooo similar..I need to hide them pics before the DW sees them.
Sweet.Inmate # 40735 At Taunton Federal Penitentiary.
Nice sheetrock work. You almost don't need mud.http://logancustomcopper.com
http://grantlogan.net/
"We have enough youth, how about a fountain of smart?"
Ha!
Here's a crew of EIGHT today - making it fly!
View Image
View Image
View Image
View Image
View Image
Forrest
Edited 4/18/2007 6:25 am by McDesign
Forrest,
Looks good. Looks like paint can start next week. Are you going to sub that out as well?
Chuck Slive, work, build, ...better with wood
>>>>>>>>>>Are you going to sub that out as well?I'm shocked that he let insulation installers and Dw installers/finishers on the property. But it looks like they're up to his standards.http://logancustomcopper.com
http://grantlogan.net/
"We have enough youth, how about a fountain of smart?"
Grant,
Are you saying 'no hablo ingles' I am sure Forrest got their I-9 info.
Chuck S
live, work, build, ...better with wood
Edited 3/24/2007 5:11 pm ET by stevent1
>>>>>>>>>Are you saying 'no hablo ingles' No sir. What I was saying is that he's done everything by his lonesome (including picking up lumber, IIRC) and suddenly there's subs on the job. I can tell from the way he approaches each task how well he's thought it out and planned the next step. Early on, I assummed from the way he operates that he's an anal retentive nut (I mean that in a good way) and no one wanted to work with him. Now I realize, he's just doing the stuff that's fun to him and getting paid for it. Rock on, Forrest.http://logancustomcopper.com
http://grantlogan.net/
"We have enough youth, how about a fountain of smart?"
<doing the stuff that's fun >
Man, you got it right - Once the framing's done, the next coupla' steps are cookie-cutter. Best to sub that to people that are really good at knocking that out. No way could I do enough DW to be as fast and good as those guys - plus, I've been using their boss or now, his company, since 1999. Just checked the job, here at 5 on Saturday, its all done and scrapped out (into my P/U). They'll finish Mon and Tues.
Kind of like the stripes on this first pic!
View Image
View Image
I've spent billable CAD time while they worked, and followed up the next leads.
I'll probably trim out and paint - it's fun to see it come together!
Forrest
Edited 3/24/2007 5:50 pm by McDesign
Edited 3/24/2007 5:51 pm by McDesign
Keep the pics coming as it progresses. I did a 30 sq copper roof/box gutter/metal cornice/3 layers of shingles tear off job by myself (my son bent some pans and hauled trash to the dump, but other than that it was solo) about 8 years ago that I wish I had documented better, so I could show off. I bought my first digital camera after I finished that job and I lost my polaroids.http://logancustomcopper.com
http://grantlogan.net/
"We have enough youth, how about a fountain of smart?"
Grant,
In no way did I mean anything negative. It seems almost all finish trades seem to have a lot of ethnic employees. Heck. My masons and brickies are ethnic. You are right. Forrest is a perfectionist and achieves it.
Chuck Slive, work, build, ...better with wood
Fantastic job Forrest! I can't wait to see how you treat that chimney. Character is one thing, but your work has made that lummox look worse than ever.
As an aside, I've used the Johnson pocket doors also, like the other poster. Good quality, but pricey. How proud are the Stanley folks of their product?
ThanksLive in the solution, not the problem.
I've used Stanley and Johnson pocket door kits (the boxed ones, not the prebuilt units). I didn't think they were much different. The track is exactly the same as far as I can see, the main difference is # of wheels on the rollers- Johnsons have 3, Stanley 4.
That said, the roller thing does seem to make the johnsons a wee bit smoother. They're both about the same to adjust. I've paid about $50 for the Stanleys. I think the Johnsons are a few dollars more.zak
"When we build, let us think that we build forever. Let it not be for present delight nor for present use alone." --John Ruskin
"so it goes"
pocket doors...
Stanley makes/made a pocket door kit with a one-sided track, not at all like the Johnson. I used them in a house 8 years ago - the box said they would never skip the track. It lied - they were terrible. If the current Stanleys have the double track, thats a different story...
I had to talk my wife into pocket doors again b/c of the character of those loser doors in our last house. Treat every person you meet like you will know them the rest of your life - you just might!
Thanks!
<that lummox look(s) worse than ever.>
Client has to make some decisions by Wednesday - chief among them whether we'll deal with the chimneys now (make 'em wood-burning-safe) or later (keep & add some gas-burning capability).
I kind of hope they decide to do it later, so I can try and make them beautiful "as-is".
I see them as two pieces of asymmetric sculpture in otherwise angular rooms.
Forrest
I see them as two pieces of asymmetric sculpture in otherwise angular rooms.
Forrest, you are an optimist in every sense of the word.
BTW, what's the next project?Live in the solution, not the problem.
Here's today - lots of little pix. The top coat was sprayed by the DW guys - some sort of thin mud. I cleared out the tape over all the elec devices, sanded the odd bits, and cleaned and vacuumed. Ready for paint, once the client decides - all lighting ordered. Flooring guy coming by for a quote tomorrow. I like all the clean white planes after the mess of building the darn thing!
View Image
View Image
View Image
View Image
View Image
View Image
View Image
View Image
View Image
View Image
View Image
View Image
Forrest
Edited 4/18/2007 6:25 am by McDesign
Never in a million years would I bury and lose that corbeled chimney. Way way too much going on there.
That is really a huge attic you're working in, Forrest. None of the photos up to now really delivered the scale of it like these post-rock ones.
I think the chimney keeps things in perspective. Nice clean lines from the new work contrasted with the realness of the original construction. Wait a minute, I'm gaying this thread up.http://logancustomcopper.com
http://grantlogan.net/
"We have enough youth, how about a fountain of smart?"
<clean lines from the new work contrasted with the realness of the original construction>
Yeah! Thats what I thought, too.
David said I was just being optimistic.
Sigh.
Forrest
Forrest,
What type of flooring are you thinking of installing?
Excellent job, Bet you're glad to be at the end of this one though. Man that was a lot of work, but it appears to be worth it. How many sq. ft. did ya recover?
dug
<How many sq. ft. did ya recover?>
Just under 1200 sq. ft.
This area will temporarily get inexpensive carpet and vinyl in the bath/laundry; will all be replaced with 3/4" T&G Mountain Lumber reclaimed heart pine when we do the main addition later this year or early 2008.
The delay is because we really don't know at this point how the as-yet undesigned addition 2nd floor will tie on to this part, though it's a given that the existing narrow stair will go away - hate to try to lace that in later
Forrest
Looks good.
Better than good. Would you consider a parge coat on the chimneys?
Chuck Slive, work, build, ...better with wood
I got a plan for the chimneys, if the client decides not to rebuild them now.
Forrest
Is the thinned sprayed-on mud sanded after it dries or is it smooth enough for paint?
<Is the thinned sprayed-on mud sanded after it dries or is it smooth enough for paint?>
Depends on the finish you want, I think. As-sprayed, the wall feels rough - maybe like 100-150 grit?. But, using a pretty fluffy roller would more than take care of it. The stuff sands GREAT, and isn't gummy, so one swipe with a sanding sponge or screen and it's like glass.
Frankly, I completely sanded the bathroom, which will be semi-gloss applied with a short-nap roller, and just hit any really rough spots in the main room and storage room. They get flat with a long-nap roller. I'm interested to see the result over the next few days.
Those rooms took (30) 12', (30) 10', and (20) 8' sheets and 20 gallons of the mud/primer
Forrest - gotta' get a book-on-tape to paint to!
Forrets,
Those drywall pics show the importance of planing out the substrates for a great looking drywall job. DW said your first pic was almost Cathedral-like. Thank you for sharing your artistry with BT FREE.
Chuck Slive, work, build, ...better with wood
Thanks! I love the way the light through that south-facing window bounces off the floor and makes the bay niche outline glow.
Customer had some relatively diverse paint color thoughts; then saw it all glowing in that primer, and they've decided to go B/M "linen white" throughout.
Forrest
My favorite is "Museum White". A blank pallete. Easy to paint over as plans evolve.
Our current home is Russian White.(B1)
Chuck Slive, work, build, ...better with wood
I've been talking about "the addition" to this house to come next (probably 2008); here's the current state of our noodling. Here's the house "as-is" downstairs. The attic triple window would be at the bottom of the drawing; the shed dormer with French doors would be at the top.
View Image
Here's the "possible". We think the shape is generally correct; we're working on the layout of the top left and top right rooms (probably won't be bedrooms), and the back porch will probably be full width, like the existing front porch Note the house has been "symmetricalized"; you can walk straight through from the front door out onto the back porch. Back (top) will have a stairway and two bedrooms above the family room
View Image
Forrest - movin' on
Edited 3/30/2007 6:06 am by McDesign
Edited 3/30/2007 6:08 am by McDesign
You've certainly got your work cut out for you with this one. But little doubt that it will end up another showplace.
First thing that jumps out at me on the original floorplan is the landlocked bedroom. Glad to see that it's gone.
On the proposal the top 2 bedrooms, which you note might not end up as 2 bedrooms, both open off the family room. I always try to envision line of sight were the door left open. And save a library or study, dislike rooms which open directly off another.
Look forward to the thread which will document all the work.
<the landlocked bedroom. Glad to see that it's gone.>
Yeah - it feels weird - especially with the three windows! That "L" or "T" shaped area in the back was a porch enclosed in the '50s.
This "proposed" drawing was an attempt to maintain three bedrooms on the main floor, but you're right, it's a bit awkward.
The upper left bedroom area will likely be a large master bath; the Ba and MBa on the drawing would become his & her closets.
The upper right area will likely become an office and a laundry room, with a horizontal hall going to the left just above the kitchen, to the outside wall, then a breezeway to the detached garage to be added off to the right and back a little.
Forrest
I bow to the master. I like what you've done with the plan! Can't wait to follow that thread. Maybe you could talk them into letting you start right away. Will they be living in the house during that project?John
J.R. Lazaro Builders, Inc.
Indianapolis, In.
forrest... this whole series is cool... i think i like this one best ....
View ImageMike Smith Rhode Island : Design / Build / Repair / Restore
Forrest,
We call that "Museum White". Each room is a blank palette.
I agree with Mike Smith. That is a great shot. I hope you can convince the owner to put in Heart Pine floors to match the rest of the house. If not, at least Yellow Pine with a shellac finish.
Chuck Slive, work, build, ...better with wood
In your proposed plan there is not much connection between the Family Room and Kitchen. This is not ideal for the lifestyle of most Families. Have you considered putting the Family Room directly behind the existing Kitchen. If the Kitchen and Family room are connected as one space the small Kitchen will be perceived as being larger.
Pretty cool - we'll talk about it. I think their desire for a straight-through North-South axis will need to be worked in there.
Thanks for the input -
Forrest
I live in a 1890's house. As was typical back then the Kitchen was through a narrow corridor at the back of the house, while the Living Room was at the front of the house. My wife hated not being able to keep an eye on the kids while she used the Kitchen, or being able to watch TV. We recently put an addition on the house with a new Kitchen/FR combo, and we like it much better. The Kitchen is about 13' x 16', and the FR is about 12' x 16', not very large rooms, but because the rooms are designed to be visually one space the rooms don't appear small. By combining the two spaces you may be able to offer a more efficient, lower cost solution to the clients. Of course the lifestyle of the clients may differ from mine. Just curious, which side of the house faces South? Where are the stairs going in the new plan?
Of course then there is the existing foundation, existing load-bearing walls, mechanicals, zoning, etc to work the design around. May be difficult to go from concept to a working plan. Should be a fun design challenge. Good luck on your project! Thanks for taking to time to post all the attic photos.
Mike K - Old House Remodeler - Aurora, IL
Hey, getting it trimmed out and painted. Just simple SW Duration "Extra White" was their expedient choice. Satin on all DW; SG on the woodwork.
Storage room - walls done; just caulked and filled baseboards tonight.
View Imagex
Side of storage room
View Image
Chimney with secret process finish
View Image
Cut-down doors to attic and HVAC - thresholds to come
View Image
Bath with skylight
View Image
Chimney again, vanity light goes on wire; pedestal lav below. Brick "shelf" makes the new daughter tenant very happy.
View Image
Edit - just wanted to remember what it looked like before!
View Image
Chimney close up. Process goes like this. Vacuum with stiff brush. Make special secret mixture of concrete bonding admixture (HyBond), WB saltillo tile sealer, white Elmers glue, vermouth, and some water to get viscosity right for Wagner power painter. Spray it on. Exactly two hours later, brush on Kilz 2 WB. Do not backbrush; will tear off. Let dry overnight. Hard as rock in the morning. Then, carefully latex caulk all holes. Dry overnight again. Then, one or two coats of, in this case, Satin SW Duration. Client loves the look, and the clean feel of it after the previous powdery mess.
View Image
View Image
Simple door frame in bath. All MDF; used 5/8" for posts; 3/4" for lintel. Clean, simple look. 3' X 7' Victorian door gets frosted glass panels and refinished white
View Image
Coped some base around the chimney penetration.
View Image
Forrest - wrapping up
Edited 4/18/2007 6:26 am by McDesign
That's probably as good a use for vermouth as any other.<G>
The job looks real nice. Your clients better be happy with your work.
I've spent the last week doing a ceiling treatment on a bedroom cathedral ceiling. I should finish up Monday. The whole job's about $7 Grand. I gotta remember to take some pics.
Post pix!
Forrest - picture junkie
My problem is that I get so wrapped up in doing the work that I forget to take pics.
And when the job is done, I want to pack up and move on to the next one.
I really have to try to remember. I've had jobs that would look great in a portfolio, but never took pics.
Shep- gettin' forgetful
Looks really good. Did you have to do any point-up on the chimney? Your secret process is no longer a secret. I copied it for future use.
I like satin for walls. Easier to wipe stains and kids messes off.
Chuck S
live, work, build, ...better with wood
Edited 4/7/2007 5:55 am ET by stevent1
No point-up other than caulk. Chimney will only be used for gas logs until such time as it is majorly redone and largely replaced, so until then it's a sculpture.
Forrest - just made a fire in the kitchen; our draft fan in the downstairs back furnace failed just as it got warm a few weeks ago - figured the cold weather was over, and I'd fix it later, and it was 46º in here with all the cold and wind last night!
Re the color choice: Mon Dieu!
Had we known before we began this thread that the whole effort would be just one big white-out at the end, we would have gone back to Leni Riefenstahl for a thread title. One of her early works, and she starred in it herself, "The White Hell."
Wow, dude, you know stuff!
Been cutting in semi-gloss white on base against white satin walls all morning - my eyes hurt!
Forrest
OK, what're you working on this week?
jt8
"We ourselves feel that what we are doing is just a drop in the ocean. But the ocean would be less because of that missing drop."-- Mother Teresa
<OK, what're you working on this week?>
Finishing up the main room - bathroom only needs fixtures installed, and the storage room is complete except for carpet. Gotta trim out and top coat main room before all carpet on Friday. Better be through by then! Also, got with the monster house people, and signed a design contract - got some clear direction and gave them the "you can't have that, it's too expensive" talk, and they got real. Signed a SOW contract with the three bathroom job people - start two weeks from yesterday. And a flooring job mid-next week for a repeater.
Today I played with the big chimney and my secret process.
Brush and vacuum and spray with special recipe - flood it on - about two gallons for this.
View Image
View Image
View Image
When dry to the touch, 2-3 hours, when you can't rub up any grit, the WB Kilz, really dabbed on with a 2" sash brush. can't go back over it; it will tear the surface.
View Image
Who put this darn wall here?
View Image
Ready for caulking up the pinholes tomorrow, top trim, and paint Thursday.
View Image
Forrest - flailing about in all directions
Edited 4/18/2007 6:26 am by McDesign
That's a slick process. Will you have to line it if they use gas logs?
Sounds like you have some nice jobs lined up.
Chuck Slive, work, build, ...better with wood
According to my chimney guy, the chimneys are fine for gas logs as is, and with my paint. Two fireplaces (one each chimney) currently have gas log setups. Later, the chimneys may get serious rebuild and relining for wood, but that's in the future.
Forrest
Great project, great pics, great job.
Did this in my own (smaller) attic a couple years ago and should have sub'd out the drywall to your guys - nice work.
I'm glad you keep repeating that the chimney will get a rebuild someday as it broke my heart to see the brick painted even though it was in pretty rough shape. In it's natural state it provided a nice counterpoint to the crisp and clean remodel.
Thanks! Roof leaks had leached out the lime in the mortar; walking past, the mere breeze would dislodge a spray of sand. Structurally okay, but darned messy!
Forrest
More today - top coats in main room; lights installed tomorrow. Nineteen fixtures in that main room! That's (6) cans, (10) ceramic upwash hip sconces, two Rejuvenation wall sconces in the front niche, and another one over the stair. Gotta get the bath fixtures mounted, too.
View Image
Added a layer of reflective 1/2" foam to the attic doors (cut-down HD pre-hung hollow core) - made a noticeable difference feeling the door with your hand on a hot afternoon.
View Image
Also added weatherstripping to both doors
View Image
Client-chosen temporary vinyl (antique heart pine next year, with major addition)
View Image
Caulked chimney pinholes and uglies visible after primer - this side anyway. Had to come home to babysit - DW has changed from Aikido / Self Defense classes to Yoga!
View Image
Forrest - feelin' safer
Edited 4/11/2007 8:34 pm by McDesign
A wife who's into yoga?
You're a lucky man.
A bottle of wine, and those yoga lessons can be put to good use <G>
The blown in insulation looks very similar to the product the insulation company I hired to do my attic and knee walls yesterday. They use fiberglass by certaineed. I believe it is InsulSafe4. They claim it doesn't settle and that the density is controlled at the pump.
If you are using the same product have you noticed any settling since being blown in. I am looking forward to this installation since my home has next to no insulation.
I haven't noticed any settling, but it's only been a few weeks. They tack up little half-yardsticks all over to get the depth consistant, and certainly filled more than the 8" I paid for.
i would think the 'glas wouldn't settle like cellulose, because it's lighter and fluffier, but each little fiber of glass is stiffer than a cellulose, or wood fiber.
Don't know if they anticipate settling or just like me ;-)
Forrest
Forrest,
Looks beautiful... absolutely beautiful. You have outstanding attention to detail and obviously a good deal of patience and ingenuity. I tip my hat to you.
Nick
Thank you sir!
Here are today's work details -
The upwash sconces installed - good but . . .
View Image
You can see the 100 W halogen bulbs if you are near the edges of the room - too harsh, IMHO. I cut out an experimental shade from aluminum sheet; the client likes it - will probably hit it with high temp white paint.
View Image
Trimmed out the two little closets and installed base. Client likes the above cabinets without doors; will use as a display shelf. Just caulked and puttied so far.
View Image
Closet only deep enough for shelves - 11"
View Image
Client actually checked to see if I put in the 1-1/4" bit of base on the left - of course!
View Image
Made the jambs; the wall is flatwise 2x4. Easy to rip two 2-9/16 jambs from one 1x6. Outer casing is 1x6 MDF; inner is that FJ crap that comes on prehungs
View Image
Another picture of the shade experiment
View Image
Trimmed-out storage room door kind of tucks behind the chimney -
View Image
Forrest
Edited 4/13/2007 9:16 pm by McDesign
Edited 4/18/2007 6:27 am by McDesign
Looks great. What's up with the light fixture on the right?http://grantlogan.net/
<What's up with the light fixture on the right?>
I'm trying to block the direct line-of-sight to the bulb. First attempt.
Forrest
Forrest,
Nice trim work. The sconces look great.
Chuck Slive, work, build, ...better with wood
More great pics.
I have to say I am not a fan of those sconces although your very clever modification did help.
With all that halogen up there I'm guessing the heat in the summer is going to build up nicely. Of course, the top notch insulation job should help mitigate the problem.
Do the skylights get the Velux blind kits?
The blinds in my skylights are closed a good deal of the time during the summer in my attic reno and it really does help. They also get closed during the night as the full moon can occasionally act like a spotlight sometimes. :-)
Trim painting, and some artful scribing around the chimney top today - had to use my paper doll technique - laid out a true line on the ceiling, then cut paper bits to fit to make the eight pieces. Pretty extreme fitting! Also got the chimney top-coated.
View Image
Really happy with the way it turned out - DW was real impressed when I just downloaded these pix - said it was "art" :-)
View Image
View Image
View Image
Forrest - going to bed; carpet in tomorrow
Edited 4/16/2007 11:14 pm by McDesign
Edited 4/18/2007 6:27 am by McDesign
Great technique. That attic looks better than most living rooms.
Chuck Slive, work, build, ...better with wood
DW was real impressed when I just downloaded these pix - said it was "art"
Be careful, she might be lining you up for some "art" work in your own house ;)
jt8
"We ourselves feel that what we are doing is just a drop in the ocean. But the ocean would be less because of that missing drop."-- Mother Teresa
More details today + carpet (temp 'til wood floor next year)
Vanity fixture grows from the bathroom chimney -
View Image
All the sconces installed and caulked; paint them ceiling color tomorrow
View Image
Trimmed out the wing wall - that's extra 1/4 rnd lying on top
View Image
Trimmed down the experimental shade (on the right); got sign-off from client. Will duplicate this ten times and paint them flat white -
View Image
Little silliness on a switch / door casing interference - not really a better place to lay out the box due to stuff in the wall - the idea is that it refelects the ceiling angles -
View Image
Forrest - more final bits tomorrow
Edited 4/17/2007 9:45 pm by McDesign
Edited 4/18/2007 6:28 am by McDesign
Commercial carpet in the storage room
View Image
Forrest
Edited 4/17/2007 9:53 pm by McDesign
Forrest,Nice switch detail. Did you use a box extension?You have done a great job on that attic!Chuck Slive, work, build, ...better with wood
I have now - just pulled the plate back off to paint this morning; I actually just bandsaw the front 3/4" of another box off - it's cheaper and better.
Forrest
> With all that halogen up there I'm guessing the heat in the summer
> is going to build up nicely. Of course, the top notch insulation
> job should help mitigate the problem.Actually, it'll make it worse. It'll hold the heat from those halogens in.George Patterson, Patterson Handyman Service
Forrest,
I haven't read through all of the posts, but those electrical boxes look like low voltage (orange color) - what's the plan for those?Justin Fink - FHB Editorial
Your Friendly Neighborhood Remodelerator
Hah! it's all 12V! No, really -
I, I mean my electrician, installs all devices and turns everything on before insulation. I tape over everything with masking tape, to seal out the JM Spider spray, and spray paint the taped-up boxes orange to be visible to the guy shaving off the excess.
It all stays on until the DW is finished - helps the DW guys remember where the boxes are, and keeps mud out of the receptacles - I like them to tighten-up the cutouts so I don't have to use jumbo device covers
Just my way
Forrest
whats that white stuff?
<whats that white stuff?>
Johns-Manville "Spider" blown fiberglas insulation. Basically dry blown through a hose, with an add-on nozzle at the end that sprays glue along with the fiberglas; makes it "sticky" enough to stack up in stud cavities.
Forrest
mcdesign,
you have made this job look so neat to the point that i find myself ashamed of some of my past remodelling sites. organization is such a huge part of remodelling, more so than in new construction, or maybe it's just so much harder to stay organized in remodelling. it's something that i srtuggle with. you make it look easy. thanks for your conributions.
Thanks for the kind words. Client is "moving in" as I am assembling the bathroom. I try to stay after them to keep it neat . . .
View Image
View Image
Still need to make the three-part window frame - will be shop-built and applied.
View Image
View Image
View Image
View Image
Made the (10) final sconce shades this AM; aluminum sheet, snipped and flattened and painted flat white on the outside
View Image
View Image
Main part of storage room full
View Image
Alley of storage room full
View Image
Yes, the thermostat is behind the furniture - must move it. Somewhere.
View Image
Client likes the little side closets do much, she decided today she wants glass doors and display shelves. Okay.
View Image
Forrest - winding down
Edited 4/20/2007 8:37 pm by McDesign
Forrest,
Those sconces worked out very well. Looks great.
Chuck Slive, work, build, ...better with wood
Looks great. I bet those sconces below the skylights make an unusual glow on the outside at night.http://grantlogan.net/
Sheeze, they either must not have been able to walk through the downstairs, or now have a couple empty rooms down there.
[edit] I thought inglenooks had a fireplace, not a window ;)
jt8
"The lowest ebb is the turn of the tide."-- Henry Wadsworth Longfellow
Edited 4/23/2007 10:47 am by JohnT8
Great job on the whole thing....not only does it look fantastic, but you know what is behind the walls is top shelf work!
all that work . . . just to store some mattresses, old couches and laundry basketsGreat effort though. Some very ingenious solutions and craft, including the temporary stairs outside. Appreciate all your time, documentation and explanations as well (makes it worth the price of admission) :)
More details -
Pocket door to bathroom - 3'x7' Victorian door; two top panels routered out from the back and etched glass panels put in. Threshold is underway! Once the stairway is removed, the door will be converted to hinged, and centered under the ridge.View Image
Inside view - just used some tiny HD stop molding to retain the glass this side - man these rooms need some art!View Image
I've done this a couple of times in attic showers. It's a curved telescoping shower rod (for more volume inside the curtain); trimmed with a pipe cutter, and with the right hand mount rotated.View Image
Attaches thru ceiling DW to strapping here - new holes drilled in rod to match angleView Image
Corner of laundry area; this will get a free-standing Japanese screen to block view of the mechanicals. Yes I always use an expansion tank. I mean my plumber does.View Image
Ha ha! Chimney flashing still leaks! Somebody better get on that . . .View Image
Looking up from the existing laundry room (yes that is an 80º corner)View Image
Looking downView Image
It's almost installed!View Image
Forrest
Edited 5/1/2007 8:40 pm by McDesign
It's almost installed
Well dang it man, don't leave us hanging!
I don't remember seeing any pics on the pocket door framing, did I miss them? And I like that door, but that space up there needs some color.
jt8
"The lowest ebb is the turn of the tide."-- Henry Wadsworth Longfellow
Here's one before the door was re-done
View Image
Forrest
Edited 5/2/2007 12:36 pm by McDesign
Finally got back over there and the new center window and hand-made "Richardson Romanesque" window frame installed.
View Image
Forrest
Edited 7/25/2007 6:37 pm by McDesign
Tempered Glass?
As always. Looks good.
Chuck Slive, work, build, ...better with wood
<Tempered Glass? >
Ummmm. . . who wants to know? I know the original two smaller windows aren't.
Forrest - pretty even-tempered
I just figgured the center one =big $$$$.
Make sure we get a full array of final shots before you vanish from the scene.
jt8
"We ourselves feel that what we are doing is just a drop in the ocean. But the ocean would be less because of that missing drop."-- Mother Teresa
McDesign
I have enjoyed your thread immensley. I wish I had half the patience you have doing this kind of remodel. People will be impressed with the before and after pictures of this project.
Do you enjoy these kind of projects as much as your writing seems to portray?
Keep the pictures coming
Greg In connecticut
I really do enjoy jobs like this. The kind where you can see the broad strokes before you start, but have to work through all the little particulars that come up.
Lucky to have jobs like this - it's become my niche, I think/hope!
Forrest
I have to agree with Chuck...I am impressed with your drive for perfection. Very uncommon in this day and age. I love following these picture threads you guys produce, despite being a longtime tinknocker. Very informative!
Keep up the fantastic work...(good doesn't cut it)!
I enjoy plumbing and wiring these size projects too. I learned what little I know about those trades out of necessity and too many $200.00 service calls to relocate an outlet or DWV line.
Don't get me wrong, those guys have definitely earned the right to bill whatever they think it's worth. The main thing is being able to avoid shutdowns b/c I'm waiting for a plumber or electrician.
Looking good. How many boards gonna take to cover up all that work? Live in the solution, not the problem.
<If I was Forrest, I'd have rented a lift rather than built the stairs.>
Ah - but they are more than stairs! How would I use a lift by myself? I still have to get material off the relatively weak 10' wide shed roof and into the attic.
The nice stairs mean I can just grab stuff off the truck, walk up and in with it, and plop it down wherever I need it - one handling operation. Also, it's a nice work area. Also, it carries me over the little building and stairs below, so's I can throw stuff in my good old truck (don't want to scratch it, ya know).
Lift just wouldn't do all the things the stairs do - and wouldn't be so purty. I'm so sold, I may never do major attic work without building one again.
View Image
View Image
View Image
Forrest - convincin' myself I can live without a lift
Edited 1/24/2007 6:26 pm by McDesign
Edited 1/24/2007 6:26 pm by McDesign
Edited 1/24/2007 6:26 pm by McDesign
Edited 1/24/2007 6:28 pm by McDesign
>>>>>>>>>>How would I use a lift by myself? How did you take those pictures by yourself?I'm talking about a boom lift that you drive from the basket, not a fork lift/telehandler.Don't get me wrong, I'm not criticizing your method, I was suggesting an alternate. It's the John Henry syndrome as someone here mentioned previously. I'd rather let machinery make my life easier than kill myself proving that I can outdo it.It would take us about the same amount of time to stock the lumber with either method, but I would have spent a lot less of my personal energy. The older you get the more this matters.BTW, I know you don't watch TV and don't like sports, but I'm watching a fantastic basketball game: KY vs GA .http://logancustomcopper.com
http://grantlogan.net/
It's like the whole world's walking pretty and you can't find no room to move. - the Boss
I married my cousin in Arkansas - I married two more when I got to Utah. - the Gourds
I think he must have better knees than I do. I cringe at the thought of carting all that material up the steps. Wouldn't even want to listen to my knees creaking up that flight of steps that much. And you couldn't pay me enough to cart it up a ladder!
LOL, I think I'll stick with my ranch project. Only two steps.
jt8
"Holding on to anger is like grasping a hot coal with the intent of throwing it at someone else; you are the one getting burned."-- Buddha
He's still young.
Forrest will start thinking about more machinery to lighten the load as he gets closer to 50.
Yuphttp://logancustomcopper.com
http://grantlogan.net/
It's like the whole world's walking pretty and you can't find no room to move. - the Boss
I married my cousin in Arkansas - I married two more when I got to Utah. - the Gourds
From:
Shep <!----><!---->
Jan-25 2:26 pm
To:
seeyou <!----><!---->
(79 of 90)
84041.79 in reply to 84041.57
He's still young.
Forrest will start thinking about more machinery to lighten the load as he gets closer to 50.
View Image Options
View ImageReply
From:
seeyou <!----><!---->
Jan-25 4:25 pm
To:
Shep <!----><!---->
(80 of 90)
84041.80 in reply to 84041.79
Yup
I feel like I'm overhearing two old-timers talk in the elevator at the home.
;-)
No, I mean that wink, really!
Forrest
Edit - talkin about gas at twenty-five cents - gad!
Edited 1/26/2007 6:46 pm by McDesign
With any luck, you'll be able get to our advanced ages.
<G>
you might be able to live without a lift.. but you've obviously got a photographer on staff
View ImageMike Smith Rhode Island : Design / Build / Repair / Restore
From what I know of Forrest it's probably a tripod and a timer, both of which he built himself.http://logancustomcopper.com
http://grantlogan.net/
It's like the whole world's walking pretty and you can't find no room to move. - the Boss
I married my cousin in Arkansas - I married two more when I got to Utah. - the Gourds
LOL...My thought too.
Alls well here. Finally.
Spheramid Enterprises Architectural Woodworks
The secret to a long life is knowing when its time to go. M. Shocked
i thought that too, but i wanted him to confirm itMike Smith Rhode Island : Design / Build / Repair / Restore
I figured it was the track car's cockpit camara with remote control and zoom features.
ANDYSZ2WHY DO I HAVE TO EXPLAIN TO FRIENDS AND FAMILY THAT BEING A SOLE PROPRIETOR IS A REAL JOB?
REMODELER/PUNCHOUT SPECIALIST
Yes! I built the camera from an old TV and a laser inferometer, using a Heathkit plan and some screen door hardware. Oh yeah, and some Snapper Comet parts.
Forrest - really, DW took the picture
This is a really good thread, I've been following you're progress, its going really well. You keep you're work area nice and tidy
Thanks! It's easy when I'm "in", not way up "on" a roof.
Forrest
>>>>>>>>>some Snapper Comet parts. The worst riding lawn mower ever made. You crack me up, man. Any progress pics?http://logancustomcopper.com
http://grantlogan.net/
It's like the whole world's walking pretty and you can't find no room to move. - the Boss
I married my cousin in Arkansas - I married two more when I got to Utah. - the Gourds
Not today - clearing out all that old insulation and tracing K&T wires and measuring.
Forrest - I loved Snapper Comets when I used to mow yards - especially the wheelies!
>>>>>especially the wheelies!I forgot about that. They almost needed wheelie bars. That big single blade scalped badly. Most mowers of that size had twin blades.http://logancustomcopper.com
http://grantlogan.net/
It's like the whole world's walking pretty and you can't find no room to move. - the Boss
I married my cousin in Arkansas - I married two more when I got to Utah. - the Gourds
More pix from today -
Finished flooring the main room, and built a bit of knee wall. Temporarily covered the stairwell (right foreground) so I wouldn't fall into it. The new wall will be built on the orange LVL and in the slot, on the downstairs top plates, a couple of feet inside the old wall. This will center the main room on the front-facing gable bay, and the dormer on the back. Room is almost 37' deep front to back, and about 22' wide.
View Image
De-skinned the last wall
View Image
Took the last wall completely down, pulled all the old DW and insulation. That chimney will be exposed in the bathroom or laundry room somehow.
View Image
Looking back at the transverse wall I built last week, and the funny crooked chimney that will be the focal point of the room (plastered). Come to think of it, I'M the focal point of a room when I'm plastered.
View Image
Also filled the truck to the top of the cab, got to the dump without anything blowing out, and filled it up again just now. So much nicer than a big 'ol dumpster tearing up the yard, and I can come back by the lumberyard with the next stuff
Forrest - got a plan
Edited 1/24/2007 6:36 pm by McDesign
Edited 1/24/2007 6:36 pm by McDesign
Edited 1/24/2007 6:36 pm by McDesign
Edited 1/24/2007 6:45 pm by McDesign
>>>>>>>>>>>Also filled the truck to the top of the cab, got to the dump without anything blowing out, and filled it up again just now. So much nicer than a big 'ol dumpster tearing up the yard, and I can come back by the lumberyard with the next stuffOn that note, I use a 12' dump trailer. I can park it in less space than your truck takes up and still have the truck available to pick up something I forgot if necessary. Ever busted a back window out of the truck throwing into it from the second story? Using your truck, you have to dump (or hand unload) before you can do anything else. You're strapped to that task 'til you complete it. I've never been to a dump that smells too good either. It's nice to roll in, open then tail gate, lift the bed, dump, drop the bed and drive away. It took me about as long to type this as it does to complete the task. Then I back haul supplies and can drop the trailer and don't have to unload right now.To cost this out, I have about 14K in my 45' boom and my dump trailer together. I've spent about 1K on maintenance in 2 years and I rent both pieces of equipment out on the few occasions that I don't need them. Keep giving us progress pics. I'm impressed with your skill and ethic. I just hurt too much to do it your way, and I know you've taken some hard knocks.http://logancustomcopper.com
http://grantlogan.net/
It's like the whole world's walking pretty and you can't find no room to move. - the Boss
I married my cousin in Arkansas - I married two more when I got to Utah. - the Gourds
Forrest,
Nice progress. It's easy to get plastered when when one is the focal point.
I may have misread, but why is the double LVL needed if it is resting on the top plates of a wall below?
Chuck Slive, work, build, ...better with wood
The front part of the wall, that will rest on the LVL, is offset about 20" from the downstairs wall (between the entrance hall and library). The back part of the wall, beside the stair, in that slot, does line up with a downstairs wall (between MBR and hall, so I'll just stud on top of that double top plate.
Darned double LVL wound up being $166.
Forrest
Now a dump trailer, I would flat LOVE! Unloading at the dump's never that fast, much as I try.
Someday I'll investigate a trailer.
Forrest
Looking good Forrest. They've really got a dance hall up there don't they. Had no idea that place was so big.
I'll soon be shopping trailers myself, but not dump. Around here the equipment operators at the landfills/transfer stations are always glad to hook to a strategically located chain wrapped around a timber and embedded in your load of debris.
They just back up and the trailer is all but empty. Did roofing tearoffs for years this way before buying my 1-ton dump. Now I'm w/out trailer or dump. Go figure.
David...starting over.
Count me as impressed overall.But quit dreaming about that dumper and go get one. I figure I paid for mine in labour savings in two years or so.
Welcome to the Taunton University of Knowledge FHB Campus at Breaktime. where ... Excellence is its own reward!
You already have a dump truck...
You just haven't installed the components that make it work.
http://www.stealthdumptrucks.com/Troy Sprout
Socialism in general has a record of failure so blatant that only an intellectual could ignore or evade it."-- Thomas Sowell
I was just talkin' to DW about that very thing, moments ago. Always been a dream.
Forrest
Love the work your doing, and love watching the progress.. Can you post pics of how the ends of the joists are supported? did you have to do any fancy notching? also, are you sistering the existing joists? I saw in one pic all the ends of the new joists ending mid span, is there a bearing wall below at that point, or are you going to header off etc.. at that point?
ThanksRav
Thanks!
The new joists all sit fully across the downstairs bearing walls top plates, and are just toenailed on. All old joists are sistered; new ones are put in between.
Once I established my "laser level" floor plane, I had to notch or shim both ends of all the joists. I tapered the notches out, so as not to make a stress riser. Given the number of joists and close spacing, there's not a lot of load on any one joist.
The maximum I had to notch the 2x8 joists was about 1-3/16"; the maximum I had to pad one up was about 2-1/2". Essentially, the top plates of the downstairs walls varied in the vertical plane by about 3-3/4" across the house.
Forrest
Finally got some pix to answer you!
First, I set up the neat new rotary laser to a rigid point (Obviously I already did this, but bear with me. On this job, I set the height of the laser at 6-3/4" above the level of the tops of the joists.
View Image
Then I hold the tape at each place on the top plate that a joist will rest, and write down the measurement the laser shoots at. I will then subtract 6-3/4" from that number, and that is the vertical height of the joist needed.
I notch the bottoms of that number is less than a 2x8 ~7-1/4"); add shims if it's more than a 2x8. This works because the old joists were notched over the plates, and the ceiling level is down about 1-1/2" from the top of the top plate.
View Image
Here on the other side, which will be the laundry area, I have to hand load all the old insulation into bags to expose the area for measuring, and uncover hot (!) K&T wiring.
View Image
Lots of 55-gallon bags - I spread it back before I put on the subfloor.
View Image
Here is the bathroom part finished - these joist also had to be aligned to accomodate the plumbing - in soon.
View Image
Forrest
Edited 1/31/2007 12:28 pm by McDesign
Edited 1/31/2007 12:28 pm by McDesign
Edited 1/31/2007 12:29 pm by McDesign
Edited 1/31/2007 12:29 pm by McDesign
Edited 1/31/2007 12:33 pm by McDesign
>>>>>>>>>these joist also had to be aligned to accomodate the plumbing - in soon.Just curious - you doing the plumbing also?http://logancustomcopper.com
http://grantlogan.net/
It's like the whole world's walking pretty and you can't find no room to move. - the Boss
I married my cousin in Arkansas - I married two more when I got to Utah. - the Gourds
I hope not.
He's gonna start making me look bad soon. I don't know where he gets all that energy.
Must be something in that Georgia water.
Forrest,As always, good looking job. What do you mean 'allign the joists for the plumbing'?Chuck Slive, work, build, ...better with wood
I had some flexibility in adding and sistering joists (exact placement, which side to sister, that kind of thing.
I laid out the room and existing joists in ACAD, located all the plumbing fixtures, designed the DWV that would be under the floor, and then laid out my new joists.
The fixtures are red, the walls are blue, the DWV is green, the old joists are black lines, and the new joists are fat gray lines.
I'll have to make sure I tell the plumber!
View Image
Forrest
Edited 1/31/2007 6:16 pm by McDesign
Well, I had taken more pix for you today, anyway!
Laundry area cleared out - last place to re-floor! Note the joist propeller
View Image
Hot knob and tube wiring under the loose-fill insulation. The "electrician" is replacing it all with 12-2 Romex back to the panel.
View Image
This is looking between the original ceiling and the lowered ceiling - exposed wire nuts to the box in the '70s lowered ceiling!
View Image
Bearing condition at one top plate - had to notch the new joists
View Image
Bearing condition at other end - had to shim the new joists
View Image
Notching is never really a good idea, but at least I kept from having a stress riser.
View Image
All installed. The spacing scheme is that every other joist sisters an old one, at random position, every other one is exactly 2' OC. blocks hold it until subfloor.
View Image
Full length (32'), taken from down a wing that won't be floored, just used for HVAC mechanicals. All this won't won't be floored, of course - just the parts from 50" kneewall on up. Big room is to the left; laundry area is near, bathroom area is on the other side of the chimney, which will be left exposed.
View Image
After the plumber and electrician finish, I'll pour all the loose fill insulation back in before the subfloor.
Forrest - feelin' wordy tonight. Must be the Valpolicella Valpantena - Ripasso. Whatever all that means
Edited 1/31/2007 7:06 pm by McDesign
Edited 1/31/2007 7:07 pm by McDesign
Edited 1/31/2007 7:07 pm by McDesign
Edited 1/31/2007 7:08 pm by McDesign
Edited 1/31/2007 7:08 pm by McDesign
Edited 1/31/2007 7:08 pm by McDesign
Edited 1/31/2007 7:09 pm by McDesign
Edited 1/31/2007 7:11 pm by McDesign
Edited 1/31/2007 7:13 pm by McDesign
I used to be just like him and then age and gravity overtook me.http://logancustomcopper.com
http://grantlogan.net/
It's like the whole world's walking pretty and you can't find no room to move. - the Boss
I married my cousin in Arkansas - I married two more when I got to Utah. - the Gourds
LOL I know the feeling.
I used to do almosty everything on a job- masonry, framing, to finish. Now some days I don't even want to pick up a bundle of trim.
And to think you're still working with all that heavy metal
< some days I don't even want to pick up a bundle of trim.>
Not sure what form of snide comment to make here.
;-)
Forrest
HAH!
I stumped Forrest!
It's the little victories that can make me a happy guy.
>>>>>>>>And to think you're still working with all that heavy metalI still listen to heavy metal. Most of the metal I work with is pretty darn light.http://logancustomcopper.com
http://grantlogan.net/
It's like the whole world's walking pretty and you can't find no room to move. - the Boss
I married my cousin in Arkansas - I married two more when I got to Utah. - the Gourds
There's one up your alley:
http://forums.taunton.com/tp-breaktime/messages?msg=85033.1
Maybe you could ship Sphere down there with a van load of copper.
jt8
Wishing I could be like Forrest
Don't give him any ideas like that. Atthe time of your post he and I were out unloadingthe days project materials.
It was nice and warm today, above 32 I think. That heat in the Bayou would kill me.
Spheramid Enterprises Architectural Woodworks
The secret to a long life is knowing when its time to go. M. Shocked
<Just curious - you doing the plumbing also?>
Umm - why? I'll post some pix once the DWV under the floor is completed . . . by someone . . .
Forrest
>>>>>>Umm - why?Just wondering if you were doing everything yourself or if you were subbing anything. You answered my question. Have fun.http://logancustomcopper.com
http://grantlogan.net/
It's like the whole world's walking pretty and you can't find no room to move. - the Boss
I married my cousin in Arkansas - I married two more when I got to Utah. - the Gourds
Forrest,
As always, looking good. Which laser do you have and how do you like it? I've been shopping for one, but I can't make up my mind.
Funny, I fell like no matter what I buy, there will be a better one out in six months.
Looks like we're gonna get some rain tomorrow, maybe I'll do some more searching.
dug
I got this one - my first, but couldn't be happier with it
http://www.amazon.com/Stabila-04100-Manual-Leveling-Rotating/dp/B00005V5NL/sr=8-3/qid=1170300055/ref=pd_bbs_sr_3/105-4957414-7584450?ie=UTF8&s=hi
It can be set on its side, and has vials for that, to establish a wall plane - darned handy in an attic across the roof.
Forrest
Forrest,
How hard is it to level? I've been looking at the self leveling lasers but, dang those things are pricey.
dug
Pretty easy to level (couple of twirls of the little thumb wheels while you watch the vials), but you really have to put it on something solid - not a floor you're walking on, unless you're over a foundation or downstairs wall. Those vials are sensitive!
The really funny thing is, you're crouched over it, leveling it, get it just right, turn it on to make sure the rotation motor doesn't throw it off, and THE VERTICAL BEAM GETS YOU RIGHT IN THE EYE!
Forrest - seeing green spots
Didn't you use your laser to establish the floor height in the attic?
I just picked up a fixer-upper in Statesville that has floors undulating like the North Atlantic. How can I set up a laser--given the presence of interior walls--to help me locate a benchmark to start from?
Fixing the up and down in the floor shouldn't be too tough once I figure out where to begin. The floor system is typical Southern style pier & girder w/brick curtain wall @ perimeter.
Thanks,
David
Forrest,
Have you had a camera tripod malfunction? We haven't been treated to any work shots lately.
Don't expect to build us up like this and have to go cold turkey!!!!
Walter horsing around a little
Roofers get bored with 20 below wind chills.
Okay - catch up time. Beautiful here today - felt like spring. Work has been slow, this has been like putting together a Chinese puzzle! I (the plumber, I mean) needed to frame and floor enough to get all the supplies and DWV in, while still allowing access in case the pressure checks show up anything. Finally figured it out. Also, had to put in wires to rewire the removed scary K&T wiring (the electrician, I mean)
Here's the toilet to the left, and the shower to the right. Will be a normal 32x60 steel tub, tile surround. Venting goes around the room to vent out the rear roof plane.
View Image
Here you can see the large opening for the 3' X 7' pocket door, and the small opening that may be later opened up for a door. The bath is to the left; the laundry is to the right. There is no dividing wall; the skylight (to come) is in the rear roof plane (upper right), and will be the only natural light in there.
Notice how the chimney is just out there in front of God and everybody! I think it will be cool, and matches the one in the main room. They both will be plastered with my "hand" technique, where I Hy-Bond the surface, and rub in Durabond by hand.
View Image
Here's a closeup of the laundry box - collected vent line is starting up the roof pitch. laundry box is high; to be over the washer. This one may spend a lot of time "off".
View Image
The far end; HWH will be here, and the pressure gauge and valve for the duration of the construction (like to have air in all my lines while I'm nailing!)
View Image
This pic is standing back to the tub, showing the little pass-through behind the chimney where you'll see the side of the washer. Pedestal lav sits centered on the chimney; supplies and waste through floor - through an S-TRAP! Hah-hah!
View Image
Here's a close-up of underfoot as you walk in the door to the bathroom, and the drain manifold. Toilet comes from lower left, tub from middle left, lav from center, and washer from upper right. Main drain drops down in front of chimney, in an existing chase beside the chimney, down through the first floor into the crawl.
View Image
Pressure test it all tomorrow, finalize and cushion all the pipe supports; do some more framing; pour all the old loose fill insul back in the floor, and put in subfloor maybe Friday.
Forrest - ready to play with the roof framing!
Edited 2/7/2007 7:31 pm by McDesign
Edited 2/7/2007 7:33 pm by McDesign
Edited 2/7/2007 7:37 pm by McDesign
Edited 2/7/2007 7:39 pm by McDesign
Edited 2/7/2007 7:41 pm by McDesign
Edited 2/7/2007 7:46 pm by McDesign
Forrest,
It's looking really good! Will it be sheetrock or plaster?
Do you clue your clients in to these threads? Or is it too risky with all the loose cannons rolling around the deck?
Thanks for the update One candle couldn't have been too tough !!!
Thanks - it will all be sheetrock - it's just an attic, after all . . .
I do share the threads with clients, if they've got a good sense of humor - everyone has, so far!
Forrest - ate the last slice of pie just now
They must wonder about some of your "cyber associates"
Hey, Forrest-
I read in the latest issue of JLC that you folk in Georgia are going to have to be liscensed by Jan., 2008.
Is that going to affect the kind of work you do?
I'll take the test and get the license for one of the three categories - no problem. I had gotten all the paperwork to exempt myself from taking the test, but . . .
Kinda' figured it wouldn't be sporting, and none of the other established guys would have taken it, so I'd be "better"!
Probably raise prices - anything that raises "barriers to entry" does that.
Forrest - now I've gotta' study
Jeez! Sniffin' all that glue for both supply and waste lines and no windows...
If you'd had more candles to blow out, you may have 'sploded. ;-)
Troy Sprout
Socialism in general has a record of failure so blatant that only an intellectual could ignore or evade it."-- Thomas Sowell
Your DWV and H&C look great Forrest. It's so good to see someone who takes pride in EVERYTHING, not just the "money view".
Keep up the great work.
David
BTW, can you send some of those temperatures about 400 mi. north please? 11 deg. this AM. Never saw 40 today. Yea I know, there's a roofer in Maine would kill for 40.
David,
As one roofer in Maine 40 would be really up there. After an incredibly mild Nov. ,Dec., and ealy Jan. we've been really blasted with cold temps.
Our highs this week will be teens with lows of 5 to 15 below.
Hope you get a warm up too.
Walter
Forrest,
Looks like a thorough job. Keep up the good work. Tell us more about that plaster technique when you apply it.
Chuck Slive, work, build, ...better with wood
Troy,
Thats a great link to a great looking product. Thanks.
Walter
Even better for the DIY Dump bed
http://www.dumpbeds.com/Troy Sprout
Socialism in general has a record of failure so blatant that only an intellectual could ignore or evade it."-- Thomas Sowell
Now a dump trailer, I would flat LOVE! Unloading at the dump's never that fast, much as I try.
I haven't looked in a while (I'm truckless at the moment anyway), but last time I looked, I think they ran $2-10k.
jt8
"Holding on to anger is like grasping a hot coal with the intent of throwing it at someone else; you are the one getting burned."-- Buddha
http://www.appalachianmfg.com/DUMPERPAGE.htmHere's the trailer I have - I paid $3500 for it about 2 1/2-3 years ago.http://logancustomcopper.com
http://grantlogan.net/
It's like the whole world's walking pretty and you can't find no room to move. - the Boss
I married my cousin in Arkansas - I married two more when I got to Utah. - the Gourds
To cost this out, I have about 14K in my 45' boom and my dump trailer together. I've spent about 1K on maintenance in 2 years and I rent both pieces of equipment out on the few occasions that I don't need them.
So would you guesstimate around $500/yr for the maint cost of the boom? That is with steady use?
BIL and a couple of his neighbors with tall houses have considered purchasing a group boom. One of them has a building to store it in, and they live close enough together to not need a trailer (small town).
LOL, I'm just sorry I missed them filling the last rental boom up with diesel. They drove it down to the station and filled 'er up.jt8
"Holding on to anger is like grasping a hot coal with the intent of throwing it at someone else; you are the one getting burned."-- Buddha
>>>>>>$500/yr for the maint cost of the boom? Yeah - so far. I've had one repair bill for about $600 which included an oil change and a tune up (plugs and wires). I've put a new battery on it and had a flat tire. I'm waiting on a part (kill switch on the dash is bad and one of the joysticks is getting sloppy so I'll replace it), but for a 10 year old machine it's been fairly trouble free. I haven't had it quite 2 years yet.We run ours down the road if there's a gas station nearby. My advice to the BIL is to get a 4x4 if it's gonna be off the pavement any at all.http://logancustomcopper.com
http://grantlogan.net/
It's like the whole world's walking pretty and you can't find no room to move. - the Boss
I married my cousin in Arkansas - I married two more when I got to Utah. - the Gourds
Hey, we fixed that Joystick at Delight's with Geocel and a rivet shank..you mean you really had it fixed by a pro?
Damm..we failed. ( sniff).
Spheramid Enterprises Architectural Woodworks
The secret to a long life is knowing when its time to go. M. Shocked
It's not fixed yet - I've ordered the part and I'll swap it out.http://logancustomcopper.com
http://grantlogan.net/
It's like the whole world's walking pretty and you can't find no room to move. - the Boss
I married my cousin in Arkansas - I married two more when I got to Utah. - the Gourds
Man, speaking of swapping out parts..I ain't doing well with the new meds. Day 7. I might be a maybe for the AM if I can't shake this feeling of unwellness.....I am in flux.
Funny that Forrest's thread is Attic Recovery, that is where I am..now where did I put them toys? That was an aerosmith allusion if I was obtuse.
Damm, I ain't well. I wish it was the flu, but I know better,,,I feel nauseous and energetic at the same time..a walking puke.
Time to get all the red Lego's in a row, and the blues in a short pile...and send the yellows to the wifes nostrils.
Spheramid Enterprises Architectural Woodworks
The secret to a long life is knowing when its time to go. M. Shocked
Not to pull you off subject (!), but i did work in the attic today.
Design work this morning; planning the bathroom and laundry that will eventually be on the other side of this wall. Had to get an idea so I could frame in the door openings in this transverse wall. Tons of measuring and little pieces!
The 6' wide opening is for a pocket door (old 3'x7' Victorian door; panels removed and replaced with frosted glass; passageway biased toward the left.
The smaller opening will go directly into the adjoining laundry room once the stairs are moved back, to the right - a later project; I'll just drywall over the opening now.
View Image
Forrest
Edited 1/25/2007 6:59 pm by McDesign
Well....Ok, but I still hate you. (G)
Spheramid Enterprises Architectural Woodworks
The secret to a long life is knowing when its time to go. M. Shocked
I can't believe that ceiling fan is still living up there. You must be a finesse guy too. I think it comes with age. Scratch that--MATURITY.
Still looking good. What about the LVL's where they run into that doorway?
I'll notch the LVLs wher they cross the doorway. Not ideal, but at least it's in the first 3', and not in the middle. Will still have plenty of meat under the notch - like 8-1/4".
Ceiling fan was fun - i just broke the rock out around it; hope it didn't crash - not yet, anyway!
Forrest
Wow, a laundry room on the third floor! You'd better leave your stairs for washer and dryer replacement, ha.Thanks for the reports, it's an intersting project, and so neatly kept, too<G> "But to be honest some folks here have been pushing the envelope quite a bit with their unnecessary use if swear words. They just put a character in to replace a letter. But everyone knows what they're saying." Sancho
Here's some more - I swept for you, even. After finding the bag full of money, even.
Finished framing the last (NW) corner. Joists had been cut; were sitting on the door frame! I bridged them to good structure. I'll move that downstairs door back 2-3' to enlarge the stairwell a bit.
View Image
Just cuteness picking up the old rafters - fun framing, drriven in tightly.
View Image
This is a view looking in the front tripartate windowacross the full 38' ballroom expanse at the new French doors.
View Image
And this is looking the other way, in the doors at the front window
View Image
This is the area for next week - a full bath and laundry room go here. i mean, like, once it has a floor and walls and all.
View Image
Forrest
Edited 1/26/2007 6:03 pm by McDesign
Edited 1/26/2007 6:04 pm by McDesign
Edited 1/26/2007 6:06 pm by McDesign
Edited 1/26/2007 6:07 pm by McDesign
Edited 1/26/2007 6:09 pm by McDesign
You sure Santa isn't stuck in that chimney?Sure looks bigger when it's cleaned up<G> "But to be honest some folks here have been pushing the envelope quite a bit with their unnecessary use if swear words. They just put a character in to replace a letter. But everyone knows what they're saying." Sancho
Forrest,
You could use better lighting than that head banger provides!
Makes us all realize what our attics could become. Thanks!
Walter
Pulled the fan down today.
The exciting news is, I showed the client this issue of FH about the curved ceiling, and they want a serious quote for that curved ceiling up there!
Hot dang!
Forrest - working on it now
Forrest, Curved ceilings are not to tough. Talk the owners, your neighbors, into a vaulted/compound curved ceiling with an eyebrow dormer.That is a massive attic. I know no structural permit is required but how about the electrical before close-in?Chuck Slive, work, build, ...better with wood
Which issue #???
I've got one about 15 years old that outlines the eyebrow Chuck's referring to.
Seems like I also remember one on an expansive barrel vault.
The new issue that just came - it's a flatter vault. Bent 1x4s to hide a deep structural ridge beam.
I know the one you mean - a barrel vault with coffering built up with layers of 1X.
I'll put regular Velux skylights on the back - no eyebrows . . . sigh
Forrest
Forrest,
I'd say your plan is working out to a T.
I think the stairs were a great idea- just glad I'm not the one hauling all those materials up them!
My reference to Grant about ladder lifts dealt with bringing my materials up and down- it's not applicable for your job here.
Thanks again for another informative, well done thread.
Walter
Whew - hit the wrong button!
Another beautiful day! a little cooler, but sunny - I thought some up your way - I heard Oswego, NY got 7 FEET today, with 3 more to come.
Finished the last corner of the laundry room; framed access doorways for the two unfinished attic areas.
View Image
Client might floor this one for unconditioned storage
View Image
HVAC goes in here
View Image
Hand excavated mountains of old insulation to expose the last of the hot K&T - darned dramatic to be under 8" of 'glas.
View Image
Scary stuff! Gotta get the 'lectrician right on that tomorrow
View Image
View Image
Hey hon', can you add a switch to darling's overhead?
View Image
Here's where the wires drop down to the '70s 200-A panel
View Image
Hey, I pressurized my supply system today (the plumber's work) AND IT LEAKED DOWN!!!!!!!!!!1
Then I realized by some selective isolation that my cheapy gage was leaking! Hope that's all - get one tonight
View Image
Forrest - itchy
Edited 2/8/2007 5:43 pm by McDesign
Edited 2/8/2007 5:43 pm by McDesign
Edited 2/8/2007 5:43 pm by McDesign
Edited 2/8/2007 5:44 pm by McDesign
Edited 2/8/2007 5:44 pm by McDesign
Edited 2/8/2007 5:45 pm by McDesign
Edited 2/8/2007 5:45 pm by McDesign
Edited 2/8/2007 5:46 pm by McDesign
Edited 2/8/2007 5:49 pm by McDesign
insert the pics already. Sheeze, don't make me OPEN them myself!
jt8
"One of the fondest expressions around is that we can't be the world's policeman. But guess who gets called when suddenly someone needs a cop." -- Colin Powell
Sheeze, that wiring is enough to make you wear rubber gloves. Sure gotta be careful how you scoop the fg up!
jt8
"One of the fondest expressions around is that we can't be the world's policeman. But guess who gets called when suddenly someone needs a cop." -- Colin Powell
< wear rubber gloves>
Yes! I got bitten twice. Didn't do my usual, which is to snap my head up and impale my scalp on a roofing nail!
Forrest
Yes! I got bitten twice. Didn't do my usual, which is to snap my head up and impale my scalp on a roofing nail!
ouch. Wonder how the place kept from burning down.
Since I'm not a pro, could you go into more detail on how you're pressurizing your drains?
jt8
"One of the fondest expressions around is that we can't be the world's policeman. But guess who gets called when suddenly someone needs a cop." -- Colin Powell
Haven't done the drains yet, because I have to get the bottom drain leg through the first floor, and cut into to their library wall - company this weekend, so Monday maybe.
Basically just glue KO plugs or expanding plugs in everything, cap the roof vent, and put ~10 psi in it for a day or so. Haven't ever had a drain leak. The only supply side leaks I've ever had were at threaded connections.
Forrest - I mean the plumber