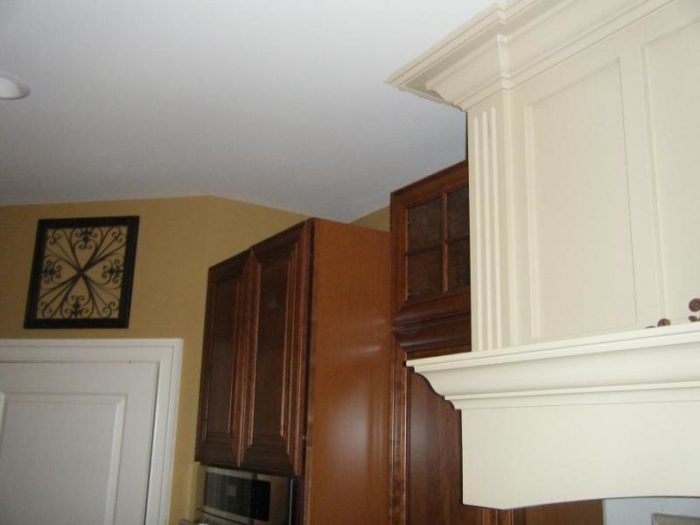
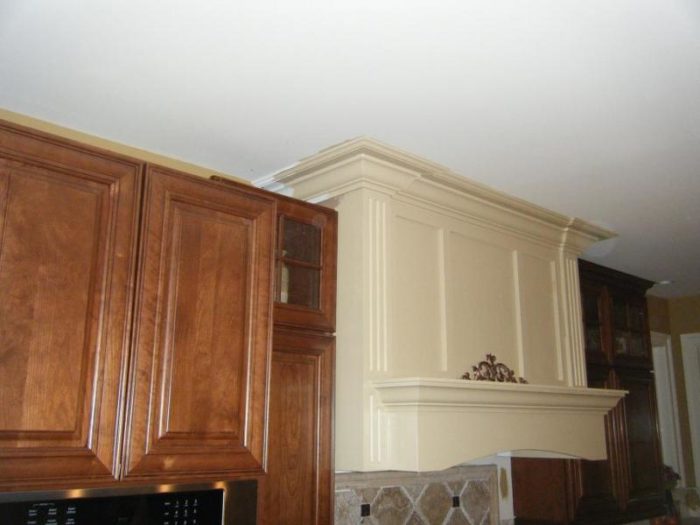
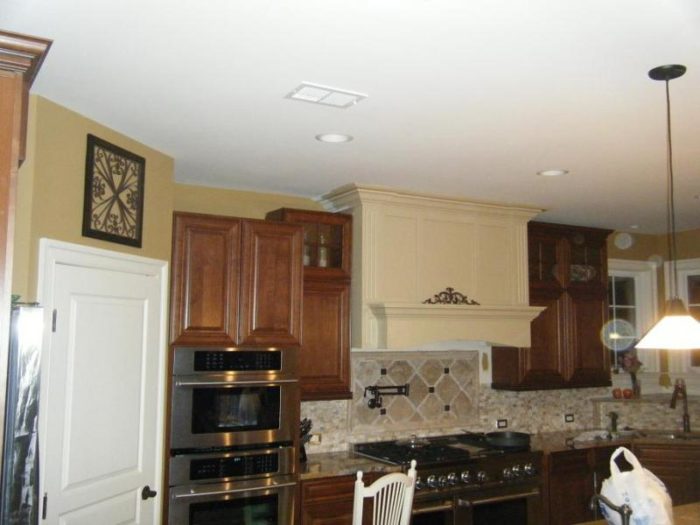
I am trying to finish off the cabinet crown in my kitchen. I have been putting this project off since we got the U&O 6 months ago because from the begining I have been unsure about how to trim out above the oven cabinet which sits 6 inches lower than the adjacent cabinet.
The biggest concern is the limited selection of stock cabinet parts that will match the finish. I really want to have crown or some moulding on the oven cabinet because it seems out of proportion without it. I tried to stack a 6″filler above the oven cabinet to match the height up to the other cabinets, but the different grain direction and poor color consistency does not work. The oven cabinet was the one cabinet that was sent out without real wood sides and I couldn’t wait for the right one. I had planned to skin it, but i didn’t have the 1/8″ unfortunately.
Any ideas? See pictures below.
Thanks, Jeff


Replies
That is a tough one.
Consider this Rez-Bump.
I'd be tempted to build a soffet from the top of the oven cab to the ceiling using plywood in the same finish as the cabs. Maybe apply a couple of "doors" to the face to give the appearence that the cabinet continues all the way up.
Them you can die the crown from the adjacent cab into the side of the soffet.
R.I.P. RAZZMAN
Any chance of finding a smaller crown for the RH cab in 1433, so that it's not chopped off? The paint v. stain contrast really draws your attention to the mismatch.
And in 1431, maybe a return on the crown, so that it dies into its own cabinet before it hits the top glass-front unit.
In other words, if it's 16" from the front of the oven cab back to that glass-front, cut the side crown at 12-13", and return it back into the side of the oven cab.
This just might be a job for the Mahogunnite guys, though.
AitchKay
How about a pedestal under the oven cabinet to lift the whole thiing up 6 inches?
Not sure how this will look "real world", but consider matching the crown on the right cabinets exactly.
To extend a single piece of crown across the left cabs, you'll have to add a filler strip on top of the oven cabinet, and it'll be set back several inches from the face of the oven cabinet's face, in plane with face frame of the cabinet to the right of the oven cabinet.
It'll result in the overall vertical elevation of the left cabinets matching the vertical elevation on the right cabinets. But obviously the oven cabinet will be sticking out proud a bit.
I kind of boogered the photoshopping of this, as the crown on the left side is set too close to the ceiling. But it should get the idea across.
View Image
Always try to keep the cabinet tops equal on both sides. I would either raise the oven cabinet up the required height to match up to the higher cabinet (A larger toe-kick is less noticeable than the eye-catching cabinet tops) OR add to the top of the oven cabinet using a build-up of a narrow front (maybe a drawer front) and add to the sides of the cabinet. This would then create a nice balance between both sides of the stained cabinets.
Can't say I like the crown crowding the ceiling or the way the wood crown dies into the painted, but if it blows your skirt up that's what matters.
Perhaps use the filler to continue the plane of the glass door upper across top of oven cab and run the crown across to wall. Then platform top overhanging the front part of oven cab...like a tabletop overhang. Could also be done with filler if it's got one finished edge.
Then put a nice ceramic chicken up there.
Quick concept attached.
Everything will be okay in the end. If it's not okay, it's not the end.
Where's the ceramic chicken?
R.I.P. RAZZMAN
He's right there, you don't see him?
Everything will be okay in the end. If it's not okay, it's not the end.
a few thoughts.
rh, lh cabinets, finish with crown . leave stove cabinet plain.
small, simple crown type material on all three cabinets.
leave three wood cabinets as is plain. Continue stove top crown around entire kitchen (may not be feasible)
additional cabinet over stove to ceiling? seam on finished rh panel might not be too noticable. then you can crown all three cabs????
good luck.
it appears you bought an 84" tall oven cabinet when you needed a 90". that should have been obvious when the layout was done. but thats water under the bridge
I would not raise the cabinet. the simple solution is to add a 6" filler to the top of the cabinet to match the height of the cabinet to its immediate right.
I know what you are saying about end grain and all. the trick would be to duplicate the stile and rail facing so that the stiles appear to continue up. I think a lot of the seam would be hidden behind those full overlay doors. if not you could raise them a hair
then, when you order your 1/8" skin for the side of the oven cabinet make sure you get a 90" piece.
then finish out the crown
edit to say its never too late to skin a cabinet and if color match is an issue look in the yellow pages under furniture repair. you can get a pro to come out and tone up any area with an hvlp
Edited 12/1/2009 8:42 am ET by maverick
If it were me I'd bring that cabinet clear to the ceiling since it sticks out from the wall so far. Add glass doors to make color match less critical and put your least used holiday stuff up there. Hate to see that much space go unused. :) A simple frame could be built in place with stock filler parts fairly easily.
This also allows the cabinet to the side of the oven die the crown into the oven cab which looks cleaner to me than wrapping it out and around the whole works at that elevation.
Add a simple light up there behind the glass doors and you'll wonder how you lived without it.
Beer was created so carpenters wouldn't rule the world.
I can see why you're putting it off. You have many levels to deal with.
Wall cabinets to the left and right of the range hood should be lower or at least look that way. Do this with a filler on the inside of the cabinet along the top inside of the frame. Install the crown on the face of the cabinet so it ends with a square end to the range hood. If you really careful you can cut down the glass cabinet doors to the new height.
Extend the oven cabinet to match the wall cabinet and continue the crown around the side and face of the oven cabinet. Install a dummy drawer front above the oven double doors or order new doors to fit over the blank area.
Nah, too much work.I'm thinking of a cloud motif -- a dry-ice fog generator, perhaps.AitchKay
There's so much going on here that you really have to match the left side to the right, including a filler over the 'shorted' cabinet. I don't agree with Mongo that the panel should go straight across - it should sit just slightly over (1/16") the cabinet below and follow it. ie 'The Right Way'. The factory should be able to provide you with matching stock - even if an odd dimension.
Still ... your crown will end up mitered onto the painted wall - not great IMO.
Jeff
Edited 12/1/2009 6:14 pm ET by Jeff_Clarke
Thanks for the ideas. The oven cabinet is actually a 96, which was the tallest standard size available. (I really wouldn't want to mess with a cabinet taller than that anyway). The adjacent cabinets are 48 overall, being a 30 with an 18 stacked above.
I think what I am going to try to do is install a full height wood veneer skin on the side of the oven cab that will reach the top of the adjacent cabinet, then build up above the oven front with a panel filler and put a door front on it.
The complication is that with the full overlay doors I have no space to install a skin on the oven cabinet and there is no space to move the oven cabinet over, or move the adjacent cabinet away.
I think I am going to remove the adjacent cabinet and use a planer to remove 3/16" thickness from the side of the oven cabinet and install a skin in its place. I figure I can use a router to clean up the edge behind the stile. Has anyone ever attempted anything similar?
Thanks.
Let me get this right, you intend to remove 3/16" of material from the entire oven cabinet end? Man, that sounds like swatting flies with a sledge hammer to me. You must be a patient man...
What kind of hinges? Can the upper doors be moved over or cut down to accomodate the panel thickness? Can a piece of veneer be installed instead of ply?
Looks like you've got splash installed, isn't that gonna be a booger to remove that upper. From here that looks like a last resort.
Everything will be okay in the end. If it's not okay, it's not the end.
i would build a little single level wine rack on the top of cabinet [i have something similar,my wife uses it to display her old rolling pins.] the run the crown straight.
the older i get ,
the more people tick me off
Not really sure what all the fuss is here. Jeff has it right. There are too many levels here and the right has to be the same as the left. Run a facia on the range cab to the proper height with backer & skin, and run your crown accordingly. If the seam bothers you, then make it the same as the one on the right hand cabs. (I can't see it well enough to see if there was anything done to that seam other than a butt).
Don't bring attention to the stained cabs, that's the job of the stove hood, which is very nice by the way.
Not too crazy about the way the stained crown runs into the painted but it looks like it was done well enough. I've had to do the same on many a kitchen due to the unforseen or shortsightedness of the designer.
Kitchen & baths like these, the devil is in the details.
I think the OP's concern are two fold. Varying height of cabs and the oven cab didn't get a finished end skin. I'm imagining the end being vinyl or melamine.
My biggest qualm about extending oven cab up and then crowning would be how the crown hits the 45 pantry wall. In my minds eye that's gonna scream "look at me".
Everything will be okay in the end. If it's not okay, it's not the end.
Extend the crown into the 45 wall. Or...45 it back to the wall (22.5 cuts) where the wall starts to splay away from the crown. Do two test pieces and see which one you like.1/8" skin with finished veneer. Or...veneer onto the melamine cab itself and color to finish. Not easy, but it's been done.
I think you miss my point, it's not how to do it, it's how it looks when done. Big crown, interesecting a corner like this will, just looks like an afterthought to my eye. Seen it to much. Ideally cabinet and wall layout would take things like this into consideration in the paper stage and not be left to cabinet maker and installer to figure out.
When it comes to crown molding in general, the thinking appears to be a lot like Mcmansion thinking... the bigger the better. I'd rather see smaller crown without all the weirdness that it frequently gets into with big and top heavy stuff. It's a pet peeve for me, I suppose.
FWIW, I 've fit prefinished veneer with contact on panels like that. Comes up from time to time in refacing...it's no fun, so I think your rec to OP is better.
Everything will be okay in the end. If it's not okay, it's not the end.
Well, you're right about crown size. I too believe there is a size ratio that is exceeded quite a bit in new building these days. That one piece he's got up on the right hand cabs is ok and should match the left. Ultimately it is up to the individual & what they like.
Thanks for all the replies. The indecision has been going on for almost a year. I installed these cabinets last december. The whole kitchen was a struggle. It was a custom design that my girlfriend and I came up with, and the way some of the details came together we really weren't able to anticiapte since this was our first time undertaking such a project.
All these minor details have been lingering since I have been very busy over the past 18 months. During construction I acted as my own GC on the house as well as doing the drain tile, waterproofing, setting all the windows and doors, air sealing, Trim, siding, tile, hardwood, as well as all the final punchout(which is pretty much going to go on forever).
Overall we are very happy with how the kitchen and the whole house turned out despite this one intersection that I am pretty sure to the trained eye will always stand out as a patch job of sorts.
I would like to try to find a 1/16" thick realistic wood veneer that I could apply to the side of the oven cabinet to solve the seam problem but I don't know if that exists in a matching color.
Jeff
What I posted to peter.
Don't know how good you are at coloring, but you can do it by making several test pieces and carefully following a formula. Or...call the manufacturer and see if they can give you a prefinished 1/8" sheet. I've worked with them.
If you decide to veneer, make sure it's backed & not raw. I wouldn't use contact cement, but a glue that has cure time so you can manipulate the piece. clamp with pieces of 3/4" ply & spring sticks going off the hood cab. Or use a few screws through the ply and veneer into the side of the range cab. the screw holes fill out & stain easily. If you seam it, do it with the grain. That's a darker color and easy to hide a seam if done right.