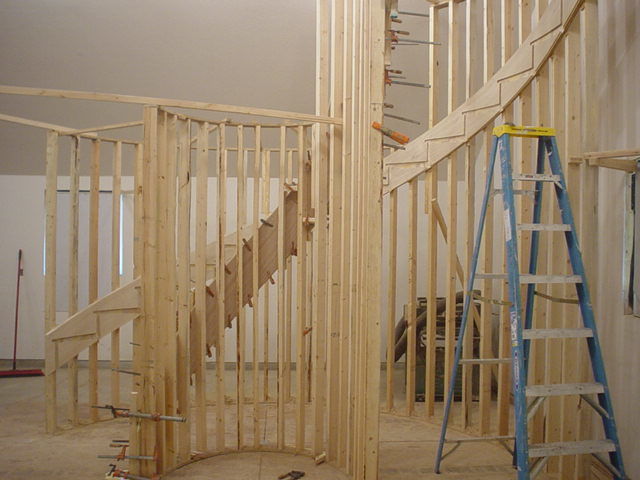
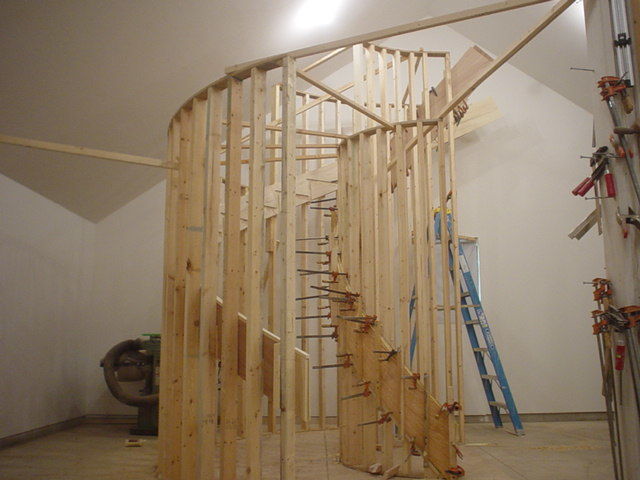
I have been busy finishing up various stairways…getting my daughter married….flying….and now I am full time on this ellipical stairway.
Stan
I have been busy finishing up various stairways…getting my daughter married….flying….and now I am full time on this ellipical stairway.
Stan

This 654-sq.-ft. ADU combines vaulted ceilings, reclaimed materials, and efficient design, offering a flexible guest suite and home office above a new garage.


"I have learned so much thanks to the searchable articles on the FHB website. I can confidently say that I expect to be a life-long subscriber." - M.K.
Dig into cutting-edge approaches and decades of proven solutions with total access to our experts and tradespeople.
Start Free Trial NowGet instant access to the latest developments in green building, research, and reports from the field.
Start Free Trial Now


Replies
I gotta tell ya Stan, for my money these are the best pictures that you post, nothing against the "flyboy" pix's but I still have a soft spot for these.
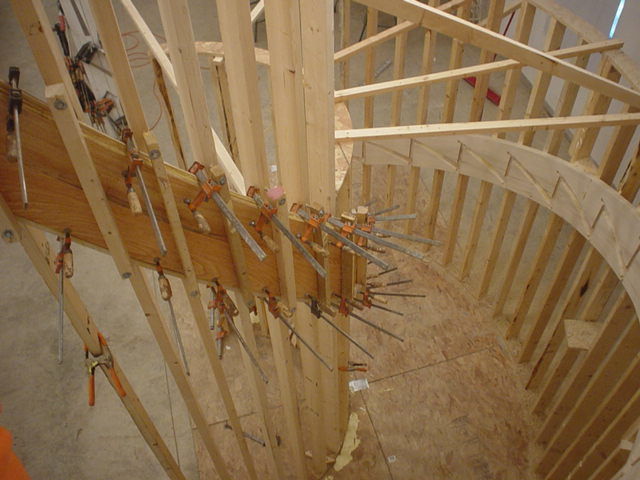
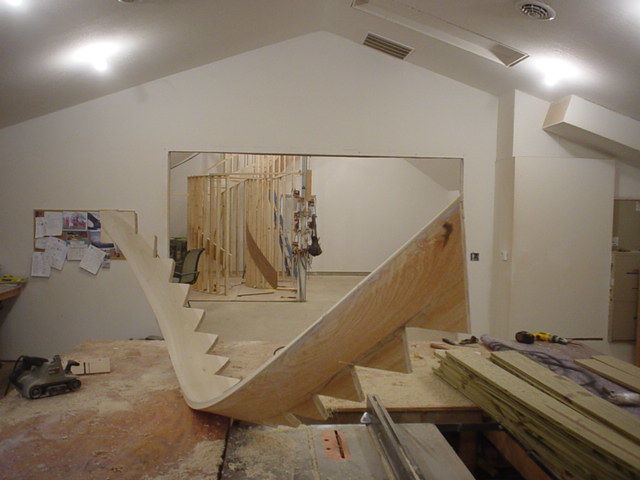
That stringer looks like it weighs a ton!
Thanks for sharing
Doug
I've wondered, so I'll just ask.
When one lays out a typical straight run stair, it's pretty straightforward. If you have a 7 rise and 11 run, thats what it is on the whole thing. But theres got to be multiple other considerations that come into play when you start curving them.
For example, a winder, it cant have a tread less than 6" (IRC) at the narrowest, which here they've said 8". Now with a curve, it probably isn't so much how narrow the short end is, but where you figure the run based on. Centerline of the turn?
If you're trying to figure how many risers, thats the easy part if they're all about 7". But how to you figure the run, and where are you measuring it? I'd love to know what the math is that you use when you start laying out a new set.
And, as always, those are just darn impressive.
"Sometimes when I consider what tremendous consequences come from little things, I am tempted to think -- there are no little things" - Bruce Barton
RW: The run around here is measured 12 inches in from the smalles end of the tread...which would be the face of the inside stringer.
On a curved stairway....I just figure the circumference length of this walking line and design it to meet the requirements.
As far as the math on a cicular stairway....its no different than a straight stairway. If you lay out a typical straight stairway on a right triangle piece of paper.....then wrap this triangle around a cylinder....you have the same thing.
Stan
"If you lay out a typical straight stairway on a right triangle piece of paper.....then wrap this triangle around a cylinder....you have the same thing"
Boy, that's an "A-HA" moment for me, makes it seem much simpler when you think about it that way.
PJ
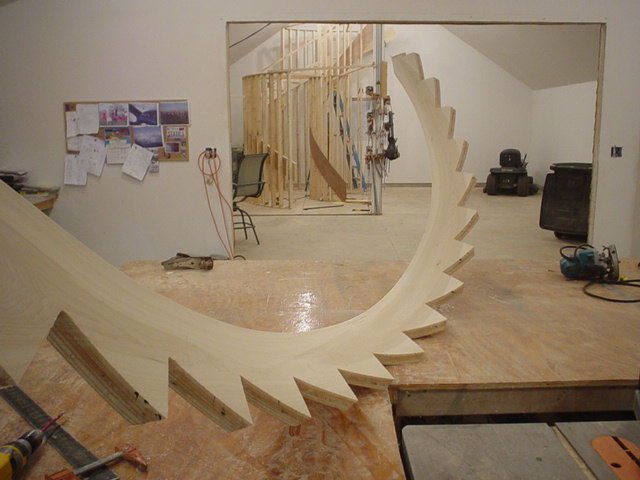
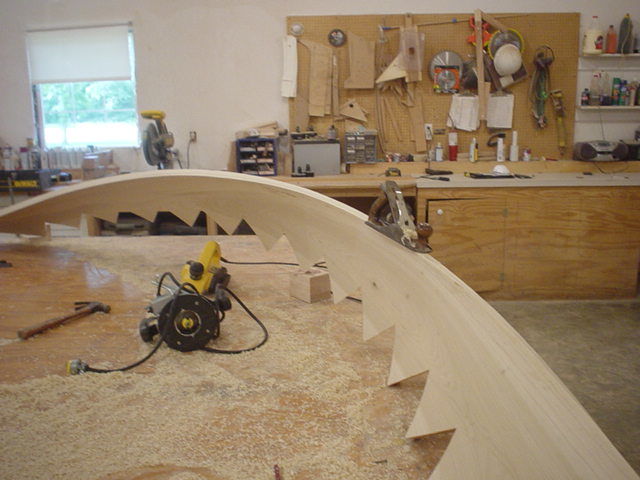
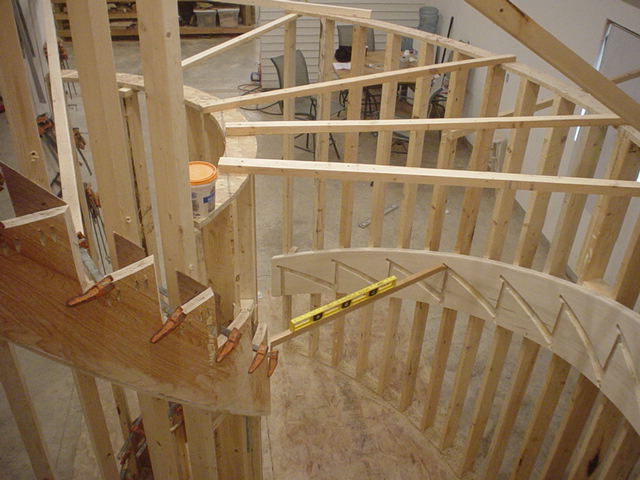
That is the prettiest set of stringers I have ever seen. I'm curious how you lay out each tread since there isn't really a centerpoint for an ellipse. I would really like to see this in plan view, and keep the pictures coming, it is what I aspire to do someday.
JK
Kirkpatrick: I layed out the exterior stringer as a true ellipse. The inside stringer is a set distance from the outside stringer...and thus isnt technically a true ellipse.
I place a row of finish nails right on the layout line and bent a narrow strip of wood around the nails. I then divided these into equal tread runs. What happens in an elliptical stairway is that the riser miter starts off square with the stringer...then gradually changes from an obtuse to an acute angle. The changes are subtle but noticable several treads apart. Each tread has its own pattern.
They are really a neat looking stairway to study in person.
Stan
I can only imagine. I'm a rough framer and I have done a good number of stairs but it's all closer to the way Tim Uhler did his. What I build is covered in sheetrock and never seen again.
What you've built is poetry in wood, man.
Keep posting, I have a house coming up that could use that look, even if I dumb it down some to my abilities.
JK
Great job as always Stan, What are the major and minor axis of the ellipse? Just curious as to the real life size of the ellipse.
Is there much room for "slop" when you build a stair like that?Seems like I remember you saying that you always went out and measured the existing walls after they were framed up. Then you take those measurements back to the shop and build the stairs. I'm wondering how you alow for error, since nothing ever works out perfectly. Like if the radius of the stair is off a hair and doesn't fit tight. Seems like there has to be SOME margin for error...
Where there is no vision, the people perish. [Proverbs 24:18]
Stan, thanks for posting. Since participating in forums for the past couple of years I've been developing an interest in space curves and their intersections. I've never had the chance to build a spiral stair as yet. Your photos are giving me an idea of what I'll be facing if the opportunity arises.Joe Bartok
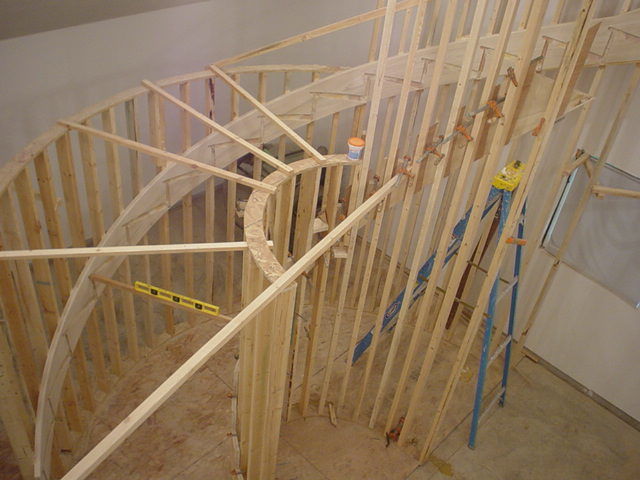
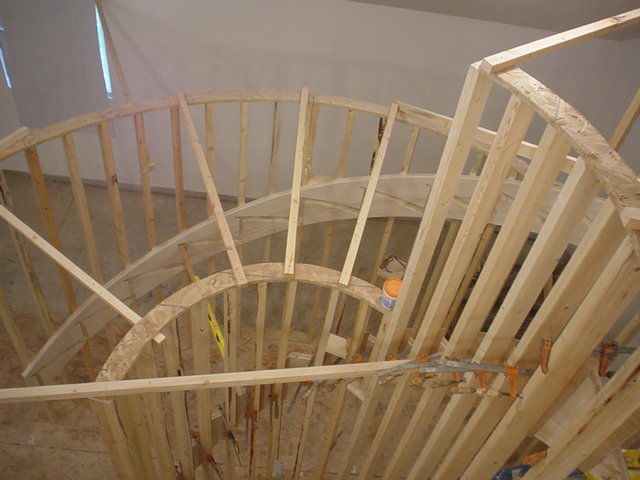
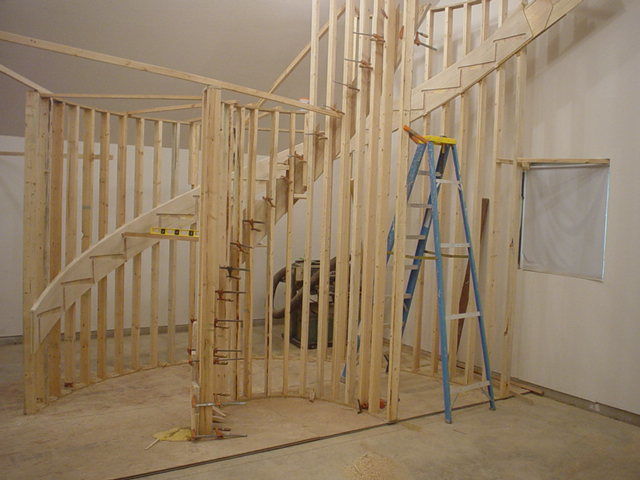
Boss: I made a template for the contractor to build the elliptical wall to. I have never had to put trim on my outside stringer....but there is always a first.
Armin: This stairs is an elliptical...but very close to circular.
The semi-major axis of the outside wall is 84.5 inches. The semi-major axis is 79.5 inches. This is a 180 degree stairway and thus is 10 inches wider one way than the other. This had to be the case so as there would be 48 inches of clearance at the front wall. Another typical architect designed home where the house was designed first...then what space is leftover is where the stair goes. It should be the other way around.
Syan
This stairs is an elliptical...but very close to circular.I have built mild ellipticals as well and always wondered how the handrail would bend in the case of an extreme elliptical. Seems like the rise/ run would not be consistent around the perimeter causing the rail to distort or run off plane. Either that or the rail height would vary from the tight section of the curve to the more gradual center curve. One of these days I'll make a mockup to scale and try it. Many years ago I saw one in an old house however it was carved out of solid lumber and not laminated.
Armin: My perception of this is that the elliptical form can be wrapped without any change of pitch as the laminates follow the curve. The edge of the laminate is going up at a fixed rate as it also goes around the drum at the same run distance.
Anyway the jigs I have set for the rail bend up follwed the exact riser/tread intersections all the way to the top. The only exception is that on this particular stairway....the first 16 treads follow an ellipse...the top 17th tread is a straight run and the rail is gaining height on that one. But thats where my gooseneck fitting will make this geometrical challenge work.
The ellipse is divided into equal tread runs which causes the miter angle starting at the bottom of the stair to gradually change from square to more acute as it appoaches the center of the turn...then gradually goes back to square at the top.
These riser intersection angles are jus the opposite on the outside stringer. They start off square...then gradually become more obtuse at the center where they gradually go back to being square at the top.
Here are some pictures of the rail being glued up yesterday. It is 16 feet long...8 laminates...and was bent into submission with help from my son Jeff and an "off the street draftee"
Stan
Started putting the prefinished treads into the painted skirtboards. The handrail is getting all scraped to shape.
Stan
I just remember your shop filled up with that pretty red bird..Maybe you have some pics on your camara that have not been posted yet?(gyrocopter)of course. stinky
Beautiful work. Please excuse the ignorance, but I have a question. At what stage in construction did you rout the outer stringer for the treads and risers? Was the stringer bent and clamped so you had to rout it in the final position?
"With every mistake we must surely be learning"
Stan
I dont recall you ever doing prefinished steps, is this common for you? Are you doing the finish work?
Looks good so far, keep the pics coming.
Doug
Mike: I routed the stringer in place.
Doug: This is the first time I have applied the finish to a stairway. It more than likely will be the last time. Circumstances with this stairway caused me to experiment a little. Its coming out real nice...but finishing is not my bag at all. I dont enjoy it....so I wont be doing that part of it anymore.
Stan
You're a craftsman in every sense of the word. I've built one set of finish stairs with a housed stringer in which I had to make a jig to cut the mortises. The jig worked to perfection (don't know how that happened lol!). My question is: do you have a custom jig with a curved base to make the mortise? I'd like to see a photo of it if you have any.
Again beautiful work.
Brian
Brian: Thanks for the comment but truly and Honestly....I am just an average trim carpenter who may have just a little bit of practical math in my head. Thats all there is to me...really.
My jig is just a piece of 3/4 plywood....thats kerfed on the back to flex enought to the curved stringer.
Stan
And modest to boot!
Stan, your average is my awesome. Thanks for all the effort you put into this site; your posts (recreational and commercial) are some of my favorites.
Wayne
do ya have any photos of the jig in action? I'm not visualizing how the flat router base would work with it (the kerfed ply).
thanks,
Brian
Stan
You make it look so easy, I can imagine the skill that goes into every stair. What is that white material you are using to bend the handrail? Thanks for the pictures.
Greg in connecticut
Greg: That white material is just some high density bending mould for the handrail. Wood bending mould would not work on this tight radius....it would just split.
The plastic kept all the laminates all nestled together as I clampled it into submission.
Stan
busy day...loading the stairway....driving 100 miles and installing it in place. It was a challenging jib ...and it fit nice....but almost too tight. It had me sweating.
The cost of setting a stairway like this? lots of sweat
The cost of it fitting nice.....priceless!
Stan
Very well done Stan, and the finish is impecable!
Doug
what did you do pre-finish this one?
Armin: Yep...the first and last time hopefully. I got conned into finishing this stairway....but it cost them. Anyway...it was the only part I didnt enjoy....so no more. It came out nice...but I am not a finisher.
My problem is that I love to handrub linseed oil finishes on curly maple gunstocks....and I just cant economically do that to a stairway. So...its just typical poly finish.
Stan
Finishing is tough especially on something of that size, kind of like painting a car only worse because of all the corners. For me it's my niche and the key is having a big clean finishing room to work in combined with 30 years of dancing with the spray gun. If you ever get another one where the customer insists on having it finished and you don't want to build the project send it my way. I have a trio of cherry columns going to your neck of the woods the end of august I'd like to look you up and say Hi.
The pics of your stairs on the trailer look like a float from a Slavadore Dali parade.
Nice work as usual, Stan!...that's not a mistake, it's rustic
What the pic's don't show is the truck/trailer pulling out of the Home Depot parking lot.
You show me the map to that Depot!
I'm waiting for pics of a stair delivered through a roof opening with the gyro. It's only a matter of time......that's not a mistake, it's rustic
Wow. That's really a work of art.
Beautiful work Stan. Not to sing you undo praise but what you do in one summer some don't do in years. You are an inspiration.
TGNY: Hey...thanks for the comment...I really do appreciate them but I am way overrated. I love to post stair pictures and I have lots that I havent posted here lately just because it makes me cower in the corner thinking I am tooting my own horn too much. Then when I do post some,.. I get all lathered up with comments that I sincerely appreciate...but gets me all kind of red faced and making me just want to keep to myself.
Is something wrong with my genetic make up something?
I wish I could just post pictures anonymously and not get all the praise. Guys like Armin are more deserving of it than I.
I think this is a tough crowd, if the folks here didn't think much of your work, you probably wouldn't get that much of a response. What makes you a little different is seeing the other sides of your life, the Gyro, the tragedy of your buddies, the joy of your daughters wedding as well as your work. I just came back from TipiFest and is was a real pleasure to meet people and here about other things in their lives. Armin got his due praise too for a job well done, but now he is known for other things too ;-)
Armin got his due praise too for a job well done, but now he is known for other things too ;-)Hey Hey fellow constructioneer, I'm known for lots of stuff, my sense of humor and my unorthodox political views to name a few.
Stan, I don't see any red face.....I hope ya not gonna stop this, never mind what others say. We all just love to see what others had done and how they made it. I had built my kitchen and it's something that I did with my own hands and the simple tools I have around. Nothing high class like some of those guys did very high class looking. I'm still not done with it 100% yet. I should post a picture or two for all to see but how do I do it like you did?
This post and others are what I like to read than the Sunday's papers....and there is no more real homebuilders/woodworkers on TV now........