We had new front steps poured last fall. They turned out nice, but are now having a couple of problems.
First problem: The side columns, which are a red colored concrete (in the mix) rub off on anything that touches them. They’ve weathered for 5 months now, but sill, just touching it will turn your hand red. I asked about this last fall and was told that sealing would do the trick. What do people recommend we seal it with?
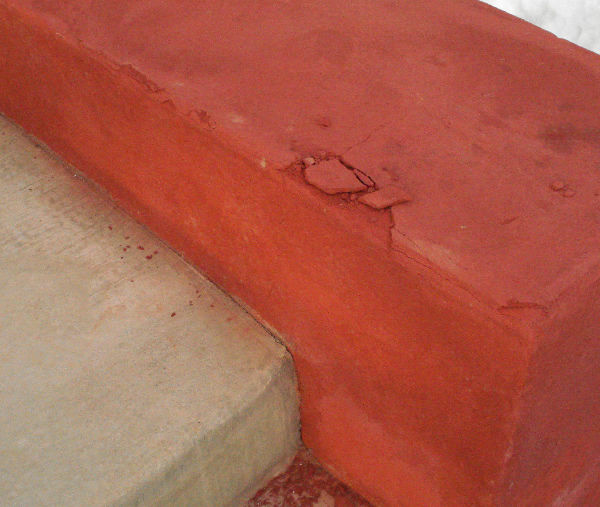
The second, and more serious problem (see photo). One of the columns now has hairline cracks all over the top. I tapped it with my food and it began flaking off in big chunks. It appeas that the top 1/4″ or so is of a chalk-consistency. Easily crumbles. This is bad, right? Possibly related to the dye/colorant? Fixable? I have a call into the concrete guy but haven’t heard back from. Any thoughts on options here? THe only thing that’s come to my mind would be to chisel the top layer off and then maybe grind it down smooth again, then seal. Thoughts?
Edited 3/9/2007 9:41 pm ET by darrel


Replies
too wet of a mix???
rip them out and start over???
Life is not a journey to the grave with the intention of arriving safely in a pretty and well preserved body, but rather to skid in broadside, thoroughly used up, totally worn out, and loudly proclaiming
WOW!!! What a Ride!
Forget the primal scream, just ROAR!!!
So, the concensus seems bad mix and I need to do a rip-out.As such, is this something the contractor should be responsible for? Or is this just dumb luck and we got a bad batch of concrete? Tearing these out is not going to be easy, they're solid concrete 4' x 4' x 2' and then the steps were poured around the column.
Not a matter of luck!
Contractor chose how wet to pour, how much to work it, what klind of colourant, how to add it...He was incontrol of the whole process so it can be argued that he caused the failure.
Welcome to the Taunton University of Knowledge FHB Campus at Breaktime. where ... Excellence is its own reward!
1) no, sealing wont help. red is a bad color too, the coloring I dont like, its like the shake and bake method. a chaulk dye troweled in. I like acid stain . If the concrete is poured wet, the color is still cement powder rubbing off. I see a 12 inch slump with color and they kept overworking the top, so when it dried it crack the upper layer.
2) that topping is not concrete, it some type of mortar grout, wet cement type. ever thought of grouting some stone on top of the wall
Edited 3/9/2007 10:25 pm by brownbagg
I,m sorry, I keep think about it. I would jack hammer it and redo.
Edited 3/9/2007 10:34 pm by brownbagg
Right too wet with chaulk. Can be fixed with a jackhammer
Welcome to the Taunton University of Knowledge FHB Campus at Breaktime. where ... Excellence is its own reward!
This is bad, right? Possibly related to the dye/colorant? Fixable?
Yes. Probably not. Ye$.
SamT
Anyone who doesn't take truth seriously in small matters cannot be trusted in large ones either. [Einstein] Tks, BossHogg.
Too much cream at the top when poured (water). Rippem' out and start over.
Dave
Is it fair to say the entire column is bad concrete or just the top? The sides seem solid enough (though they're still 'chalky')
My mistake, I thought I was looking at a single step. (I had only seen the one pic) The column appears to be fine. Something that size I wouldn't be too inclined to rip out. Chisel away any of the loose concrete. It is possible to repair but it is a pain in the butt because you will need to match the existing dye in the concrete. Add a concrete fortifier to your mix and to the surface of the repair area. You can put a couple of concrete nails into the deeper parts of the repair area. Allow the heads to stick up a little. This will give the concrete something to hang on to if doesn't make a perfect bond. After the concrete begins to set up, use a damp sponge to "gently" blend the surface into the existing concrete. Keep an eye on it. Using a spray bottle, periodicaly "mist" the area. This will help it from drying too fast and shrinking back.
(please note: I have made repairs like this to regular concrete with good success. I have never made a repair like this with dyed concrete)
Dave
How late in the fall? Did it freeze that night?
My front steps are the same color, poured in 1957, painted with tinted concrete paint, I'm sorry to say look newer than yours.
October. No freezing. The steps look great and are solid as can be. Unfortunately, the steps wrap around the columns. Considering they poured the steps so well, I'm wondering if the issue wasn't the mix itself, rather than the contractor. That's still his problem, of course, but maybe he has recourse from the concrete vendor.My bigger worry is the fact that they had to bring in skid steers to tear out the old steps + bring in the new concrete. After the steps were in, I then spent a month of weekends laying in a custom brick patio. I REALLY don't want to redo that brick patio... ;o)Also...it sounds like if we must tear out and redo that we perhaps shouldn't go with a premixed color this deep and instead paint or stain?
Edited 3/9/2007 11:20 pm ET by darrel
If you don't want to redo, try blasting it with a pressure washer, and resurfacing with a product by " Stonemason" . Gets hard like rock, good product, try HD, that's where I get it.
You could chip it with a rotohammer/chiping blade, paint with acrylic, thinset, then tile over the roughed up surface. Breaking out that giant block would be a pain.
Your mix could be fine 1/2 to 1" beyond surface.Just throwing it out there, options and all.__________________________
Judo Chop!
Maybe you can cut the tops off and set tile to cap with.
Welcome to the Taunton University of Knowledge FHB Campus at Breaktime. where ... Excellence is its own reward!
Not so sure about tile. It's a stucco and brick house, brick patio/sidewalk. No sure that adding yet another material would really work.Well, thanks for all the advice. I'll let the contractor give his opinion (if he gets back to me) and we'll take it from there. I'm sure I'll be back with some more questions one I hear from him...
brick or pavers then
Welcome to the Taunton University of Knowledge FHB Campus at Breaktime. where ... Excellence is its own reward!
match the side walk..Life is not a journey to the grave with the intention of arriving safely in a pretty and well preserved body, but rather to skid in broadside, thoroughly used up, totally worn out, and loudly proclaiming<!----><!----><!---->
WOW!!! What a Ride!Forget the primal scream, just ROAR!!!
I'll let the contractor give his opinion (if he gets back to me) and we'll take it from there.only thing you need to know.." I dont like it, redo it"
True. That said, I under stand *&#^ happens. My bigger concern is that tearing out the steps is going to include tearing out the patio. Which is going to delay resodding the yard, which means yet another year with now yard to use... *sigh*So, I understand the bad concrete. We'll see what the contractor says...I like the idea of using the sidewalk pavers better than tile, but I'm still thinking it'd be too busy. Perhaps I can get custom conrete caps created for each of the columns and lay them on top. I'll post some larger pictures today. As for the coloring rubbing off...is that, by itself, somewhat normal for this kind of colored concrete or is that a symptom of a larger issue with the concrete and/or trowelling?
you could pour your concrete top yourself as a weekend project
Any suggestions if that were the route to go? I'd probably make it in two forms. Any minimum-thickness issues I should consider?
Some more photos for context:
View Image
Edited 3/10/2007 12:03 pm ET by darrel
2 inch would be good, screw the wood together. I would think about a cheap piece of formica for the bottom and pour upside down so the top will be slick when you remove it.
Sounds good. I would make it with a 1-2" overhang and the same color as the steps.
I've picked at the concrete some more and underneath the top flaking layer (turns out to be 1/2" at the most) seems fairly solid. I'm thinking scraping off the flaking stuff, giving the whole thing a wire-brush treatment to get the 'dust' layer off and then doing the caps as suggested. I agree, 2" and tan like the steps should look pretty good...possibly better than before. Should I still bother sealing the red columns after the wire-brushing? Will that help at all with the power rubbing off?
OK, Darrel, since no one else is mentioning it, I guess I have to.
Those monoliths look like something out of Trading Places on tv.
Overall, you got a beautiful, quaint home. The pavers are a nice touch. But you're screwing the whole concept up by introducing another, totally different design concept.
The home is traditional, so are the pavers. The monoliths are contemporary.
I believe they should be removed and replaced with a matching brick or paver structure.
But IF you must retain them, get rid of that horrible color:
Tap all over the concrete to break off any non adhereing portions. Build it back up with Miracote Repair Mortar I.
Then mix up a bag of Miracote MPC (multippurpose cementatious coatings) and tint it to match the color of the stucco above your brick. Brush, roll, whatever to cover your structures. The next day, make up a bit more and spray it on with a hopper gun, let sit for a few minutes and then do a knockdown, again attempting to match the stucco above the brick.
http://www.miracote.com
edit:
Well, your's is a troweled texture coat on the stucco. Do the same on the ceement with the MPC. Add a color contrasting top coat to the ceement steps while you're at it.
Edited 3/10/2007 4:11 pm ET by peteshlagor
Edited 3/10/2007 4:12 pm ET by peteshlagor
Would look much better if they were stucco to match the house.
"The monoliths are contemporary."I'm OK with that. ;O)Actually, your advice is sound. The original steps were brick as well...though not a brick that matched the house (why? I don't know...)Alas, the steps were way out of scale with the house. These steps, while feeling large, are actually look a LOT less massive than the previous incarnation (the original steps).That's not to say they aren't big. We, in fact, had planned to make the entire thing much narrower than it is. Alas, the original steps were on a solid foundation so we had to build the new ones on top of it.And yea, they are red. Much redder than we had hoped. We had considered brick but it was a) much more expensive and b) still wasn't going to match the original brick. So we gambled a bit. ;o)As for the house, that's painted stucco, so we could actually paint the columns fairly easily. Might just do that. We'll see how things look when capped.
Possible reason why original bricks were not the same as the house veneer.
Those on house look like wire cut with holes in centers. They woul dnot be hard enough for foot traffic over time and depending on how laid, the holes would likely be inappropriate for that much exposure.You migh =t be able to tell if they had the holes by studying the corbeled ones around the entry way
Welcome to the Taunton University of Knowledge FHB Campus at Breaktime. where ... Excellence is its own reward!
Sometimes honesty is the best policy!
Welcome to the Taunton University of Knowledge FHB Campus at Breaktime. where ... Excellence is its own reward!
WOW!Those side walls are totally out of place for that house! Please don't take it personally, but that looks like somebody made a big mistake!You worry about having too much going on by adding tiles or pavers, but you already have way too much going on. two kinds of brick and two kinds of concrete and then the stucco besides in yet another colour!But it is an easy fix.Chip loose all the bad crete and use a consolidator on what is lefet to stabilize it. Do the sides in the same stucco type and colour as on the house and the tops in the same pavers as on the ground.
Welcome to the Taunton University of Knowledge FHB Campus at Breaktime. where ... Excellence is its own reward!
Darrel : Your concrete guy screwed the pooch on this one.
The cheapest cosmetic fix would be to attach stucco grade wire lath,
and cover with a 3 coat masonry stucco.
The finish coat could be acrylic, as you will have better color choices.
Top the walls out with overhanging masonry units ( capstones)
with drip edges or reglets.
At his cost.
his cost...good info. Pfiffin...honesty is good. That's why I'm here! ;o)I don't mind the mass as much as I do the color. Much of our interior is contemporary, and I don't mind the mix and match concept. Also, we have massive retaining walls on our front hill that match the stucco color, so, all in all, the steps don't overwhelm the rest of the masonary going on.That said, as for color: these things turned out beet red. Nothing close to the mix chip from the cement co. (We actually picked a brick red to match (surprise, surprise) the brick. They said they just can't guarantee any color match given the small amount we ordered. `I'm liking the stucco idea the more I think about it...
Nothing wrong with themassive size - it's the colour and the flaking that is wrong.
Welcome to the Taunton University of Knowledge FHB Campus at Breaktime. where ... Excellence is its own reward!
Hey! What's wrong with flakey?
Imeen, yahno?SamT
Anyone who doesn't take truth seriously in small matters cannot be trusted in large ones either. [Einstein] Tks, BossHogg.
You're starting to grow blonde hair - I can see it now..Might as well pack. You'll be moving to California before you know it!;)
Welcome to the Taunton University of Knowledge FHB Campus at Breaktime. where ... Excellence is its own reward!
My vote is for brick caps on the pillars with the sides done in stucco to match the house.
Wow, all you guys are really over dramatic and ready to throw the baby out with the bath water. You don't need a jackhammer to fix this, just a chipping hammer with a bush head. Now yes if these are only 5 months old than I would belive it's the contractors responsibility and put the blame on him. But besides that two fixes are possible for you or your contractor.
The first is, and I know works because it's a process I worked on at the Michigan State football stadium on all of it's structural concrete beams and columns. Remove all crumbled concrete back to seemingly solid concrete and than remove anywhere from 3"-6" beyond that leaving a rough surface to bond to. Additionally insert number 6 bar dowels sticking out half as thick as the newly placed concrete will be, or you could wrap the surfaces with wire mesh, (not chicken wire or plasters lath) good road mesh. You can additionally epoxy the dowels in for added measure. Than clean the existing surface thoroughly of all dust, this very important. Use a power washer, air blowgun, or even a shop vac, just make it clean. Just prior to placing concrete apply a top notch bonding agent, Not just a quickcreate bonding agent off the self but something from like Acroseal, or I would prefer a two part bonding agent I used in waste water treatment plants concrete aeration tanks in need of repair. It's an epoxy with one component a 5gal. bucket and a second 1gal. bucket of a black syrup, available from Ersco. Paint this stuff on a 1/2hr before concrete arrives, close the forms back up and pour your mud. Don't skimp on the concrete since this is a repair job and don't let your contractor get lazy and add water to the mix. Go with a 5-6 sack with air, no accelerators, and keep it at a 6" slump. Yes a 6" it'll suck to pour but he screwed up in the first place so to bad. Make sure to vibrate, if you don't have accesses, use rod to drive the crete down into all pockets and beat the hell out of the forms until nothing sounds hollow, cream drips from every seam, and mud stops going down in from the top. Skip the colored concrete and just paint it.
The other option is if you have a good finisher knowing what their doing, you can Scable up all the lose surfaces with a chipping hammer, clean as above, place a bonding agent and rebuild the surface with a high grade patch like Ardex and slurry mix. Than paint and don't use colored concrete
My hero!
You're the one who fixed my football stadium. Go Green!
keep it at a 6" slump. Yes a 6" it'll suck to pour but he screwed up in the first place so to bad.6 inch slump here goes back to plant
Not necessarily the batch plant's fault if the contractor ordered something different or added water at the site.
As for the stadium, ya we spent 2 summers "secretly" repairing the stadium since just before a season opener a 1' size chunk just fell from the top when the place wasn't even being used. Now, about 5yrs. later they just completed another 2yr. project spending umptteen million to pull all the outer ramps off, push the end zone seating out and add executive sky boxes that will only cost you $8,000.00 a season to watch collage football.
OK...an update for everyone. (And thanks for all the advice, as always!)We're going to give the red columns a mottled dark stain. This should bring them closer in tone to the brick on the house. They're then going to seal it to prevent the rubbing off of the dye.They then ordered capstones for each of the columns to top it off. It turns out the flaking wasn't deep at all. It was maybe a 1/4" at most on one half of one of the columns. The capstones should clean up the irregularities just fine.OK, a new catch: The capstones they decided to get are limestone. The old steps had some limestone decorative peices that were a nice tan-ish off-white.These new capstones, however, are about as pure white as one can get. These, I'm afraid, are going to stick out even more than the red colums.So, new question...can limestone take a concrete stain? Alternatively with it being a porous stone, is there anything else I could/should stain it with to knock back the white a bit?
use red granite...Life is not a journey to the grave with the intention of arriving safely in a pretty and well preserved body, but rather to skid in broadside, thoroughly used up, totally worn out, and loudly proclaiming<!----><!----><!---->
WOW!!! What a Ride!Forget the primal scream, just ROAR!!!
Heck just rub some mud and dirt on it. All limestone, new that is, is bright white. That tannish, off white of the old stuff is what all limestone will become if not regularly powerwashed/scrubbed. Depending on climate and overhang growth of trees or local air pollution it won't take long to turn that typical weathered shade.
I've seen brand new limestone installed right next to old stone on some restoration jobs and by the end of the project the stones will nearly match.
As for a stain if you want to go that far, any stain that works on concrete will work on limestone. Remember one of the largest portions of concrete's ingredients is limestone. Beware though it will absorb much much darker and faster since the lime stone is pretty soft and pores in comparison.
No, you don't want tile on the exterior if there ever is a chance of freezing temp in your area. Water gets beneath (if only a bit), freezes (expands), up comes tile!