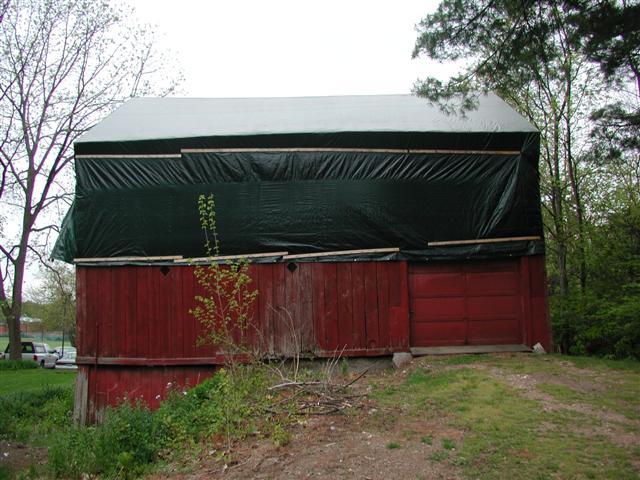
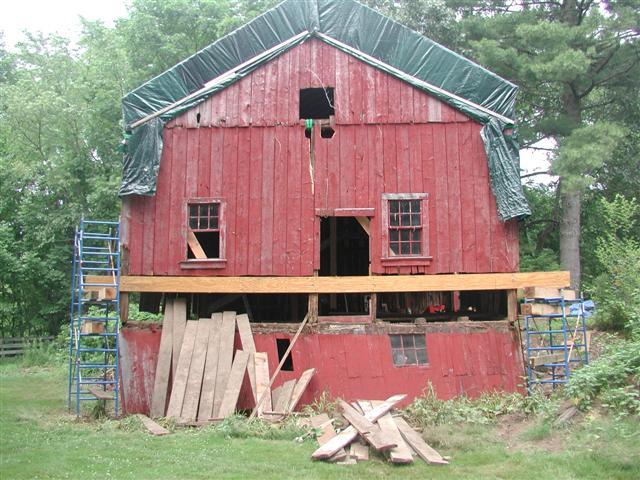
Here’s a barn I’m working on in Glastonbury, CT. We’re putting in 8 x 8 sills, replacing a few girts, putting in a brick foundation under the part of the barn that hangs in the air.
Then we’ll put up new siding and put in new 2 x 6 t&g for a floor. Having fun with this one!
Rod
You can see more pics at http://community.webshots.com/user/rodbishop108


Replies
Rod
Cool, keep the pics coming as work progresses.
Its always nice to see an old structure saved.
Doug
Looks a little like that This Old House project from several years ago. I'll bet that it's a fun job.
About 20 yrs ago a friend built a nice house on a place with an old barn. He really wanted to "restore" it but just couldn't accept the amount of work (i.e. $$$) it would take to do the job. He would still like to do it, but the amount of work has probably doubled and the amount of $$$ has probably quadrupled. - lol
Where in GBury? That's where I grew up!
Justin Fink - FHB Editorial
2163 Main St, right across the street from "Mark's Restaraunt", near the old Academy School, which is now Town offices.Do you remember when Dairy Queen was on the corner of Spring & Main St?I grew up in Glastonbury too,..............class of 76The town sure has changed since then, had to move out to Colchester..............and may have to move again! Rod
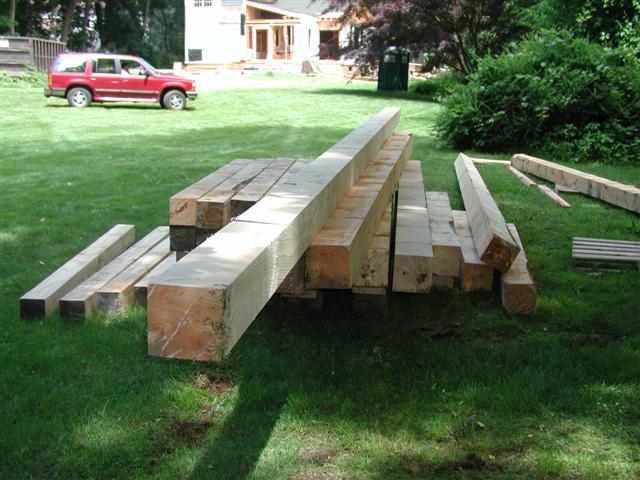
Here's a few more........I couldn't get another 36' 8 x 8, so I had to scarf 2 pieces together. Used a joint I found in the book "Timber Frame Construction", came out pretty nice if I do say so myself. Had a good time with this......Ray Lamontagne music in the background, in the shade with a nice little breeze going..............doesn't get much better than that!(Thanks Ed Levin!)
Edited 7/27/2005 6:38 pm ET by master of none 2
Now, that is cool. How long did it take?
I like that double dovetail joint.
Did you support the whole end of the barn on the pipe stageing? or is that optical illusion?
Cool job.
NIce looking joint!
Keep the pics comming.
Doug
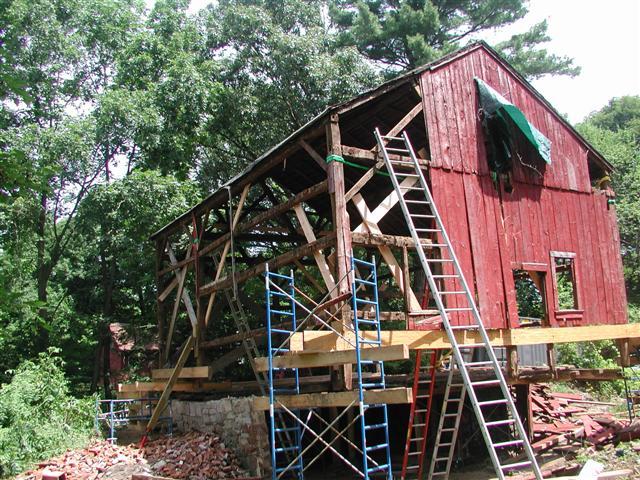
That joint took about 5 hrs to cut and put together. I tend to go at a slower pace, try to minimize mistakes, don't want to cut on the wrong side of the line!That end of the barn is supported wholly on the pipe staging. And I'll guarantee you that the barn is better supported now that it has for a long time. That end was literally supported by dirt. Look at the way the siding leans.The other end of the barn is supported by 6" x 6" x 4' cribbing. The rear sills are 33' long, so I ordered a 36' long piece to give me something to extend out longer to support with.And the condition of the original sills! There was not a lot there.We are going to put footings and a brick foundation under the part of the barn that is supported by staging. Then we'll rebuild part of the stone foundation that exists, to bring it into line with the new sills.
Am really looking forward to following this one!! A great project, and I lived in Glastonbury too for a little over a year when I was in school. Great town and a great project. That joinery is outstanding.
Brian_____________________________HomeBase______________ LLC
Where did you get the timbers for this project? local yard?
Justin Fink - FHB Editorial
Got the timbers from Charlie Pike's sawmill in Chaplin, CT. Charlie could saw a timber up to 50' long if he had the right tree. Good bunch of guys up thereHad the mini excavator delivered today so I can start digging for the footings. As long as I don't knock one of those pipe staging setups..............I think I'll do ok. Rod
Nice.cabinetmaker/college woodworking instructor. Cape Breton, N.S
nice joint...
you done this before, huh ?
View ImageMike Smith Rhode Island : Design / Build / Repair / Restore
To be honest, I had not done this particular joint before. I've done a few scarf joints before, but this one was a first. I found a picture of it in a book and said.................why not, looks like fun. It was. (Thanks again, Ed Levin)
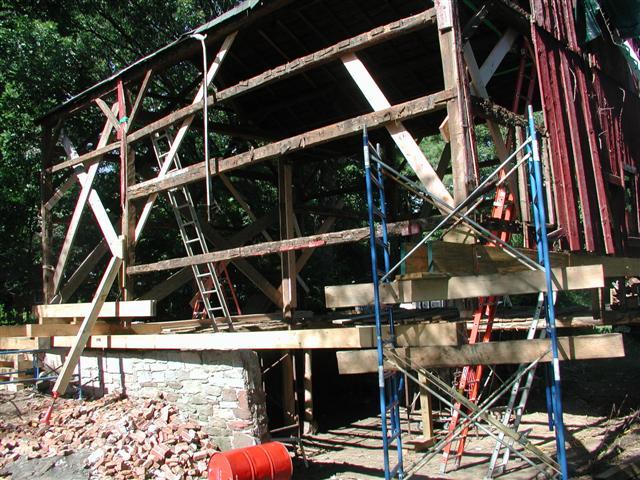
rod... this pic clearly shows your double -LVL's.. good jacking plan...
View ImageMike Smith Rhode Island : Design / Build / Repair / Restore
Sheeze, just how much weight does scaffolding carry?!
jt8
The reason so many people never get anywhere in life is because when opportunity knocks, they are out in the backyard looking for four-leaf clovers.-- Walter Percy Chrysler
distributed on the frames in the right load paths.... quite a bit...
if you concentrate the load in the mid-spans... not so muchMike Smith Rhode Island : Design / Build / Repair / Restore
Here's the footings being poured, on a Saturday no less.I don't work Saturdays, but...........I'll sleep better knowing the concrete is in place.(Mike, it didn't work for me, "paste" doesn't highlight)
Edited 7/30/2005 12:06 pm ET by master of none 2
click on your picture to display it
once the pic is displayed, RIGHT click the pic... select COPY
click your back button to close the pic..
then click EDIT post
in EDIT mode... figure out where you want to insert the pic in your text
like .... here's Tilcon pouring your footings
View Image
click PASTE ( as above )...
then APPLY your edited changes
Mike Smith Rhode Island : Design / Build / Repair / Restore
Pics in post:
To be clear, you have to UPLOAD the photo file to the website before you can select it with copy and paste it to the body of your post - it won't work trying to copy and paste it directly from your home system. I think that detail hangs up a lot of people.
hackn...
once it is posted on the thread it is already loaded on the website..
you can copy/paste any photo that is posted..
luka's pointis that once it is pasted for direct viewing... everyone has to see it , wether they want to or not... for dial-up it means that some threads are slow to view, since they have to load the pics as well as the textMike Smith Rhode Island : Design / Build / Repair / Restore
Don't be filling a thread with a big buttload of pics that show up on the screen like that, or you'll lose us dial-uppers.; )Especially with the size of some of your pics.=0)
Are we there yet ?
luka... all of rod's pics that i saw were under 100KMike Smith Rhode Island : Design / Build / Repair / Restore
In Luka's defense, I did inadvertently post one that was about 2mb..........but did edit and delete it when I realized
Rod
Yup,That 2 mb pic is exactly what I was thinking of.=0)I didn't know you'd deleted it. I never opened that one.I never have a problem with Mike posting them up like that, because generally I am keeping up with a thread pretty much as he does. So I only get two or three of the pics to have to wait for at a time.And it IS cool to have pics come up like that sometimes.But even if the pics were all 50k, once you get 4 or 5 in a thread that all have to be loaded before the thread is finished loading, I start to have second thoughts about whether I want to wait for this thread or not. And I am a lot more patient than most...Plus, lately there has been a problem with the pics loading up. They hang up partially loaded. Then won't load from the attachment either. So I end up never being able to see the full pic.With them posted as attachments, I choose when to get them all started loading up. And can load them up when it dosn't interfere with anything else.=0)
Are we there yet ?
Even 200k is sometimes a loooooong wait on my dialup.And I don't mean that half-minute cyber-eternity, either. I mean an actual long wait.=0)
Are we there yet ?
luka... some times it hangs when i'm loading pics.. most of the time i suspect my broadband.. but sometimes it's just ProsperoMike Smith Rhode Island : Design / Build / Repair / Restore
Thanks Mike, that's good to know.If it's happening to you too, then it isn't just because I am on dialup and it's slow.There is definately a problem at Prospero's end.I really think they stick Taunton with crappy, third-rate servers. And I think it is only going to get worse when we are separated from their "universe of Prospero forums". (We will be "out of sight, out of mind".)We can, of course, hope that it gets better. Maybe they'll actually give us our very own "crappy server". he he he And maybe whatever crappy server they put us on will be ok, once it is not also trying to handle all the prospero worldwide traffic besides Taunton's...
Are we there yet ?
keep up the good work - thanks for the picts - how old is the structure?
"there's enough for everyone"
It's very hard to date a structure like that. Often times they were built with recycled posts and beams from another building so mortises, etc. show up where there's no reason for them.The flooring system had a combination of hand hewn sills and mid span timbers with log joists. So far, the nails that we've pulled from the frame are dated from modern times back to the early days of nail mass manufacturing. I haven't found any hand made nails,...that (along with the fact that its left side is hanging out over a bank with very little support), makes me think that the barn has been moved to its present site and been rerected.But, the tell tale signs of an early barn, are:chestnut frame
log floor joists (as opposed to sawn or hand hewn)
hand hewn timbersThis one has them all.I can only guess that it's from the mid 1700's.I'd certainly welcome any other guesses.
Rod
<Bump>
Don't forget us out here once you get some more photos!!_____________________________HomeBase______________ LLC
Sorry Gents,I've kinda been on autopilot for the last couple weeks. My mom came down to visit, (from Caribou, Maine), and since I don't get to see her but a couple times a year, I've been slacking on the barn..........although I did get one side of the brick foundation done. I also made a couple of window frames out in the shop of 2 x 4 cedar for the barn, that way I was still able to work on the job but take breaks to visit with mom.So.........two pictures of the foundation, and one picture of a bottle I found in the dirt. All the digging that was done on site, and it never broke! I'm curious though........why the rounded bottom......this bottle can not be stood up. Anybody know what it was used for? Rod...formerly known as master of none 2
rod.. still nice work..
although the brick work looks kinda grand next to the barn..
View Image
enjoy your visit with your momMike Smith Rhode Island : Design / Build / Repair / Restore
I agree Mike, it does look a bit grand , but..........These bricks are the Red Restoration brick made by Morin Brick Co in Auburn, Maine. You really can't tell much by the picture but they are a smaller molded brick (7 1/4 x 1 7/8) and have a texture that fits well in historical work. I use them exclusively. In a fireplace, in the chimneys and foundations. With white mortar they look fantastic.Plus they match the house foundation and house chimney (which I just finished), which is out of view in any pictures I've taken. I'll remedy that Monday. The house is becoming grander by the day! Cedar roof and copper drip courses, and a copper roof around the chimney. The chimney is in an area where they felt that cedar would not work as well as copper....snow build up, rain run off, etc.I had to put a foundation in, and stone is $$$$, and brick is appropriate. There was literally nothing but a 4 x 4 in dirt as a sill supporting that end of the barn.But I know what you mean............ 6' of brick! But with the windows and double door in, some creative landscaping, I think it'll look great.And I'll be able sleep knowing it's not coming down anytime soon. Rod
New pics?
jt8
"Someone's sitting in the shade today because someone planted a tree a long time ago." --Warren Buffett
Here's a couple more, I'm still slacking a little bit............ the weather has been so nice this week. I've finished the brick work, my hands are all tore up.Here's my daughter Jessica, she comes in a helps me sometimes. She goes to college, works 2 jobs, and she can still haul brick for the old man!
Don't know if you got an answer to your round bottomed bottle question: The round bottom ensured that these bottles were stored on their sides, keeping the cork gasket around the stopper (zink or ceramic) wet, thereby keeping the seal intact (and the ale fresh). Hand-blown, mid-1800's I believe.
Thanks for the info. I did go on the web and find some round bottom bottles like mine. I also found another interesting bottle, dark brown, flat bottom, and wrinkled........as if it was set down soon after coming out of the fire and the glass was still not cooled down enough to support itself.And it settled just a bit.Kinda like my clay projects in elemetary school!Found quite a few bottles on the right front corner of the barn, must've been the "dump" area. Rod
Bottles are intersting in what they can reveal about the lifestyles of the previous owners, although somewhat slanted since metal, wood and paper from other goods may be long gone. One basic tool for aging bottles is to examine the line that runs up the bottle sides marking where the mold came together. The higher up the bottle, the newer they tend to be. The "automatic bottle machine" came in to use in the early 1900's, so bottles that have mold lines that run right up to the top of the lip are not hand blown and won't be more than 100 years old. If the mold line ends just over the shoulder of the bottle, they are usually early to mid 1800's. The glass blower blew the glass into the mold, pulled the glass up to form the neck, and then applied a lip by hand. Check out your bottles, you can see how they were made. Only a small percentage of bottles were embossed with writing, so they tend to be more valuable. For some bottles, especially wine bottles, the blower gave the mold a spin before removing it, erasing the mold lines and leaving concentric rings around the body. They will still have an applied lip.If the bottle is really early, it may have been entirely hand blown, and you will see a rough pontil mark on the bottom where the bottle was held as it was shaped. I think these would be early 1800's or older. I really don't have any idea what makes some bottles have crinkley texture. Cold molds?
So you have a large plate under your stageing, I know that mine will sink real fast if I just stand on them without a base plate.
Do you have more pics of that joint ? it sure is one neat looking joint.
Here's a few more pics of that joint.Yes, I always put something under the legs of the staging to spread the load, (kinda like an elephants foot) Then I can use the adjustable feet to jack under a beam or post.Edited 7/30/2005 6:08 am ET by master of none 2
Edited 7/30/2005 6:16 am ET by master of none 2
Here we are ready to pour footings on Monday.
Edited 7/30/2005 6:14 am ET by master of none 2
this is a good shot for your portfolio...nice detail
View ImageMike Smith Rhode Island : Design / Build / Repair / Restore
Thanks Mike, I'm definetely having fun with this one.Now...........you gotta tell me how you get those pics to come right up like that.I've done it like that before, but I've forgotten how.
rod.... right click on the pic... select "copy"
then "paste " it into your edited post... or your new postMike Smith Rhode Island : Design / Build / Repair / Restore
Well done!That's a nice little scarf joint. FYI, general rule of thumb is a scarf should be 3x as long at the beams wide side....so an 8" timber would have a 24" scarf. Keep up the good work, Old barns need guys like you treating them with care and not bolting them up with sisters and cleats.
Thanks for your comments.I have seen and done scarfs like you mentioned, however, this one was taken right out of a book called "Timber Frame Construction", written by Jack Sobon & Roger Schroeder........ page 187And again... I have to thank Ed Levin because this joint is credited to him in the book (Thanks, ED)I'd never done this particular joint before and it's in a spot in the frame where it'll be well supported by the stone foundation.
I thought the guys doing the roof in Kentucky were impressive, then I hit your pictures and wow!
At first, I wasn't sure if you were putting it back together or taking it apart. Every picture I saw had less sidewall up. If you keep repairing this, you'll be down to the frame in no time!
Great work. I wish I had the chance to do something like that. Maybe in my nest lifetime. This one looks like it's already booked up...
Don
That's the problem with restoration.........you have to go backwards to go forward.
We are taking it right down to the frame, and replacing the entire sill structure.........all the while keeping the barn standing. We are almost done with that actually. A little bit more foundation work and then I can start putting in a new foor........2 x 6 T&G. Then new siding, new windows, etc.It is a fun project, I'd like to have 10 more just like it lined up & ready to go, but........... Rod
the barn looks really great. I hope they don't run out of cash. People don't realize how much is involved when they let them go without maintenance for a while. ....how much....for "just-a-barn"....
I can't speak for Jack Sobon or Ed Levin, but I'd say the book you mentioned is quite a few years back for the Timber Framing world's knowledge base. I'd bet they saw a few of those joints in sill plates in new england. It's a good joint for a sill. The scarf I mentioned (3x wide) is for a more structural circumstance and the 3x rule is something I got from an old Hodgson book (1899) on timber work.
In any case, they Timber frame community has learned a lot from an engineering perspective since the early works of Sobon and Levin. I'd check it out. Best group of people I've ever met. http://www.tfguild.org
Keep up the great work!
Yes, TFG are good people. I am a member and was a speaker at the last TTRAG conference in Durham,, NH. There's a conference coming up in Burlinton, Vt soon.....Oct 13 - 16.I went to Burlington for a conference a few years ago............you want to see some fantastic joinery check out Joshua Jackson, (who gives classes thru the TFG), and those darn Japanese fellas! Holy Sheeit! Can they do some work!Joshua Jackson uses a double bubble level scribe to connect round logs to square timbers. Incredible stuff.....way above my head but something I'd like to try when things slow up a bit. Maybe a nice winter down time project.Anytime I go to a conference I learn something new! Rod
Here's some more pics after the staging has come down, and windows put in.
Nota
Looks like everything is going well.
Nice to see the view towards the house, gives a little perspective on the whole place.
Keep up the good work.
Doug
In pic 028 why is the elephant sticking his head out the side of the barn?
Looks good.
I pulled a muscle in my back the other day.........doc got me some Percoset..................I still don't see any elephant.But I'm trying......... :)
It wasn't a real elephant , It looked that way on a quick glance . It was the plastic sheet on the gable end and the opening and the shadows all working together ..............It looses somthing if ya gotta explain it .............................. Ya need to get generic drugs
;-)
I was in Glastonbury this past weekend for the Arts & Crafts show and drove by the site for a peek at the project. Pretty impressive stuff... what comes next? How do you proceed now that the brick wall is in place?
Justin Fink - FHB Editorial
The next thing to do is to get the stone foundation straightened up. With all the shifting that's been going on the top course of foundation stones are all out of whack. I use binder straps & crank 'em up to the sills and then fill in under them.Once the stone foundation is up to par then I've got to put in all the timber joists for the first floor. I've replaced a few of them with new timber, but most of the original log joist will be put back in.Once the joists are in, then I'm going to put on the flooring....... 2 x 6 T&G.I've got to repair a couple joints in the frame, but I'm going to wait so I can work off of the floor instead of ladders.Then siding, then shingle the roof.Then I can start my next job..................finally. This job has taken longer than I anticipated, (don't they all?), the brick foundation wasn't part of the original deal.It sure is nice now to be able to walk around the site, now that all that staging is gone.I wish I had known you were coming, I could have met you there. Rod
I didn't even know I was coming! Like I said, I was in town for that art show, then I was driving down main st. to hit the library book sale that happens once a year on the same day. I remembered this thread as I was passing the area and I took a quick peak from the road.
What did you say this barn is going to be used for?Justin Fink - FHB Editorial
The bottom of the barn will be used for garden equipment/storage, and the first floor will be used as a work shop/lumber storage area. The owner has a miscellaneous collection of doors and radiators, etc that he doesn't want to just throw away.Somebody can use this stuff someday. Rod
Here I am starting the flooring of the barn. Ordered 2 units of 12' 2 x 6 T & G. Haven't been thru 1 unit yet and I've rejected about 20 pc so far. I'm a little disappointed , may have to look for another supplier. I expect some waste , but not 25% of a unit before I'm even thru it.
Looks like there's a furry sentry on the barn.
jt8
"Striving for excellence motivates you; striving for perfection is demoralizing." --Harriet Braiker
Yes, that's Bailey, my border collie. She comes to work with me 9 days outa 10. She's 11 yrs old now, that's a lot of work days.
I do find that it's getting harder and harder for her to jump up into the truck these days. She wants to..........the mind is willing...........but she keeps looking to me to help her up.Sadly, I think I'm begining to know how she feels.Here she is making sure the ball don't move.
Beautiful dog! My neighbor built a ramp for his aging sheapard before she passed so she can get up the stairs to the front door. A friend of his in a wheelchair came by for a card game and said, "you didn't have to build that for me!" "Uhhmm..."...that's not a mistake, it's rustic
Where did you say you're buying the T&G from?
I've had great success working with Sanford & Hawley http://www.sanhaw.com
You can fax orders to them 24 hours a day, they do millwork in their shop, and all deliveries are free - whether you order one board or one hundred. They've got 4 or 5 locations, but I think the Manchester store would probably be closest for you (I think it's on Hartford road? --somewhere in that area anyhow).Justin Fink - FHB Editorial
Thanks for the tip, I do know where they, just didn't think of them. I'll call them first thing in the morning.............I still have to get all the siding for the barn. Rod
Let me know if SanHaw ends up helping out...Justin Fink - FHB Editorial
Called Sanford & Hawley this morning about the siding and maybe some 2 x 6 t & g. No go on the 2 x 6 t & g, they don't carry it. They have shiplap siding, but maybe/maybe not in the length I need, they could special order it, maybe pull from a few different suppliers............got a speil on how Mr. Sanford was checking the world market on eastern white pine just so I might be able to get some.For gods sake all I want is some 16' shiplap pine siding!!!!!!!!!Went to Hull Forest products in Pomfret CT.http://www.hullforest.com/I asked........... do you have any 8" - 10" 16' long pine siding?Well, let's see...............it looks like we have some 16' boards set aside as barn board sheathing. We'd have to plane it and shiplap it, should take about a week or so.Can I see it?Of course you can, Mr. BishopLooks great, here's a deposit, I'll look for it in a week or so.Ohhhhhh, if only everything was as easy . What a pleasure to deal with this company.I've dealt with them before..............I'll deal with them again. And I'm sure that my order was just a piddly thing compared to what most of their dealings are. These guys ship worldwide.And to make a good day better, I called the sawmill for my beam order, told them I was in the area, they said come on over, by the time you get here they'll be waiting for you to pick up. They almost were........waited ten minutes. This is a family run, small time, custom order sawmill.Goes to show you that two companies at the complete opposite ends of the business spectrum can have the same quality of customer service.It's been a good day, got a lot accomplished, more so today than any other day this week.I'm going to have a cup of coffee...................decaf. Rod
Here we are starting the floor of the barn............2 x 6 x 12 T & GHad to make 2 trips back to the lumber yard to get some decent sticks, but it was worth it. No time to compromise now! Today Eric & his son Jay started the roof work. Two layers of asphalr, one layer of wood, all being stripped. New wood fire retardant shingles going back up.Started raining real heavvy this afternoon, maybe it'll wash them beams off a bit.
Also here's a picture of a 22' 7 x 7 pine beam on my truck........a little top heavy.........slow ride home!
Looking good Nota!
nota...
what's that orange thingy-bob ? ain't chu old enoug to go air floor nailer ?
View Image
i retired both my Porta-Nailers after i bought a Bostich flooring gun....
anyhow ... nice work... good progressMike Smith Rhode Island : Design / Build / Repair / Restore
Actually Mike, you gotta look a little closer. That orange thingy is a Paslode gun, with a orange dead blow hammer next to it. We use the ratchet straps to pull the flooring in tight, dead blow to slam it in good, (with a scrap piece, of course), and then nail it thru the toungue with galvy ringshanks, facenailing sometimes when it seems to be the thing to do.It's been a fun project, I can see the light at the end of the tunnel.Next I'm on to a center chimney stack, 2 fireplaces, one made from granite, and a beehive oven. Another fun one!Sometimes I just feel so damn lucky! Rod
OK, the floor is in! Had to return about 60 - 70% of the 2 x 6 T&G, the lumberyard apologized, said they'd been having trouble with that particular vendor. But it's done..........and I'm happy with the result.Concrete guy came and poured us a new floor..........man is that nice!Had the siding deliverd last week, but I'm a bit behind in the post & beam repairs, so I've been hot on that this week. We've had to replace a few split beams.Next week we start siding, then the roof, then I go on vacation! At least for a couple days! Rod
i think this is one of the coolest projects to come through here in awhile... please keep the pics comin'. i'm still amazed that the new sill (even as big as it is) can hold that massive stone without noticable deflection. did you do the masonry yourself?
_____________________________HomeBase______________ LLC
Edited 10/15/2005 10:53 pm ET by homebaseboston
Yes, I did all the brick & stonework myself. Not the concrete floor. I did some bartering with the owner, and ended up with a great wellstone, and a set of bulkhead stones, posts, and about 300 sq ft of old patio stones. and.........a 3'x 10' x 7" granite stone for I don't know what yet! It was the entrance stone to the barn, (and one of the primary reasons why the front sill had rotted out years ago).Now I've got to find a place for it in my yard.My wife rolls her eyes every time I come home with treasure.It's been raining lately so I haven't been doing anything on the barn. Tomorrow I hope to start the siding.Rod
...must have been fun getting those stones in and out of the truck.
Justin Fink - FHB Editorial
Yeah............I shoulda had more kids!The 10 footer I just picked a good spot in the yard, backed up real quick and hit the brakes!Almost made it where I wanted it.A little push with my J-20 plow and truck and it was all she wrote.Now..................if I have to move it again...............Here's some pics of the siding going up on the barn. Nice to see some progress after all this rain!
The siding is done! Except I still have to make the final cut to even everything out. Had to replace another couple of beams, but I think I'm going to be outa there by the end of next week.The front of the barn has been shingled, the rear should be done next week. Rod
Looks good.
Whats the barn going to be used for? Maybe you mentioned it earlier but I'm to lazy to go back through 80 posts to find out!
Doug
I believe he may put a small wood working shop in there, but mainly it'll be just for storage.Besides the barn he's got an attatched 2 car garage, and he's having another detatched 2 car garage built.
Rod
Rod -
The project is fantastic. Been fun to lurk through; still admiring the dovetail joint.
Then saw the pic of your doggie.
And thought: "OMG - it's Oreo2's twin!"
DUM SPIRO SPERO: "While I breathe I hope"
Was just checking out your excellent thread. Great reading and beautiful work. Just noticed though back on #76 the pic of the posts sitting on the piers. Was wondering if you put anything between the concrete and the post to serve as a moisture barrier? I recently replaced some posts in a similar barn here in NH and didn't want to use treated wood so I put a used a swatch of lead flashing to break the contact between the concrete and the untreated wood. Any concerns with the untreated wood in contact with the concrete?
Hope the weather holds for final painting/staining.
Sorry for the delay, been working steady to get this thing done, time to move on.Anyway..........I had thought about putting something under the posts, but we were hurrying, trying to get the posts in place so the concrete pour could be done...........we didn't have any lead on the jobsite.........yada yada yadaFact is , we didn't put anything there, and probably should have. With much of the barn repaired, and with a new roof on it, I think the basement will be pretty dry, so I'm not going to worry about it.Especially since the owner stiffed me on the final bill. Rod
Not,
I meant to ask this earlier... hopefully you're still lurking (and will post some final pics when you're done!).
What kind of mortar mix did you use on the stone work? If lime mortar, what ratios do you like?
Thanks,
Brian_____________________________HomeBase______________ LLC
I used regular Type N mortar on all the stonework and brickwork, except the block foundation below grade, that was Type S.I only use a lime based mortar on real historical work, to match existing conditions if called for.Or in the building of a beehive oven. Rod
Well, here's some final pictures. Really had a good time with this one, too bad the taste turned sour. And for such a small amount.Makes you wonder how people think the way they do.Check the thread "Contracts or handshake", under the business section for details. Rod
Can I ask, are you going to make it liveable?
No, it's for storage and/or a workshop. There's a house and 2 2 car garages on the property already.
nota
good work and keep the pictures coming
Doug
You know, the best thing about this place is it reminds me of how little I know about my trade. As well, how little is written about it today.
Here is the book I mentioned, plus the scarf page. Hodgson mentions it a little different way, but 3x wide works pretty well. Anyway, thought you might get a kick. Guess they were pretty sharp in 1902.
hey , rod... cool job...
what am i looking at ?
View Image
Mike, you're looking at the left gable end of a barn. That side of the barn was literally supported by the siding which was attached to a 4 x 4 sill sitting on dirt.I attached 12" x 36' LVL's to the outside and inside of the left bent, (capturing the whole end as a unit), and picked up the weight with the staging. The staging has a 3' x 5' footprint. I put 8" x 8" x 8' oak on the staging rungs and jacked the barn up a little at a time. The left front corner was 13" lower than the right front corner.That is a testament to the ability of a timber frame structure to stand the test of time!This barn has obviously been moved to this location some time ago. It is sitting halfway onto a bank. It was never given a proper foundation on its left end, so it was doomed to fail from the beginning.It was looking pretty sad. But it was not going down without a fight!I'm glad the owner has the foresight to see what he has, and wants to save it. He truly does want to save it.Here's a pic as I first saw it. And of the double LVL's through bolted to the posts.Did I mention I LOVE Timberlocks! Rod
Edited 7/28/2005 9:27 pm ET by master of none 2