FHB Logo Facebook LinkedIn Email Pinterest Twitter X Instagram Tiktok YouTube Plus Icon Close Icon Navigation Search Icon Navigation Search Icon Arrow Down Icon Video Guide Icon Article Guide Icon Modal Close Icon Guide Search Icon Skip to content
Subscribe
Log In
  • How-To
  • Design
  • Tools & Materials
  • Restoration
  • Videos
  • Blogs
  • Forum
  • Magazine
  • Members
  • FHB House
  • Podcast
Log In

Discussion Forum

Discussion Forum

Bending a cap rail for a curved railing

Mac_Built | Posted in Construction Techniques on July 3, 2005 04:38am

Hello all,

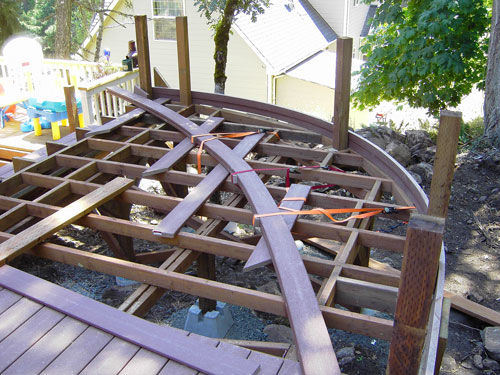
Been a while since I’ve been here – life’s been good and I’ve been busy! I’m working on a TREX deck right now that I curved the handrail. Top and bottom rails curved nicely because they were TREX 5/4×56 decking on it’s side.

So far I’ve busted two 5/4x6x20 boards attempting to curve them on the flat. The first one I broke because I only had one strap pulling it right at the center. The second one I took three days of continual pressure from 5 straps to pull it into shape. On the third day, I noticed a little tear near the center of the board. I pressed down on the board and it just snapped. Weather hasn’t really cooperated – staying in the 60s-70s. I had a portable heater heating the center of the board.

The radius was 102″.

What say you, Breaktimers? Any thoughts on different material for the cap rail? I talked with the homeowner about three ripped sections of 5/4 bent separately, then screwed together on the radius shape. He really wants a unbroken look for the cap rail.

I’m thinking about the cutting 3/4″ grooves in the underside of the cap rail every 1/2″ or so across the inside 4″ of rail and trying again. That way, the outside edge is unbroken and there’s space for the board to compress into. The inside edge would have lines every 1/2″ but the material would be compressed so they would be lines, not gaps.

Anyone done something like this?

Thanks in advance for your thoughts –

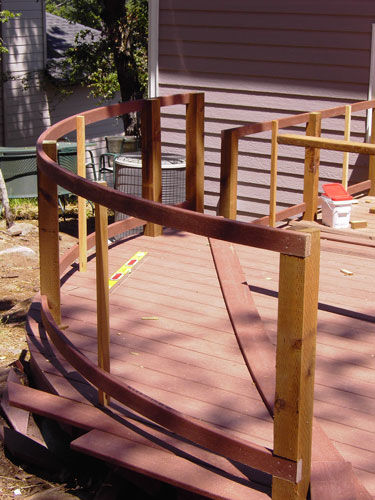
(And no, I don’t particularly like the pt posts with the TREX rails. It was a fiscal decision made by the owner. He’s going to paint them white to match the cedar balusters.)

Mac


View Image
Reply
  • X
  • facebook
  • linkedin
  • pinterest
  • email
  • add to favorites Log in or Sign up to save your favorite articles

Replies

  1. quicksilver | Jul 03, 2005 06:41am | #1

    Wow that looks like fun. I hope you have a little extra in there for experimentation. As far as I can see there is 3 ways you could make that bend: 1. kerf the front edge to relieve compression while making the bend,
    2. use a steam box. 3. make rips out of the piece and glue them together.

    The first one I think will work but probably won't look very good because the kerf would have to be through the entire board and calculating the right amount of stock removal to get it just right would be beyond me, so I wouldn't go that route.

    The steam box probably, if executed properly, would give you the best result, and would probably second most labor intensive, but I've never really messed with one. So I might, but probably wouldn't choose this route either. Because I would hate to put the time into it when I'm only pretty sure it would work.

    So I would opt for the last. The key to this I think would be the ability to bend it around a mold. When we bent rails for interior staircases we used a plywood jig. It was basically a plywood T with a 45-degree strong back on one side made out of about 4'' rips. Both pieces of the T about eight inches. This piece will be used to anchor the bent rail against. Now you will need some 8''X4'' pieces for the other side of this clamping jig. Now if you set the assembled T with strongback in front of you upside down with strong back to the left (this is the fixed side of the jig) and take one of the 8''X4'' pieces and set it next to the upright to the right. these two pieces will make the clamp. All you need now is a way to tighten the clamp. You will need some J-bolts. Drill two holes in each of the pieces laid out in the same place. Slide the J-bolt through the T and through the other piece, Now you can bend the rail through the jig and tighten with the J-bolts. This is how we did hand rail.

    Your situation being 5/4 X 6 I might even forgo the J-bolt scenario and just use clamps if you have enough. Although it will be much easier with the J-bolts. Key to it is some where to lay out the radius so that with a screw or small lag the jig can be plotted so that the radius will be true. Draw the radius line and screw the jigs around it. Position of the jig is critical. Align the fixed side inside edge with the radius that you want on your outside rail. If the edge of your deck is 102'' radius you'll have to add if your handrail goes out past the edge. You'll probably get away with three rips to make that bend, a little over I-13/16.

    This method is pretty labor intensive, and I imagine a lot of guys would just go out and start to bending. I prefer knowing that my work is going to have a predictable outcome. Possibly some one else could come in work next to me and pull a board into place while I was still making my jigs but then again maybe not. I think you will know by the feel if you can bend it without one of these more elaborate approaches.

    There is still the problem of glue and alignment. The glue I would check on but the alignment can be done during the bending. This is why the bending jig with the J-bolts works so well because you can get all the rips in the jig before it is completely tightened. a slow tightening and maybe some auxiliary clamps with some straight strong back to keep the rail from cupping will be a great help. I hope this helps and also maybe someone will come up with a better scenario.

    After rereading this I still think you have your hands full and it doesn't look as fun as it did at first glance. Good luck

  2. Saint | Jul 03, 2005 10:43am | #2

    Mac,

    It's gonna take time but your gonna need to to make a jig with the specific radius.

    Rip and glue up your stock. Remember to leave extra room - the rips get 'shorter' as you glue up the layers in the jig.

    Enjoy,

    Saint   

  3. reinvent | Jul 03, 2005 03:24pm | #3

    Trex is made to bend that way. I have seen pics of it done on deck flooring. The trick is Heat. Rember trex is mostly plastic, get it hot enough and you can turn it into a pretzel. Contact trex and ask them how they would recomend heating up. You might need to make an inside curve template to bend the rail to after it has been warmed up.

  4. jayzog | Jul 03, 2005 03:37pm | #4

    I have recently done a simular rail with a 5' radius. I used 5/4x8 Azeck.

    Azeck sells a heat bending kit that gets the material to the recommended 300º, then the stuff is really flexible.

    Being their kit costs about $1000, I just built a plywood box with salvaged electric heaters in it, which worked pretty well.

    1. Mac_Built | Jul 03, 2005 04:21pm | #5

      Did you heat the entire board in the plywood box, then bend it all at once? Did you use a jig to bend it after it was heated? Was the plywood box segmented?how close were the heaters to the product? would you send me a pic of your box or a description of it? I will probably build something like it so that I can do this for future composite decks I build.Thank you for your time in replying,MacView Image

  5. donpapenburg | Jul 03, 2005 04:29pm | #6

    Steam or NH3 are the only options I know of for  a solid wood rail bent like that .  Both would be a task . I think that ripping the board into strips no wider than they arer thick .  Mark  the center and number the rips keep them in order. glue up around a form . Pulling from the middle ,keep the center line straight . use lots of clamps .  And good water proof glue.

    The other option would be to use the trex for the cap . The other day at RP lumber the Azek guy was there with a sample of 5/4x4 bent in a spiral of about 1 1/2 " radius .  He also had samples of shaped azek that were bent flat after they were shaped . That could be anothe r  option

    1. Mac_Built | Jul 03, 2005 04:35pm | #7

      I didn't specifically say in my first post but the cap rail is TREX. I wouldn't even take on the job of trying to bend a wood 2x6 to this radius!Thanks for the suggestion though,MacView Image

  6. quicksilver | Jul 03, 2005 04:38pm | #8

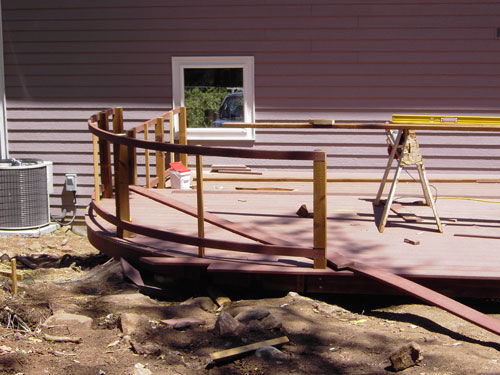
    No matter what approach you take the deck looks like it has some real potential and I would like to see a final pic. And the guy who gave you the advice about calling the manufacturer to find out about bending is right on.

    1. Mac_Built | Jul 03, 2005 04:45pm | #9

      TREX is on my list for calls Tuesday. This deck was for a buddy of mine who's going to finish installing the balusters on the rails I build for him. I'll finish up my end on Monday and take some pics.MacView Image

      1. USAnigel | Jul 03, 2005 07:21pm | #10

        Read up on this at http://www.trex.com tells just how to do this.

  7. lwj2 | Jul 03, 2005 08:27pm | #11

    Mac:

    Below is url from Trex's site, has specs for bending.

    http://www.trex.com/products/installation/pdf/Special_Applications.pdf

    Note that it's a PDF and requires Adobe's Acrobat Reader to open, avaliable as a free download from Adobe at http://www.adobe.com .

    Looking forward to seeing the photos of the finished deck.

    Regards,

    Leon Jester

Log in or create an account to post a comment.

Sign up Log in

Become a member and get full access to FineHomebuilding.com

Video Shorts

Categories

  • Business
  • Code Questions
  • Construction Techniques
  • Energy, Heating & Insulation
  • General Discussion
  • Help/Work Wanted
  • Photo Gallery
  • Reader Classified
  • Tools for Home Building

Discussion Forum

Recent Posts and Replies

  • |
  • |
  • |
  • |
  • |
  • |
View More Create Post

Up Next

Video Shorts

Featured Story

Podcast Episode 688: Obstructed Ridge Vent, Buying Fixer-Uppers, and Flashing Ledgers

Listeners write in about removing masonry chimneys and ask about blocked ridge vents, deal-breakers with fixer-uppers, and flashing ledgers that are spaced from the wall.

Featured Video

How to Install Exterior Window Trim

Learn how to measure, cut, and build window casing made of cellular PVC, solid wood, poly-ash boards, or any common molding material. Plus, get tips for a clean and solid installation.

Related Stories

  • Guest Suite With a Garden House
  • Podcast Episode 688: Obstructed Ridge Vent, Buying Fixer-Uppers, and Flashing Ledgers
  • FHB Podcast Segment: Finding the Right Fixer-Upper
  • Keeping It Cottage-Sized

Highlights

Fine Homebuilding All Access
Fine Homebuilding Podcast
Tool Tech
Plus, get an extra 20% off with code GIFT20

"I have learned so much thanks to the searchable articles on the FHB website. I can confidently say that I expect to be a life-long subscriber." - M.K.

Get home building tips, offers, and expert advice in your inbox

Signing you up...

This site is protected by reCAPTCHA and the Google Privacy Policy and Terms of Service apply.
See all newsletters
See all newsletters

Fine Homebuilding Magazine

  • Issue 332 - July 2025
    • Custom Built-ins With Job-Site Tools
    • Fight House Fires Through Design
    • Making the Move to Multifamily
  • Issue 331 - June 2025
    • A More Resilient Roof
    • Tool Test: You Need a Drywall Sander
    • Ducted vs. Ductless Heat Pumps
  • Issue 330 - April/May 2025
    • Deck Details for Durability
    • FAQs on HPWHs
    • 10 Tips for a Long-Lasting Paint Job
  • Issue 329 - Feb/Mar 2025
    • Smart Foundation for a Small Addition
    • A Kominka Comes West
    • Making Small Kitchens Work
  • Issue 328 - Dec/Jan 2024
    • How a Pro Replaces Columns
    • Passive House 3.0
    • Tool Test: Compact Line Lasers

Fine Home Building

Newsletter Sign-up

  • Fine Homebuilding

    Home building tips, offers, and expert advice in your inbox.

  • Green Building Advisor

    Building science and energy efficiency advice, plus special offers, in your inbox.

  • Old House Journal

    Repair, renovation, and restoration tips, plus special offers, in your inbox.

Signing you up...

This site is protected by reCAPTCHA and the Google Privacy Policy and Terms of Service apply.
See all newsletters

Follow

  • Fine Homebuilding

    Dig into cutting-edge approaches and decades of proven solutions with total access to our experts and tradespeople.

    Start Free Trial Now
    • Facebook
    • Instagram
    • X
    • LinkedIn
  • GBA Prime

    Get instant access to the latest developments in green building, research, and reports from the field.

    Start Free Trial Now
    • Facebook
    • YouTube
  • Old House Journal

    Learn how to restore, repair, update, and decorate your home.

    Subscribe Now
    • Facebook
    • Instagram
    • X

Membership & Magazine

  • Online Archive
  • Start Free Trial
  • Magazine Subscription
  • Magazine Renewal
  • Gift a Subscription
  • Customer Support
  • Privacy Preferences
  • About
  • Contact
  • Advertise
  • Careers
  • Terms of Use
  • Site Map
  • Do not sell or share my information
  • Privacy Policy
  • Accessibility
  • California Privacy Rights

© 2025 Active Interest Media. All rights reserved.

Fine Homebuilding receives a commission for items purchased through links on this site, including Amazon Associates and other affiliate advertising programs.

  • Home Group
  • Antique Trader
  • Arts & Crafts Homes
  • Bank Note Reporter
  • Cabin Life
  • Cuisine at Home
  • Fine Gardening
  • Fine Woodworking
  • Green Building Advisor
  • Garden Gate
  • Horticulture
  • Keep Craft Alive
  • Log Home Living
  • Military Trader/Vehicles
  • Numismatic News
  • Numismaster
  • Old Cars Weekly
  • Old House Journal
  • Period Homes
  • Popular Woodworking
  • Script
  • ShopNotes
  • Sports Collectors Digest
  • Threads
  • Timber Home Living
  • Traditional Building
  • Woodsmith
  • World Coin News
  • Writer's Digest
Active Interest Media logo
X
X
This is a dialog window which overlays the main content of the page. The modal window is a 'site map' of the most critical areas of the site. Pressing the Escape (ESC) button will close the modal and bring you back to where you were on the page.

Main Menu

  • How-To
  • Design
  • Tools & Materials
  • Video
  • Blogs
  • Forum
  • Project Guides
  • Reader Projects
  • Magazine
  • Members
  • FHB House

Podcasts

  • FHB Podcast
  • ProTalk

Webinars

  • Upcoming and On-Demand

Podcasts

  • FHB Podcast
  • ProTalk

Webinars

  • Upcoming and On-Demand

Popular Topics

  • Kitchens
  • Business
  • Bedrooms
  • Roofs
  • Architecture and Design
  • Green Building
  • Decks
  • Framing
  • Safety
  • Remodeling
  • Bathrooms
  • Windows
  • Tilework
  • Ceilings
  • HVAC

Magazine

  • Current Issue
  • Past Issues
  • Magazine Index
  • Subscribe
  • Online Archive
  • Author Guidelines

All Access

  • Member Home
  • Start Free Trial
  • Gift Membership

Online Learning

  • Courses
  • Project Guides
  • Reader Projects
  • Podcast

More

  • FHB Ambassadors
  • FHB House
  • Customer Support

Account

  • Log In
  • Join

Newsletter

Get home building tips, offers, and expert advice in your inbox

Signing you up...

This site is protected by reCAPTCHA and the Google Privacy Policy and Terms of Service apply.
See all newsletters
See all newsletters

Follow

  • X
  • YouTube
  • instagram
  • facebook
  • pinterest
  • Tiktok

Join All Access

Become a member and get instant access to thousands of videos, how-tos, tool reviews, and design features.

Start Your Free Trial

Subscribe

FHB Magazine

Start your subscription today and save up to 70%

Subscribe

Enjoy unlimited access to Fine Homebuilding. Join Now

Already a member? Log in

We hope you’ve enjoyed your free articles. To keep reading, become a member today.

Get complete site access to expert advice, how-to videos, Code Check, and more, plus the print magazine.

Start your FREE trial

Already a member? Log in

Privacy Policy Update

We use cookies, pixels, script and other tracking technologies to analyze and improve our service, to improve and personalize content, and for advertising to you. We also share information about your use of our site with third-party social media, advertising and analytics partners. You can view our Privacy Policy here and our Terms of Use here.

Cookies

Analytics

These cookies help us track site metrics to improve our sites and provide a better user experience.

Advertising/Social Media

These cookies are used to serve advertisements aligned with your interests.

Essential

These cookies are required to provide basic functions like page navigation and access to secure areas of the website.

Delete My Data

Delete all cookies and associated data