Best way to extend exterior wood sills
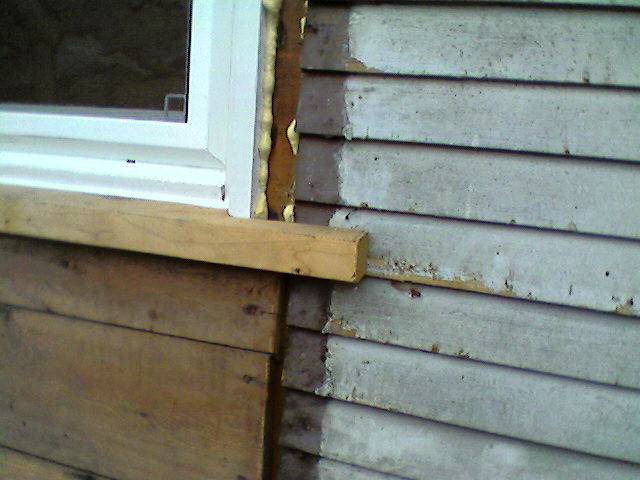
We have an old house we’re renovating. It’s got nice wood siding, which was covered up years ago by those large asbestos shingles, abt 12×24. We stripped off the shingles and found great wood siding in very good condition, only one or two coats of paint, no cracking or peeling, etc.
They had ripped off all the original trim around the windows, and cut off the tails of the sills to make their siding job easier. Now we want to re-trim the windows as they were, but need to put those tails back ON to have something for the verticle boards to land on. We’re planning on putting 5″ x 3/4 on the sides and 7″ x 1 1/4 on the tops. We’d use 5/4 (1″ net) on the sides, but there isn’t much sill to land on in that case. Anyway… to get to the POINT:
I was having a discussion with another carpenter who was leery of even trying it, but I can’t think of any other way for these windows to look good. I’ve toyed with putting a “fatter” piece on with ext. wood glue and a stout dowel, and then using the belt sander to get it to match, but before I do anything, I’d like some input from y’all.
You can see in the pics below a closeup of one window where the tail is cut off, and another where we had to rebuild a frame and it HAS a tail, and then a wide angle shot of one small window that shows pretty clearly the current state of affairs as an example of the missing trim (you can see where it WAS by the different color paint) and cut off tails.
If this was YOUR project, how would you trim out these windows?
PS: They did put some brickmold on the windows that’s still on there that’ll come off when we get to this part of things, so don’t be hung up when you see it.
Edited 1/26/2007 9:41 pm ET by geoffhazel


Replies
Well, there is more that one way to approach it. First, an observation. It appears that there is enough sill depth for the 5/4 material. Brickmold is 1-1/4" deep. 3/4" casing will not protrude past the siding. If you want to make the sills deeper and longer, I would do the following:
1. Clean the paint from the face of the sills.
2. Add the length you want to the existing sill. Glue and toe nail into the existing sill, and face nail through and into the wall sheathing.
3. Glue a second piece across the whole face of the sill. This will tie the three pieces together, and produce a joint free face. Long jawed bar clamps work well for clamping from face of the sill to the inside wall. A few nails in the face help to reduce slippage while clamping.
I have excellent results with the titebond glues. Epoxy is even better. For leveling any defects on the top surface is a good idea. Bondo will work for that too, but will not last as long.
An oil based primer coat and two finish coats of 100% acrylic latex paint is essential. As with any repair of this type maintenence is important. Keep it well painted and your repairs will last.
Glue a second piece across the whole face of the sill
I like that a lot. It'll give a good look from the front, and also add a bit of depth so we can use the 5/4 for the legs and still have some sill projecting at the bottom.
Around here, we call them horns, not tails. Your idea is fine, just mill what you need to extend them, prime all sides, then screw or nail to the sheathing. Polyurethane glue(Gorilla brand or equivalent) would be as good as epoxy, and a lot easier. A random orbital sander (rather than a belt sander) would make quick work to flush everything together. After sanding, patch and re-prime as necessary. Close inspection of the patches may reveal its "character" but it will look great from the curb, and just fine from five feet away.
About 25 years ago we took the asbestos siding off of our 120 year old house which we had just purchased. Why did they ever put that stuff on? I guess it was sold as insulation and as a way to avoid future painting. Like your's, our siding was in excellent shape. Unlike some other types of applied siding, asbestos did not tend to rot the wood underneath. Anyway, we only needed to repair the drip caps and the horns on the sills. Regarding the horns, we only needed to add a couple inches of material to the sides of each sill. I made several long pieces and cut smaller pieces off that as needed. You can make that larger piece pretty close to the exact shape of the horn so you don't need to do a lot of additional sanding once the smaller pieces are glued and nailed on with a finish nail. Your house is going to look great.
Chip Tam
Not to hijack, but does anyone know why this asbestos siding was done. Every house in my neighborhood has this same treatment. Except dutch lap siding, which is painted, then covered with these shingles.
Was it done at construction (I think it was, but why?) or did a salesman come through and convince EVERYBODY to reside at a later date.
I worked on many of these houses and invariably the siding and paint are in good shape, with the exception of nail holes and trim mangaling the OP is dealing with.
I've always wondered about this.
I know my Dad installed it on one of our homes. He was tired of the incessant painting.
I had to do something similar on a job and I used a dowel and Gorilla Glue to secure a short piece of wood on the end. The piece I did was on a door threshold. One day while waiting to get installed the assembly fell over and the piece I attached did not break off but another part of the wood was damaged. The Gorilla Glue held the piece on while the wood broke at another place.