FHB Logo Facebook LinkedIn Email Pinterest Twitter X Instagram Tiktok YouTube Plus Icon Close Icon Navigation Search Icon Navigation Search Icon Arrow Down Icon Video Guide Icon Article Guide Icon Modal Close Icon Guide Search Icon Skip to content
Subscribe
Log In
  • How-To
  • Design
  • Tools & Materials
  • Restoration
  • Videos
  • Blogs
  • Forum
  • Magazine
  • Members
  • FHB House
  • Podcast
Log In

Discussion Forum

Discussion Forum

Big gaps between brickmold and brick veneer -NEW PHOTOS ATTACHED

user-1163745251 | Posted in Construction Techniques on March 14, 2011 11:18am

Hi all,

I’m replacing some rotted brickmold on my old (1920’s) frame and brick veneer house and trying to figure out how to best caulk/fill the joint between the brick and wood. 

The brick is rough clinker brick.  The veneer (properly) sits 1″ or so off the sheathing to allow for ventilation, but in some places there are large (say 3/4″) gaps between the brickmold and the brick, mostly where mortar has chipped out at the back of the joint or where the irregular bricks just leaves a bigger gap..

Previous owners slopped some sort of hard putty and gobs of caulk in areas where there are large gaps.  Looked like crap and the joints had failed in many places so I painstakingly removed it. 

I’m thinking here must be a better way… Repoint?

I’ve removed the old brickmold.  What’s next? Brickmold first, then mortar? Pack with mortar, then brickmold?  Tools and techiniques?  A grout bag, maybe? 

Or should I be caulking?

Any help would be appreciated.

Jim

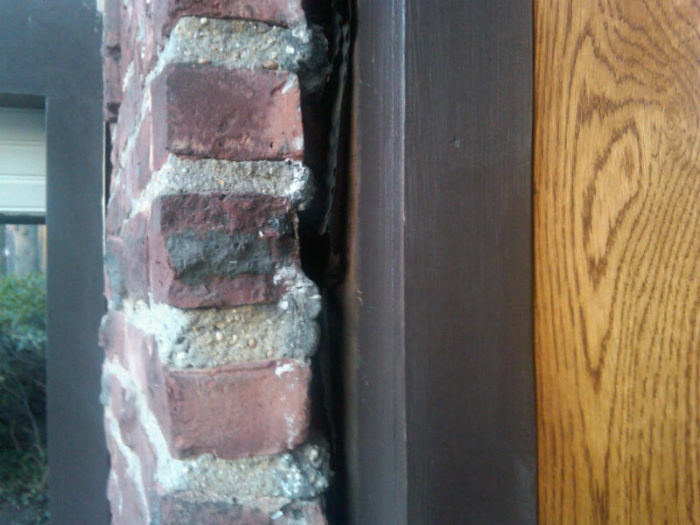
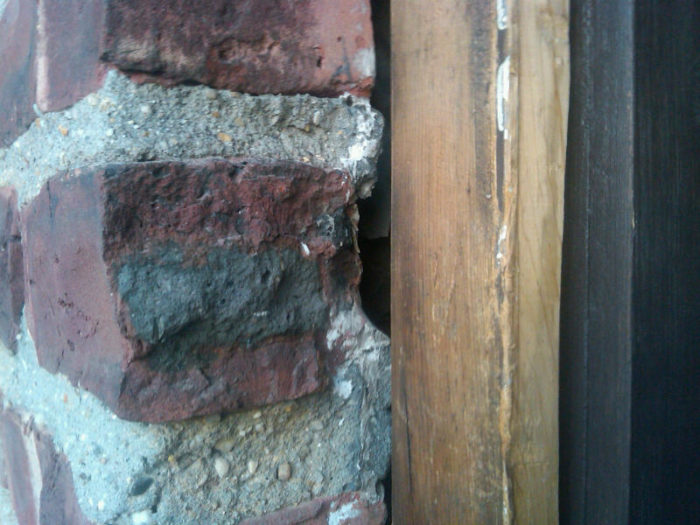
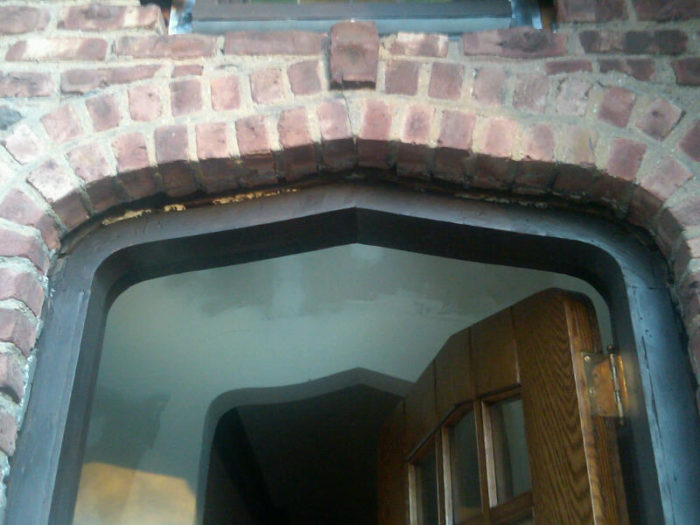
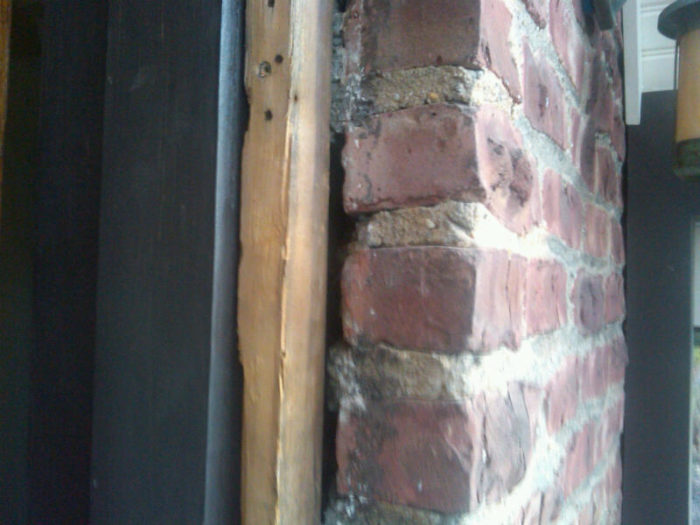
PS – New photos attached.  The first two show closeups of the door frame with the brick mold removed, (door frame is primed brown) highlighting the gap behind the brick and the fact that it does not return to the wall.  The second also shows what looks like an old attempt to repoint behind the brick.The third shows the gaps with an old piece of the brick mold held in place and the fact that there are still gaps to be filled.  The fourth shows the shape of the head of the opening.  The fifth shows another larger gap, about 3/4″ in size.

Any new ideas?

Reply
  • X
  • facebook
  • linkedin
  • pinterest
  • email
  • add to favorites Log in or Sign up to save your favorite articles

Replies

  1. calvin | Mar 14, 2011 01:43pm | #1

    Jim

    Not being able to see it from here.........

    If there were a couple "bad" spots I'd use backer rod first to put a stop to hold the caulk and then use urethane caulk to do a nice job between the brick and just installed molding.  Use the caulk to fake the bad spots.  There's a "sanded" type made for morter repair-Tremco sealants is a good one to look for-Dymonic is one of there's.  The other more sandy one they have-the name escapes me at this time.  Limestone (the color) dries a light grey.  They might have a darker grey also.

    If there are alot of places where you've got morter missing, I'd repoint.

    As for the best method for that.................a grout bag takes two hands.  You've got to give the morter somewhere to both stick and stop-so it doesn't fall out and you keep plugging more in.  With two hands on the bag, you've got none to stop the morter.

    You'll end up with a pointing trowell and the fingers on your other hand holding it from the back.

    One thing that might work would be to take a pc of cardboard or even a strip of masonite-.  Cram it in there flat against the back of the brick and figure a way to hold it in position.  Now you've got a way to stop the morter from falling in.  If you could grease it up so morter doesn't stick to it, all the better.

    Best of luck.

  2. DanH | Mar 14, 2011 07:19pm | #2

    If the gap is oversize all around, and you already have the brick mold off, I'd replace with wider brick mold, to get things down to 3/8" or less.  While the brick mold is off I'd point the really bad spots, then stuff large foam backer rod into the gap, then install the brick mold.  (Be sure you pre-prime the brick mold on all sides with the best quality exterior primer you can find before installing.)  Where the remaining gap is wider than about 3/16" stuff in more (narrower) backer rod, then caulk.

    You DON"T want to try to fill the gap with mortar -- you need 1/8" to 1/4" gap to caulk properly, and mortar alone does not seal and does not have the "give" needed to stay tight with the wood.  You also DON'T want to "stuff" the gap with caulk -- use the backer rod so that the caulk is never more than 1/4" deep (and preferably a bit less).

    Do it right and the job will last 20 years easy.

    1. calvin | Mar 14, 2011 07:54pm | #3

      Dan

      I think the problem is with the brick returns back to the sheeting.  So the brick mold is not too narrow but not thick enough.

      Now that I write that I can come up with another solution.

      B/4 reapplying new brickmold, he should extend the window jamb out so now the usual thickness brickmold (been the same for a long time) will cover the returns.  Now, no need to point the real bad spots where the brick is cut too short.

      I'm assuming these are halves cut and turned to return.

      maybe.

      1. DanH | Mar 14, 2011 08:10pm | #4

        Yep, if the brick is proud of

        Yep, if the brick is too proud of the brick mold he can install shim strips behind the mold.  Also, even if he uses stock mold (which in my experience has changed size at least once in the past 35 years) he can cut it a little longer and "reveal" a little more on the window jambs to help close up any gaps.

  3. DanH | Mar 15, 2011 07:00am | #5

    All together now -- everyone click "Inappropriate".

  4. user-1163745251 | Mar 16, 2011 12:04pm | #6

    Thanks for all the responses, guys. Sorry it took me a while to get back.

    The opening in question is a tudor-arched door opening.

    I saved and cleaned up the 2 head pieces, but am replacing the legs. The old stuff was just 5/4 stock ripped to 1 7/8" wide, so that's what I plan to use.

    I initially thought the idea of "thickening" the brick mold made sense, but if I do this then the legs will stand proud of the horns on the oak threshold.

    How about using some expansive foam (Great Stuff) as a backer for the pointing?

  5. user-1163745251 | Mar 16, 2011 12:33pm | #7

    The brick does not return back to the sheathing.  The only thing that covers the gap between the sheathing and the brick is the brick mold.

    Scribing is a good idea that I hadn't thought of, although I already ripped the 5/4 stock to the same width as the old.  Would have to buy new for this approach to work...

    Will try to get a photo tonight.

    1. user-1163745251 | Mar 17, 2011 04:48pm | #8

      New Photos posted above

      Any other thoughts?

  6. user-1163745251 | Mar 18, 2011 08:52am | #9

    Not sure that'll work on the bottom at all, as the front face of the thicker brick mold would stick out beyond the front face of the oak threshold... 

    A plinth would only make matters worse, wouldn't it?  Or are you suggesting that I "encase" the horns with the plinth, somehow?

    1. calvin | Mar 18, 2011 09:39pm | #10

      encase the horns?

      Cut 'em off and run the plinth down past and next to the threshold...................

      Use something that'll take the abuse of moisture wicking, sitting and constant.  Good use for stone or  Azek.

      1. user-1163745251 | Mar 21, 2011 09:17am | #11

        Great solution - will do

        Thanks!

        1. calvin | Mar 21, 2011 07:45pm | #12

          Jim

          It's worked for me in moisture areas.  But it you use stone, seal the hell out of any wood that it comes in contact with it.

          Here, limestone is the stone of choice for underthresholds, treads for steps, etc..  A real moisture holder.

  7. eagletgb | Nov 09, 2023 05:31pm | #13

    Interested in the solution. My GC’s workers decided the brick molding did fit close enough so they started chiseling out brick … and was trying to put the molding behind the brick. Now I have a large hole gap between to brick and the brick molding… larger than before they chiseled out the brick. I thought they just needed a 1/2 to 1 inch thicker brick molding and now that is impossible. What is the solution?

    My cousin … and window anc door contractor in another state said they miss measured the thickness anc should have re-ordered the door or added 1.5 of additional molding … this was before they started chiseling out brick … I have no idea what they plan to do but it looks like they made a bigger problem rather than fix the original minor problem.

    1. stamant | Nov 10, 2023 08:15am | #14

      look at Mike Sloggatt for some inspiration; not quite the same he has masonry veneer over wood and you likely have masonry mass wall construction.

      https://www.finehomebuilding.com/project-guides/windows-doors/new-window-in-a-brick-house

      try to tie into the felt paper that appears around the opening with some peel and stick or with some metal flashing and sealant. get this in place and do whatever you can to work with the drainage plane to control water and direct it out.

      chipping masonry on a 100 year old structure to install $200 of trim? you need a good mason before you need a carpenter. they should be using a restoration mortar [1:1:5 PCC/hydrated lime/sand for instance] instead of the type S mortar that appears they used in the past.

      Then you can install brick mold -- Seems like you need custom milled stock. certainly possible, but looks like beyond the skill-set of the crew you have now.

Log in or create an account to post a comment.

Sign up Log in

Become a member and get full access to FineHomebuilding.com

Video Shorts

Categories

  • Business
  • Code Questions
  • Construction Techniques
  • Energy, Heating & Insulation
  • General Discussion
  • Help/Work Wanted
  • Photo Gallery
  • Reader Classified
  • Tools for Home Building

Discussion Forum

Recent Posts and Replies

  • |
  • |
  • |
  • |
  • |
  • |
View More Create Post

Up Next

Video Shorts

Featured Story

FHB Podcast Segment: Roofing on Commercial vs. Residential Buildings

In certain scenarios, flat roofs make more sense than pitched roofs (and vice versa).

Featured Video

A Modern California Home Wrapped in Rockwool Insulation for Energy Efficiency and Fire Resistance

The designer and builder of the 2018 Fine Homebuilding House detail why they chose mineral-wool batts and high-density boards for all of their insulation needs.

Related Stories

  • Podcast Episode 691: Replacing Vinyl Siding, Sloping Concrete, and Flat vs. Pitched Roofs
  • FHB Podcast Segment: Roofing on Commercial vs. Residential Buildings
  • Preservation and Renewal for a Classic
  • A Postwar Comeback

Highlights

Fine Homebuilding All Access
Fine Homebuilding Podcast
Tool Tech
Plus, get an extra 20% off with code GIFT20

"I have learned so much thanks to the searchable articles on the FHB website. I can confidently say that I expect to be a life-long subscriber." - M.K.

Get home building tips, offers, and expert advice in your inbox

Signing you up...

This site is protected by reCAPTCHA and the Google Privacy Policy and Terms of Service apply.
See all newsletters
See all newsletters

Fine Homebuilding Magazine

  • Issue 332 - July 2025
    • Custom Built-ins With Job-Site Tools
    • Fight House Fires Through Design
    • Making the Move to Multifamily
  • Issue 331 - June 2025
    • A More Resilient Roof
    • Tool Test: You Need a Drywall Sander
    • Ducted vs. Ductless Heat Pumps
  • Issue 330 - April/May 2025
    • Deck Details for Durability
    • FAQs on HPWHs
    • 10 Tips for a Long-Lasting Paint Job
  • Issue 329 - Feb/Mar 2025
    • Smart Foundation for a Small Addition
    • A Kominka Comes West
    • Making Small Kitchens Work
  • Issue 328 - Dec/Jan 2025
    • How a Pro Replaces Columns
    • Passive House 3.0
    • Tool Test: Compact Line Lasers

Fine Home Building

Newsletter Sign-up

  • Fine Homebuilding

    Home building tips, offers, and expert advice in your inbox.

  • Green Building Advisor

    Building science and energy efficiency advice, plus special offers, in your inbox.

  • Old House Journal

    Repair, renovation, and restoration tips, plus special offers, in your inbox.

Signing you up...

This site is protected by reCAPTCHA and the Google Privacy Policy and Terms of Service apply.
See all newsletters

Follow

  • Fine Homebuilding

    Dig into cutting-edge approaches and decades of proven solutions with total access to our experts and tradespeople.

    Start Free Trial Now
    • Facebook
    • Instagram
    • X
    • LinkedIn
  • GBA Prime

    Get instant access to the latest developments in green building, research, and reports from the field.

    Start Free Trial Now
    • Facebook
    • YouTube
  • Old House Journal

    Learn how to restore, repair, update, and decorate your home.

    Subscribe Now
    • Facebook
    • Instagram
    • X

Membership & Magazine

  • Online Archive
  • Start Free Trial
  • Magazine Subscription
  • Magazine Renewal
  • Gift a Subscription
  • Customer Support
  • Privacy Preferences
  • About
  • Contact
  • Advertise
  • Careers
  • Terms of Use
  • Site Map
  • Do not sell or share my information
  • Privacy Policy
  • Accessibility
  • California Privacy Rights

© 2025 Active Interest Media. All rights reserved.

Fine Homebuilding receives a commission for items purchased through links on this site, including Amazon Associates and other affiliate advertising programs.

  • Home Group
  • Antique Trader
  • Arts & Crafts Homes
  • Bank Note Reporter
  • Cabin Life
  • Cuisine at Home
  • Fine Gardening
  • Fine Woodworking
  • Green Building Advisor
  • Garden Gate
  • Horticulture
  • Keep Craft Alive
  • Log Home Living
  • Military Trader/Vehicles
  • Numismatic News
  • Numismaster
  • Old Cars Weekly
  • Old House Journal
  • Period Homes
  • Popular Woodworking
  • Script
  • ShopNotes
  • Sports Collectors Digest
  • Threads
  • Timber Home Living
  • Traditional Building
  • Woodsmith
  • World Coin News
  • Writer's Digest
Active Interest Media logo
X
X
This is a dialog window which overlays the main content of the page. The modal window is a 'site map' of the most critical areas of the site. Pressing the Escape (ESC) button will close the modal and bring you back to where you were on the page.

Main Menu

  • How-To
  • Design
  • Tools & Materials
  • Video
  • Blogs
  • Forum
  • Project Guides
  • Reader Projects
  • Magazine
  • Members
  • FHB House

Podcasts

  • FHB Podcast
  • ProTalk

Webinars

  • Upcoming and On-Demand

Podcasts

  • FHB Podcast
  • ProTalk

Webinars

  • Upcoming and On-Demand

Popular Topics

  • Kitchens
  • Business
  • Bedrooms
  • Roofs
  • Architecture and Design
  • Green Building
  • Decks
  • Framing
  • Safety
  • Remodeling
  • Bathrooms
  • Windows
  • Tilework
  • Ceilings
  • HVAC

Magazine

  • Current Issue
  • Past Issues
  • Magazine Index
  • Subscribe
  • Online Archive
  • Author Guidelines

All Access

  • Member Home
  • Start Free Trial
  • Gift Membership

Online Learning

  • Courses
  • Project Guides
  • Reader Projects
  • Podcast

More

  • FHB Ambassadors
  • FHB House
  • Customer Support

Account

  • Log In
  • Join

Newsletter

Get home building tips, offers, and expert advice in your inbox

Signing you up...

This site is protected by reCAPTCHA and the Google Privacy Policy and Terms of Service apply.
See all newsletters
See all newsletters

Follow

  • X
  • YouTube
  • instagram
  • facebook
  • pinterest
  • Tiktok

Join All Access

Become a member and get instant access to thousands of videos, how-tos, tool reviews, and design features.

Start Your Free Trial

Subscribe

FHB Magazine

Start your subscription today and save up to 70%

Subscribe

Enjoy unlimited access to Fine Homebuilding. Join Now

Already a member? Log in

We hope you’ve enjoyed your free articles. To keep reading, become a member today.

Get complete site access to expert advice, how-to videos, Code Check, and more, plus the print magazine.

Start your FREE trial

Already a member? Log in

Privacy Policy Update

We use cookies, pixels, script and other tracking technologies to analyze and improve our service, to improve and personalize content, and for advertising to you. We also share information about your use of our site with third-party social media, advertising and analytics partners. You can view our Privacy Policy here and our Terms of Use here.

Cookies

Analytics

These cookies help us track site metrics to improve our sites and provide a better user experience.

Advertising/Social Media

These cookies are used to serve advertisements aligned with your interests.

Essential

These cookies are required to provide basic functions like page navigation and access to secure areas of the website.

Delete My Data

Delete all cookies and associated data