FHB Logo Facebook LinkedIn Email Pinterest Twitter X Instagram Tiktok YouTube Plus Icon Close Icon Navigation Search Icon Navigation Search Icon Arrow Down Icon Video Guide Icon Article Guide Icon Modal Close Icon Guide Search Icon Skip to content
Subscribe
Log In
  • How-To
  • Design
  • Tools & Materials
  • Restoration
  • Videos
  • Blogs
  • Forum
  • Magazine
  • Members
  • FHB House
  • Podcast
Log In

Discussion Forum

Discussion Forum

Birch, Iron & rustic maple stairs

riverman | Posted in Photo Gallery on March 31, 2007 03:15am

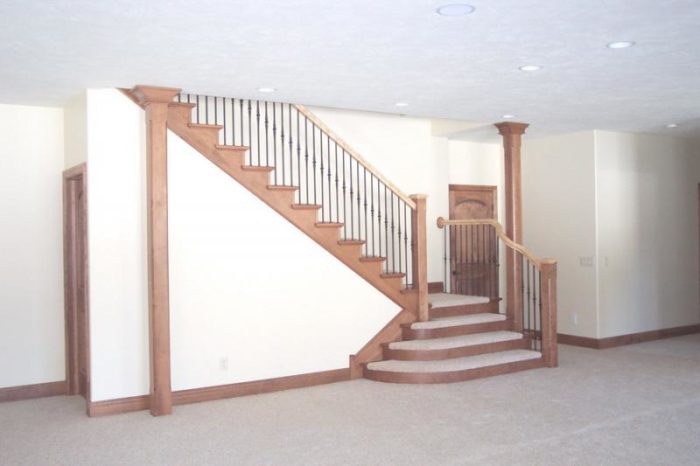
Finished this up a few weeks ago. Yellow birch stringer, risers & trim. Hard maple treads carpet center. Stained medium brown followed by 3 coats spray applied Sherwin Williams Kem-Var. Powder coated iron balusters, custom base shoes and our exclusive captured bark rustic maple railings and newel post caps.

Reply
  • X
  • facebook
  • linkedin
  • pinterest
  • email
  • add to favorites Log in or Sign up to save your favorite articles

Replies

  1. User avater
    Sphere | Mar 31, 2007 03:19am | #1

    I like that a LOT.  I might be pestering you about a quandry I have with my stairs ( yet to be built). I'll email ya. if thats OK?

    Parolee # 40835

    1. riverman | Mar 31, 2007 03:23am | #3

      Cool send it off.

  2. riverman | Mar 31, 2007 03:22am | #2

    This staircase services a large walk out basement with 9-foot ceilings. Like most projects I end up with the designer did a totally screwed job of planning the stairwell opening. Somehow the design only allowed 5'-4" of headroom at the lower landing. I solved the problem by moving a closet on the main floor as well as extending the stairwell 18 inches into the foyer. Proof once again a sawzall and good crowbar can fix almost anything. I wasn't two thrilled about staining the staircase since birch has a tendency to become splotchy and is difficult to wipe out evenly.

    Photo of boxed in support columns and capital

    1. riverman | Mar 31, 2007 03:36am | #4

      Since I always pre-fab my stairs I choose to build the understructure to my spec’s. Once the drywall is on I hate looking for backing that isn't there because somebody didn't second guess where I needed it. It saves me a bunch of time during the install since my templates are checked with the walls before I head back to the shop. Photo 06 shows the framing portion of the stair wall. The slab of masonite sitting on top of the stair wall is the stringer template complete with construction notes. I try to time this so the sheet rock guys are still on site. This way they can put the drywall where I need it and eliminates the chance of placing a joint where it might cause a problem later on.

      1. riverman | Mar 31, 2007 03:50am | #5

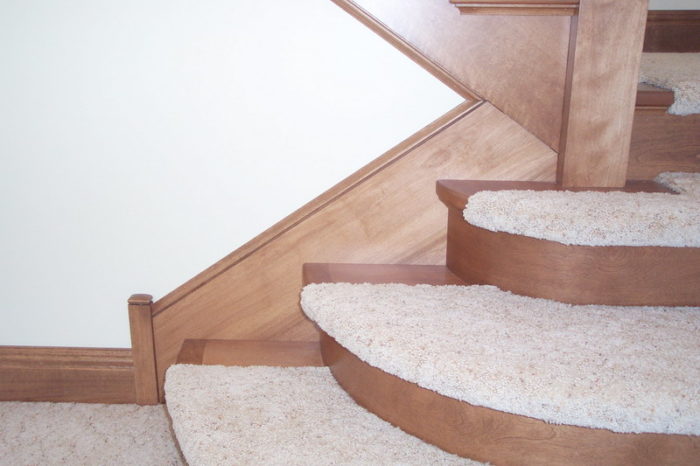
        Photo of main floor railing & newel. The wood is a little know fluke of the hard maple tree. Sometimes referred to as bark inclusions, ingrown bark along with a host of local slang. Basically its ingrown bark, captured or surrounded by new growth. The end result is pretty stunning, it's my number one seller when it comes to unique. A real bitch to work with since the bark contains impregnated sand that eats up cutters at an alarming rate.The lower left corner at the landing shows how I solved a problematic jog around a structural post.

        1. riverman | Mar 31, 2007 04:02am | #6

          Originally the stairs didn’t have the curved tread returns below the landing but rather made a conventional 90-degree turn complete with railing and lower newel. The client wanted a more open look so I opted to return the curved risers back into the main stair wall. This opened up another can of worms, as the code required a continuous railing on the open end of the stairs. At this point the landing was already built and the original railing died into the wood column and exited out the other side. I ended up moving the post 3 inches, the max I could get away with then jogging the rail around the column.

      2. Snort | Mar 31, 2007 04:02am | #7

        Armin, nice touch on the column capitol. Good job of playing with the cards you're dealt. Have you got any closer shots of the bark captured handrail?For curiosity's sake, why did you use the stop block at the skirt/base transition?As always, I enjoy seeing your stuff. Outside of the gates the trucks were unloadin',

        The weather was hot, a-nearly 90 degrees.

        The man standin' next to me, his head was exploding,

        Well, I was prayin' the pieces wouldn't fall on me.

        1. riverman | Mar 31, 2007 06:24pm | #8

          (For curiosity's sake, why did you use the stop block at the skirt/base transition?)The base is 3/4 thick and the skirt ended up being 5/8 thick. Even if they had been the same thickness I still would have used the transition block for effect.

          1. Snort | Mar 31, 2007 10:35pm | #9

            Makes sense, usually our skirts are thicker than the base, so we make a little roll at the transition.Hey, you been out on the water lately? Outside of the gates the trucks were unloadin',
            The weather was hot, a-nearly 90 degrees.
            The man standin' next to me, his head was exploding,
            Well, I was prayin' the pieces wouldn't fall on me.

            Edited 3/31/2007 3:36 pm ET by Snort

          2. riverman | Apr 01, 2007 01:49am | #10

            Usually our stringer skirts are thicker than the base however this time it didn't work out that way. I started using the transition blocks as a way to merge my stringer molding into the more conventional base molding profile. Yes I have been out on the lake. It's been a mild winter so I got in a few ice burg runs as well as the spring breakup last weekend. First whitewater run tomorrow, might be the only run I get in this season since the water is at an all time low. Sea pic's.

          3. riverman | Apr 01, 2007 03:43am | #11

            A few working photos of the curved risers under construction.I begin by drawing a full scale layout on birch plywood. The red bending brackets are screwed to the plywood in the appropriate places. The riser material consists of a face layer of 1/16 thick birch, a core of two layers of 3/8 bending luan backed up with final layer of 1/16 birch.After the glue is applied the whole stack is stretch wrapped and slipped into a long narrow vacuum bag. Initially I extract just enough air to snug up the bag to the laminates and still be loose enough to allow the stack of laminates to bend unrestricted around the bending brackets. Once everything is in place full vacuum is applied and maintained until the glue has reached final set. Note in photo 43 the end brackets are offset to lock the stack of laminates in place.

          4. Snort | Apr 01, 2007 04:04am | #14

            Armin, your bracket set is the ticket. What is the metallic looking surface on the riser face? Reflection? And, how do you keep the brackets from rubbing holes in the bag when it's vacuumed? You are the king of jigs and fixtures, I am impressed at how few and light the clamping is with those brackets. You made 'em too, didn't ya?<G> Outside of the gates the trucks were unloadin',

            The weather was hot, a-nearly 90 degrees.

            The man standin' next to me, his head was exploding,

            Well, I was prayin' the pieces wouldn't fall on me.

          5. riverman | Apr 01, 2007 05:36am | #17

            *What is the metallic looking surface on the riser face?*Must be the flash reflecting off the clear poly bag. The bag doesn't drift enough to cause any wear spots. Besides the poly bag is pretty tough. I have one main bag that has seen almost daily use for the better part of 12 years and still doesn't have a hole in it. The old bag is big, can handle a 4 x 10 wood counter top with ease. In the case of laminating big stuff sometimes you have to rearrange the work piece in the bag, the wife refers to this as me being half in the bag. see photo.Yes I made the red brackets, a rather recent addition to my collection of fixtures. They were simple, cheap and easy to make, one of rare brainstorms that actually has a life beyond the one project I originally built them for.

          6. Snort | Apr 01, 2007 06:29am | #18

            Puts a whole new spin on bagging the big one<G> Outside of the gates the trucks were unloadin',

            The weather was hot, a-nearly 90 degrees.

            The man standin' next to me, his head was exploding,

            Well, I was prayin' the pieces wouldn't fall on me.

          7. stevent1 | Apr 03, 2007 02:28pm | #19

            Armin,Great work as usual. The jog around the post is excellent. is it from solid stock or a lamination?Chuck Slive, work, build, ...better with wood

          8. riverman | Apr 04, 2007 06:14am | #20

            It's laminated as 2 layers, the bottom is 1-7/8 thick with a 3/8 cap. Joints are concealed in the profile. to get a decent color and grain match all sections are sequence cut from the same plank.

          9. DavidxDoud | Apr 04, 2007 07:15am | #21

            tip 'o the hat -

            thanks for sharing -

            D


             "there's enough for everyone"

          10. StanFoster | Apr 01, 2007 03:44am | #12

            Armin:    As usual.. very nice elequent work.   You are simply the best.


            Stan

            Edited 3/31/2007 8:45 pm ET by StanFoster

          11. riverman | Apr 01, 2007 04:53am | #15

            Thanks Stan, I don't consider myself the best, just always try to do the best work I can.

          12. Snort | Apr 01, 2007 03:52am | #13

            Nice pics. No way I'd take my camera out there. Went sailing, Mrs 'Snort didn't think the dry bag needed to be completely closed...she does now<G> How do you keep your powder dry? Outside of the gates the trucks were unloadin',

            The weather was hot, a-nearly 90 degrees.

            The man standin' next to me, his head was exploding,

            Well, I was prayin' the pieces wouldn't fall on me.

          13. riverman | Apr 01, 2007 05:03am | #16

            I have one of those plastic, gasket sealed containers mounted to the deck of the boat. The biggest hazard I have is fiddling around to long gazing through the camera view sights, misjudging the distance and running the nose of the boat up on an ice burg. One near miss convinced me you pick your shot, aim, shoot and put the camera way. At a water temp of 34 degrees your wet suit is nothing more than a form fitting body bag.

Log in or create an account to post a comment.

Sign up Log in

Become a member and get full access to FineHomebuilding.com

Video Shorts

Categories

  • Business
  • Code Questions
  • Construction Techniques
  • Energy, Heating & Insulation
  • General Discussion
  • Help/Work Wanted
  • Photo Gallery
  • Reader Classified
  • Tools for Home Building

Discussion Forum

Recent Posts and Replies

  • |
  • |
  • |
  • |
  • |
  • |
View More Create Post

Up Next

Video Shorts

Featured Story

FHB Podcast Segment: Are Single-Room ERVs the Answer?

Learn more about the pros and cons of single-room ERVs.

Featured Video

Micro-Adjust Deck-Baluster Spacing for an Eye-Deceiving Layout

No math, no measuring—just a simple jig made from an elastic band is all you need to lay out a good-looking deck railing.

Related Stories

  • Vintage Sash Windows Get an Energy-Efficient Upgrade
  • Design and Build a Pergola
  • Podcast Episode 689: Basement Garages, Compact ERVs, and Safer Paint Stripper
  • FHB Podcast Segment: Are Single-Room ERVs the Answer?

Highlights

Fine Homebuilding All Access
Fine Homebuilding Podcast
Tool Tech
Plus, get an extra 20% off with code GIFT20

"I have learned so much thanks to the searchable articles on the FHB website. I can confidently say that I expect to be a life-long subscriber." - M.K.

Get home building tips, offers, and expert advice in your inbox

Signing you up...

This site is protected by reCAPTCHA and the Google Privacy Policy and Terms of Service apply.
See all newsletters
See all newsletters

Fine Homebuilding Magazine

  • Issue 332 - July 2025
    • Custom Built-ins With Job-Site Tools
    • Fight House Fires Through Design
    • Making the Move to Multifamily
  • Issue 331 - June 2025
    • A More Resilient Roof
    • Tool Test: You Need a Drywall Sander
    • Ducted vs. Ductless Heat Pumps
  • Issue 330 - April/May 2025
    • Deck Details for Durability
    • FAQs on HPWHs
    • 10 Tips for a Long-Lasting Paint Job
  • Issue 329 - Feb/Mar 2025
    • Smart Foundation for a Small Addition
    • A Kominka Comes West
    • Making Small Kitchens Work
  • Issue 328 - Dec/Jan 2024
    • How a Pro Replaces Columns
    • Passive House 3.0
    • Tool Test: Compact Line Lasers

Fine Home Building

Newsletter Sign-up

  • Fine Homebuilding

    Home building tips, offers, and expert advice in your inbox.

  • Green Building Advisor

    Building science and energy efficiency advice, plus special offers, in your inbox.

  • Old House Journal

    Repair, renovation, and restoration tips, plus special offers, in your inbox.

Signing you up...

This site is protected by reCAPTCHA and the Google Privacy Policy and Terms of Service apply.
See all newsletters

Follow

  • Fine Homebuilding

    Dig into cutting-edge approaches and decades of proven solutions with total access to our experts and tradespeople.

    Start Free Trial Now
    • Facebook
    • Instagram
    • X
    • LinkedIn
  • GBA Prime

    Get instant access to the latest developments in green building, research, and reports from the field.

    Start Free Trial Now
    • Facebook
    • YouTube
  • Old House Journal

    Learn how to restore, repair, update, and decorate your home.

    Subscribe Now
    • Facebook
    • Instagram
    • X

Membership & Magazine

  • Online Archive
  • Start Free Trial
  • Magazine Subscription
  • Magazine Renewal
  • Gift a Subscription
  • Customer Support
  • Privacy Preferences
  • About
  • Contact
  • Advertise
  • Careers
  • Terms of Use
  • Site Map
  • Do not sell or share my information
  • Privacy Policy
  • Accessibility
  • California Privacy Rights

© 2025 Active Interest Media. All rights reserved.

Fine Homebuilding receives a commission for items purchased through links on this site, including Amazon Associates and other affiliate advertising programs.

  • Home Group
  • Antique Trader
  • Arts & Crafts Homes
  • Bank Note Reporter
  • Cabin Life
  • Cuisine at Home
  • Fine Gardening
  • Fine Woodworking
  • Green Building Advisor
  • Garden Gate
  • Horticulture
  • Keep Craft Alive
  • Log Home Living
  • Military Trader/Vehicles
  • Numismatic News
  • Numismaster
  • Old Cars Weekly
  • Old House Journal
  • Period Homes
  • Popular Woodworking
  • Script
  • ShopNotes
  • Sports Collectors Digest
  • Threads
  • Timber Home Living
  • Traditional Building
  • Woodsmith
  • World Coin News
  • Writer's Digest
Active Interest Media logo
X
X
This is a dialog window which overlays the main content of the page. The modal window is a 'site map' of the most critical areas of the site. Pressing the Escape (ESC) button will close the modal and bring you back to where you were on the page.

Main Menu

  • How-To
  • Design
  • Tools & Materials
  • Video
  • Blogs
  • Forum
  • Project Guides
  • Reader Projects
  • Magazine
  • Members
  • FHB House

Podcasts

  • FHB Podcast
  • ProTalk

Webinars

  • Upcoming and On-Demand

Podcasts

  • FHB Podcast
  • ProTalk

Webinars

  • Upcoming and On-Demand

Popular Topics

  • Kitchens
  • Business
  • Bedrooms
  • Roofs
  • Architecture and Design
  • Green Building
  • Decks
  • Framing
  • Safety
  • Remodeling
  • Bathrooms
  • Windows
  • Tilework
  • Ceilings
  • HVAC

Magazine

  • Current Issue
  • Past Issues
  • Magazine Index
  • Subscribe
  • Online Archive
  • Author Guidelines

All Access

  • Member Home
  • Start Free Trial
  • Gift Membership

Online Learning

  • Courses
  • Project Guides
  • Reader Projects
  • Podcast

More

  • FHB Ambassadors
  • FHB House
  • Customer Support

Account

  • Log In
  • Join

Newsletter

Get home building tips, offers, and expert advice in your inbox

Signing you up...

This site is protected by reCAPTCHA and the Google Privacy Policy and Terms of Service apply.
See all newsletters
See all newsletters

Follow

  • X
  • YouTube
  • instagram
  • facebook
  • pinterest
  • Tiktok

Join All Access

Become a member and get instant access to thousands of videos, how-tos, tool reviews, and design features.

Start Your Free Trial

Subscribe

FHB Magazine

Start your subscription today and save up to 70%

Subscribe

Enjoy unlimited access to Fine Homebuilding. Join Now

Already a member? Log in

We hope you’ve enjoyed your free articles. To keep reading, become a member today.

Get complete site access to expert advice, how-to videos, Code Check, and more, plus the print magazine.

Start your FREE trial

Already a member? Log in

Privacy Policy Update

We use cookies, pixels, script and other tracking technologies to analyze and improve our service, to improve and personalize content, and for advertising to you. We also share information about your use of our site with third-party social media, advertising and analytics partners. You can view our Privacy Policy here and our Terms of Use here.

Cookies

Analytics

These cookies help us track site metrics to improve our sites and provide a better user experience.

Advertising/Social Media

These cookies are used to serve advertisements aligned with your interests.

Essential

These cookies are required to provide basic functions like page navigation and access to secure areas of the website.

Delete My Data

Delete all cookies and associated data