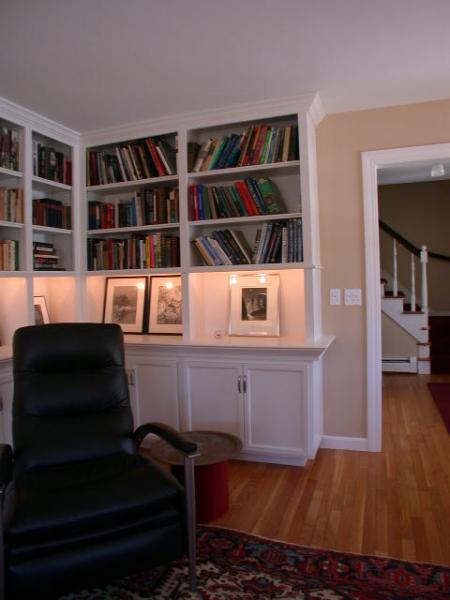
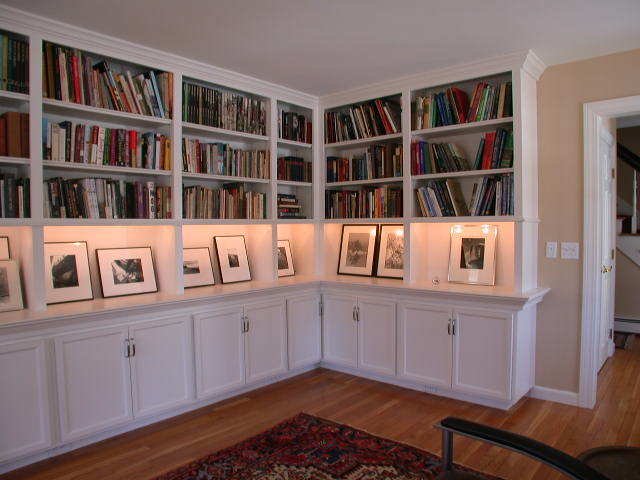
here’s a bookcase we did last winter.
i finally went back with a wide angle lens and a tripod..
the lower shelf is backlit to display some of the Owner’s photography
Mike Smith Rhode Island : Design / Build / Repair / Restore
Edited 2/19/2005 11:34 pm ET by Mike Smith
Edited 2/19/2005 11:35 pm ET by Mike Smith


Replies
Those are really nice; proportioned, finished and elegant.
Did you use MDF and paint on-site or spray off site and then install?
And are the lights halogens?
and more on question; did you think about how to light the spines of the books at night (for picking out titles)?
Nice job!
NotAClue
Great work Mike, gets me thinking again how I need to get started on some built ins at my house - nice lines
Very nice Mike.
That's work your company can be proud of for sure.
Can you tell us all about the construction and finish?
Eric
I Love A Hand That Meets My Own,
With A Hold That Causes Some Sensation.
[email protected]
the ends , doors and counter are all MDF.... some good one side some two side
the common sides are a sandwich... 3/4 AC with 1/4 luan on each side.. the luan forms a rabbet to relieve the KD shelf track
the face is poplar
the moldings are all PFJ
the minor shelves are all adjustable.. and the main shelf is fixed with a light bar molding to hide the halogen rope light
almost all of our built-in cabinet work follows this same basic menu..
here's a close-up of the inset KD trackMike Smith Rhode Island : Design / Build / Repair / Restore
Mike you said you used a halogan rope light, is this the kind sold by home depot rated at 9 watts per 3'
I am looking for a stronger one per ft.
dude , i don't know the specs.. my electrician supplied themMike Smith Rhode Island : Design / Build / Repair / Restore
Tanks, and check out these brackets:http://stairsupplies.com/index.asp?PageAction=VIEWCATS&Category=23very strong, quick install, nice look... Don't worry, we can fix that later!
snort.. look good.. have you used this one..
View ImageMike Smith Rhode Island : Design / Build / Repair / Restore
here's some more bookcases..
this is the library with the queen mother holding court..
View Image
and a built-in display case with glass shelves
then a window seat....
Mike Smith Rhode Island : Design / Build / Repair / Restore
Edited 2/20/2005 11:02 am ET by Mike Smith
and here's some other built-ins..
a sewing room with some drawer units for a base..
View Image
and the hall laundry closet....open & closed
Mike Smith Rhode Island : Design / Build / Repair / Restore
Edited 2/20/2005 11:06 am ET by Mike Smith
Real good looking stuff there Mike. I can't wait till I getthe shop off the ground this summer..I am so cramped working in the house that I couldn't begin to do anything on that scale...Keep them pics a rollin..I always love your photos.
Spheramid Enterprises Architectural Woodworks
Restoring, Remodeling, Reclaiming The Quality..
gene-o
Yeh....Katrina keeps asking me to get my shop in shape....but then again she asks me to finish the upstairs bathroom....and the master bedroom...and the siding and the painting and the landscaping, moldings....even to clean my tipi...and to finish the kitchen and get the electrical done...geeezzz....the nerve of some wimminz.I mean I work 8-10hrs during the week and it does eventually get done....Hey....my shop has a great TS....radial arm piece ####shid I never use and my great DW SCMS....and enough tools to fill a barn.
Told her as soon as I get offa BT I'll finish it all up this coming week...lol. This dump aughta be great for the 2006 TipiFest....pool and all.(if I live through this).....then again you're probably going through the exact same thang over at yer crib.Bust azz during the week and do absofugginglutly nuttin' on the weekends..and even thats a chore.....
she tells me I'm becoming eccentric that I won't go anywhere...
I figure...I'm already there.
Be well bro
a...The secret of Zen in two words is, "Not always so"!
When we meet, we say, Namaste'..it means..
I honor the place in you where the entire universe resides,
I honor the place in you of love, of light, of truth, of peace.
I honor the place within you where if you are in that place in you
and I am in that place in me, there is only one of us.
Mike,Great work on all of these...inspirational! I have never had the chance to build bookcases as nice as those.I really liked the dual use of crown in the first picture, I will try that sometime.I tried to shrink down the photo files of a couple of bookcase type projects I did
this year. I hope this works better than the monster files I posted before.
Edited 2/20/2005 1:31 pm ET by basswood
messed up this attachment.cherry shelves and desk w/ integral cleats.
bass, either you straightened things up before you took those photos , or you area much neater guy than me (I ? )
nice workMike Smith Rhode Island : Design / Build / Repair / Restore
that was a tidy homeowner, not me.here's a picture of my parlor.
ah, home , sweet home....
View ImageMike Smith Rhode Island : Design / Build / Repair / Restore
Yup. I got a lot of work for the money when I bought this one.Still a mess around here, but the parlor is done. Here is the same room three years later. I'll spare you the details.ccf14022005_00009.jpgmessed that paste up.
Edited 2/20/2005 5:17 pm ET by basswood
here's the pic.
c'mon , bass.. the "after" is supposed to be taken in the same location as the "before" .. from the same angle..
or at least in the same county
nice touch , with the flowers..
oops..
gotta go... she who must be obeyed says it's time to go to the movies..
laterMike Smith Rhode Island : Design / Build / Repair / Restore
actually here is that big closet when it had some of my stuff in there.
Si...don't be confused by imitators who use 3 screws...talk about slowing you down<G> Don't worry, we can fix that later!
Mike,Dumb question: If you cover the AC with Luan to recess the kd track, why use AC?
Jon Blakemore
I wondered the same thing and figured it must be because the AC is more stable than some of the lower grades
will wait to see what Mike says
i tried going cheap couple years ago... trying to flatten warped 3/4 ply with 1/4 luan ain't gonna happen..
BTW
reason we use 3/4 is because of the little nails that come with the KD track.. they looked like they MIGHT go thru and mess things up.. but you could PROBABLY get by with 1/2"... in which case i'd probably use underlayment plyMike Smith Rhode Island : Design / Build / Repair / Restore
If you use a lot of KV track, Bostich makes a stapler just for them. It's sweet...luckily I know someone silly enough to own one<G> Don't worry, we can fix that later!
Well I hate to ask this but...md was here
Do you have a model number for that Bostich stapler?
Free Sancho!!!
Doode, I don't, but if I find it, I'll email ya...it's in yer profile, right<G> Don't worry, we can fix that later!
Hi all-
Really nice bookcase. I wandered over here from gardening, and as I'm wanting a built-in bookcase in my LR, I wondered if I could ask a few questions.
What materials are acceptable/good/best? The finish will be white paint to match the trim. I want them to be quite simple, not alot of molding and stuff. There is a window in the middle of the wall, there would be a windowseat part under the window (duh) that would run the entire length of the wall, with bookshelves from there to the top of the window or the ceiling on either side. I have particle board/melamine bookcases there now which I hate more than anything. Also, I have lots of books and I really cram the shelves full with them.
Thank you.
are you sporting the 02 because of prospero problems ?
most of the painted woodwork now is built with 3/4 MDO.. which is a dense plywood with no voids and a paper impregnated covering. you can get the covering either one side or two, depending on your needs..
are you going to make the trek to toledo in august ?Mike Smith Rhode Island : Design / Build / Repair / Restore
Thanks for that info.
I'm 02 because there was already a Biscuit...
perhaps that Biscuit will be in Toledo, but I will not ;-)
lots of people here have met 01 at petefest...
where do you live ?Mike Smith Rhode Island : Design / Build / Repair / Restore
Iowa.
What exactly is a petefest?
same as a Caperfest, a ReckoFest, a TexFest , and A RhodeFest.. except PeteFest was the first..
take a look in the folder...
"Breaktime Fests".. btw.. you're invitedMike Smith Rhode Island : Design / Build / Repair / Restore
Ahh, that 'splains alot.
thanks for the invite. Will think about it.
biscuit02, what you're building your shelves out of depends somewhat on the finished surface. I think you said you were going to paint it, so that really opens up your options.
I share your dislike for MDF or particleboard for shelves. I would rather use regular wood and/or plywood. If using plywood, you can apply an edge treatment (either a strip of real wood, or some form of laminant strip) that will conceal the ply's of the plywood.
How wide will the window seat be? If it is going to be 4-5' or so, you will probably want to build a framework under it to support it. Also, is the window seat going to be just a solid block, or is it going to have a drawer or door on the front? (some people even hinge the top to make a toy-box like space)
Do you have a picture of the wall in question and/or a sketch of the shelves/seat that you could show us?
jt8
The reason so many people never get anywhere in life is because when opportunity knocks, they are out in the backyard looking for four-leaf clovers. -- Walter Percy Chrysler
Edited 2/28/2005 9:56 am ET by JohnT8
john... i also share your dislike of MDF..
however .. i'm talking about MDO. a whole'nudder product.... and it loves paintMike Smith Rhode Island : Design / Build / Repair / Restore
Mike,
I just finished catching up with this thread, let me say two things before I launch into questions:
First, really nice job on those built-ins, and awesome tip for using the 1/4 luan instead of rabbets - I never much liked the look of the shelf standards, but your method sure seems to be fast and effective...I may have to rethink some things...
Questions:
Why the kicker along the sides of the built in bookshelves? I would think the two outsides would go straight to floor...is this how you typically build them Mike?
I've never used MDO for bookcases, but it sounds great. What are you paying for 1 side and 2 side 4x8s in Rhode Island?Justin Fink - FHB Editorial
justin... repost one of my pics to show this "kicker" so i can comment on it..i suspect it's because the base is bigger than the top, so you can't rip one piece
and i'll have to get a quote on MDO today as those were bought almoist two years agoMike Smith Rhode Island : Design / Build / Repair / Restore
View Image
Just curious why the outer side of the lower cabs don't go all the way to the floor...they cut in 3 inches or so, just like the kicker on the front of the cabs. See what I mean?Justin Fink - FHB Editorial
i don't know why i did that.. i wanted a toe-kick, and i wanted to avoid the problem of how to treat the molding at the base...
is there a convention i might have followed ?Mike Smith Rhode Island : Design / Build / Repair / Restore
I'm looking for some ideas of how to do a built-in bookcase tucked up under a sloped ceiling. Mostly concerned with how to connect the ends of the shelves into the slope. This will be a library area, with the shelves built out of pine. Need some pictures so I can get an idea of how it will look. The slope is very steep; 9 in 12. thanks
i don't have any pics of shelves like that.. but
are your shelves going to butt into the slope (perpindicular to the slope )
or are they going to stair-step backwards ( parallel to the slope )Mike Smith Rhode Island : Design / Build / Repair / Restore
They will butt into the slope. I've seen some articles with shelving units built into the sides of stairs, a similar situation. I remember a 'finishing touches' on this idea i.e. storage built into space under stairs, but can't find mention of which issue.
Is this what you mean? It's a room I designed/built, with about a 5/12 pitch where the bookcases meet the ceiling. It's a bump out designed to hold a couch and to get around the narrow dimensions that were existing, so the ceiling was getting low at the intersection.
Basically, the bookcase has a flat "ceiling", but the face and side trim just rise to meet the ceiling.
Here are two shots, not sure which one will show best.
View Image
Jake Gulick
[email protected]
CarriageHouse Design
Black Rock, CT
Edited 3/1/2006 4:14 pm ET by Lateapex911
Edited 3/1/2006 4:16 pm ET by Lateapex911
And since we're talking bookcases, heres the other side of the room. I should find a "before" shot of it.
View Image
Jake Gulick
[email protected]
CarriageHouse Design
Black Rock, CT
Edited 3/1/2006 4:18 pm ET by Lateapex911
Nice, Jake.TIPI,TIPI,TIPI!
Jim
I think this would be a good oportunity for you to retell your infamous bookcase story. ( The one involving the painter)
hello to Kathy
best wishes
Markhttp://www.quittintime.com
Best wishes right back atcha, old friend.
No stories these days. That well done dried up. TIPI,TIPI,TIPI!
I like that room Jake, very well done
Doug
Beautiful room, nice clean lines. Unfortunately, I would need to put the bookcases on the end walls, gable parallel to the front of the case. Thanks for the ideas!
Marty
Sorry, I don't have a pic to post (and I've never posted a pic, so I must learn that) but it is pretty simple. 10' long wall. Window centered on wall, 37" wide (incl frame, trim, whatever you call it-- all the wood parts, plus 1" or so on either side for the sill) bottom of window frame/trim is 19" above floor. Window seat would be about 16-17" above floor and would run the length of the wall, about 22" depth. On either side of the window, how many inches from the window I'm not sure, the upright sides for the bookshelves would run from the window seat up to the top of the window, or maybe all the way to the ceiling. Shelves and uprights would be 10-12" depth, maybe less at top than at bottom.
I have a large globe (20" diam w/ it's holder thing) made of stone and brass, and a TV-- these would sit on the "window seat" bench on either side of the window- the window seat under the window would be for plants or for people when I have parties.
I'd like the space under the window seat, the whole length of the wall, to be functional, either drawers, or cabinet doors, or cabinets with pull-out shelves. Not a lid that that you lift.
when I call someone to come give an estimate, can I specify what materials to use? That's why I was asking-- I wasn't sure if plywood could be used, or if it would need to all be solid wood. Although I said it would be painted, I'm also considering having the whole length of the top of the window seat be finished similar to the floor. could this be a veneered plywood or would solid wood be better long term?
Window seat would be about 16-17" above floor and would run the length of the wall, about 22" depth. On either side of the window, how many inches from the window I'm not sure, the upright sides for the bookshelves would run from the window seat up to the top of the window, or maybe all the way to the ceiling. Shelves and uprights would be 10-12" depth, maybe less at top than at bottom.
So if I'm understanding you correctly, under the window the "window seat" is a window seat, but on the rest of the wall, the "window seat" is simply a lower shelf which sticks out further than the shelves above it?
So if we look at Mike's picture, you would be lowering his illuminated shelf down to 16". On either side it has bookshelves above it, while in the middle it just has the window?
View Image
when I call someone to come give an estimate, can I specify what materials to use?
Yes, you can tell them what you want it made out of. They may make recommendations. If you have seen their previous work and like it, I would listen to their recommendations.
That's why I was asking-- I wasn't sure if plywood could be used, or if it would need to all be solid wood. Although I said it would be painted, I'm also considering having the whole length of the top of the window seat be finished similar to the floor. could this be a veneered plywood or would solid wood be better long term?
Prices on regular wood and plywood are constantly going up and down. Which one would be cheaper depends on whatever the current prices are and what the actual structure of the bookcase/window-seat is.
Veneered plywood can be sanded and stained. Just keep in mind that you don't want any edges exposed (because they will give away the fact that its plywood), and therefore should have some form of edge treatment to cover the plywood edges.
I don't like particleboard or MDF, but I've never used MDO. You will have to ask Mike about it.jt8
The reason so many people never get anywhere in life is because when opportunity knocks, they are out in the backyard looking for four-leaf clovers. -- Walter Percy Chrysler
MDO is great plywood.. with no voids.. it has an impregnated kraft surface that loves paint..
if you are doing any kind of flatwork ( like shelves and bookcase ends ) it's almost impossible to find a better material for painted woodwork..
i would rather use MDO that the best grade of plywood for any painted work...
naturally , for stain work , i'd use a veneerMike Smith Rhode Island : Design / Build / Repair / Restore
What does MDO stand for?
Is it the kind of wood you sometimes see in modern furniture where the ends are not covered up, and you can see the layers? It looks nice, not unfinished.
When I get an estimate for this job, will I need to specify how many pounds each shelf will hold?
What is easier/less expensive to do-- drawers, or cabinets with pull-out shelves?
Or is that unanswerable without knowing more info?
MDO - stands for medium density overlay.It is also know as "sign board".It's big use is in making signs because it is so flat and smooth."When I get an estimate for this job, will I need to specify how many pounds each shelf will hold?"Just what you want to use it for. Unless you will be displaying your collection of gold bars then books is probably the heaviest things per ft.
Unless you will be displaying your collection of gold bars...
Howdja know? Great bookends!
just dredging up this old chesnut so i could show dieselpig some bookcasesMike Smith Rhode Island : Design / Build / Repair / Restore
This is a great thread. So MDO is the sheet stock that appears to have an orangeish paper faced covering over plywood? While MDF is that compressed sawdust/chicken beak stuff that makes me sneeze and causes my nose to run all over my table saw? I think I've got a handle on it. And MDO is available with either one or two 'good' sides, right? And MDO would about as stable as 5 ply birch?
Help a framer out here. View Image
yes, Medium Density Overlay,
mdo is basically a "A" grade plywood with no voids and is either faced one side or faced two sides.. it has the strength of plywood with none of the voids and the facing makes it love paint
the only problem you have is the edge.. which is why we usually use clear poplar, which also likes paint, and tools well
Mike Smith Rhode Island : Design / Build / Repair / Restore
I never thought of using MDO, and now that I think about it the "paper" face is probably more durable than the thin veneer of birch ply.
I'll have to try it out next time.--------------------------
It's only satisfying if you eat it.
Brian, the MDO we get here (and what I use for similar shelving units) seems to be nice and flat when two side paper'd (it comes primed). One side always seems to have a bend in it. If you double up 1/2 to make the sides that doesn't seem to be a problem: When using an inch and strong 3/4 face frame stile, I'll use 2 pcs of 1/2 with rips of 1/2 in between. Keeps the stiles just a bit proud of the face frame. I didn't go back and look, does mike use KV adj standards (for the clips) and add to the sides to flush them out. I've seen that done some where. Easier than dadoing or routing the groove I suppose.A great place for Information, Comraderie, and a sucker punch.
Remodeling Contractor just outside the Glass City.
Quittin' Time
for my sides.. i use 1/2 ac then cover with 1/4" luan to bury the KV track so my common sides wind up 1/4 + 1/2 + 1/4
for the end sides i use 3/4 MDO , good one side with the 1/4" luan burying the KVS, so i get a 1" thickness on the end sides tooMike Smith Rhode Island : Design / Build / Repair / Restore
Do you find the good one side has a curve to it and the G2S to be flatter?A great place for Information, Comraderie, and a sucker punch.
Remodeling Contractor just outside the Glass City.
Quittin' Time
i try to pick my sheets so they are flat... i think it's more a function of 1/2" vs. 3/4"
if it were curved, i couldn't use it for a tall side pieceMike Smith Rhode Island : Design / Build / Repair / Restore
Here is a paintgrade arrangement of builtin shelving I built a while ago.
The carcase is an arrangement of 3/4 MDF boxes, three wide, one high. Each box has a 1/4 MDF back rabbeted into the sides.
A simple buttjointed faceframe of poplar is put together with pocket screws for the front, and 4-member frames of poplar are pocketscrewed to give the ends a paneled look.
Shelves are all 3/4 MDF and are fronted with 3/4 x 1-1/4 poplar edgestrips.
The whole thing stands up on a 1x base and is trimmed at bottom with the same 2-piece base as adjacent walls. A simple piece of beveled poplar is used for the crown top.
All was sprayed with one coat of Binz white lacquer, then two coats of SW ProClassic Acrylic enamel.
I posted these today on another thread in the tavern.
I furred out the walls drywalled the upper part, and wainscoating on the bottom half.
These are pictures of pictures, so they aren't very high quality.
View Image
View Image
--------------------------
It's only satisfying if you eat it.
Edited 1/31/2006 9:12 pm ET by dustinf
That looks great. Is that box car siding?
I'm not sure what box car siding is, but I've always called it beadboard. --------------------------
It's only satisfying if you eat it.
stinger... nice bookcase... how deep .. how high ?
View ImageMike Smith Rhode Island : Design / Build / Repair / Restore
Did you get inspiration for the bookshelf from Gary Katz's article in FHB? I seem to remember he had the same detail for fastening the shelving and then covering up with a face frame.
Jon Blakemore RappahannockINC.com Fredericksburg, VA
Yes. It is a Katz design. Simple and quick.
Hard to tell by my crappy pictures, but I used the same design. --------------------------
It's only satisfying if you eat it.
And in the same room, here is the "partner style" two-person desk arrangement. Desktop is all MDF with quartersawn white oak veneer, solid strips of same species edging, the peninsula end is all poplar and MDF, and the file cabs at ends have white melamine carcases and solid poplar painted drawerfronts.
another gem ....
View ImageMike Smith Rhode Island : Design / Build / Repair / Restore
Mike, details of one box are attached. Three make up the unit.
The simple crown over the top just goes around the top edge, and matches that seen over the door casing in elevation. You can step on a stool and stash your secret possibles up on the sunk tops.
Really nice paint job on that piece of art.
trigger.. that piece of art belongs to stinger.. i was just reposting his picMike Smith Rhode Island : Design / Build / Repair / Restore
Oh.
Gorgeous.... thanks for all the 411.
View ImageView Image
Gene,I like the desk. As Mike would say, it's very elegant, both in design and (I assume) efficiency in use as an office.
Jon Blakemore RappahannockINC.com Fredericksburg, VA
Gene ...
consider that Office Desk idea stolen.
very nice.
one change I'd make ... bump out the end unit (maybe only an inch or so ... just for effect) ... might be bumped out already ... couldn't tell ... then bump out the counter top ... to follow the lines
would make for a "nook" as ya sat there working ... a wrap around CT.
Jeff Buck Construction
Artistry In Carpentry
Pittsburgh Pa
time for a bump... guy wanted to know about boocases
hey... how 'bout dem bears ?Mike Smith Rhode Island : Design / Build / Repair / Restore
I really liked the pic's and ideas in this thread. I will probably steal some techniques for this winter's built in entertainment center project. I'm certainly not trying to compare workmanship shown elsewhere in here as I fall far short. Just showing another option for shelf cleats... I don't remember where I saw this idea, it wasn't mine, but I played around with it for a bookcase in the kids room. I didn't want any metal hangers for this unit.
hey....how bout dem Colts....smash mouth dominating football....like the Gators.
Uh oh. I may be making ememies.
Edited 2/5/2007 1:00 pm ET by txlandlord
seems I know more about booKcases than I do football betting!
at least I've made money on most bookcases I've built ...
Jeff Buck Construction
Artistry In Carpentry
Pittsburgh Pa
Hey brotha.
Get yer liberry card renewed?
Good to see you around. Don't be such a stranger.
J. D. Reynolds
Home Improvements
kiss, kiss.... i wuv peyton......
but who were those guys disguised as the BIG BAD BEARS ?Mike Smith Rhode Island : Design / Build / Repair / Restore
for 3/4 x 11 shelves. i like to limit the shelf span to about 30"...- 36"..
if you notice.. we don't use an edge band, we use a molding, which is glued and nailed.. the molding has depth ( 1 1/8" - 1 3/8") this turns the edge into a mini-I-beam.. so it can span further or carry greater weigh without deflecting.
the only disadvantage is IF THEY DO deflect , you can't just flip them upside down to correct it..
the shelves in our library were built in '85.. no dings, no bumps, no deflection, no hits, no runs, no errorsMike Smith Rhode Island : Design / Build / Repair / Restore
and no one left on base...
Yes, that edge treatment is the kind of thing I had in mind. The width of the shelves will be about 36" so I was thinking of dividing them in half with another upright, but not sure if that is going to look too crowded. <sigh> so many decisions, each one balancing function, aesthetics, cost... kinda fun though.
So if we look at Mike's picture, you would be lowering his illuminated shelf down to 16". On either side it has bookshelves above it, while in the middle it just has the window?
Exactly.
They may make recommendations.
And I'd like to have some idea whether their recommendations are sound!
Which one would be cheaper...
Although cost is certainly a consideration (i.e., I won't be using mahogany!), I'm mostly concerned about how it will hold up-- to the weight of the books, but also how it will hold paint, and how it will look, say 20 years from now, after the inevitable wear and tear and bumps and dings. Solid wood with dents and dings has character, but alot of other materials with dents and dings just look cheap.
Veneered plywood can be sanded and stained. Just keep in mind that you don't want any edges exposed...
A solid hardwood edge treatment would work better long run than the veneer tape, I would think. I would still be a little concerned about the longevity of a veneer on the top of the window seat.
Thanks for your information. I will have to go to a lumber store or woodworker's shop and find out what MDO is. Mike said it has no voids, it sounds like it might work for a desk top between two file cabinets, something else I need (and something I do want to do on the cheap.)
Nice work Michael....reminds me of some cases I did cept I stained mine....which is now almost destroyed after our last move so it harbors my tools in the shop. You probably saw them but don't remember.
Where'd you build them? The shop in your garage? Did you make the moldings or were they pre made?
Spray or brush?
MDF or ply or solid?
Interested to know cause I'm gonig to have a lot to build here once again.
Be well bro
a...
The secret of Zen in two words is, "Not always so"!
When we meet, we say, Namaste'..it means..
Nice touches with the neck mould, and the crown under the counter. ..but I really want to compliment you on the stair handrail. I have to do a lot of winders, and I'm stealing that<G>. But, I see no railing brackets, levitation? How'd ya do dat? Don't worry, we can fix that later!
snort.. here's some more of the stair rail... all of the parts are store-bought (HD) oak
we used a gel stain from MinWax... Bombay Mahogany.. i swear.. great stuff.. you would have no more idea than the man in the moon that the rail is oak... more like a black racer
View Image
the wall brackets are those large solid brass ones you get at HD for about $10 / each
Mike Smith Rhode Island : Design / Build / Repair / Restore
Edited 2/20/2005 10:20 am ET by Mike Smith
Real nice work Mike on those bookcases Mike and timely too. I can pitch the undershelf lighting idea to a client I'm working with now too. And while I like the open look of the stair balustrade I'm wondering how you got past the part of the stair railing code that says:
View Image
ParadigmProjects.com | Paradigm-360.com | Mac4Construction.com
No permit.
ROAR!"Live Free, not Die"
We actually had a client once who had us design a balustade that they could remove sections of to make it more open after inspection which is why I asked.
View Image
ParadigmProjects.com | Paradigm-360.com | Mac4Construction.com
Sorry, ill attempt at humor.
be heading back under the rock"Live Free, not Die"
no permit... those stairs were built by someone else in '87Mike Smith Rhode Island : Design / Build / Repair / Restore
jerrald .. here's some more pics of the underlighting...
finding a molding thick enough to both cover the edge of the MDO and extend far enough down to conceal the light was most of the trick
View Image
Mike Smith Rhode Island : Design / Build / Repair / Restore
Edited 2/24/2005 7:53 pm ET by Mike Smith
So who makes or where did you get those lights? I am actually going to go to that project I was inferring we had where I'll pitch the shelf lighting tomorrow so once again your posting pictures of the units is particularly timely.
View Image
ParadigmProjects.com | Paradigm-360.com | Mac4Construction.com
i'd have to get that info from my electrician.. i know the wire and the fixtures are both made for each other
send me an email and i'll follow up tomorrow
mfsmith1 (at ) cox.net.Mike Smith Rhode Island : Design / Build / Repair / Restore
Thanks for the great detail shot on the lights...
Do they run hot?
And how long before they need replacement?I've actually thought about using LEDs (Like from a boating catalog, or West Marine supply) through a 12 volt converter in order to get:
1) bulbs that last 100,000 hours and
2) keep it nice and cool next to book sleeves and papers that I don't want aging prematurely (like all my archived back copies of FHB)NotaClue
nota.... i'l give them the touch test..
but notice.. the lower shelf they are illuminating has no books on itMike Smith Rhode Island : Design / Build / Repair / Restore
You're right!
However, I can't imagine having a shelf that didn't eventually fill up with books...
Too many rattling around here already (and no heart to thin them)
NotaClue
Mike,
The lower shelf is illuminating photographs. Heat can certainly be an issue. I don't know about B&W photos, which these seem to be, but with color photographs you also need to worry about UV and color temperature. I'd be curious to see if these lights handle (or need to handle) these two requirements.
I have several applications for this kind of light as well so would really appreciate an e-mail with the Mfg/model info.
Thanks,
Wayne
wayne.. i'll see if i can get the specs... good pointMike Smith Rhode Island : Design / Build / Repair / Restore
wayne... here's the site..
the lights are from Seagull Lighting .. the "Ambiance line " of undercabinet
you need all of the components .. wire, fixture, bulb,transformer..
here's a link..
http://www.seagulllighting.com/Cabinet-Lighting-9498A15.htm
poke around in there..
their techy's should be able to answer your questionMike Smith Rhode Island : Design / Build / Repair / Restore
Beautiful book cases. Nice lighting. Great photo! A very inviting room.
Gary
andy... we built them in that room.. and set up our ts on the porch .. jeeves marked everything we left outside...
all of the paintwork is brush & roller
Mike Smith Rhode Island : Design / Build / Repair / Restore
I knew there was a reason I kept ya around here ...
genius!
add a layer of 1/4 ....
and to think of all these years I've been putting the dado blade on the table saw ....
I'm stealing that one. the little cost of extra materials gotta more than make up for the speed and accuracy. I've been asked in the past for the best may to turn a fixed shelving built-in into adjustable ... think I have a new answer for that too!
nice lines on the first one too ... classy.
over the weekend I think I just talked myself into custom building the current customers entire kitchen instead of mixing and matching semi-custom cabs with my own site built built-in ... I need all the inspiration I can get.
I'll start a new thread ....
Jeff
Buck Construction
Artistry in Carpentry
Pgh, PA
I went through the whole thread. Those are some nice shelves, Mike.
The fixed vs adjustable shelf debate is always interesting. Fixed make for a visually balanced and more structurally sound bookcase, however an adjustable shelf unit allows greater utility in storing books.
I prefer adjustable. They can always balance out the shelves if they want to (like your first pics show), but it leaves the flexibility of being able to adjust. And if you're dealing with a built-in, you're attaching the unit to the wall anyway, so the structural argument is out the window too.
Was that a Lladro in one of the pics?
jt8
The reason so many people never get anywhere in life is because when opportunity knocks, they are out in the backyard looking for four-leaf clovers. -- Walter Percy Chrysler
jerrald .. talked to my electrician..
the lights are from Seagull Lighting .. the "Ambiance line " of undercabinet
you need all of the components .. wire, fixture, bulb,transformer..
here's a link..
http://www.seagulllighting.com/Cabinet-Lighting-9498A15.htm
View Image
Thanks Mike I do appreciate that. So where did you hide the transformers in you installations?
View Image
ParadigmProjects.com | Paradigm-360.com | Mac4Construction.com
we dropped the wire thru the floor and put it in the ceiling of the basement..
but we could have put it in one of the base cabinetsMike Smith Rhode Island : Design / Build / Repair / Restore
The reason I ask is we've been building in chases at the top and backs of our cabinets for running network wiring such as USB cables, catv lines, etc and that wouldn't be a bad place to stick a transformer provided it wasn't too big.
View Image
ParadigmProjects.com | Paradigm-360.com | Mac4Construction.com