FHB Logo Facebook LinkedIn Email Pinterest Twitter X Instagram Tiktok YouTube Plus Icon Close Icon Navigation Search Icon Navigation Search Icon Arrow Down Icon Video Guide Icon Article Guide Icon Modal Close Icon Guide Search Icon Skip to content
Subscribe
Log In
  • How-To
  • Design
  • Tools & Materials
  • Restoration
  • Videos
  • Blogs
  • Forum
  • Magazine
  • Members
  • FHB House
  • Podcast
Log In

Discussion Forum

Discussion Forum

Bracing Floor Trusses

jeduhi | Posted in Construction Techniques on May 21, 2015 11:37am

I have noticed a lot of bounce in the floor of our living room area. Everyone in the family walks on their heels except me so it further magnifies the problem. I first noticed it small, but anymore when lying on the couch and someone walks near you, it feels extremely bouncy. I am an amateur at best when it comes to construction, but I went in my basement and noticed something that I’m fairly certain are not correct. If anyone is able, please advise how I can fix this problem. I have attached pictures and will explain, what I am looking at.


I believe the 2×6 shouldn’t be nailed like this correct? It should be nailed on the side not on the end.

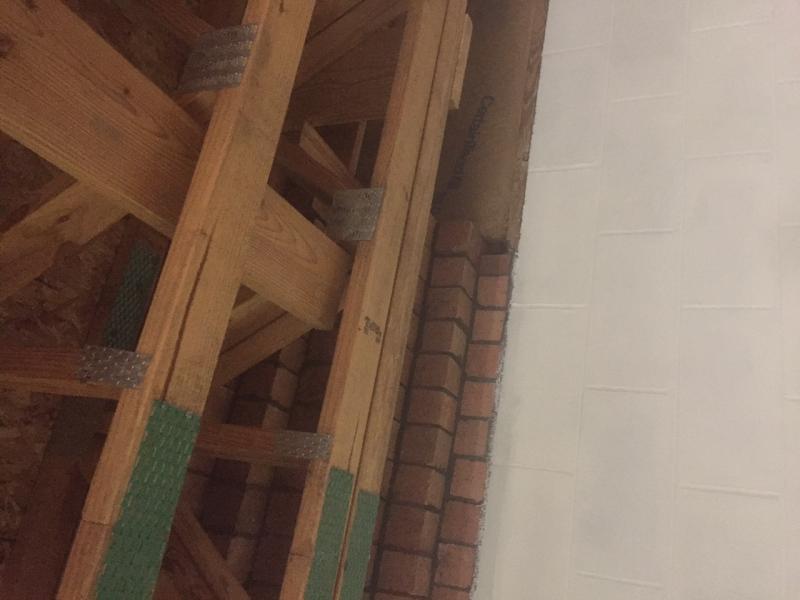
As you can see, one of the boards has completely come unnailed, and with the hearth being there, there is no sill plate for it to sit on.

Lastly, as you can at the point where the strongback is nailed in the first picture the webs are actually not longer in a straight line.

Please can anyone advise on what can be done to fix this problem? Thank you

Reply
  • X
  • facebook
  • linkedin
  • pinterest
  • email
  • add to favorites Log in or Sign up to save your favorite articles

Replies

  1. DanH | May 21, 2015 08:43pm | #1

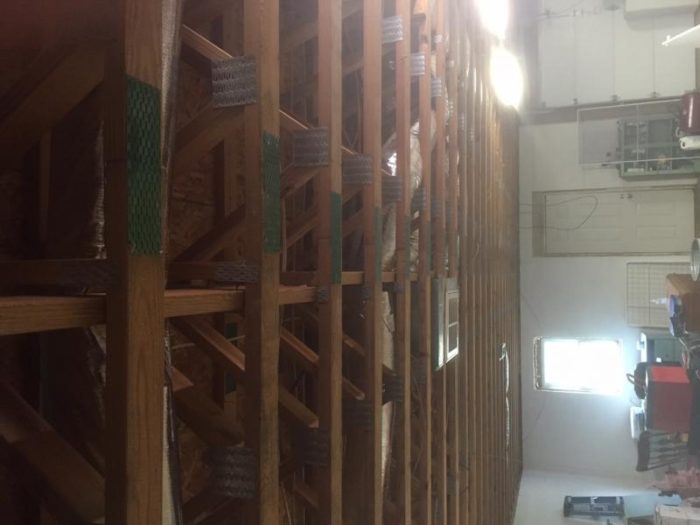
    The board in the second shot adds no real strength to the floor, but is simply serving as "stapping" to hold the trusses upright.  A 1x4 member would have worked about as well.

    The vertical 2x in the first and third shots is acting as would "blocking" with conventional joists, and, as you say, serves as something of a "strongback" in this case.  Boss Hog could likely tell us whether this is "normal" practice or not.  Until then I'll note that the "jog" in the member is made necessary by the slight change in style of the trusses.

    The strongback would add some stiffness, but, as installed (even if tightly nailed) not that much, since nails don't hold up that well in shear.  You could add something like TimberLok screws to pull the joints tight and provide more shear resistance, and probably reduce your bounce a bit, but hard to say how  much.

    Note that, for some reason, lying on a couch makes you more sensitive to bouncy floors than any other orientation, and you're apt to notice the bounce more if the couch is laying parallel to the trusses, as you're sensing "roll" more than "bounce".

    1. jeduhi | May 21, 2015 09:02pm | #2

      Thank you for your reply, the board in the 2nd shot is just sitting there. The house was built in 1996 and I believe initially it was nailed as a sort of strongback, but has eventually worked itself free over the years, when exactly I have no idea. 

      I was thinking of moving the 2x to the other side and having it overlap the 2x in the 3rd shot, as it would all then line up. Not sure how these strongback are supposed to terminate since the hearth is located there.

      I'm also open to any ideas to minimally reduce the bounce to ease some of the rattling in area of items on furniture. Minor inconvenience to some, but I plan on finishing half the basement within the next year and want to take care of all of this before I tackle that project

  2. oops | May 21, 2015 09:19pm | #3

    floor bounce

    I doubt that the bounce that you are experiencing  has anything to do with 2x6 you show in you pic. More likley the problem lies with the origional design of the trussess.  The trusses are probably adquate to carry the design load and even meet code, but were not designed with the bounch/rigidity factor being concidered.

    You didn't mention the span of the trusses, but bounce is not uncommon in long span truss/joist construction.  An engineer or maybe a truss mfr. representative might offer possible solutions to your problem.  Or if you know a good experienced building contractor.

    If you are concerned about the butt connection of the 2x6, you could sister/scab a short section of 2x6 across the existing connection/joint.

  3. User avater
    deadnuts | May 22, 2015 03:15pm | #4

    There aren't any "

    There aren't any " strongbacks" here. This is lateral bracing likely installed by the framers so that they could walk the floor joists safely before installing decking and tying in the band boards. I believe preventing "roll over" was the main purpose here and it was a designed solution of a couple of field carpenters. It served it's temporary purpose well. That's about it.

    You're dealing with floor trusses designed by an engineer for your specific home.  If you want to  make structural changes to it in order to reduce floor  deflection, then hire an engineer to specify this improvement. Trying to solicite structural engineering advice for free on this forum is folly and only results in idiotic responses from folks like Dan who think nails don't perform well in shear.

    1. jeduhi | May 22, 2015 07:34pm | #7

      The way the 2x's are added I do not believe this is the case and they are positioned the way advised by many manuals for this style truss. I just believe it wasn't quite done correctly. I don't currently have the money to call out an engineer so I will do what I think will suffice for now, but thank you for your input.

    2. User avater
      BossHog | May 28, 2015 07:26am | #10

      Hey there, Mr. Wonderful - Did you know that trusses are not designed by engineers? 

      Once again, you're posting annoying, incorrect, and useless advice.  You need to be quiet when the adults are talking.

  4. User avater
    coonass | May 22, 2015 03:31pm | #5

    jed,

    What we did in a similar situation was to nail verticle 2x4s to each side of the joist, then on both sides of the 2x4s we nailed and glued rips of 3/4" plywood. Two runs of this decreased deflection by quite a bit. I actually measured this with two guys jumping on the center of the floor before and after.

    I would also reattach the 2x6s with either some big screws or nails long enough to clench or both.

    A sheathed ceiling with at least 5/8" ply would also help.

    Injunear not needed for non critical structure and rarely needed if you have experience and know what you are doing.

    KK

    1. jeduhi | May 22, 2015 07:41pm | #8

      I think I'm going to try something similar to this approach and see what the result is. I took the short 2x and moved it to the other side of the webbing (no easy task) and screwed it to the other side and sistered it to 2 trusses. I didn't do any test but I had my girlfriend walk across the floor as she normally does and it feels as if there is less deflection than previously.

      Hopefully even less on I securely reattached the board that is simply laying down attached to nothing currently.

  5. User avater
    coonass | May 22, 2015 07:01pm | #6

    Mark,

    You replied to the original poster instead of Deadnuts.

    How would you fix this?

    KK

    1. mark122 | May 28, 2015 06:29pm | #11

      kk sorry for the dealy in response...been baking in the sun with the family for a few days.

      I would start by ripping 5/8'' plywood the depth of the joist and glue and nail it to both sides of the joist. basically making them a beam.

      if mechanicals plumbing or electrical dont allow this process to be completed on enough joist to eliminate the bounce then i dont see another option other than breaking the span with a beam running perpendicualr to the joist. this can be done with some pretty small profile steel ibeams 4-6''

      1. User avater
        coonass | May 29, 2015 10:04pm | #12

        mark,

        That should help but I think my solution is cheaper and easier. Steel angle on the bottom of the joist would also work.

        I try to awoid the sun since I'll be baking enough this summer.

        KK

  6. User avater
    BossHog | May 28, 2015 07:24am | #9

    First - A little background about strongbacks:

    The purpose of a strongback is to reduce vibration.  It spreads the impact load of someone walking across more than one truss. They're not structural, and are highly recommended but not required.

    The strongbacks are typically 2x6 with the wide face vertical. They should be nailed to a vertical member in the floor trusses, roughly at 10' spacing acros the span of a truss. Where there are splices they should be lapped at least one truss spacing

    In a perfect world the strongbacks are suposed to be fastened to something at the end of their run. In reality, it doesn't really bother me much if they aren't.

    In your first picture - No, the strongbacks should not butt into a vertical like that.  If floor trusses were perfect, the verticals would line up well.  In this case they obviously don't.

    In the 2nd picture - The one where the 2x6 is laying loose - I wonder if it was set in place, but never nailed.  If so, you can probably just stand the thing up and fasten it to the closest vertical.

    The 3rd picture - As you mentioned, the verticals are not in a straight line. Not really a good thing, but not a huge deal either.  The strongback is probably still helping some.

    I'm curious what the span and depth of the trusses are.  Is the vibration limited to one area?  Or is it in the whole house?

    In an existing house, it's incredibly difficult to get more strongbacks in the truss space. I've tried. So you'll probably have to work with what's there.

    If you can get the existing strongbacks fastened more securely it might help.  Shim between the strongbacks & verticals where you need to.  You can either use screws to pull them tight together, or drill a hole and use a small carriage bolt. Make sure they're tight, so they don't squeak.

    Please write back and let us know how it turns out.

Log in or create an account to post a comment.

Sign up Log in

Become a member and get full access to FineHomebuilding.com

Video Shorts

Categories

  • Business
  • Code Questions
  • Construction Techniques
  • Energy, Heating & Insulation
  • General Discussion
  • Help/Work Wanted
  • Photo Gallery
  • Reader Classified
  • Tools for Home Building

Discussion Forum

Recent Posts and Replies

  • |
  • |
  • |
  • |
  • |
  • |
View More Create Post

Up Next

Video Shorts

Featured Story

How Trump's “Big Beautiful Bill” Will Affect the Inflation Reduction Act

The Big Beautiful Bill could do away with much of the Inflation Reduction Act, including the 25C, 25D and 45L tax credits.

Featured Video

Builder’s Advocate: An Interview With Viewrail

Learn more about affordable, modern floating stairs, from design to manufacturing to installation.

Related Stories

  • Podcast Episode 691: Replacing Vinyl Siding, Sloping Concrete, and Flat vs. Pitched Roofs
  • FHB Podcast Segment: Roofing on Commercial vs. Residential Buildings
  • Preservation and Renewal for a Classic
  • A Postwar Comeback

Highlights

Fine Homebuilding All Access
Fine Homebuilding Podcast
Tool Tech
Plus, get an extra 20% off with code GIFT20

"I have learned so much thanks to the searchable articles on the FHB website. I can confidently say that I expect to be a life-long subscriber." - M.K.

Get home building tips, offers, and expert advice in your inbox

Signing you up...

This site is protected by reCAPTCHA and the Google Privacy Policy and Terms of Service apply.
See all newsletters
See all newsletters

Fine Homebuilding Magazine

  • Issue 332 - July 2025
    • Custom Built-ins With Job-Site Tools
    • Fight House Fires Through Design
    • Making the Move to Multifamily
  • Issue 331 - June 2025
    • A More Resilient Roof
    • Tool Test: You Need a Drywall Sander
    • Ducted vs. Ductless Heat Pumps
  • Issue 330 - April/May 2025
    • Deck Details for Durability
    • FAQs on HPWHs
    • 10 Tips for a Long-Lasting Paint Job
  • Issue 329 - Feb/Mar 2025
    • Smart Foundation for a Small Addition
    • A Kominka Comes West
    • Making Small Kitchens Work
  • Issue 328 - Dec/Jan 2025
    • How a Pro Replaces Columns
    • Passive House 3.0
    • Tool Test: Compact Line Lasers

Fine Home Building

Newsletter Sign-up

  • Fine Homebuilding

    Home building tips, offers, and expert advice in your inbox.

  • Green Building Advisor

    Building science and energy efficiency advice, plus special offers, in your inbox.

  • Old House Journal

    Repair, renovation, and restoration tips, plus special offers, in your inbox.

Signing you up...

This site is protected by reCAPTCHA and the Google Privacy Policy and Terms of Service apply.
See all newsletters

Follow

  • Fine Homebuilding

    Dig into cutting-edge approaches and decades of proven solutions with total access to our experts and tradespeople.

    Start Free Trial Now
    • Facebook
    • Instagram
    • X
    • LinkedIn
  • GBA Prime

    Get instant access to the latest developments in green building, research, and reports from the field.

    Start Free Trial Now
    • Facebook
    • YouTube
  • Old House Journal

    Learn how to restore, repair, update, and decorate your home.

    Subscribe Now
    • Facebook
    • Instagram
    • X

Membership & Magazine

  • Online Archive
  • Start Free Trial
  • Magazine Subscription
  • Magazine Renewal
  • Gift a Subscription
  • Customer Support
  • Privacy Preferences
  • About
  • Contact
  • Advertise
  • Careers
  • Terms of Use
  • Site Map
  • Do not sell or share my information
  • Privacy Policy
  • Accessibility
  • California Privacy Rights

© 2025 Active Interest Media. All rights reserved.

Fine Homebuilding receives a commission for items purchased through links on this site, including Amazon Associates and other affiliate advertising programs.

  • Home Group
  • Antique Trader
  • Arts & Crafts Homes
  • Bank Note Reporter
  • Cabin Life
  • Cuisine at Home
  • Fine Gardening
  • Fine Woodworking
  • Green Building Advisor
  • Garden Gate
  • Horticulture
  • Keep Craft Alive
  • Log Home Living
  • Military Trader/Vehicles
  • Numismatic News
  • Numismaster
  • Old Cars Weekly
  • Old House Journal
  • Period Homes
  • Popular Woodworking
  • Script
  • ShopNotes
  • Sports Collectors Digest
  • Threads
  • Timber Home Living
  • Traditional Building
  • Woodsmith
  • World Coin News
  • Writer's Digest
Active Interest Media logo
X
X
This is a dialog window which overlays the main content of the page. The modal window is a 'site map' of the most critical areas of the site. Pressing the Escape (ESC) button will close the modal and bring you back to where you were on the page.

Main Menu

  • How-To
  • Design
  • Tools & Materials
  • Video
  • Blogs
  • Forum
  • Project Guides
  • Reader Projects
  • Magazine
  • Members
  • FHB House

Podcasts

  • FHB Podcast
  • ProTalk

Webinars

  • Upcoming and On-Demand

Podcasts

  • FHB Podcast
  • ProTalk

Webinars

  • Upcoming and On-Demand

Popular Topics

  • Kitchens
  • Business
  • Bedrooms
  • Roofs
  • Architecture and Design
  • Green Building
  • Decks
  • Framing
  • Safety
  • Remodeling
  • Bathrooms
  • Windows
  • Tilework
  • Ceilings
  • HVAC

Magazine

  • Current Issue
  • Past Issues
  • Magazine Index
  • Subscribe
  • Online Archive
  • Author Guidelines

All Access

  • Member Home
  • Start Free Trial
  • Gift Membership

Online Learning

  • Courses
  • Project Guides
  • Reader Projects
  • Podcast

More

  • FHB Ambassadors
  • FHB House
  • Customer Support

Account

  • Log In
  • Join

Newsletter

Get home building tips, offers, and expert advice in your inbox

Signing you up...

This site is protected by reCAPTCHA and the Google Privacy Policy and Terms of Service apply.
See all newsletters
See all newsletters

Follow

  • X
  • YouTube
  • instagram
  • facebook
  • pinterest
  • Tiktok

Join All Access

Become a member and get instant access to thousands of videos, how-tos, tool reviews, and design features.

Start Your Free Trial

Subscribe

FHB Magazine

Start your subscription today and save up to 70%

Subscribe

Enjoy unlimited access to Fine Homebuilding. Join Now

Already a member? Log in

We hope you’ve enjoyed your free articles. To keep reading, become a member today.

Get complete site access to expert advice, how-to videos, Code Check, and more, plus the print magazine.

Start your FREE trial

Already a member? Log in

Privacy Policy Update

We use cookies, pixels, script and other tracking technologies to analyze and improve our service, to improve and personalize content, and for advertising to you. We also share information about your use of our site with third-party social media, advertising and analytics partners. You can view our Privacy Policy here and our Terms of Use here.

Cookies

Analytics

These cookies help us track site metrics to improve our sites and provide a better user experience.

Advertising/Social Media

These cookies are used to serve advertisements aligned with your interests.

Essential

These cookies are required to provide basic functions like page navigation and access to secure areas of the website.

Delete My Data

Delete all cookies and associated data