FHB Logo Facebook LinkedIn Email Pinterest Twitter X Instagram Tiktok YouTube Plus Icon Close Icon Navigation Search Icon Navigation Search Icon Arrow Down Icon Video Guide Icon Article Guide Icon Modal Close Icon Guide Search Icon Skip to content
Subscribe
Log In
  • How-To
  • Design
  • Tools & Materials
  • Restoration
  • Videos
  • Blogs
  • Forum
  • Magazine
  • Members
  • FHB House
  • Podcast
Log In

Discussion Forum

Discussion Forum

Building an arched screen door – attn: FatRoman

hipaul | Posted in Construction Techniques on December 15, 2009 12:13pm

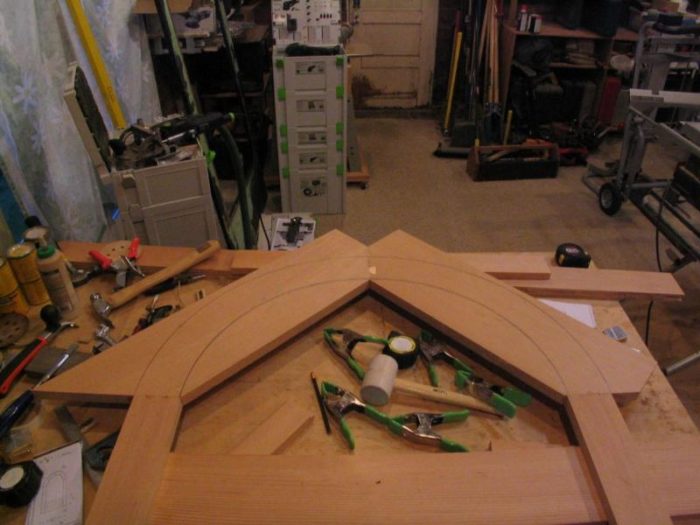
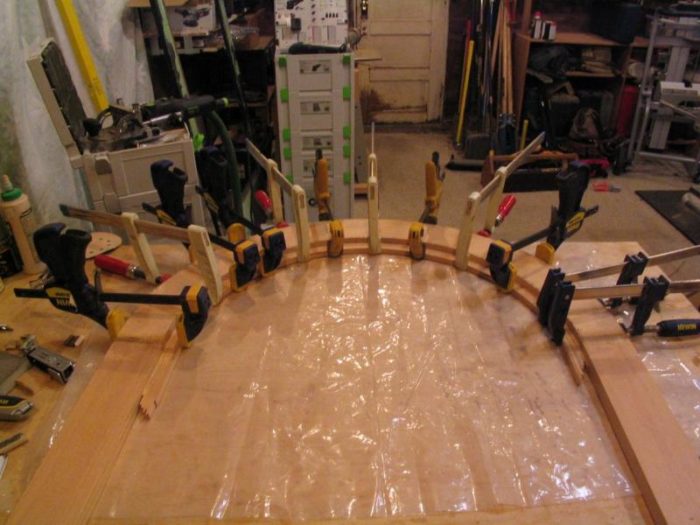
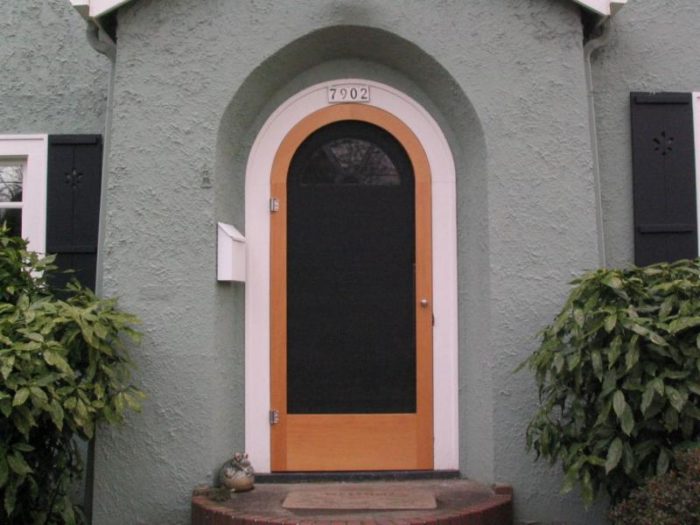
Steve, this one’s for you as requested. I finally am somewhat settled in my new home so I’ve got a little breathing room now. I haven’t been here at BT in a while so I’m getting used to this new fangled layout, but here goes. So for this screen door, I had an existing opening with an existing arched-top screen door that was badly rotted out in places. Especially at the large splined joints. There’s no shelter over the doorway and the screen door that was there was only 3/4″+ thick! So the joints were mostly rotted through. I took the door for a template, and after looking it over decided that I didn’t want to have any areas that could potentially open up and allow water to get into the joints. So I decided to try butt joints with only dominoes as reinforcements. Unfortunately I can’t embed pics on the Mac, so you’ll have to click on them individually after reading the descriptions. I had picked up some material, let it acclimate for a while in the shop and then rough milled everything down (VG fir). Let it acclimate a few days more to ensure no funny business. Laid out the pieces for best color and grain match, milled them down to assembly size and then got busy. For the bottom rail I wanted a tall piece so I joined 3 pieces together for a 12-1/2″ high rail. I edge glued the pieces together, reinforced with dominoes. I also beveled the top of it to shed water. I picked out 2 wide pieces to use as the 2 sections of the top arc. Traced out the arc from the screen door to make sure it would fit in the best parts, and then joined those 2 pieces together with glue and 2 dominoes. This is the joint that should want to open up the most due to the grain running perpendicular-ish to the miter, but I tried to choose arc pieces with some arc to the grain pattern as well so that it followed the natural shape of the arc as much as possible. I then joined the bottom rail and the top arc to the stiles. For the bottom rail I used a stopped dado (ummm, I mean a stopped groove) to make a stub mortise and tenon joint there. I rabbeted the sides of the rail to make the mating tenon. I then set the domino for as deep a mortise as possible and cut mortises on both sides of the rail and stiles. Because of the extra depth of the stub mortise, I had to nip off the end of each of the dominoes to make them fit. I have (had) one of those nifty miter trimmers from Lee Valley that worked wonders for those. It unfortunately broke down though on the last domino. Snapped a chunk of blade right off. Those are some tough little buggers. After everything was dry fit, I glued and clamped it all together. I then laid the previous screen door on top to trace it out for arc fit. I traced it out, and then used a trammel to trace the radius of the curve over the top of that without any paint bumps and such. I used a jigsaw to cut away the waste and then a belt sander to fair the curves. (Bosch on the outside, mini-mouse on the inside) Because the clients have a couple small kids AND they wanted the screen to be full length with no middle rail, I wanted to make the screen very easily removable. I opted for a removable trim held in with screws rather than brad nailed in. To make the arch top trim, I ripped a bunch of small strips and then glued them together and used the inside of the arc as a bending form. Pretty awesome right?! Oh wait, no, not so much. Using the inside of the door arc for the outside of the trim arc yields a totally different radius then what is needed, but that didn’t apparently make it into the mind of the hero of this story until after removing the trim and testing it to fit. I am so smart, S…M..R…T! Cut the strips again, glued it up again, and clamped it to a correctly sized bending form. Milled up some matching trim, cut them all to fit, installed screen, screwed on trim, voila. Took the door to the house, test fit it. Belt sanded it down a bit to fit nicely. And then installed the hinges and pulls. Oh yeah, finished everything with a few coats of Sikkens Cetol before installing the screen. They now want a middle rail since the kids have succeeded in putting their little fists through the screen just about every time they open and close the door. Because I can’t do any sort of mortise and tenon joinery without taking the door back apart (I guess I could dovetail it together!) I’ll probably just pocket screw it together and then hide the screw holes with the matching trim. So there’s the saga of the door. I’m concerned about the racking over time at those butt joints, it’s certainly not the strongest joint to use there. But if the joint itself stays tight then there shouldn’t be much movement to possibly let water in. That’s why it’s really a test to see how well those dominoes hold over time (all done with the full cooperation of the clients, of course, some great repeat customers.) Let me know if that was what you were looking for. best, Paul

Reply
  • X
  • facebook
  • linkedin
  • pinterest
  • email
  • add to favorites Log in or Sign up to save your favorite articles

Replies

  1. User avater
    FatRoman | Dec 19, 2009 07:52am | #1

    Paul,

    Thanks so much for taking the time to put this together! Looks like it turned out very well.

    I'm interested in trying something similar come Spring (we're in the midst of 2 feet of snow today, which is a bit unusual for DC)

    Couple of quick questions for you. Did you pick the beech dominoes for a climactic match? I had figured that I'd have to use the Sipo ones, but I only know enough to be dangerous on that front.

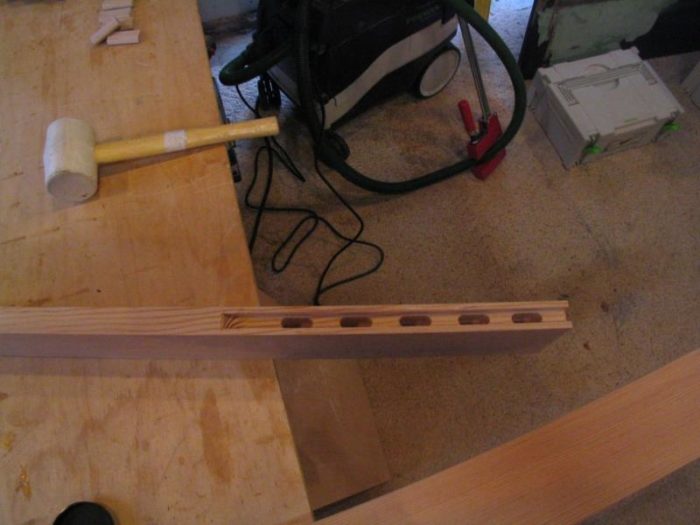
    Good mention on the depth issue with the dominoes in the stub tenon. Is the top of that dado (in photo #1) chamfered? Cut that with a router?

    I laughed at the tale of the trim radius, but only because I could imagine myself have done the same thing.

    Do you have the screen rabbeted in, or is there applied trim on both sides?

    Thanks again, I really appreciate this. It's given me a lot of good ideas to get going in the right direction.

    Best,

    Steve

    1. hipaul | Dec 20, 2009 05:51pm | #2

      Steve,

      Glad that gives you some good ideas. Like I said, this is kind of a test to see how well those floating tenons will work in this kind of situation.

      Answering your questions:

      I used the beech dominoes because that's what I had at the time and my point in building the door this way was to try and minimize any possibility of the joints opening up and exposing the innards to water. While that's a high hope, I matched up the grain of the different pieces to ensure similar movement in relation to grain. If I were to do it again I would use the Mahogany ones just as an added measure, but I don't foresee any problems with the beech and fir movement posing any problems.

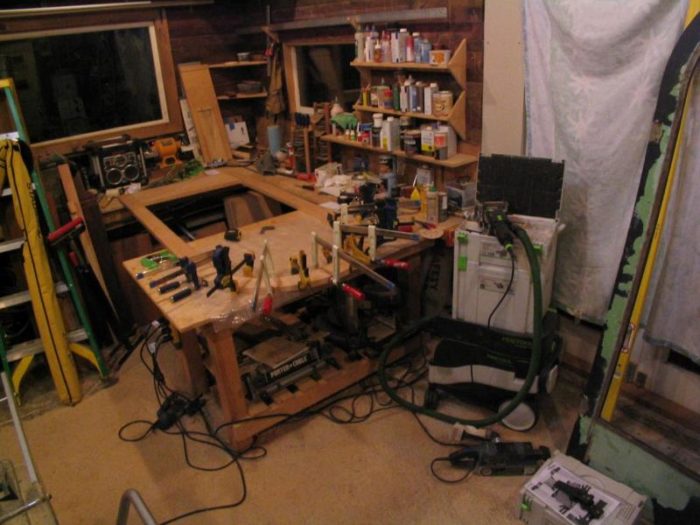
      I just cut that dado with a dado blade on the table saw so the chamfer you see is where I pulled it up from the blade. I just made a reference along the side that I could reference off of the table and stop it short of where it would be visible. As you could see from the photos, my shop is/was small enough that the more joinery I can accomplish with the fewer machines helps keep it from becoming a madhouse.

      On this door I just applied the screen and the trim. The point of it here was to make it very easy for them to change out the screen since they wanted fiberglass screen and they've got active children and no mid-point push bar. I foresaw them having to change it out every year or two (using my own memories of what I did to my family's screen door as a reference point). They can just unscrew the trim, pull off the screen and staples, and staple new screen back on. That has the possibility of appearing hokey, but it was totally with them and their family in mind. Otherwise I normally cut a groove and spline it in.

      I'll keep you posted how it looks after the winter and a full year of use. I'll be just as interested to see how those butt joints are going to hold up.

      Paul

  2. User avater
    NickNukeEm | Dec 20, 2009 06:37pm | #3

    Great job.

    For the added center rail, you might consider half laps at each end glued/screwed or nailed into matching pocket rabbits on the inside edges of the stiles. Similar to if you were gonna dovetail it, only the pockets would only need to be as deep as the difference left after cutting the half-laps.

    Again, great looking door, and thanks for sharing.

  3. User avater
    FatRoman | Dec 04, 2010 06:43am | #4

    How's this holding up?

    Hi Paul,

    Got to thinking about this when someone at the Festool forum was asking about building an exterior door with dominos. Wondered how are the ones here are holding up a year or so later?

    Hope all is well with you.

    Best,

    Steve

Log in or create an account to post a comment.

Sign up Log in

Become a member and get full access to FineHomebuilding.com

Video Shorts

Categories

  • Business
  • Code Questions
  • Construction Techniques
  • Energy, Heating & Insulation
  • General Discussion
  • Help/Work Wanted
  • Photo Gallery
  • Reader Classified
  • Tools for Home Building

Discussion Forum

Recent Posts and Replies

  • |
  • |
  • |
  • |
  • |
  • |
View More Create Post

Up Next

Video Shorts

Featured Story

Podcast Episode 684: Masonry Heaters, Whole-House Ventilation, and Porch Flooring

Listeners write in about fireplaces and ask questions about whole-house ventilation, traditional porch flooring, and gutter sealants.

Featured Video

Builder’s Advocate: An Interview With Viewrail

Learn more about affordable, modern floating stairs, from design to manufacturing to installation.

Related Stories

  • Podcast Episode 684: Masonry Heaters, Whole-House Ventilation, and Porch Flooring
  • FHB Podcast Segment: Repairing an Old Home While Maintaining Its Integrity
  • Tools and Gear for the Moms Who Get it Done
  • An Easier Method for Mitered Head Casings

Highlights

Fine Homebuilding All Access
Fine Homebuilding Podcast
Tool Tech
Plus, get an extra 20% off with code GIFT20

"I have learned so much thanks to the searchable articles on the FHB website. I can confidently say that I expect to be a life-long subscriber." - M.K.

Get home building tips, offers, and expert advice in your inbox

Signing you up...

This site is protected by reCAPTCHA and the Google Privacy Policy and Terms of Service apply.
See all newsletters
See all newsletters

Fine Homebuilding Magazine

  • Issue 331 - June 2025
    • A More Resilient Roof
    • Tool Test: You Need a Drywall Sander
    • Ducted vs. Ductless Heat Pumps
  • Issue 330 - April/May 2025
    • Deck Details for Durability
    • FAQs on HPWHs
    • 10 Tips for a Long-Lasting Paint Job
  • Issue 329 - Feb/Mar 2025
    • Smart Foundation for a Small Addition
    • A Kominka Comes West
    • Making Small Kitchens Work
  • Issue 328 - Dec/Jan 2024
    • How a Pro Replaces Columns
    • Passive House 3.0
    • Tool Test: Compact Line Lasers
  • Issue 327 - November 2024
    • Repairing Damaged Walls and Ceilings
    • Plumbing Protection
    • Talking Shop

Fine Home Building

Newsletter Sign-up

  • Fine Homebuilding

    Home building tips, offers, and expert advice in your inbox.

  • Green Building Advisor

    Building science and energy efficiency advice, plus special offers, in your inbox.

  • Old House Journal

    Repair, renovation, and restoration tips, plus special offers, in your inbox.

Signing you up...

This site is protected by reCAPTCHA and the Google Privacy Policy and Terms of Service apply.
See all newsletters

Follow

  • Fine Homebuilding

    Dig into cutting-edge approaches and decades of proven solutions with total access to our experts and tradespeople.

    Start Free Trial Now
    • Facebook
    • Instagram
    • X
    • LinkedIn
  • GBA Prime

    Get instant access to the latest developments in green building, research, and reports from the field.

    Start Free Trial Now
    • Facebook
    • YouTube
  • Old House Journal

    Learn how to restore, repair, update, and decorate your home.

    Subscribe Now
    • Facebook
    • Instagram
    • X

Membership & Magazine

  • Online Archive
  • Start Free Trial
  • Magazine Subscription
  • Magazine Renewal
  • Gift a Subscription
  • Customer Support
  • Privacy Preferences
  • About
  • Contact
  • Advertise
  • Careers
  • Terms of Use
  • Site Map
  • Do not sell or share my information
  • Privacy Policy
  • Accessibility
  • California Privacy Rights

© 2025 Active Interest Media. All rights reserved.

Fine Homebuilding receives a commission for items purchased through links on this site, including Amazon Associates and other affiliate advertising programs.

  • Home Group
  • Antique Trader
  • Arts & Crafts Homes
  • Bank Note Reporter
  • Cabin Life
  • Cuisine at Home
  • Fine Gardening
  • Fine Woodworking
  • Green Building Advisor
  • Garden Gate
  • Horticulture
  • Keep Craft Alive
  • Log Home Living
  • Military Trader/Vehicles
  • Numismatic News
  • Numismaster
  • Old Cars Weekly
  • Old House Journal
  • Period Homes
  • Popular Woodworking
  • Script
  • ShopNotes
  • Sports Collectors Digest
  • Threads
  • Timber Home Living
  • Traditional Building
  • Woodsmith
  • World Coin News
  • Writer's Digest
Active Interest Media logo
X
X
This is a dialog window which overlays the main content of the page. The modal window is a 'site map' of the most critical areas of the site. Pressing the Escape (ESC) button will close the modal and bring you back to where you were on the page.

Main Menu

  • How-To
  • Design
  • Tools & Materials
  • Video
  • Blogs
  • Forum
  • Project Guides
  • Reader Projects
  • Magazine
  • Members
  • FHB House

Podcasts

  • FHB Podcast
  • ProTalk

Webinars

  • Upcoming and On-Demand

Podcasts

  • FHB Podcast
  • ProTalk

Webinars

  • Upcoming and On-Demand

Popular Topics

  • Kitchens
  • Business
  • Bedrooms
  • Roofs
  • Architecture and Design
  • Green Building
  • Decks
  • Framing
  • Safety
  • Remodeling
  • Bathrooms
  • Windows
  • Tilework
  • Ceilings
  • HVAC

Magazine

  • Current Issue
  • Past Issues
  • Magazine Index
  • Subscribe
  • Online Archive
  • Author Guidelines

All Access

  • Member Home
  • Start Free Trial
  • Gift Membership

Online Learning

  • Courses
  • Project Guides
  • Reader Projects
  • Podcast

More

  • FHB Ambassadors
  • FHB House
  • Customer Support

Account

  • Log In
  • Join

Newsletter

Get home building tips, offers, and expert advice in your inbox

Signing you up...

This site is protected by reCAPTCHA and the Google Privacy Policy and Terms of Service apply.
See all newsletters
See all newsletters

Follow

  • X
  • YouTube
  • instagram
  • facebook
  • pinterest
  • Tiktok

Join All Access

Become a member and get instant access to thousands of videos, how-tos, tool reviews, and design features.

Start Your Free Trial

Subscribe

FHB Magazine

Start your subscription today and save up to 81%

Subscribe

Enjoy unlimited access to Fine Homebuilding. Join Now

Already a member? Log in

We hope you’ve enjoyed your free articles. To keep reading, become a member today.

Get complete site access to expert advice, how-to videos, Code Check, and more, plus the print magazine.

Start your FREE trial

Already a member? Log in

Privacy Policy Update

We use cookies, pixels, script and other tracking technologies to analyze and improve our service, to improve and personalize content, and for advertising to you. We also share information about your use of our site with third-party social media, advertising and analytics partners. You can view our Privacy Policy here and our Terms of Use here.

Cookies

Analytics

These cookies help us track site metrics to improve our sites and provide a better user experience.

Advertising/Social Media

These cookies are used to serve advertisements aligned with your interests.

Essential

These cookies are required to provide basic functions like page navigation and access to secure areas of the website.

Delete My Data

Delete all cookies and associated data