FHB Logo Facebook LinkedIn Email Pinterest Twitter X Instagram Tiktok YouTube Plus Icon Close Icon Navigation Search Icon Navigation Search Icon Arrow Down Icon Video Guide Icon Article Guide Icon Modal Close Icon Guide Search Icon Skip to content
Subscribe
Log In
  • How-To
  • Design
  • Tools & Materials
  • Restoration
  • Videos
  • Blogs
  • Forum
  • Magazine
  • Members
  • FHB House
  • Podcast
Log In

Discussion Forum

Discussion Forum

BuiltUp Beam, unsupported butt joints, & ledger/4 Repair

Calloused_Thumb | Posted in Construction Techniques on February 4, 2010 05:25am

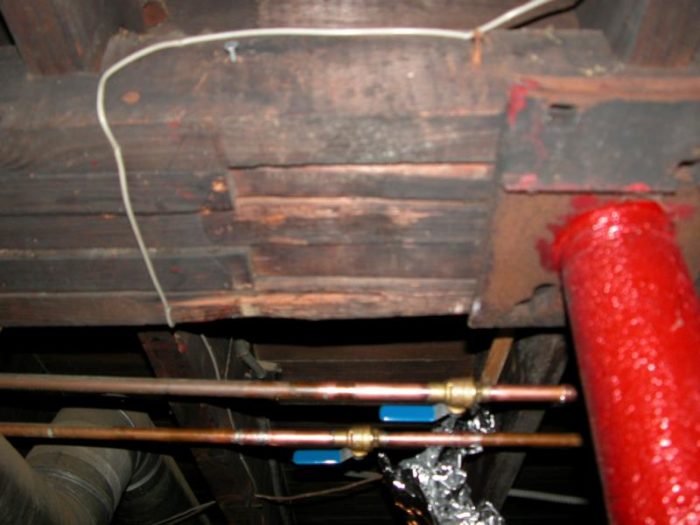
My wife and I are repairing the first floor framing in a 2-story balloon frame home with a hip roof. We would welcome your ideas and questions to help us get ready for the return of our structural engineer. Maybe your comments will help us get the most bang for buck from that guy. Our question is not about jacking or supporting…. the question is once that’s all done, how would you complete the repair? There are some pics below. The basement is 20×32. A builtup beam splits the floor framing into two 20×16 foot sections, with opposing step-up joists partially supported at the beam with notched 2×4 ledgers. (The joists are “step up” or whatever other word you use…. I mean that each joist is also notched, in such a way that its 1.5″ tongue perches on top of the built up beam, and that’s what provides the rest of the joists’ support on the beam end. One of the pics tries to show this.) As built, the beam was supported in midspan by two tree trunks. The beam consists of 3 2x10s, each of which has a butt joint. The butt joints in the two outside 2x10s are even with each other, and are four feet from one basement wall, and the middle board’s butt joint is closer to the other wall. As built, these butt joints were supported by the two tree trunks. You can still see the old trunks footprint in the basement slab and indentation in the wood of the beam on both sides of the butt joints. At some point the tree trunks must have deteriorated because someone long ago replaced them with lolly columns, but instead of building temporary supports to one side and putting the columns under the butt joints, they just smashed the lollies into place to one side, raising the midspan of the beam a 1/4 too high, and then left the lollies…. that is to say, without supporting the butt joints. The problem has to do with the two outside boards of the built up beam and their attached ledgers. See pics. The two outside 2/10s are sagging 1/2″ on the same side of the butt joints. To make matters worse, on one side of this beam the joists were deeply notched and are sagging at their own mid-span. As a result the ledger on that side is rotating and pulling away from the beam. We are trying to bring the floors more even without changing the existing permament columns or adding any others. We also want to keep our headroom. Assuming we get that butt joint evened up, how would ya’ll tie the three 2x10s together, and would you try to reattach the ledgers or replace them with hangers? The original material is quite dry and prone to splitting. Also we haven’t decided whether to use full length sisters tied into the beam or to cut them a bit short. Ideas and questions for our engineer are welcome! Anybody? Thanks in advance! Steve

Reply
  • X
  • facebook
  • linkedin
  • pinterest
  • email
  • add to favorites Log in or Sign up to save your favorite articles

Replies

  1. wane | Feb 05, 2010 08:50am | #1

    okay, I'll take a stab, you
    okay, I'll take a stab, you can't have your cake and eat it too .. personally I think another jack post is required, this is a 10 sec fix, someone took out the tree, so just put it back. Otherwise the only other way is to replace the beam with an LVL or allike, this would involve temp support walls iether side of the beam, cutting it out, sliding in a new beam and re-attaching the floor joists with hangers. The hangers need to be spec order as the old lumber will not fit/pass in readily avail ones. Another option might be a 3 or 4 foot piece of HEAVY angle under the existing jack post to help support the joints, but I think that's kind of a hack.

    1. Calloused_Thumb | Feb 05, 2010 01:29pm | #2

      Thanks for your ideas Wane.

      Beam replacement is on the back burner as a last resort.

      Your idea to just set additional posts seems like the inexpensive solution alright, but I left something out. Among other things I have a woodshop in the basement. The worst spot is right above the outfeed for my table saw. Setting an additional post would require extensive redesign of the shop layout, and probably require moving the house water heater and furnace too. (Or just building an outbuilding for my operation but the money's not there for that yet.)

      Here's our concept. Can anyone improve this or offer a better solution that presrves the beam, the headroom, and does not require new posts?

      After supporting the joists to take weight off the ledgers and realigning the beam parts, maybe we'd install 2x6 solid bridging on top of the 2x4 ledger flush against the 2x10 beam. Before removing the temporary supports we might tie the beam parts together with thru-bolts, drilling thru the new 2x6 blocks, halfway between each pair of opposing joists. Maybe we'd have some custom iron work made up in a U-shape... about as long as a joist bay and wide enough to wrap around all the parts before inserting the thru-bolts.

      Whether we added the iron or not, full length sisters could be butted flush up against the vertical surface made by the old 2x4 ledger on the bottom and 2x6 solid bridging on the top. We could simultaneously reinforce the original joist's attachment and tie in the sistered new material using standard 4" wide hangers

      Anybody think that's dumb? Got other ideas? Remember we need to preserve head room and not add any new posts.

      Thanks for all comments.

      Steve

  2. IdahoDon | Feb 05, 2010 06:03pm | #3

    As a remodeler anything short of tearing out that old, cobbled together mess and replacing it with a couple of lvl's and metal hangers for the floor joists would be bordering on hack work since it doesn't take that long to replace everything properly.

    Anyone who insists on keeping it in tact is either emotionally attached to it and there is an unrealistic hope of turning a sows ear into a silk purse or you want steak results on a hamberger budget. Even on sale steak will cost more than burger.

    Add posts in the proper locations or tearing it out are the only two options I see.

    For two carpenters that's not much more than a days work as long as there aren't a lot of wires and pipes going through or around the beam.

    If it were my personal house I'd go down to a metal recycler and see what they have for metal beams...a used I beam can be a fraction of the price of a new one and depending on your loads may span the distance with no additional midspand posts required--the ideal solution. Armed with your list of available beam sizes your engineer can say which will work and how many supports are required midspan if any.

    Too often carpenters are afraid of using steel beams in these situations.

  3. Calloused_Thumb | Feb 05, 2010 10:06pm | #4

    Used steel beams... interesting idea, Idaho.

    However, replacing the beam would mean removing some flooring and disturbing the finished surfaces of the load bearing wall above the beam. Right now the wall sits on the tongues of the step up joists, but they are mainly under compression force with the beam in place. With the beam removed they would become short cantilevers, and due to the sag we are trying to correct, several of the notches are cracked in the inside corner (where the tongue sticks out from the joist as in pic 3). The budget doesn't allow for disturbing the flooring our finished walls on the 1st floor.

    Any more ideas?

  4. Calloused_Thumb | Feb 06, 2010 09:42am | #5

    STEEL! Thanks Idaho.... We were already planning on supporting the joists on each side of the beam with temporary 2/12 beams but I wasn't seeing how to get the walls weight off those tongues from below.... of course the answer is some kind of metal work passed thru the gap above the beam, and alongside the tongues.

    Would you try to crib the metal wall supports off the top of the temporary beams supporting the joists, or place a separate set of support columns for the wall?

    Steve

  5. junkhound | Feb 06, 2010 10:30am | #6

    Bolt a 3/16" thick, 8" wide steel plate to the bottom of the 2x10s. (plate will weigh about 100#) You will need to drill over 80 holes in the plate, and bolt with 3" lags into the 2x10s. Dont drill holes oversize, need to be tight fit on bolts

    Might even be able to delete the center lally column, would need to do calculations.

    You basically are building an equivalent to an 8" by 10 inch steel T beam.

    After ya drill the holes (e-mail me with a drawing and I's send you an estimate of where to drill the holes, lots more at the ends than than the center of the span)

    Put the plate across the bottom of the 2x10s, using 5 hyd jacks and 4x4, jack the beam to about an 1/8" crown in the middle, then do the bolting.

    Add info to your profile, could possibly send you a box of lags even if you go this way.

    Did this on brother's house 25 years ago to correct a 2" sag and get rid of column, still good, no sag, less bounce.

    Pop did this when I was a kid (on advice from railroad bridge engineers) to that house, also did it on son's house to eliminate a post.

    Good luck

    1. Calloused_Thumb | Feb 06, 2010 12:51pm | #7

      Thanks Junkhound, interesting approach. A question for clarification please.... I think any midspan column would butt up against the plate, right? I mean, this plate would go all the way across as a single unit, correct?

      Thanks for the idea

      Steve

Log in or create an account to post a comment.

Sign up Log in

Become a member and get full access to FineHomebuilding.com

Video Shorts

Categories

  • Business
  • Code Questions
  • Construction Techniques
  • Energy, Heating & Insulation
  • General Discussion
  • Help/Work Wanted
  • Photo Gallery
  • Reader Classified
  • Tools for Home Building

Discussion Forum

Recent Posts and Replies

  • |
  • |
  • |
  • |
  • |
  • |
View More Create Post

Up Next

Video Shorts

Featured Story

Picture-Perfect Pergola

Built from locally sawn hemlock, this functional outdoor feature uses structural screws and metal connectors for fast, sturdy construction.

Featured Video

Video: Build a Fireplace, Brick by Brick

Watch mason Mike Mehaffey construct a traditional-style fireplace that burns well and meets current building codes.

Related Stories

  • Design and Build a Pergola
  • Podcast Episode 689: Basement Garages, Compact ERVs, and Safer Paint Stripper
  • FHB Podcast Segment: Are Single-Room ERVs the Answer?
  • Fire-Resistant Landscaping and Home Design Details

Highlights

Fine Homebuilding All Access
Fine Homebuilding Podcast
Tool Tech
Plus, get an extra 20% off with code GIFT20

"I have learned so much thanks to the searchable articles on the FHB website. I can confidently say that I expect to be a life-long subscriber." - M.K.

Get home building tips, offers, and expert advice in your inbox

Signing you up...

This site is protected by reCAPTCHA and the Google Privacy Policy and Terms of Service apply.
See all newsletters
See all newsletters

Fine Homebuilding Magazine

  • Issue 332 - July 2025
    • Custom Built-ins With Job-Site Tools
    • Fight House Fires Through Design
    • Making the Move to Multifamily
  • Issue 331 - June 2025
    • A More Resilient Roof
    • Tool Test: You Need a Drywall Sander
    • Ducted vs. Ductless Heat Pumps
  • Issue 330 - April/May 2025
    • Deck Details for Durability
    • FAQs on HPWHs
    • 10 Tips for a Long-Lasting Paint Job
  • Issue 329 - Feb/Mar 2025
    • Smart Foundation for a Small Addition
    • A Kominka Comes West
    • Making Small Kitchens Work
  • Issue 328 - Dec/Jan 2024
    • How a Pro Replaces Columns
    • Passive House 3.0
    • Tool Test: Compact Line Lasers

Fine Home Building

Newsletter Sign-up

  • Fine Homebuilding

    Home building tips, offers, and expert advice in your inbox.

  • Green Building Advisor

    Building science and energy efficiency advice, plus special offers, in your inbox.

  • Old House Journal

    Repair, renovation, and restoration tips, plus special offers, in your inbox.

Signing you up...

This site is protected by reCAPTCHA and the Google Privacy Policy and Terms of Service apply.
See all newsletters

Follow

  • Fine Homebuilding

    Dig into cutting-edge approaches and decades of proven solutions with total access to our experts and tradespeople.

    Start Free Trial Now
    • Facebook
    • Instagram
    • X
    • LinkedIn
  • GBA Prime

    Get instant access to the latest developments in green building, research, and reports from the field.

    Start Free Trial Now
    • Facebook
    • YouTube
  • Old House Journal

    Learn how to restore, repair, update, and decorate your home.

    Subscribe Now
    • Facebook
    • Instagram
    • X

Membership & Magazine

  • Online Archive
  • Start Free Trial
  • Magazine Subscription
  • Magazine Renewal
  • Gift a Subscription
  • Customer Support
  • Privacy Preferences
  • About
  • Contact
  • Advertise
  • Careers
  • Terms of Use
  • Site Map
  • Do not sell or share my information
  • Privacy Policy
  • Accessibility
  • California Privacy Rights

© 2025 Active Interest Media. All rights reserved.

Fine Homebuilding receives a commission for items purchased through links on this site, including Amazon Associates and other affiliate advertising programs.

  • Home Group
  • Antique Trader
  • Arts & Crafts Homes
  • Bank Note Reporter
  • Cabin Life
  • Cuisine at Home
  • Fine Gardening
  • Fine Woodworking
  • Green Building Advisor
  • Garden Gate
  • Horticulture
  • Keep Craft Alive
  • Log Home Living
  • Military Trader/Vehicles
  • Numismatic News
  • Numismaster
  • Old Cars Weekly
  • Old House Journal
  • Period Homes
  • Popular Woodworking
  • Script
  • ShopNotes
  • Sports Collectors Digest
  • Threads
  • Timber Home Living
  • Traditional Building
  • Woodsmith
  • World Coin News
  • Writer's Digest
Active Interest Media logo
X
X
This is a dialog window which overlays the main content of the page. The modal window is a 'site map' of the most critical areas of the site. Pressing the Escape (ESC) button will close the modal and bring you back to where you were on the page.

Main Menu

  • How-To
  • Design
  • Tools & Materials
  • Video
  • Blogs
  • Forum
  • Project Guides
  • Reader Projects
  • Magazine
  • Members
  • FHB House

Podcasts

  • FHB Podcast
  • ProTalk

Webinars

  • Upcoming and On-Demand

Podcasts

  • FHB Podcast
  • ProTalk

Webinars

  • Upcoming and On-Demand

Popular Topics

  • Kitchens
  • Business
  • Bedrooms
  • Roofs
  • Architecture and Design
  • Green Building
  • Decks
  • Framing
  • Safety
  • Remodeling
  • Bathrooms
  • Windows
  • Tilework
  • Ceilings
  • HVAC

Magazine

  • Current Issue
  • Past Issues
  • Magazine Index
  • Subscribe
  • Online Archive
  • Author Guidelines

All Access

  • Member Home
  • Start Free Trial
  • Gift Membership

Online Learning

  • Courses
  • Project Guides
  • Reader Projects
  • Podcast

More

  • FHB Ambassadors
  • FHB House
  • Customer Support

Account

  • Log In
  • Join

Newsletter

Get home building tips, offers, and expert advice in your inbox

Signing you up...

This site is protected by reCAPTCHA and the Google Privacy Policy and Terms of Service apply.
See all newsletters
See all newsletters

Follow

  • X
  • YouTube
  • instagram
  • facebook
  • pinterest
  • Tiktok

Join All Access

Become a member and get instant access to thousands of videos, how-tos, tool reviews, and design features.

Start Your Free Trial

Subscribe

FHB Magazine

Start your subscription today and save up to 70%

Subscribe

Enjoy unlimited access to Fine Homebuilding. Join Now

Already a member? Log in

We hope you’ve enjoyed your free articles. To keep reading, become a member today.

Get complete site access to expert advice, how-to videos, Code Check, and more, plus the print magazine.

Start your FREE trial

Already a member? Log in

Privacy Policy Update

We use cookies, pixels, script and other tracking technologies to analyze and improve our service, to improve and personalize content, and for advertising to you. We also share information about your use of our site with third-party social media, advertising and analytics partners. You can view our Privacy Policy here and our Terms of Use here.

Cookies

Analytics

These cookies help us track site metrics to improve our sites and provide a better user experience.

Advertising/Social Media

These cookies are used to serve advertisements aligned with your interests.

Essential

These cookies are required to provide basic functions like page navigation and access to secure areas of the website.

Delete My Data

Delete all cookies and associated data