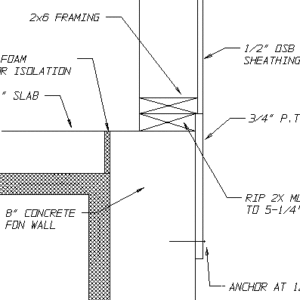
Help me design my sill detail, please. We will have a slab on grade adjoining a deep foundation wall on a footing. We want our siding finish to come down 12″ below inside floor line, and so we have a detail involving a ripped mudsill, some 3/4″ P.T. plywood, and an arrangement that lines up the ply face with that of the adjoining 1/2″ OSB sheathing. Is there an easier way? And regarding the joint at the inside where slab meets foundation wall, how can that be improved so that in areas where we do ceramic tile, we don’t have cracks when the slab and wall don’t move together? My drawing is attached.
Discussion Forum
Discussion Forum
Up Next
Video Shorts
Featured Story

Making mitered head casings is a breeze with this simple system.
Featured Video
How to Install Cable Rail Around Wood-Post CornersHighlights
"I have learned so much thanks to the searchable articles on the FHB website. I can confidently say that I expect to be a life-long subscriber." - M.K.
Fine Homebuilding Magazine
- Home Group
- Antique Trader
- Arts & Crafts Homes
- Bank Note Reporter
- Cabin Life
- Cuisine at Home
- Fine Gardening
- Fine Woodworking
- Green Building Advisor
- Garden Gate
- Horticulture
- Keep Craft Alive
- Log Home Living
- Military Trader/Vehicles
- Numismatic News
- Numismaster
- Old Cars Weekly
- Old House Journal
- Period Homes
- Popular Woodworking
- Script
- ShopNotes
- Sports Collectors Digest
- Threads
- Timber Home Living
- Traditional Building
- Woodsmith
- World Coin News
- Writer's Digest


Replies
skinny your top of foundation wall down to six inches.. so the sheet rock will cover the joint
Mike Smith Rhode Island : Design / Build / Repair / Restore
How's this look?
Mr T
Do not try this at home!
I am a trained professional!
definitely lose the joint like Mike says. I've used shims like T draws too.
One thing I don't care for on yours is the break between plys. it doesn't hel pshear strength. Also, unless the concrete wall is poured much better than most, you'll have a lot of chipping and grinding to get a true connection between your 3/4" ply and the crete. Shimming as T shows lets you work around the bad spots a little, keep a continouos shear panel and add some insulation to the perimeter of the slab while eliminating that control joint.
Excellence is its own reward!
"The first rule is to keep an untroubled spirit.
The second is to look things in the face and know them for what they are."
--Marcus Aurelius
How's this? We'll put a 3" x 6" deep ledge on the inside edges of foundation walls, and get the slab edge over under the finish. We'll overhang the stud line over the foundation wall line 1", and use some 5/4 P.T. rips for cleating, so we can apply a sheathing skirt and bring the finished exterior shingles down below floor line. I know Piffin likes the sheathing to be continuous, not pieced, but the framer wants to sheath most wallframes when they are built on the deck, and this "skirt piece later" scheme facilitates that.
So put your sill plates on and install the pt "frame" at the same time. Then frame and ply. No? If the sheathing drop isn't too much a shimmed pt rail and blocking at ends is all you need.
I was curious, why are you dropping the exterior finish below the slab?
Finished grade is 12 to 18 inches below inside floor level, and we want the siding finish outside to come down to about 6" off grade. We wish to hide that foundation wall. I am doing a slab-on-grade version of a plan that was built with a full foundation, and in that version, the siding came down to about 2" under the bottom of the mudsills, and the mudsills had a floorframe system atop. My slab-on-grade concept has the mudsills a good 12" higher than in the architect's scheme, thus the need to cover.
Around here we keep the wood off the ground. 6" would freak me out, but design away. Thanks for the reason, I thought maybe it was one spot you had a Q about the detail.
Oops, forgot to ask why you were splitting the ply on the sills, Thanks Mike.
I'm curious what your definition of "slab on grade" is. The description and drawing have the slab 18" ABOVE the grade. There are good reasons for this. Siding down in the wet snow doesn't last as long. Bugs find their way in. Youy've got to constantly use more chemical preservatives and bug treatments when the wood is within 18" of the ground, around here anyway - not that far from you, if I remember you are NY or Vermont.
Wouldn't your foundation be better described as a "slab with stem walls"?.
Excellence is its own reward!
"The first rule is to keep an untroubled spirit.
The second is to look things in the face and know them for what they are."
--Marcus Aurelius
gene, check your code.. the new UBC calls for continuous pieces of ply sheathing from sill to like 16" up the stud..if you are building under thta code.. better make sure everyone is on boardMike Smith Rhode Island : Design / Build / Repair / Restore
I assume your still in the design phase, so couldn't you have your foundation subs fasten some treated lumber to your forms before they pour maybe 16" or so long on layout and then stack your studs above.
Guy, the foundation is never straight enough.
Plates and deck are to a 1/4" minimum, try that with forms.
As a framer I guess I know what deck and plate tolerances are. I agree with you that foundation aren't straight but it is my experience that they are usually straight enough. After all,we are talking about two or three rows of siding. Granted some people are pickier than, me in that case, I imagine a shim or two nailed to the face of the blocks could straighten the siding out.
T's sketch has the right idea on the pour. Get the conc wall in and frame up the 2x's, shoot them in real close and use them as the pourstop. You just made the slab part of the critical path and below slab utilities have to be in now and not later when the rest of the frame is ready for those trades. Frame up the walls and leave a strip of sheathing off the bottom. Then tie it all together with the balance of the sheathing.
The third sketch on this thread requires extra formwork you can avoid. Save the money for the counters and what SHE wants.
Edited 12/10/2002 10:21:45 PM ET by Ted
A very well reasoned voice!.
Excellence is its own reward!
"The first rule is to keep an untroubled spirit.
The second is to look things in the face and know them for what they are."
--Marcus Aurelius