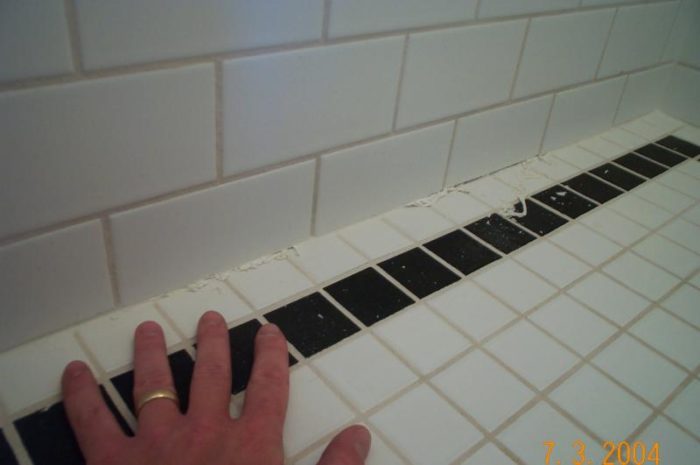
I wonder if anyone can tell me what went wrong here. I built a tiled shower stall (following various FHB articles), complete with PVC built-up shower pan and cement board walls. The caulked joint between the floor and the wall is failing – basically it is “oozing” out from the joint. This started happening directly below where the shower spray hits the wall and/or floor, but now the “oozing” has progressed along this joint. At first I thought it was water getting behind the tile and pushing out the caulking, but when I inspect the joint carefully, I can still see lots of caulking back in the joint. The caulking that oozed out is soft and mushy, not rubbery the way it should feel.
I used an acrylic caulking – supposedly these are as good as silicone these days, right? The product is Mono Ultra Bath & Kitchen caulking. I installed it when very dry (we have about 25% humidity up here in the Yukon), and allowed it to cure at least 24hr before using. The tile is 3×6 subway tiles with sanded grout. The grout was sealed with two coats of sealer.
Any ideas what went wrong? There are only two of us using the shower and we have been using it only 4 months or so. Is there that much water getting behind the tile to build up pressure and push out the caulking? Is this product incompatible with a shower stall (even though the instructions say so) and it is absorbing water and swelling? Is this simply a bad batch of caulk….ideas?!!!


Replies
Well it's obvious that you're gonna hafta demo the entire shower and floor, replace all the studs and floor joists, new shingles on the roof, etc.
Never seen that. FWIW I only use 100% silicone bath caulk in showers and tubs. The bath version has a mildewcide additive that really helpos keep it looking good, and I like the durability of silicone.
Whenever you are asked if you can do a job, tell'em "Certainly, I can!" Then get busy and find out how to do it. T. Roosevelt
Ignore Ed. All shower caulk eventually fails, and yours is no different. It may be that there was still too much moisture in your setting bed and it may be that you did not let the caulk cure long enough (I doubt 24 hours is adequate). You'll need to dig it out and replace it, and then do it again if you continue to use caulk. It would be worth going to a tile dealer and seeing if there's a longer lasting caulk you can use, but it's not likely. Tilesetters I talk to are only about 50-50 in favor of caulking showers because the caulk fails so soon. You could dig out the caulk and grout the joint instead.
Edited 7/6/2004 9:10 am ET by davidmeiland
I think two things may have happened - you didn't allow the caulk enough time to cure (24 hours is too short - 48-72 is better) and a better, silicone-based caulk would have been superior in this application. Acrylics are good, but they're really not designed for an area that will get a LOT of water - like a shower pan. That area is really a "marine" environment and if an acrylic hasn't completely cured, all the moisture will break it down. Acrylics are more designed for sealing around the edge of a drop-in sink or counter backsplash, etc. - places that will get we occasionally, but won't be wet for hours at a time.
I used GE Slicone II Kitchen and Bath sealant in the same area of my shower and it has held up good for a couple of years now. It has a mildewcide, has excellent adhesion, and is 100% silicone based, so it's impervious to water. The only downside is that it's a solvent-cleanup caulk, so you have to be careful when applying it. I'd recommend it, but there are other similar products around.
Good luck!
Ignore Ed. I am so hurt ... crushed. Actually, your comment about grouting the corner joint is not appropriate, cuz that's the first place that will crack due to movement of two different planes.
Whenever you are asked if you can do a job, tell'em "Certainly, I can!" Then get busy and find out how to do it. T. Roosevelt
The gentleman who did two tiling jobs for me (kitchen and bath) would do that, that is, grout where the tile met another surface. Don't know why he did that, except it was probably handier than caulk. It all cracked out, of course.
I grout, not caulk, unless it is a very very shower, in which case I use sanded grout.
About 20% of the time the grout fails and I have to dig it out and caulk, but that what I do, I grout the corners.
This caulk should not be wet. The preslope should take this moisture down and out the drain; the weep holes should be clear to allow this. Somehow, moisture is backing up by the walls and going up the walls. A clear sign to me that there is no preslope or clogged weep holes.
I haven't reached that conclusion yet, but my questions are pointed to that subject.Regards,
Boris
"Sir, I may be drunk, but you're crazy, and I'll be sober tomorrow" -- WC Fields, "Its a Gift" 1934
Sometimes I think your sarcasm is a little much, maybe not on this post, but on others where I could hardly tell if you were serious. I ain't tryin' to offend no one.
Re caulk vs. grout in corners, I have talked to tilesetters and read about this extensively. Pros seem evenly divided about it, some caulking, some grouting, everyone agreeing that neither is perfect. I've done it myself both ways and next time will be grout and we'll live with the hairline crack that will eventually open up. Around the bottom of the shower pan it's hardly visible. The vertical corners hold up a lot better with caulk, but in any case caulk will degrade. Job I'm on now with four showers and a veteran tilesetter... he's grouting all corners and says he's done more than 100 showers in his day.
Regarding what Boris says re the drain and preslope, my last shower with failed caulk was done meticulously with 3/8 per foot preslope and clean pea gravel protecting the weep holes. Everything cured and dried completely, and then Spectrum sanded acrylic caulk went in. The caulk lasted well for about 6 months and then started to pop out of the pan joint. My opinion (and that's all it is) is that the floor setting bed becomes damp with daily use and stays that way, and starts to blow the caulk out.
Edit to say that maybe a silicone caulk would work better, but since most folks want a grout match that's not always possible. It would be with white grout. Never done it myself.
Edited 7/6/2004 8:17 pm ET by davidmeiland
Sometimes I think your sarcasm is a little much, maybe not on this post, but on others where I could hardly tell if you were serious. Yeah, that's always been one of my more abrasive traits. That and my good looks.
I ain't tryin' to offend no one. Don't worry ... I have very thick skin, and dense cranial matter.
Whenever you are asked if you can do a job, tell'em "Certainly, I can!" Then get busy and find out how to do it. T. Roosevelt
Alright, we're cool. I still say I'm right about the grouted corners. Not sure what the TCA recommends.
I think your main problem is that you injected the caulk too deeply into the joint. Generally, the thickness of the caulk in a joint like this should be no more than 1/4". Thicker causes it to set more slowly and makes it more apt to fail.
Also, I would stick with a silicone bathtub caulk.
When you recaulk, be sure to get the joint as clean as possible first. Don't expect new caulk to stick to old caulk.
Questions:
1. Did the shower have a preslope under the PVC membrane? If so, what is the slope per foot?
2. Did you use a 2 part clamping shower drain? Did the unit have weep holes? What did you do to cover those holes and keep mortar from clogging them?
These are the two biggest issues in shower failures, and before I suggest anything, please answer these questions.
Boris
"Sir, I may be drunk, but you're crazy, and I'll be sober tomorrow" -- WC Fields, "Its a Gift" 1934
Generally I followed that article in FHB a year or so back. The PVC is pitched at I think 1/4" / ft, maybe a bit more. I put clean stone around the weep holes to keep the concrete from filling it. so, I think I did those things okay.
-Forest
I just read somewhere (FHB I think) that caulk will only stick to two surfaces never three. Therefore it is important to use a backer rod (foam). That gets jammed into the crack and caulked over. Save caulk and keeps everything somewhat flexible.
Just a thought.
Martin
Heads I win, tails you lose.
My vote is that 24 hours was not enough time for the caulk to cure. Uncured acrylic latex caulk melts in water, as you described. You said that the caulk joint is deep, and it takes a long time for this type of joint to dry. The outside of the caulk joint skins up and dries but it may take a week for the interior to cure.
Scrape it out, dry it out, and re-caulk with silicone.
Billy
OK Forest:
I am assuming that you correclty installed the slope and the weep holes are clear. I dunno how water is getting into this area but it sure is. It might be wicking, it might be drooling down the walls, but its sure getting in there. Lets try this:
1. Remove the caulk. All of it.
2. Put a hair dryer or paint heat gun and dry out the area thoroughly. This may take 30 minutes or so. Let it sit for about a week. Stick a cue tip in there every couple of days and check for moisture. The area has to dead dry. You are good to go when it is dead dry--all of it.
3. Now seal the tile. The walls and the floor. Use a good pentrating sealer like Aquagold 15. The stuff is ridiculously expensive ($80 a gallon) but you'll only need a quart or so. Spread the sealer on per instructions, and remove the excess. Let it dry overnight.
4. My first choice would be Custom Building Products Sanded Caulk. Really pack it in there and then smooth out the edges. Let it dry about a day or two. Normally you can use it the next day, but I am being really cautious here.
Now shower and let us know what happens.
Regards,
Boris
"Sir, I may be drunk, but you're crazy, and I'll be sober tomorrow" -- WC Fields, "Its a Gift" 1934
Boris, you got it. I've had to go behind a few of our "experienced" installers and fix this very problem. Did just about exactly what you said to. Pull out caulk, all of it. Place heater in stall for 24 hrs., check till dry. Seal and caulk with high quality sanded caulk. Usually when I do shower pans I grout corners and within one day caulk with clear silicone. So far haven't had a problem with this method.
Silicone will supposedly even cure under water. Could the grout sealer have affected the cualk. The backer board hasn't shifted and ropped down, right?
Yeah, a petroleum based grout sealer will probably attack the caulk and soften it.