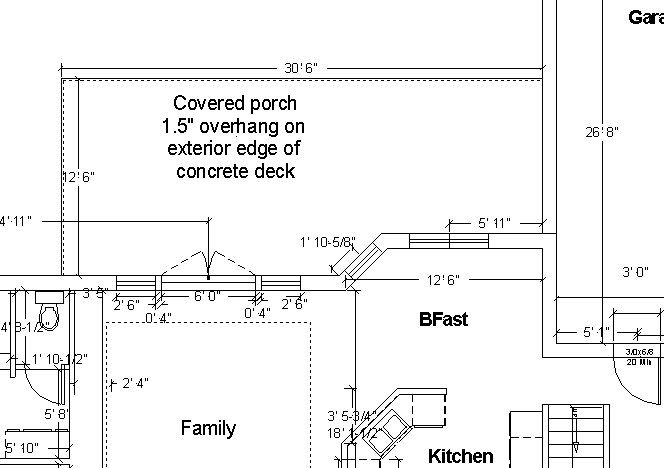
on the east side of the new house, I have a covered porch 13’deep x 30’wide x 9′ walls. At present it will be exposed to the elements e.g. open to the east and north, house on west and south. prevailing winds will be NW in winter, and SW in summer. in the next 5-7 years it will be converted to a 3 seasons room, and I installed in-floor radiant heat when the cap was poured.
We’re trying to figure out what to put on the ceiling, moisture resistant drywall, tapped and textured and painted with a high quality exterior paint, bead board, car siding, T1-11 we’re just not sure. I am certian that the drywall would be the least expensive, car siding is about $450. We’ve considered doing the drywall now (quick and easy) and when the conversion happens, put up bead board or something to that affect.
What do you suggest?
Rip


Replies
Hmm, 1/4" plain plywood, painted might be even cheaper than tape-n-floated, painted gyp.bd.--if not very aesthetic.
You might check on Azek's beadboard, while you are at it.
Like as not, plain plywood with a 1x4 "batten" every 24" O.C. might be the inexpensive solution.
Are you thinking to have a flat "ceiling," or to have this as a between-rafters/bottom-of-deck "lid" for the porch? Are yopu planning on many penetrations for lights and/or ceiling fans? (It can be a pain to set individual bead boards with a line of recessed can light fixtures.)
We would like to keep the ceiling flat if possible, we aren't real fond of the battened look...but if we have to we have to. I'll check into the Azek's bead board.The ceiling only has 2 boxes in it for a ceiling fan with a light. Which ever method we choose, I believe I'll blow cellulose insulation over the top when I do the house in a couple of weeks.
Azek's beadboard is god-awful expensive. Like $140 a sheet when I looked two years ago. Plain beadboard plywood almost always looks good as a porch ceiling, and you don't have to tape it.
The classic porch cieling covering is usually some sort of running board. V joint board is nice, and even plain flat t&g looks good. My favorite however is real t&g beadboard painted a robin's egg blue.
Another vote here for the robin's egg blue - the traditional color for porch ceilings.
<robin's egg blue - the traditional color for porch ceilings.>
Keeps away the flies!
Sez some.
Forrest
"Keeps away the flies!Sez some."Interesting, never heard that. I have heard that the blue was to give an illusion to the sky.In my opinion, there's nothing quite like a large lazy front porch with the rocking chairs and the swing. It was the liaison twix the private and the public domain, a place for one to sit and view the goings on without the bother of obligation. I have such fond memories of my grandparents home as such in smalltown USA.
It's one thing the Victorians did do right.
That's just the type of memories we're trying to make with the porch. With this whole house building project, it's the one thing I'm holding my breath to use.The porch faces due east. The closest house if about 500 feet SE of our house, and you can see roughly 8 miles. The view in my opinion is spectacular at least for Iowa, it just screams rural and farming. Since I grew up on a farm, I just can't shake the farming fever.Ah...for a fresh cup of coffee, news paper and big comfy chair....watching the sunrise...man I can't wait!
I used primed FJ beadboard. In these pictures the bead boards only been up a cpl of months but in the rest of the additions they've been up a cpl of years w/ no problems.
BE well
andy
Creation arises, is sustained for awhile, and then things change. That’s the dance.
http://WWW.CLIFFORDRENOVATIONS.COM
That looks great, it just has a "feel" about it doesn't it? I do believe we'll head that direction.Thanks,Rip
That looks great, it just has a "feel" about it doesn't it? I do believe we'll head that direction.Thanks,<<You're welcome. And yeh it does have a good feel. Bythe end of next week I should have it all togther 100%. Can't wait. Every day now it looks more and more whole.
Be well
andy...Creation arises, is sustained for awhile, and then things change. That’s the dance.
http://WWW.CLIFFORDRENOVATIONS.COM
http://www.ramdass.com
Andy,I can't really tell, on the material used is it a 1x4, blind nailed? You don't happen to have another pic that you could share do you?Rip
Rip,
Its 1x4 TXG and I nailed it the same way I nail any T&G. I use my Porta Nailer cept I had to buy Stainless steel nails and had to buy it directly from "them" cause no one else sells them that I know of. $80 a box plus shipping. Wanna buy a box dicounted? I ordered one to many.
I'm waiting for a bandsaw blade to be delivered here so I can take 3/16 off the last dozen or so on the upper porch because I ran short and couldn't get the same mahogany. What I had to get was a little thicker...ugh and I had to make my own T&G and bevel the edges as well....dbl ugh.
If you want when I finish up next week I'll shoot some pic of the last four feet I have to finish. Just lemmie know.
BE well
andyCreation arises, is sustained for awhile, and then things change. That’s the dance.
http://WWW.CLIFFORDRENOVATIONS.COM
http://www.ramdass.com
Hey Andy,
I always appreciate picts, especially of kinda unique projects. I finally decided to go for Spruce bead board...of the options...it worked out pretty well.
Just curious, did you choose to use SS nails or is there something else going on? I was going to use gal 2". Sorry I can't use the nails...need 34deg angled.
I'm priming the backs before installing and will hopefully install this coming weekend.
Thanks!
Rip
Rip
In my floor I used my Porta Nail gun w/the SS nails/cleats. Could have used galvies and a hammer or trim gun but the Porta NAiler really socks the boards home nicely. The porch floor out front does creek a little when you walk on it but I LOVE that...lol...really. I know it ain't goin' anywhere though and thats what counts.
The beadbaord on the ceiling I used SS in my trim gun. Galvies would have worked but I already had the SS and it can't hurt so.
All in all better safe than sorry with all I've done so far. Whats another cpl a hundred bucks in nails...ugh.
Good luck with your project.
Be well
andy
Looking outward to the blackness of space, sprinkled with the glory of a universe of lights, I saw majesty -but no welcome. Below was a welcoming planet. There, contained in the thin, moving, incredibly fragile shell of the biosphere is everything that is dear to you,all the human drama and comedy. That's where life is; that's were all the good stuff is.Loren Acton - Astronaut
http://WWW.CLIFFORDRENOVATIONS.COM
Earlier this year I got to rip down the MR drywall on a porch ceiling; the moisture had caused the tape to delaminate and had begun to hang down. I replaced it with cellular PVC beadboard planks after putting up some 1/2" plywood. Turned out great.
Bottom line: Don't put up drywall in an exterior application.
"I am the master of my fate, I am the captain of my soul." Invictus, by Henley.
In the back of my mind I wondered if that would happen...an if it's a possiblity, I think I'll toss that out.Thank for the heads up.Rip
1x6 double-beaded fir would be very appropriate
in fir it would run about $900- $1000 for material
in the 3/8 primed MDF they sell at HD it would run about $400 - $500 for material
Maybe it would work, but I wouldn't quite trust MDF in this type of thing. I think fir would be perfect.
I used 1X6 cyprus centermatched bead board, and yes it is robin's egg blue.
View Image
The ceiling is actually flat but gives the illusion that it is the bottom of a hip roof. All corners are bisquited and TB II
View Image
Chuck S.
live, work, build, ...better with wood
Edited 10/26/2006 3:45 pm ET by stevent1
Edited 10/26/2006 3:48 pm ET by stevent1
That's sharp....and you've done a nice job...it'll certianly go into the consideration pool! You had to work from the center out -- correct?
Rip,You are correct. Center out. That porch was 11 X 14. Picture frame ceilings require carefull layout and a lot of blocking.Your porch is 13 X 30 with two ceiling fans. I would divide your ceiling into 2 -13 x 15 areas. First make sure the electrical rough in is dead center in each section. Snap 45' chalklines from each corner. In your case 8 lines The lines will intesect and that will give you the length of the starter board The width of the starter board will be determined by the mounting plate of your fans. You must add the width of this board to the determined length. Mine was 6" wide. Hold a longer than needed board where the end lines up with a pair of chalklines. You can mark the length of the board where the other set of chalklines intersect the board.You then cut a groove on the edges of the starter board and cut some splines that will act like a tongue. I think this will give you a unique ceiling.Chuck Slive, work, build, ...better with wood
I would put up WindsorOne beadboard, cheaper than fir. Also the light blue also has an Indian legend to it, though I cannot recall exactly right now. It also supposedly does not attract spiders.
I'll check it out...thanks for the tip. I further priced material this weekend, and pine bead board came in @ $650 and one came with a slightly different profile came in at $750.I've never heard the tales about the color of the ceilig for the bead board so I decided to research it a bit with google...here's some links for those interested:<http://www.npr.org/templates/story/story.php?storyId=5645263>I'm sure there's other stories out there...but to this mid-westerner, it's new to me....now to try and talk the SWHMBO talked into it........
Thanks for the link - I enjoyed that little side trip!
How about corrugated tin?
Would you have picture that would be a titch closer to the details? It certianly would be an option...Rip
Another shot. Used cheap tin from Lowes and standard vinyl c type channel. Screwed to ceiling joists.
Thanks for the picture...I'm going to forward that on to the wife and see what she has to say...personally I like the look!Thanks,Rip
This weekend, I got probably 95% of the bead board installed in the ceiling...and I think for the most part it looks pretty good. We decided to use spruce T&G bead, lays 3". I had a couple of "challenges" and I got to wondering how the pros do it...no not "it", but it. ;-)
The first was in seating the board. As you can imagine, the boards are not all straight and some times the bow was just more than I could muster to hold and nail. There's no place to clamp from the previous course(s), the next solid thing to brace from is 10+ feet away. I didn't have a bowrench, and if I did, it would poke a bunch of holes in the plastic vapor barrier. (we will be making this into a 4 season room with-in 5 years) What I did was while holding the bead board as close as I could, take a 1/4 in chisle, drove it in the ceiling truss maybe 1/4" and lever the boards together. Keep in mind this is a chisle that can be spent...not the best in the box. It seemed to work well and was quick.
What do you do? There has to be a better way...
Also, not all the boards are the same width, can be off maybe as much as 1/16". When butting a narrow one up to a wide one, do you just match the patterns as best as you can and move on with life? A few as you can imagined caused a slight widening between the T&G. My hope is that when it's all painted robin egg blue that most of the imperfections will visually go away.
Thoughts?
If anyone is interested, I could snag a picture tonight when I go back and finish it up...
Rip