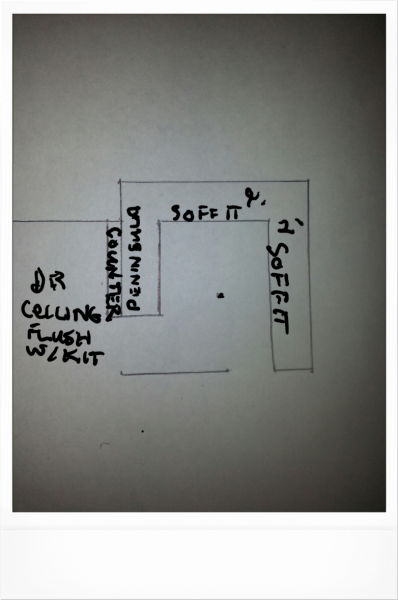
I’m doing a total remodel of a kitchen and I’m very perplexed as to where my kitchen ceiling light should go. It’s a 10 x10 U shaped kitchen with an eat at peninsula forming one of the legs of the U. There are no cabinets or headers above the peninsula and the kitchen and adjacent dining room ceilings are flush to one another.
The rest of the U has soffits above the upper cabinets but they’re not the typical 13″ width, they’re a full 24″. This is the result of having a dropped load bearing beam on the bumped out exterior wall. The other soffit was presumably built to match the one on the exterior wall.
The lighting plan calls for 2 or 3 pendant lights over the peninsula, a sink light, undercabinet lights and a center light for general lighting . Because of the wide soffits and the way the rafters fall over the dropped beam, recessed lights were not a viable option.
Here’s the issue I’m having with locating the center fixture. The kitchen floor is 10×10 but the ceiling is 8×8. If I center it to the kitchen floor/ work area it will 2ft off center to the ceiling. There will be 3ft of ceiling on the cabinet side and 5 ft on the peninsula side (see sketch). On the other hand, if I center it to the ceiling it will be 2ft off center to the kitchen floor/work area. I’m not comfortable with either option so I thought I’d bounce it off the forum and see if anyone has a better solution or a vote on which of these two alternatives I should go with.
 .
.
.


Replies
Split the difference so it's not centered to either floor or ceiling. It won't be noticable to most people, of course you'll always see it.
JJ
Too hard to visualize, especially without knowing the fixture you are using.
but I'm thinking center it between the face of the soffit and the face of peninsula cabinet . This will balance the light with both penn cab s and those across, while centering the light according to most of the enclosed floor space.
( more simply, center between the faces of both lines of cabinets )
Maybe I'm overthinking this
Your suggestion is what is represented in the sketch and it seems to make sense since the fixture (simple round flush mount) would provide general lighting to the work center. As you said I'm having trouble visualizing it but it just seems like it would look odd having 3 feet of ceiling showing on one side and 5 feet on the other side (toward the peninsula.
Other than the 2 foot wide soffit, this isn't an uncommon kitchen layout so it can't be as hard as I'm making it. And even if I had the typical 13" soffit the centering of the light would still be an issue. Spliting the difference, as someone else suggested may be the way to go but I still want to explore other options. I'd hate to have to sheetrock the ceiling again :).
Just a few random ideas have come to mind:
1. eliminate the soffit across from the peninsula. I'm not sure how it would look having a soffit over the upper cabinets on the one leg and not the other but I'm leaning towards not good.
2. Building a 2 ft soffit over the peninsula which would create a coffered ceiling of sorts measuring 6x8 feet. This would solve the centering issue but it would eliminate the flush ceiling and open feeling between the dining room and kitchen..
3. Using recessed lights as general lighting. As I said in my original post the dropped beam restricts where I can place them on the exterior wall side of the kitchen. I would like to have at least 12" of insulation above them. But a tighter pattern of 4 cans may work. Or perhaps just spread around over the main work areas.
4. And the final option is to install a junction box in the attic, install the sheetrock and cabinets and then figure out what sort of ceiling light configuration to go with.
Thanks to all for the suggestions and any more that follow.
Jim
Jim
Centering between the base cabs is what I mean. So this puts it in the work area center and equidistant from the soffit to the kit side of the penn, no?
Yes but
Yes, since the soffits are the same width as the base cabinets this would put the light dead center between the front of the kitchen wall base cabinets and the front of the peninsula. But since there is no soffit over the peninsula the light would be two feet off center to the ceiling. Maybe that is the norm and it would look fine but I'm just nervous about cutting holes in a new ceiling and then having to patch them later if it turns out looking odd.
Jim
Study it, try holding a hot wired lamp up there, ask the wife.....
Lay the cable up above the ceiling if necessary, cut in a remodel fan box(bar hanger and box) later....
Best of luck
When you look at the light, you'd be more likely to be looking up than down. So I'd center it on the ceiling
As a practical matter, place it where it will provide the most even lighting of the intended areas, while avoiding "hot spots" and shadows.
Revisit your lighting plan. The idea of one centered light is an old and outdated model. Consult a lighting designer at a local fixture outlet. (not a big box)
For ideas, check out kitchen design books from your local library. They'll be full of ideas.
About 6 years back I posted pictures of our kitchen ceiling -- I looked around but can't find them to repost (lost a bunch of stuff when I had to reload this computer several years back). The ceiling originally had soffit on 3 sides (and a wall on the 4th) and an ugly translucent dropped-ceiling, using the metal accoustic ceiling support bars, hiding fluorescent strips.
Tore out the existing dropped ceiling and reinstalled one with wood support bars, consisting of a 3/4" x 3" vertical piece and two 3/4" square strips attached to each side (biscuits and glue). The strips were attached to give the vertical piece a 3/4" "reveal", so the assembly was cross shaped, with about an inch and a half above the strips.
The arrangement was a 2x2 foot matrix, with the supports running wall to wall one direction and 2-foot pieces between. The ends of the 2-foot pieces were dadoed so they fit over the side strip of the longer pieces. Similarly, the longer pieces were dadoed to fit over the strip of the piece (absent one strip) around the edge of the opening.
Made of oak, stained to match our cabinets. Used acrylic panels (not the crummy polystyrene that yellows and gets brittle). Still looks nice.
Making more work for myself
I really wanted the recessed lights to work and if I can get past the fact that I will only be able to get about 5.5 inches of insulation over the two 7.5 inch deep airtights off the exterior wall soffit I still may go with them. And that's if I come in 2 feet off it. I'm wondering if maybe I'm worrying too much about the energy loss for just 2 cans. After all, when you put electrical boxes in the outside walls there's energy loss there too. I think I would be fine with just 4-5 cans since I have plenty of other lighting and only the 2 cans off the exterior wall would have less than optimum insulation.
Keep checking cans...
There,s both remodel cans and reg. housings that are meant for 2x6 framing. Not sure if that includes LED's. that could give you more space above.
look to a good supply house.
remodel cans allow for final movement along the joist space. And, perfect alignment of the can hole cut.
What is a Light to Do?
That's what you need to ask .... what am I trying to accomplish with the light? Let's go back to basics for a moment:
Lighting -generally- is intended to accomplish one of three things. It can provide overall ambience, it can provide lighting for performing tasks, and it can add decorative accents.
No matter which of the three uses you're thinking of, a light in the center of the room is usually a really poor choice. Why? Because, no matter where you are in the room, you're casting a shadow on what you're looking at. This is especially true in a U-shaped kitchen - which, by definition, has two dark corners.
Remember ... the main purpose of a light is to ... provide light when & where you need it. It ain't ceiling jewelry.
Here are some ideas to consider:
1) Scatter several small (25 or 40 watt equivalent) lights around the perimeter of the kitchen, spacing them about 18" from the edges of the cabinets. This will give you plenty of light overall, reduce the 'shadowing' issue, and take centering out of the equation;
2) While I generally despise recessed lights, a single DIMMABLE can over the work area will give you lots of light, focused right where you want to work;
3a) If you must have a light in the middle of a small room, consider one that directs the light out the sides, and blocks the area directly under the fixture. That is, you see walls and cabinets 'washed' in light, rather than a bright dot on the ceiling;
3b) There's a (very affordable) fixture - I've seen it at both the box stores and at Wally World that consists of three track-style lights on a common base plate. I see this as almost ideal for U-shaped kitchens, in that you can aim each of the heads to exactly where light in needed. (Too bad you usually wind up standing between the light and what you're trying to see!)
4) If you feel the need for under-cabinet lights, chances are your cabinets are both too deep and too close to the counter - and your body is blocking the light you need there!; and,
5) Since counters are supposed to have lots of receptacles, use this to your advantage. Use receptacles with built-in night lights, simply stick night lights in them, and place even more receptacles than the "code minimum"- especially in those dark corners. (Personally, for counters I'm a real fan of "plugmold," which will place a receptacle every six inches ... and you can mount it right under the bottom edge of the cabinets, which pretty much removes it from sight.)
Now ... if only .... someone would mount door-operated lights in kitchen cabinets!
Good Advice
The kitchen is gutted and already wired for most of the lighting and receptacles. The hardwired UC lights are being placed at the front edge of the cabinets and should provide plenty of counter task lighting. Pendant lights are going over the peninsula for task lighting of that area. The OTR microwave has an LED light for task lighting at the range. A pendant light will also be located over the sink.
What I'm left with is the need for general lighting. I've read that when recessed lights are used as general lighting they should be placed in an equidistant pattern rather than spread around over work areas as you would do if you used it for task lighting. I'm not sure I understand the reasoning behind it that but If I go with that advice I would place four cans in the ceiling about 2 feet off the soffit and accept having only 5-6 inches of insulation over 2 of them (r19 vs r38). Not the ideal situation but I'm still considering using it as you recommended.
I agree that a center light is limited in function and cast shadows in front of where you're standing but if those shadowed areas are sufficiently illuminated with the UC, pendant and sink lighting I'm not sure this would be an issue. The use of a center light also seems the safest choice since can lights could always be retrofitted down the road.
Lights in the cabinets are great, especially the lower ones. I know you can't put 120v in so I use the battery powered ones. I recently installed a motion activated Duracell LED model I found at Costco. It has 3 lights in it and uses 6 AAs. It's very bright but the motion detector activated randomly and wore the batteries down too fast so I put it on manual mode.
Did I say Science?
I take that back. If kitchen lighting design was a science you would'nt have so many different opinions among the experts. Some say 4" cans shouldn't be used for general lighting, some say they're fine and even preferred in a smaller room.
So far they are the largest dia. ones I can find with a low 5.5 inch profile which make them a much more attractive choice for my application. Getting closer to making a decision. Thanks for the input.