Well, the building inspector was driving by the other day, and he decided my chimney needed to be repointed. Which I knew, but it was a few months down on my schedule. Needless to say, it moved to the top of the pile. ;-(
It’s 80-90 yrs old and about 32′ tall, 3 flues — one for the furnace (no longer used, since I now have a direct vent unit), one for a water heater, and one for what used to be a coal-burning fireplace, now used for wood maybe 8-10X per year.
Like a dummy, I started repointing at the bottom (’cause I was short on scaffolding to reach the top.) This weekend, I picked up another set of scaffolding and got to the top. Looking down did not make me a happy camper. Looking inside, I shoulda rebuilt the top 12′ from the roofline up. But that ain’t gonna happen now.
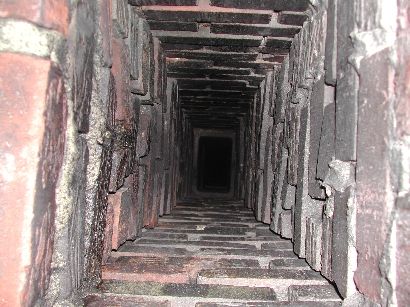
The furnace and water heater flues are lined, but the lining stops 3 or 4 courses short of the cap, and the fireplace flue (the center flue) is lined only to the roofline — about 10 or 12′ short of the cap. Here’s what it looks like:
Questions: 1) I’d like to drop a tile flue liner into the center flue to bring it up to the cap, but it looks like the bricks between the flues make the run too narrow in a place or two. Think I can reduce it and use a narrower liner, or a 10″ round (made into an oval if necessary) SS liner, for the missing section?
2) I’d like to make a chimney cap. I’ve got some 16 oz copper laying around I could use for the top, but have no clue where to get expanded copper for the screening. Any ideas?
Mike Hennessy
Pittsburgh, PA


Replies
Give Grant a shout !!
I'm curious as to how the BI just happened to be driving around and can stop and tell you to retuck your chimney? whats up with that?
"I'm curious as to how the BI just happened to be driving around"
LOL -- I think that's half their job. Pretty tight ship in my neighborhood. They'll cite ya if your grass is too long!
Mike HennessyPittsburgh, PA
Your BI would red-tag three-quarters of all the homes in the northern Adirondacks of upstate NY.
I never knew it to be the building inspector's job to require existing (read: grandfathered) buildings up to code.
Howzat work, exactly?
What if you are 86 years old, and just getting by with what remains in your savings account, and your social security checks?
Does he or she have the right to come inside your old brick-clad 1919 foursquare in Aspinwall, and cite you for your smoke and carbon monoxide detectors not being up to snuff?
Where does the limit of authority end? And what teeth are there, to make a property owner comply?
Jail sentence? Foreclosure? Eminent domain?
View Image
"A stripe is just as real as a dadgummed flower."
Gene Davis 1920-1985
"I never knew it to be the building inspector's job to require existing (read: grandfathered) buildings up to code."
Well, in all fairness, he was dead right. This chimney was pretty bad in spots, with bricks threatening to drop. So, it was getting to the point where it coulda been a safety issue. Like I said, I knew it had to be done soon -- the BI just moved it up a few notches on the list.
I'm not in Aspinwall (are you from around here to know that?), or even "Aspinwall Heights" (you must be thinkin' of Buck. LOL!) but the Great Police State of Mt. Lebanon. ;-) I'm sure they couldn't come inside w/o cause, but this was so bad it was picked up on a drive-by. (Either that, or someone called it in. Ya never know with neighbors.) As for teeth, they can levy daily fines to, er, "encourage" compliance.
I gotta give a plug here for the local BI dept. tho'. Unlike other horror stories I've heard and experienced in other communities, they've always been pretty easy to work with, they know their stuff, and have always gone out of their way to be helpful. IMHO, they more than earn the cost of the permit. Real pros.
Mike HennessyPittsburgh, PA
Edited 4/21/2009 8:01 am ET by MikeHennessy
I'm sort of with you. I realize that safety issues affecting adjacent property are the purview of some municipal authority or another, in this case the BI. But at the same time, short of preexisting codes, covenants and restrictions, it seems like deferred maintenance to already built structures should be between the HO and their insurance company. If someone chooses to have their house fall down around their ears, whose business is that? I'm ambivalent about where legitimate enforcers for the common good stop enforcing and where the "Committee Think for Common Decency" begins. Sorry, this is off the chimney topic.
We had a metal liner put in ours, combined with a chimney top damper, because of deteriorating flue. Takes the masonry out of the picture. So you have chimney Gestapo in your area?
i think you can get a clay flue liner, same size as existing , all the way down..
prep the first section with about 4 - 6 dabs of mortar... let them set... they are spacers
you can make a tension device that will hold the liner until it makes contact....then it will release
set about 2 flue sections, then lower a sand bag that almost fills the flue, that you can pull up and down on a rope
drop some loose mortar on top of the bag ...it will try to fall off, as you raise and lower the bag ti will force the mortar into the open joint .... repeat with each section
the last section should stick up above the top of the brick about 6"
you have to form and pour a concrete cap about 3" around the flue and 2" at the brick edge
"you have to form and pour a concrete cap about 3" around the flue and 2" at the brick edge"
Fortunatel, there's already a nice stone cap -- just that the flues & dividers stop short of it for some reason. No idea what they were thinking when they built it -- musta run out of tile or something.
Here's about the best pic I have of the outside of the chimney -- it was raining too much to take pics last night.
View Image
As for the tile liner, that's how I'm leaning. I may have to open it up here & there to nudge some of those separator bricks outa the way tho'.
Mike HennessyPittsburgh, PA
Edited 4/21/2009 4:58 am ET by MikeHennessy
Mike,
Does the center flues tile come up to the roof line or is it still below it ?
I haven't dropped a tape down it yet, but it looks like it reaches just about the gutter line. So, up to the roof line in the front, just below in the back.
Mike HennessyPittsburgh, PA
http://www.chimneysupply.com/?x
Mike -
Back in my chimney sweep days, I built a flue tile dropper. It consisted of two 2x4s hinged together on one end with a table leaf hinge spreading them. The bottom ends of the 2x4s were beveled so they slid into the tile below. There was also a plumb notch to receive the tile being dropped. A rope attached to the table leaf hinge was dropped down the flue 1st and then the tile was lowered with the top buttered. A yank on the bottom rope disengaged the device and it was pulled back up and reloaded. http://www.quittintime.com/ View Image
Dude! I spent about an hour last nite surfing the Web looking for that mesh without luck. Thanks big-time!
The tile dropper you describe is what I had in mind, but the table hinge sounds like an improvement on my thoughts. Thanks for that as well.
Mike HennessyPittsburgh, PA
You can use the SS mesh with a copper cap and you can't hardly tell the difference from the ground. It's much cheaper than CU.http://www.quittintime.com/ View Image
"You can use the SS mesh with a copper cap"
Yeah, I was thinkin' that after one fire, it would be black anyway. Prolly a bit stiffer too.
BTW, that site is pretty cool. Found some stuff I didn't even know I needed! ;-) May pick up one of the flue-top dampers as well, since the FP never had one.
Mike HennessyPittsburgh, PA
I used a scissors jack to lower each tile. Welded a socket with a long rod so I could unscrew the jack and place the next tile.
Another good idea -- might work better in case a tile needed some "coaxing".
Mike HennessyPittsburgh, PA
Grant, thanks again for that site link. I ordered the stainless mesh and it showed up in two days. Never worked with it before -- that stuff is a beee-atch to cut & bend!
As it turns out, the liners did not fit - the brick flue dividers had deteriorated so much that they had started to lean into the unlined flue. So I had to put a hole in the chimney every two feet, tear out the divider, and rebuild as I added liner tiles. I used the tip about using a jack to grab the liner's ID for lowering it.
View Image
When it comes to tuck pointing, I always hated pointing the head joints -- I usually make a mess of things, and drop more mortar than I get into the joint. I have no idea how a mason does these joints, but to simplify my job, I made an head joint doobie -- just a trough 3/8" wide by 2" deep. I can jam its nose into the mortar bucket to load it with morter. Then, I just put it into the head joint and push the mortar into the joint with the pointing trowel. Worked pretty slick.
View Image
I'll post some pics of the chimney cap next.
Mike HennessyPittsburgh, PA
Edited 4/27/2009 7:32 am ET by MikeHennessy
I had some copper left over - almost a full sheet, so I made up a chimney cap to use it up. I didn't have access to a brake for this, so the only bending tool I had was a little Malco sheet metal folder. So I made do. ;-)
Following a tip from, I think, Grant, I made a Sketchup of the cap and used it to make paterns for the individual pieces. Since I only had the folder, the joints are only single rolled and soldered. The roof is riveted and soldered to the "columns".
Here's the pattern:
View Image
Here's a dry fit of one roof section:
View Image
Here's My Lovely Assistant riveting up the "columns":
View Image
Done:
View Image
Mike HennessyPittsburgh, PA
i like your cap...... pretty handsomewhat holds it down?Mike Hussein Smith Rhode Island : Design / Build / Repair / Restore
"what holds it down?"
I bolted some aluminum angle stock to the stone, drilled through the cap's legs and the angle, tapped the angle, and fastened the legs to the angle with 1/4-20 brass machine screws. After it was on, I latched onto it and gave it some mighty stiff pushes & pulls & it's rock solid.
I hope I never have to remove it, but if so, it should come off pretty easily -- 6 screws and yer done.
Mike HennessyPittsburgh, PA
Looks good, Mike. That's pretty fancy work with a hand bender.http://www.quittintime.com/ View Image
"That's pretty fancy work with a hand bender."
No -- just a low resolution pic. ;-)
Thanks, tho'. High praise coming from a true metal master.
Mike HennessyPittsburgh, PA
looks like that cap is leaning to the right. no?
"looks like that cap is leaning to the right. no?"
Heck, the whole chimney is leaning to the right! But I didn't really want to try to rebuild the top section to level things out. The stone cap was cracked and I thought I'd lose it if I tried to take it off and reset it -- so I left it as I found it, and chalk it up to "character". ;-)
Mike HennessyPittsburgh, PA
My bad, I thought that it looked like you reset the cap. I've seen your other work and did not think it looked like you :) carry on. nice job on the copper work!
"did not think it looked like you."
Yeah -- I lean more to the left. ;-)
Mike HennessyPittsburgh, PA