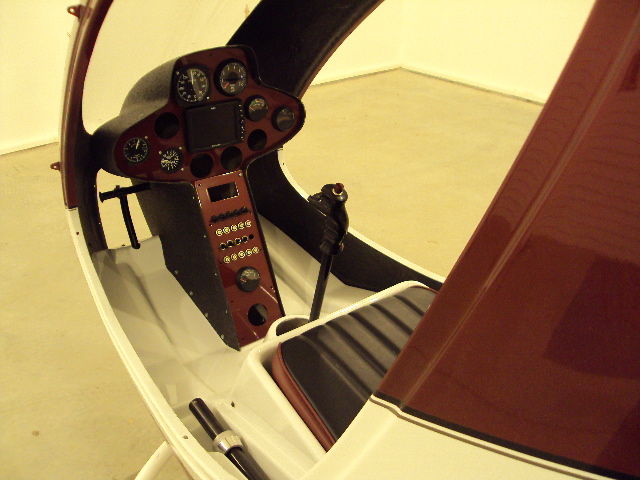
I have had a shipment of parts ….and now have the instrument panel in….fuel tanks all installed and leak tested,….transmission in….tailrotor and driveshaft in…..all control linkages set to specs….and just now installed the swashplate. My rotor blades are coming next week,,,,lots of work on those….
My turbine arrives at the end of the year….meanwhile I will be doing the wiring.
Stan


Replies
A buddy of mine is getting close to completing a plane, and is insufferably giddy every time I visit. I hope you're equally stoked about this unit.
It looks awesome.
Scott.
hey stan
whats it cost to build one of those
I have to admit I'd be a little nervous about flying one.... unless I built it myself
"I have to admit I'd be a little nervous about flying one.... unless I built it myself"
LOL! Me, I'd be doubly worried if I built it myself!Mike HennessyPittsburgh, PAEverything fits, until you put glue on it.
Gravity sucks.
Is that a chopper behind the chopper?http://www.tvwsolar.com
We'll have a kid
Or maybe we'll rent one
He's got to be straight
We don't want a bent one
He'll drink his baby brew
From a big brass cup
Someday he may be president
If things loosen up
After I am finished...a factory rep comes to my place...and spends 4 days going over my work. The turbine is started for the first time...adjusted...rotorblades are balanced...tail rotor blades are balanced. All my control rigging are checked for being to specs...all bolts safety wired. Then the guy will fly it first...and adjust the trim. Then it will be my turn to fly it. These are a very serious machine...and guys are accumulating all kinds of hours in one.
This is my grandson checking ot out.
Stan
I had to cut out 16 blade doublers. A stacked set of 4 ...each progressively larger are going to be bonded to the top and bottom of the root end of each rotorblade. This spreads the load out.....
Other pictures are the swashplate and rotorhead.
Stan
"bonded" ???
Wazzat? Welded? Glued? Rivets?
Also, I like the idea of makin' somebody else fly it first. Heck, that right there is worth twice whatever you paid for this kit! ;-)
BTW, I saw a great pic yesterday of a serious babe in a short skirt getting out of a chopper. I was gonna post it for ya, but I figured I'd get banned for life -- so just use your imagination. ;-)Mike HennessyPittsburgh, PAEverything fits, until you put glue on it.
bonded in aviation structures means glued and then pressed, usually vacuum bags, to get an even pressure across the pieces. The epoxy adhesives that are available for this are pretty darn amazing and usually a long cure time usually 24 hours while bagged and then longer 'til full full strength.
I think the question is, why is he doing all this cutting and bonding? shouldnt it be done as part of the kit?
that was my first thought but don't want to knock his kit too much. My previous life I was working fixed and rotor wing and bonding laminated doublers was best left up those who did it day after day.
But the idea behind the kit aircraft is that the 'builder' do as much work as possible thereby removing much of the risk from the kit supplier and putting it on the shoulders of the builder. if it were me, I'd farm out the bonding/bagging to a shop that does it all the time and make my own doublers for them to install.
Also, I like the idea of makin' somebody else fly it first. Heck, that right there is worth twice whatever you paid for this kit! ;-)
My second airplane was a used homebuilt bi-plane. Like Stan's chopper, it was a single seater so no place to put an instructor.
My previous airplane had been a Cessna 150, a docile two seat trainer. It's typical tricycle gear made it easy to land under most conditions. The little Starduster bi-plane had a tail wheel. Tailwheel airplanes require much more skill to land than tricycle airplanes.
So I prepared for my first flight by taxing the plane at gradually higher speeds. These practice sessions went on for several weeks, an hour here and there as my schedule permitted. I gradually became familiar with the change from control wheel/yoke to a stick, and the throttle from right hand to left.
Finally I felt comfortable enough with the new environment and the sportscar like handling to fly the thing. I called a pilot friend who had many years more flying than I, in lots of different airplanes. I told him I was finally ready to get the little bi-plane in the air.
He said, "The first time you fly it, stay up for an hour or so before you try to land".
I asked him why I shouldn't start with some approaches and landings right away.
He said, "Naw, fly it for at least an hour before you land. That way, if you crash it, you'll have gotten something for all the money you spent."
As funny as that was it actually made sense to me so I took his advice. Had an amazing flight, really enjoyed the great handling, the open cockpit, the old time feel of two wings, buzzing a corn field, the whole deal.
Luckily there was no cross wind when I came in to land so I got down safely, without scaring the #### out of myself.
"Naw, fly it for at least an hour before you land. That way, if you crash it, you'll have gotten something for all the money you spent."
Ah, the wisdom that comes with age!
My older brother spent the whole summer once building a model airplane (wire controlled) with about a 4' wingspan. Rice paper, balsa and dope. He was really careful and meticulous. Probably had a hundred hours in it, easy.
When it was done, my Dad decided he ought to take the control for the maiden flight himself. It went up, over his head, and straight into the ground at about 1000 MPH. Burried the engine about 6" in the dirt & bent the crankshaft so bad the engine never would work again. The plane, of course, was an unrecognizable pile of scraps. The thing had a useful life of about 2-1/2 seconds and was junk before my brother ever got to give it a try.
My brother abandoned that hobby right then & there. When I later tried my own hand at the hobby, I never did tell my Dad when I was headed out to fly the things.Mike HennessyPittsburgh, PAEverything fits, until you put glue on it.
It went up, over his head, and straight into the ground at about 1000 MPH.
Wow! Thanks dad. Sick feeling in the stomach for at least two people. Funny story though, specially after all these years.
My first flying model was a balsa, rice paper, free flight job with a Cox .049 engine.
At eleven, I wasn't as patient as your brother. Just broke the pieces out of the sheet, glued them all together and laid on the rice paper. No sanding to fit, just glue and go. It worked for plastic static models so why not for balsa?
I was in an unspoken competition with a good friend who was building a U-control model of a P-51, with a much bigger engine. I figured that if I got my plane in the air first that would count for something.
So Friday after school I invited my friend and another kid our age to hike over to the model airplane field with me the next morning. I needed someone to carry the gas can and the big 12v battery for the glo-plug. And of course I wanted to show off as the first fledgling aviator in the group.
We arrived at the rural dirt field where several RC flyers were preparing to fly or flying. As I waited my turn to fire up and launch my free flight plane, one of the older men stopped and looked at my rough workmanship.
"That plane's not going to fly, boy. The wing covering is too loose and the ribs aren't shaped right. You should take that thing home and sand the ribs to fit, then recover the wings correctly."
But I was commited to fly. Couldn't go home without trying anyway, not after dragging my friends down there.
So, I got the little engine going, leaned it to full bore, then stood up and hand launched the little plane.
It rose without grace to an altitude of about fifty feet. Then the wing with the looser covering stalled. The plane did a quick wing over and spun toward the ground at a comparatively high speed, crashing with finality and lots of dust, small pieces of balsa and red rice paper rising into the air, then falling gently again.
I was stunned but my friends were ecstatic and laughing. "Wow, great crash". "Yea, that was cool".
After recovering from the initial shock, I joined in the general mayhem. Even the older guys were laughing along with us.
I salvaged the .049 but nothing else. All my recent earnings had gone into that project so I wasn't inspired to do that again.
=================================
The next Saturday my friend was ready to fly his U-control model so the three of us trudged down to the model field once again. We'd all watched the U-control planes being flow there before. They were noisy and relatively fast, pretty impressive for kids our age.
Of course my friend had test fired his model's engine at home so he was ready to go as soon as everything was properly laid out. His model was considerably nicer than mine had been, mainly because he'd taken more time to build it correctly.
He was nervous about flying it but determined to be successful. I, on the other hand, was of two minds. If he flew it well that would be fun for all of us but if he crashed it I'd be vindicated.
He fired up the noisy engine with me holding the tail, then adjusted the mixture and throttle. When there was nothing else he could fool around with, he stood up and ran to the middle of the circle where he picked up the controls with nervous anticipation.
He yelled at me to let 'er go and off she went, the strong engine and prop accelerating the plane quickly to full speed. He had to lean back to stay in position, his arms straight out and a look of anxiety on his face. Around the circle it went, wooo-ow, wooo-ow, wooo-ow, three of four times, staying level with the ground.
"Do SOMETHING!" I yelled at him, hoping to see a little climb and descent.
In response he did the only thing he could, give it up elevator. Before he was able to counter that move, the plane did the same thing you described, a direct vertical climb...over the top and straight into the ground. Wham! Then silence.
"WOW! What a great crash!", said the two of us bystanders in unison.
"That was much better than yours", said the other kid.
"You ain't kiddin' ", I replied.
My friend, the pilot, stood there, his jaw drooping and his eyes like saucers. I knew how he felt but I also knew he'd get over it quickly, as I had a week earlier.
We had to dig the engine out of the small crater it had made in the solid clay. It had been a wild sight, that crash, and the evidence was convincing too.
That young model builder continued to make other scale models, HO trains and such but no more U-controlled airplanes. He enjoyed it so much that he made it his profession. He's been designing and building models for the movie industry for more than forty years.
Edited 8/14/2009 7:17 pm by Hudson Valley Carpenter
Bonding the doublers isnt that hard to do. Just attention to preshaping the aluminum...cleaning....and light clamping pressure is all thats needed.
Here is a video I took at Mentone, Indiana last Friday. Joe Loxtercamp made a 2 hour flight from Ohio in his Helicycle that he built. Joe is one extremely nice guy and a meticulous builder.
http://www.youtube.com/user/Helicyclepilot#play/all/uploads-all/0/28qTAGIeggE
Stan
This is another Helicycle video. The Solar T62-32 turbine that powers the Helicycle is used is a Chinook helicopters apu. Its very reliable and is happy spinning 62000 rpm.
http://www.youtube.com/watch?v=BNuW6Bfx840
Stan
Cool, but I enjoyed your DeWalt-powered chopper vid more!
Gotta' look for that really long extension cord.
Forrest
my first free-flight with an engine - it was designed for rubber band, I put an .020 on it. 'bout wore that little engine out!View ImageView Image bakersfieldremodel.com
Sounds like you didn't mind chasing your plane. Or you were wise enough not to fly it when there was any wind.
Where and when was the photo taken?
Sepulveda BasinView Image bakersfieldremodel.com
Same same. I even recognize the smog. :-(
Oh man did that sound familiar when you described the u-control going overhead and quickly pile driving into the ground! Been there done that! Put a SuperTiger .45 on my Ringmaster once, went so fast I thought the centrifugal force would pull the bellcrank right out of the plane. Yes, I did crash it. Amazing how fast the fun can end!View Image bakersfieldremodel.com
As I recall, there was evidence of a number of small craters around that dirt circle at the Sepulveda Basin field, back in the 50's.
In hindsight, it was THE novice mistake, over-controlling an elevator that was really too large for normal flight at those speeds, in that scale. It took less than two seconds for the plane to do it's last manuver, after one small blip of the wrist.
I recall a family in our neighborhood who built and flew "free-flight" models. (This was before RC was really practical.) Basically, the aircraft had no fuel tank. An external fuel tank was used to start the thing, then removed just before the model was released, giving you 15 seconds or so of powered flight.
As I stood before the gates I realized that I never want to be as certain about anything as were the people who built this place. --Rabbi Sheila Peltz, on her visit to Auschwitz
We used a timer that pinched the fuel line. 15 seconds will get you pretty doggone high with a fast climber. We also had a fuse on the stabilizer wing, so it would pop up after about 5 min - dethermalizer we called it, without it sometimes they'd just disappear up into the sky, if they found a thermal, or rising column of air.View Image bakersfieldremodel.com
Trying to recall, I believe that my free flight model had a tiny header tank, just behind the firewall, somewhere near the center of lift. I recall the release you described on the horizontal stabilizer which some or the better flying FF models had.
One of my early memories of RC flying at the Sepulveda Basin field was of men chasing their models when they got out of range of their transmitters. They usually left their car keys in the ignition and had another pilot standing by as a driver so that they could hang out the passenger window with the transmitter and look for the model.
Those early 50's receivers and transmitter were before the invention of the transistor so they depended on tubes which required more electric power to operate. So there was a serious limit to the range of those radios because of the weight penalty which came with the bigger, heavier batteries required to gain broader coverage.
Recent developments in battery technology and miniture electic motor technology has made it possible for super light electric powered RC models to fly very well. They are now nearly as popular as gas powered models.
This is more my style of radio-controlled model...
http://www.youtube.com/watch?v=S_ONutgLuV8View Image bakersfieldremodel.com
Very cool. Makes a small day at Malibu look like the North Shore.
But what happens when there's a line up? Little buddy goes bye-bye...for good. :-(
winding a big rubber band!View ImageView Image bakersfieldremodel.com
Maybe thirty years ago I took both my sons to the nearby Air Force Station to watch the RC club have a public demonstration of their club flying their models. Publicized in the newspapers and it had drawn a pretty nice crowd. After several planes had flown, they even had an air race, this one individual started his plane, took control of the box and took off. The airplane went straight up, maybe 150', then came straight DOWN right into the asphalt!!! Smashed into a thousand pieces! Everybody started to hoot and holler, clap (as if it were planned) and both my boys laughed uncotrollably. I guess the pilot felt as you did. All of this took maybe 15 seconds from startup to the crash.
heh heh heh, here's one of mine when I completed it, I must've been about 12 or 13 at the time
View Image
...and here it is, after I totalled it and rebuilt itView ImageView Image bakersfieldremodel.com
He could have said, "stay up for an hour or so to burn off excess fuel so that if you crash, the fire won't be as serious!"
I've never heard a pilot joke about fire.
"I had to cut out 16 blade doublers"
Stan - I don't understand why you would have to do this. Aren't the blades a purchased item / assembly, engineered specifically to your application??
John
do they have you do any bonding checks on the fuel tank or is it just bolt & go?
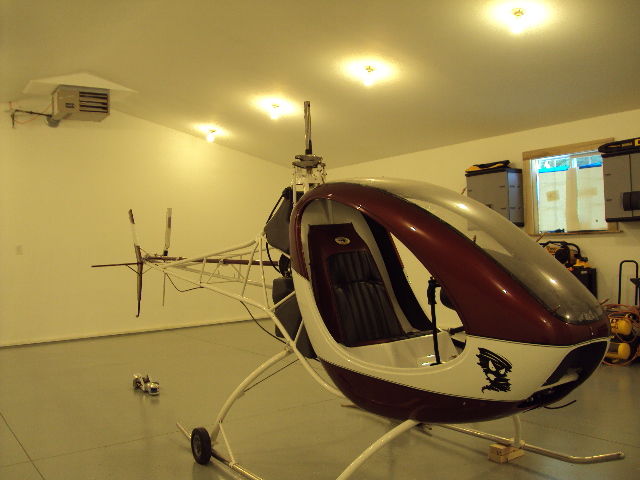
No passenger room huh?
A bit of advice: Stay away from the Hudson river.
Been watching America Chopper on tv. Saw ur post. Thought wow, someone is building a bike. Fooled me...........lol.
Been watching America Chopper on tv. Saw ur post. Thought wow, someone is building a bike.
Stan's other "chopper" he's been building...
View Image View Image bakersfieldremodel.com
Stan I would pay money to watch you guys work on your chopper. Your workmanship is truly remarkable. stinky
stinky- Thanks for the comment....but honestly...the skill level building this helicopter is mostly having patience....think through each step.....then execute. There isnt really that much workmanship building it. I know areas I am not qualified at...and one is painting this chopper. I paint the gearboxes and small parts...but the cabin, tail and driveshaft were done by an expert.
Stan