A friend, mentor and sometimes business associate (architectural restoration) sent me photos of some of his recent projects. I thought I’d share a few shots from one of his jobs.
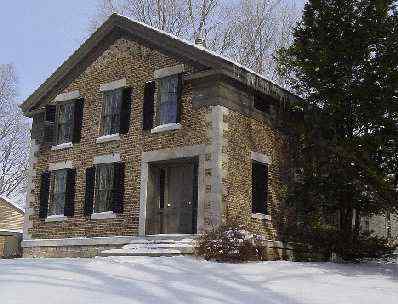
The house is a c.1840 Greek Revival near Syracuse, N.Y. It is stone construction with coursed cobbles for the exterior surface (a common technique in central and western New York state, 1830-1850).
My friend specializes in cobblestone masonry repair, carefully matching existing lime mortars and joint profiles. This particular house suffered from structural failure due to differential settlement and water damage. It had also been repointed in some areas with inappropriate mortar.
This first set of photos shows the repair of one area. Photos are attached at bottom of this post.
Side_before: Area of damage on one side of the house.
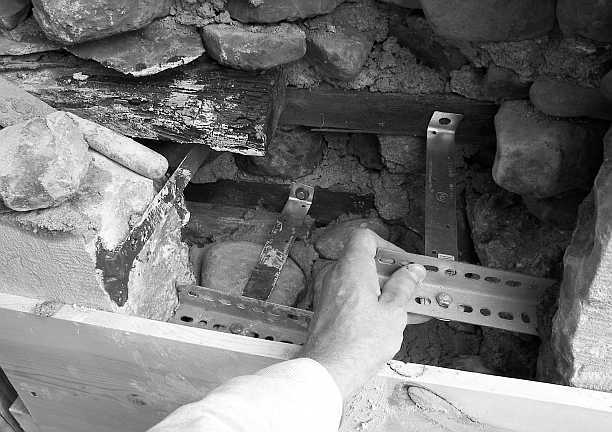
Ties_detail: A variety of brackets and ties attach to existing, sound structure.
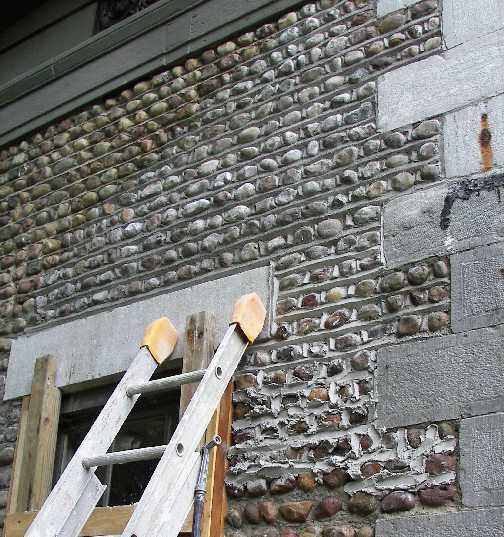
Plank_form_cobbles: A plank defines the front plane of the wall, to which the new cobblestones must align. Backing stones, making up the interior structure of the wall, are various-sized fieldstones.
New_mortar: Newly-applied lime mortar is tooled to replicate the original profile. The lower right area shows the roughly-applied mortar before tooling. Later, brushing and an acid wash will “weather” the new mortar to match new to the original.
Side_after: The wall rebuilt and repointed.
-Allen


Replies
There was extensive work done on all sides of this house. Here's a look at the facade repairs (photos attached at end of post).
Facade_damage: Areas that had to be rebuilt.
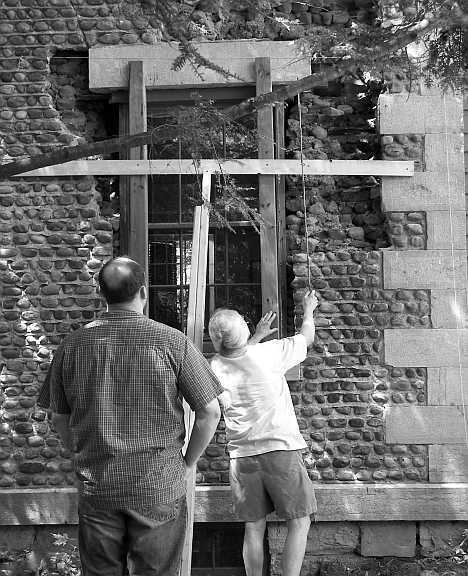
Window_area: A detail shot (B&W).
Facade_after: Rebuilt and repointed.
Bush-hammer: The limestone front steps were also new construction. This is a detail shot of the bush-hammering in progress.
-Allen
This is an interesting construction technique. What actually supports the roof and the upper floors, is it a timber frame?
What type of lime did you use for the repair and what was the mix?
Drystone, it's all masonry construction. Fieldstone for the interior of the walls, and the cobblestone on the face. I think the floor joists are let into masonry pockets.
This was a friend's job, but generally he uses a mortar mixture of one-part lime putty to three-parts sand. The lime putty is hydrated lime plus water, pigment and sometimes clay (depending on the original mortar he's matching). The sand coarseness and color is determined by an analysis of the original mortar, also.
I've done quite a bit of lime mortar masonry myself, so I can probably answer any additional questions you might have.
Allen
Edited 2/23/2007 7:21 pm ET by WNYguy
The building, and the repairs, are stunning. Is there a source for a more detailed description for this style of building?
Drystone, there have been a number of books written about this building technique. I had a few of them on my bookshelves, but I think my stonemason friend has borrowed them! I can't recall authors or titles.
The only one currently in print, that I know of, is "Cobblestone Quest" (Footprint Press, 2005), which gives some basic history and driving tours featuring many examples in central and western New York.
There are about 700 examples of these buildings in the Rochester, N.Y., area, dating from the late 1820s to about 1860. There are also examples in Ontario, Canada, and in the midwest (Michigan, Wisconsin).
There are coursed cobblestone buildings in England and Europe that are likely the precedent for this technique. Because of the time period that this techinique was popular here, most of the buildings are Greek Revival in style. There are also many Gothic Revival examples.
The earliest buildings here were constructed of glacial field cobbles, collected from farm fields. The stones were relatively large. Later, smaller lake-washed (smooth) cobbles were collected from the Lake Ontario shoreline. They were sorted for color, size, and shape. There are stunning examples of oblong lake-washed cobbles laid in herringbone pattern -- as a beltcourse, or covering an entire facade.
There is one major late 20th-century example of this technique, and that's the Town Hall in Trumansburg, N.Y. My stonemason friend clad the concrete block building with fieldstone cobbles in 1997.
If I can find an Internet site that features a history and photos of cobblestone masonry, I'll post a link.
Allen
Whereabouts are you in WNY? I'm in Niagara county and we have our fair share of cobble stone homes and churches. I've been told that the Erie canal allowed the farmers to sell their goods at much higher prices down in NYC. They took the money and built homes and churches which were very expensive at the time.
I have a few cobble stone homes and a church on my road, I'll try to post some pix when I can get my camera back from my kids.
Cobbles are common stones from Lake Ontario and the Niagara river.
If I recall, the local historical societies have some books for sale on cobble stone buildings.
Dave, I live in neighboring Orleans County. The house next door to me is cobblestone, as is the foundation of my c.1838 house.
Yes, there's no doubt that the Erie Canal contributed to the prosperity that made this type of construction possible. I've also heard that stone masons brought here to work on the canal might have stayed in the area and encouraged masonry construction. Dunno how true that is, though.
The Cobblestone Society is located here in Orleans County (north of Albion), but the Town of Phelps in Ontario County boasts the most number of cobblestone buildings located in any single town. (I grew up in Ontario County).
I know the Cobblestone Society's bookstore sells a few titles on the subject. But I can't remember the titles or authors, except for the aforementioned "Cobblestone Quest," and Delia Robinson's "Cobblestone Buildings of Orleans County, N.Y." (1996).
Post those photos when you can!
Allen
I look forward to getting the info, if you can find it. There was a system of building in the south of England which used flint and mortar, a kind of slipform building which had the face built up against a form which was slipped up as the wall got higher.
Drystone, that's interesting about the slipform construction. In one of the books I used to have, I think there were photos showing English buildings like that. And other ones where the flints were in horizontal rows ... not sure how that was achieved.
Based on your moniker, I'm wondering if you specialize in dry-laid masonry construction?
Ahh, I just looked at your profile. Are you currently working and living in Scotland?
Allen
Allen,
You are right on both assumptions. I have a growing interest in lime, the only way to repair and preserve stone structures - especially sandstones which can be murdered by the use of strong mortars.
Despite centuries of lime mortar use, and many thousands of pristine examples that have withstood the ravages of time and harsh environments, it's been a challenge to convince builders and masons to accept it in new construction, or even repointings of historic work.
As recently as the 1990s, my mason friend wrote an article for The Old House Journal describing how to exactly match old lime mortars for repair and repointing. One of his main points was that using ANY portland cement in such a case is WRONG. The editors actually CHANGED his recipe and the content of his article to add portland cement to the mix.
Using lime mortars in Europe, I think, has been the accepted restoration method for a lot longer than here (it's still very uncommon to see it done in the U.S.). Even existing, perfectly sound mortar is often raked out by overzealous masons who dig into it with a screwdriver to show homeowners that "this mortar is too soft, it must've deteriorated over time and needs to be replaced"!
One of the great advantages of lime mortar (besides things like being much kinder to stone or brick, no need for ugly expansion joints, etc.) is that it can be mixed in bulk and used over a long period of time. For a barn foundation reconstruction project here on my own property, I mixed a couple tons of mortar and used it over a two-year period (I kept it moist and covered with plastic). I only had to rent a mixer for one day.
I should point out that at grade and below grade, we do use a portland cement mix.
One of my clients this past year is from Scotland. His uncle visited from Scotland for a few weeks (he did the interior plaster work on my client's house) and was amazed at how much wood construction there is here. As we were dealing with a lot of rot and decay on that particular project, he viewed that as a negative. Wood was a hugely abundant resource here in the 18th and 19th centuries, and the construction reflects that, of course.
Allen
You have it right. The editors of ''This Old House'' obviously had no sympathy for restoration, or any Old House. Modern cements do have their place, very hydraulic mortars should be used below grade and in exposed places, but generally the mortar should be softer than the stone. This means that not all lime mortars are suitable for all types of stone, chose the lime and the sand carefully.
Lime mortars need to be loved and cherished as they mature then tended carefully while they do their work. In repayment they will perform admirably for decades. What more could you ask of lime, or a wife?
I have been working down south, hence my delay in replying.
My friend's article was in "The Old House Journal," not "This Old House." Sorry if I misspoke, but no matter. Neither magazine seems to get the details right, especially regarding masonry and mortar.
I'd be interested in hearing more about your work, and the use of lime mortars in Europe (especially for new construction). It'd be great if you could start a thread on the subject!
Allen
Allen
Havent seen you here in a long time, been busy?
Thats one cool house!
Thanks for posting the pictures
Doug
Hey Doug, how are things back in Iowa?
I see you're still active here. Yes, I've been busy, and without a computer for a while.
One of these days I'll get back a few finished photos of that Italianate porch I was working on during the summer. I was waiting for the homeowners to get a lot of their junk off the porch for the final photos, but that wasn't their top concern with winter closing in.
Allen
Your freind did a heck-of-a- job. Man I love stuff like that.
Yeah, he does some amazing work. He's been restoring cobblestone houses (and other 19th-century masonry) since 1991.
When he's done with a project, it looks like he was never there! That's a far cry from most of the botched masonry repairs done to these wonderful old stone homes during the past half-century (mostly too-hard, too-gray, too-featureless portland mortar repointings).
Allen
That is simply stunning.Absolutely beautiful work.I LOVE that look.enviously, Mongo
Mongo, I'll pass along your comments!
Attached below is a photo of the front of the house, showing areas that were rebuilt and repointed.
The areas outlined with the red dashed line were rebuilt. The area outlined in black were repointed.
Allen
Heck, I want to move out there, buy one of those places, and just sit in a lawn chair all day looking at the walls!Mongo
Great photos, looks like a very interesting project. Do you have a better picture of the pointing detail? It looks a bit like the joints are shaped into a protruding point, kind of a triangle profile, rather than raked back. I've never seen that before. The coursing makes it look really nice.
Are the quoins limestone? They look massive.
Have you (or your mason friend) ever used pozzolan clay in your lime mortar? I used some in a historic restoration masonry project I did a couple years back. . .I'll look around for the mortar recipe later. Pozzolan clay is something like volcanic ash, or maybe flyash- it makes the mortar set up a bit harder. Apparently used in roman masonry thousands of years ago.zak
"When we build, let us think that we build forever. Let it not be for present delight nor for present use alone." --John Ruskin
"so it goes"
Zak, I've attached a photo below of the poiniting detail. On the left of the photo is the original mortar, which is somewhat eroded. On the right is new pointing prior to the acid wash. A diluted muriatic acid solution cleans off that white lime haze, and makes the new work indistinguishable from the original.
The horizontal joints are a protruding "V" in profile, and the vertical joints are elongated three-sided pyramids. This is the most common joint detailing on cobblestone buildings. And the most attractive, in my opinion. Other variations include half-round horizontal joints, and a honeycomb effect where each stone is surrounded by a raised mortar hexagon.
Yes, the quoins, lintels and sills are are all limestone. That's the most common stone used, although sandstone and sometimes even brick is seen in some cobblestone buidlings.
Regarding pozzolanic clay, my understanding is that when fired with limestone (or maybe just mixed with lime, as you describe?), it creates a hydraulic cement. That is, unlike pure lime cement, it hardens under water (like Portland cement). The ancient Romans understood this, and used it to great advantage. The knowledge was apparently lost during the Middle Ages, during which time only lime mortars were used. Lime mortars need to "dry out" and chemically react with carbon dioxide in order to harden.
Actually, other types of hydraulic cements were known prior to the invention of portland cement in 1824. These were the result of naturally-occuring limestone deposits that yielded a hydraulic cement when fired. There were a number of quarries in New York state that produced hydraulic cements used in the construction of the Erie Canal in the 1820s.
How was your experience with the pozzolanics? Do you do a lot of restoration work?
Allen
That's a very interesting mortar joint. Being out west, I haven't really seen any decorative styles- most of the stonework out here has joints raked back for the drystone look, or just slightly recessed joints for weather protection (how I've done it). Apparently the V profile holds up through freeze/thaw cycles, since you get quite a few of them where you're at. It's a nice look.
My experience with the pozzolan clay- well first, here's the recipe I used: 5 shovels lime, 1 shovel pozzalan clay, 10 parts sand (86% fine sand, 10% forestry sand, 4% extra coarse "aquarium gravel"). Make lime putty, let sit for 15 minutes before continuing. 1 capful of lampblack per batch.
Anyway, the pozzolan clay in that amount didn't set the mortar as much as we wanted it to at the time. This project was a comfort station on Mt. Rainier, built by the CCC. Elevation was around 7500 ft, and the weather wasn't very good during our stay. The mortar worked out ok in the end, but it took forever to set up, and it would run down the rocks when it got too moist. Temps were around freezing, and it was often either sleeting or we were buried in a cloud.
I like doing restoration work, but I think results would have been better with a lime and cement mortar, like type N. That's what we used on other parts of the project. The original stonework still had mortar on the faces of the rocks, so apparently the original masons had the same problems.
Here's one picture of the building that we repointed with that mortar. We laid the stone roof over a xypexed concrete slab roof- originally the roof was slabs of rock set on log purlins. That didn't last very long, as you might expect.
View Image
zak
"When we build, let us think that we build forever. Let it not be for present delight nor for present use alone." --John Ruskin
"so it goes"
Edited 2/24/2007 8:13 pm by zak
Wow, a stone roof! Is it flat or is it sloped? Did you use the same mortar recipe for the roof? I'd be concerned with the mortar staying constantly wet, and disintegrating when it freezes. With the concrete slab, the stones aren't structural, so I suppose not a huge concern.
Yes, there are plenty of decorative lime mortar joints around here that have held up well for 170 years and counting. What destroys them, however, is constant water saturation (leaking gutters, etc.). Water can dissolve out the lime, and of course the freeze-thaw cycle will crumble the mortar away.
Am I reading that mortar recipe correctly ... 5 parts lime, 10 parts sand, 1 part pozzolan clay? Were you matching existing mortar, or did the CCC spec lime mortar for some other reason? (What is the "CCC"?)
Did you do anything special to expose the aggregate, or did you simply trowel the joints smooth and let nature take over from there? Generally, I give a slight misting of water while the mortar is still quite soft, and when it has set up firmly I clean up with diluted muriatic acid, followed by a water rinse. My stone mason friend uses a small wire brush at some point in the process, also.
But we're usually matching existing mortar (weathered 170 years), or recreating that aged look when doing new construction.
Thanks for the recipe and for posting that photo. I'm always trying to learn something.
Allen
You're reading the recipe right- it's very rich in lime compared to other mortars I've used. Apparently, the recipe is from a masonry specialist somewhere back east- I don't know exactly, since the recipe was given to me by the National Park Service, whom we were contracting for. I always wished I could have talked to that mortar guy.
The CCC was the Civilian Conservation Corps- an employment program for skilled labor during the depression. They did an incredible amount of work, especially in the west, in the early 30s. Especially as far as backcountry stone work is concerned. This mortar recipe wasn't designed to exactly match their mortar, but to get pretty close, and to be soft enough to absorb some freeze/thaw cycles without breaking the rocks around it.
As far as the roof goes- the stones aren't structural, and the waterproofing is below them. All the mortar on the roof was sealed with pool coating epoxy, so as to shed most of the water. There are a lot of freeze/thaw cycles in the spring and summer, but for most of the year, everything stays frozen.
The joints were filled with a mortar bag, then tooled with a jointer or finger (usually finger), then brushed with a stiff natural bristle brush. I find that a wire brush is too aggressive if you want to keep the mortar sealed to the edge of the faces of the rock, which is the most weatherproof way. Cleaned with a 1:10 muriatic acid solution when the mortar had set up, which sometimes took 5 or 6 days.
It was definitely a learning experience for me. I wish there was a bit more of that type of work out here, I'd jump at the chance to do it again.zak
"When we build, let us think that we build forever. Let it not be for present delight nor for present use alone." --John Ruskin
"so it goes"