Hi,
Not quite sure where to post this question.
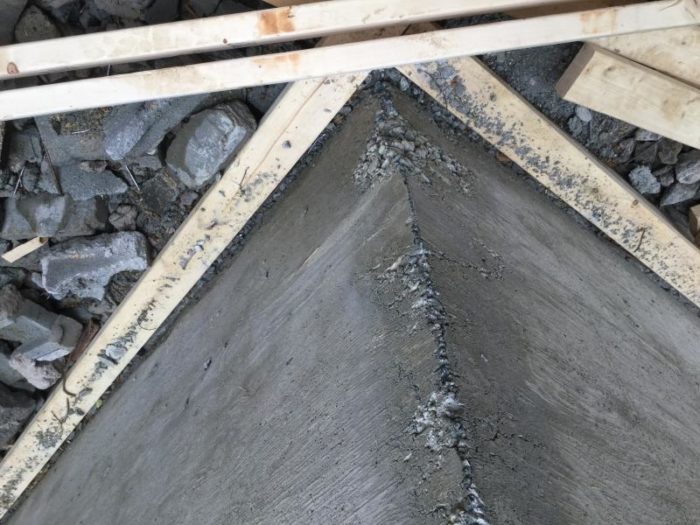
I just had a foundation wall poured and the plywood forms removed. Not quite sure what to make of the “pebbled” appearance at the base of each corner of the house. Wondering if there is something wrong with the pour. Shouldn’t the concrete be relatively smooth. I have to wonder about the quality of the work or is it the concrete mix itself that isn’t quite right.
.
wanda


Replies
concrete foundation
Hi,
Forgot to add these pics. The old cinder block foundation had to be removed and a new foundation wall poured. Those corners just don't look right. They said they'd just fill the "flaws" using hydraulic cement. I have to wonder about the integrity of the concrete. Could be perfectly normal for all I know.
take a look at the pics and see what you guys think.
Mostly what you have is "normal". That one corner, though, was not sufficiently rodded and might merit some repair work before it's backfilled or whatever.
A clear example of improperly mixed and placed concrete.
concrete
Yes, it doesn't look great. You can tell by one of the pics that the last of the previous truckload wasn't uniformly mixed, then a better mix was poured on top. They more than likely didn't vibrate everything thoroughly, otherwise it wouldn't look like this. However, if you had your job engineered and inspected there should be plenty of steel in there and as long as the steel is not exposed you'll more than likely be fine, structurally speaking. Generally it doesn't look unsound.
There's a product called wonderfix that can be applied to make the pour look just fine if it's going to be exposed and you need it to look good.
concrete foundation
Hi,
Thanks guys for the info. I was doing a little research online last night. Judging by the blob of concrete that was left in the driveway it's most likely the mix like you said. I heard that the man on site operating the vibrator was not experienced.
That would explain why the concrete didn't get down into the crevices. Plus there appears to be a high percentage of larger aggregate in the mix.
I'm wondering if there could there be a problem in the interior of the concrete wall? You can clearly see the honey combing on the outside of the fondation wall. There's a possibility that this wall could be compromised. Over time water could seep in. This might only be superficial requireing a minor fix.
let me see if I can dig up some pics of the forms.
Odds are the vibrator man never got his dildo down into that bad corner at all.
If the wall will be backfilled and expected to exclude moisture from any sort of finished/inhabited area inside, it should be waterproofed before backfilling -- this is true regardless of the quality of finish.
concrete foundation
Hi Dan,
It appears I am going to have to find myself a man that knows how to operate a vibrator!
DIY
What you're seeing are the remnants of air pockets. Air is trapped between the form and the concrete, which is what the vibrator helps to eliminate.
Large aggregate is actually makes a stronger mix than the smaller aggregate. As you can imagine, whole stones are stronger than any bond between cement and aggregate, be it rocks or sand. Ideally it would be evenly mixed though, which isn't exactly the case at your job, in a few spots. However, I really wouldn't be worried about your pour. There's way worse out there that has been functional for decades. Here you have a modern concrete mix and plenty of steel, (I'm assuming). The pour is okay, not great, but definitely looks to be okay.
All concrete, even with no voids, is porous. So if you're going to backfill up against it and you don't want water in your building, you have to waterproof. Even without piling up earth against it, it can become saturated due to heavy rain and you might see dampness on the interior. There is stuff you can add to the mix that crystalizes the concrete somehow and prevents water infiltration but you have to add it prior to placing the concrete.
Like I said before though, if you simply don't like the way it looks you can trowel on the Wonderfix and get a really nice finish on the walls. It's pretty easy to get that stuff baby butt smooth. You may have to fill the larger voids with something like Speedcrete first though. Just read the instructions on the bags, (or have your mason do it).
Hi Sunsen, Yes let's hope there's steel in there!!!!
The contractor mentioned patching the corners. When that's finished they'll coat the fondation walls with PAQCO P60. I am not too worried about the appearance of the concrete. As long as it's structually sound that's what matters. We wouldn't want water seeping through the fondation walls and into the concrete. I live in a Northern climate and the soil is very acid. We have a lot of freezing and thawing during the long winter months.
The men are now getting ready to remove the rest of the cinder blocks from the side of the house. But first they have to remove the electrical panel that's on the wall. Fingers crossed all goes well. Should be ready to pour next week.
concrete
Can you tell if there's enough steel from looking at pics 1 and 6 in the previous post and the pic I have posted here today?
How would you go about patching those corners? Any need to chip out those larger stones with a chisel before applying the patch?Some you can pick off with your fingers. Not sure what product they're using to patch the voids.
I see a few pieces of rebar poking up from the slab in the pic you just posted but I don't see any vertical or horizontal steel in the pictures of the forms you posted earlier. Did you have this engineered and inspected? I build in Northern California so anything of this nature has quite a bit of steel in it, (earthquakes). Also, it would have to be engineered and inspected. Isn't this the case where you are located?
As for the cosmetic repair, no need to chisel anything away. The patch will adhere fine.
Hello again Sunsen,
I wasn't around when they did the pour. So I have no idea if any other steel was put in the forms before the concrete was poured. Rebar and just the horizontal rods holding the forms together is all I saw. (which is what you see in the pics) I don't live in an area where I have to worry about earthquakes. Thank God!
ok I won't worry then about the patch work. I'll just have to make sure they find a more experienced vibrator guy. Concrete is never pushed laterally is it? It's not going to smooth out on its own. Should't concrete be compacted vertically down into the forms? Hopefully they get it right for the next pour.
Hopefully they'll get the last 2 walls poured by next Friday.
Oh, if there is loose material that should be removed prior to patching. Don't get into chiseling material away though.
concrete
forgot to add.. the man who constructed the forms is an engineer.. Inspections are not mandatory where I live.
Funny, I was thinking whoever did the forms definitely isn't a concrete guy. They're way too nice. However, whoever did the pour isn't a concrete guy either, heh, heh. Experience with the stuff would have prevented the less than satisfactory result.
To be honest, based on your photos, it doesn't look like you have any reinforcing steel in your walls. This surprises me because I've never, in my forty years of building, poured walls without plenty of rebar in them. That's where the real strength comes from. Especially in the case of a retaining wall, which is what looks to be happening around the back side of your house.
In any case, it will be essential to waterproof walls that are up against the earth, and also to provide proper drainage. Ask your engineer about hydrostatic pressure. There are all different types of engineers, and if the fellow who did the form work is not well versed in construction technology you ought to speak to a structural engineer.
Like I said, I'm very surprised to see walls poured without rebar reinforcement.
As for the concrete, it should be well mixed by the time it arrives in the truck. It is simply poured in place, not pushed into the forms. The vibrator elimnates air pockets and insures that you have a good flow throughout the formwork and around steel. Vibrating too much can be a problem though. It can cause the larger aggregate to migrate to the bottom whereas you want it fairly evenly dispersed. Also, over vibrating can cause the forms to bulge at the bottom, where the weight of the concrete is greatest. They simply have to drop the vibrator wand in relatively quickly and pull it out more slowly. Keep moving down the line. Hit the corners but don't sit there over vibrating. It's pretty easy to get a nice pour.
Also, the cold joint visible in one of your pics can be prevented by timing the concrete delivery a little better along with vibrating better.
concrete foundation
Hello again,
Just found the pics I was hunting for. Pics of the forms.
p.s. They did a really nice job on the forms by the way. I'm just wondering where the steel is because that is usually installed prior to finishing the inside of the forms. It's hard to get it in around the snap ties otherwise. Did you have this engineered?
As the others have stated, the concrete was not consolidated properly (rodded, vibrated etc)
If you really want it to be smooth on the forms, tap them lightly after the concrete is consolidated and it will "float" the cream against the form. You will see the grain in the wood.
"Rodding" is the term used
"Rodding" is the term used before there were vibrators. One would take a rod (length of rebar) or a long, thin stick and stick it repeatedly down into the concrete and work it around, especially along the edges and in the corners. This was to release any air bubbles and make the concrete flow into corners, etc. The vibrator is an easier/better way to handle "rodding", but it does require an IQ of at least 50, since the vibrator should be dropped into each outside corner (as well as every 6-12 inches along the length of the forms).
concrete
Thanks for the info Dan. :)
concrete
HI Sunsen,
Do you see anything unusual about the pics below? there are a few gaps in beneath the framed window opening. I assume they will fill those with hydraulic cement. That small block of 2X6 nailed to the plate above .. ends should meet over the middle of the 2X6 uprigh?
Whoever built this house in 1970 obviously didn't know a darn thing about carpentry. The place should have been torn down and rebuilt.
I must find out if any steel was placed in those forms before the pour. The rods drilled into the footing and the snap ties are the only things I saw as you can see in the pics. The men were hard at work today and spent most of their day in the basement finishing putting up their support walls. The last of the cinder blocks were knocked out today and the forms will probably be put in tomorrow.
The reason for the cold joint...... The contractor was concerned about support issues. 2 walls were poured last week and the other 2 walls will be poured on Friday or possibly Monday. Depending on how much work they can get done tomorrow. Should I be concerend about the "cold Joint".
I'll be meeting with the contractor tomorrow.
Treated plate.
Are these walls temporary? If not the sill plates need to be treated wood.
Hi Guys,
What is the best way to secure/fasten a sill plate to a newly poured foundation wall?
toolbabe
Normally you'd use the bolts that were set into the top of the foundation when it was poured.
Titens
http://www.strongtie.com/products/anchorsystems/mechanical/titen-hd/
concrete foundation
Hello again,
I managed to find the picture on my desktop.. This is a good picture of the framing. What's the correct way to sheath that framing. what materials and fasteners would you use?
concrete foundation
Hi,
Managed to find the picture on my desktop. Her's the picture of the Framing.
I can't speak for codes or practices in your area, but.... Sheathing is often designed to resist shear forces on a building either from wind or earth quake. In order to do this all the plywood edges need to be nailed to a framing member or blocking. Assuming your studs are 16" on center I would run the plywood strips vertically from top plate to bottom plate. There is nothing wrong with reusing the plywood in this way as long as there are no gaps or unblocked seams. Did these guys fix the anchor bolt problem?
Judging from the pictures, this is a retrofit foundation, and the "stud wall" is only about 3 feet high.
HI Mike and Dan,
I'll have more pictures of the reno come Sat. The men are not finished sheathing yet. I have yet to find out how the sill plate was anchored/attached to the concrete foundation. When I find out I'll let you know. The framing ( 3' stud wall) was attached using 3" concrete nails that's all I know.
The old foundation wall was approx. 8' but since the entire cinder block foundation had to be removed and a concrete wall poured the foundation wall is now 5' in height. Had to go with a 5' foundation wall because of the way the house is situated.
I must check whether it's a 16" or 24" spacing between studs. I'll have more pictures come Sat.
The men installed the 16" plywood strips horizontally. and they cut smaller strips of plywood to cover the remaining 4".
Can't believe they waited this long to order the siding. Should have had that ordered weeks ago. The home owner shouldn't have to place the order. I just assumed the contractor took care of all that. Live and learn I suppose.
That bottom plate does not appear to be treated lumber, which is bad news and probably a code violation.
Eastern Canada is a pretty big place. PEI, NS, NB, NL,QC all use the National Building code with local amendments. Ontario publishes it's own code, but it is modelled on the National code as well. You can get the Ontario code online (or download) here: http://www.ontario.ca/laws/regulation/120332
Chapter 9 is the prescriptive code that applies to small buildings, like your house.
The parts you are interested in are:
9.3.2.9. Termite and Decay Protection
(3) Structural wood elements shall be pressure-treated with a preservative to resist decay, where the vertical clearance between structural wood elements and the finished ground level is less than 150 mm.
9.23.6.1. Anchorage of Building Frames
(1) Building frames shall be anchored to the foundation unless a structural analysis of wind and earth pressures shows anchorage is not required.
(2) Except as provided in Article 9.23.6.3., anchorage shall be provided by embedding the ends of the first floor joists in concrete, or fastening the sill plate to the foundation with not less than 12.7 mm diam anchor bolts spaced not more than 2.4 m o.c.
(3) Anchor bolts referred to in Sentence (2) shall be fastened to the sill plate with nuts and washers and shall be embedded not less than 100 mm in the foundation and so designed that they may be tightened without withdrawing them from the foundation.
9.23.7.2. Levelling of Sill Plates
(1) Sill plates shall be,
(a) levelled by setting them on a full bed of mortar, or
(b) laid directly on the foundation where the top of the foundation is level.
(2) The joint between the sill plate for exterior walls and the foundation shall be sealed in accordance with Subsection 9.25.3
Regarding your pictures:
The finish ground level looks to be closer than 150mm ( 6 in) - the sill plate should be pressure treated,
I don't see any anchor bolts. Concrete nails are not an acceptable substitute.
The top of the foundation my be level, but it is not smooth. I would have expected a sill gasket to be installed as a routine matter to provide a moisture barrier and air sealing. The sill plate will require sealing, and that seal should be tied into the air barrier. Requirements are listing in sect 9.25.3
concrete foundation
Hi Catmandeaux,
How do I get my hands on a copy of the National buidling code??? I need to know what the building code says about installing sheathing. I need this information to back up my argument as to why that sheathing is put on incorrectly. I have no idea how a contractor can stand there with a straight face and tell me that sheathing is fine.
3/4" sheathing or 1/2" ? he says 1/2" would be fine but he'll go with the 3/4" if that makes me "happy". sarcastic P.....! He assures me it make no difference.
The National Building Code (NBC) is available for purchase from the National Research Council: http://www.nrc-cnrc.gc.ca/eng/publications/codes_centre/codes_guides.html
I don't know of any free online sources. Public libraries often have copies available if you need to see the actual code wording.
CHMC publishes a guide, Canadian Wood-Frame House Construction (CWHC) which shows how to build a house that complies with the NBC. Available here: (free download) https://www03.cmhc-schl.gc.ca/catalog/productDetail.cfm?lang=en&cat=178&itm=1&fr=1436676125775
The Ontario Building Code is based on the NBC. I am not aware of any significant differences for the prescriptive codes in Sect 9. It is available for on-line viewing or download here: http://www.ontario.ca/laws/regulation/120332
Start with the CWHC. Chapter 13 shows how the wall and sheathing sould be attached. Appendix A has the table for material, thickness, and nailing schedule.
Note that the nailing schedule in all of these references is for common nails ( hand driven). Nail guns use thinner nails ( not as strong) so require the spacing to be reduced to 2/3 the distance specified in the code. Detail on nail-gun fastener strength is here: http://www.icc-es.org/Reports/pdf_files/ESR-1539.pdf
Requirements for plywood wall sheathing are 1/4" for 16" stud spacing, and 5//16" for 24" spacing. The panel must be attached to the sill and top plates. Code allows horizontal panel installation, but does not specify what the minimum width of each panel is.
I would not consider a 16" wide strip to be a panel, but the code does not clearly specify that. Not putting blocking at the panel seams will reduce the shear strength capacity of the wall assembly by ~ 33%. Unless the contractor has calculations showing that the plywood strips are strong enough, than it would be in violation of this section of the code:
9.23.2.1. Strength and Rigidity
(1) All members shall be so framed, anchored, fastened, tied and braced to provide the necessary strength and rigidity.
Using properly fastened 1/2" panels extending from the sill plate to the top plate would meet code requirements.
concrete forms/ sill plate
Hello Catmandeaux,
Came across these pics today.. Maybe they'll shed some light on the anchor bolt mystery. Might just be the pieces of the puzzle you need to find out how that sill plate was attached.. Doesn't look like any anchor bolts were used. If you focus in on a few of those pics it looks like the sill was nailed a few inches down from the top of the plywood (look inside the form.) looks like a nail misplaced.. at first I thought it was some kind of anchor.. t shaped but under closer inspection it just looks like a nail that was hammered in crooked. So the PT 2X4 was attached to the form and then the concrete poured in the form. What do you think???
oh no .. the pics are 8.82MB which exceeds the max. file size of 6MB. :( I will have to find a way to make them smaller so I can pot them to the form.
Understand the situation you're in. Somewhere down the road you're going to want to have some other work done and the inspector is going to come out and incidentally discover that the sill plate is not bolted down. Then a flag will go on your property records down at the courthouse and you'll need to have the situation remedied before you can sell the house.
concrete foundation
Hi guys,
Seems we are at a stand still. The main carpenter told me this morning that he is not going to install the foam core or house wrap over the sheathing because the work doesn't meet his standeards. He doesn't want his name attached to this job. Where do we go from here?
I was right to be concerned. I knew the job wasn't being done correctly.
2 of the contractor's men were on the job very early this mornig taking away lumber. I have a sneaking suspician they are reselling the lumber for profit. Meanwhile using plywood scraps to sheath my house. A real money making venture. The lumber that gets delivered on site .. I'm assuming the home owner has paid for that lumber. Any leftover scraps either go into the dumpster and larger pieces brought back to the lumber yard and the homeowner gets a refund.
I will be meeting with the contractor on Sat. Apparently he is after more money. 50% of the money was to be paid up front and the other 50% after the job is complete.
I think it's time to lawyer up. Definitely no more money until there are some firm written agreements as to what will be done to correct the defects (and who will pay for it).
Ditto
I can't speak for Canada but in many states this behavior would amount to serious contractor law violations. Check and see what the law is there. There may be some government agency that can help you out.
http://www.canadianresidential.com/content/hiring-contractor
One thing to consider/worry about (at least in the US) is who is officially the "contractor". The "normal" approach is that the main guy is the "contractor" and the other trades work for him as "subcontractors".
But it could be that the "deal" you (perhaps unknowingly) made with the foundation guy is that YOU are the "contractor". The contractor is ultimately responsible for all the bills, and also responsible for site security, etc (ie, making sure the workmen are not stealing materials). If you are the contractor then you could be on the hook for a lot more than you bargained for.
concrete foundation
Hello again,
Forgot to mention JPEG #4 you might be asking.. that looks right.. Yes, that's the way it should be sheathed.. the only reason that little section was done right.. because there just happen to be 2 decent pieces lying on the ground. So the carpenter tacked those in place.
this contractor is making mint. using up the scraps.. no way would he use that plywood to sheath his house.... Remember that plywood wasn't cleaned / hosed down. It has concrete bits attached to it. The men used it for scaffolding. so they could walk around the trench. It provided them something to stand on so they could reach up to attach the sheathing.
do you have a contract with this guy? is he licensed?
you are getting the wool pulled over your eyes. you need to stop work and figure out how to address these issuse before you are invested in this any further.
Thank you,
Thanks for sharing all this. You can get a lot of help from this site. Good luck on your meeting with the contractor.
How do you get your dogs to stick to the ceiling like that?
Good lord Wanda , you do have some bogus luck....
wondered about what you've been up to and sad to hear how it's going.
best of luck with this and under no circumstances let anyone back fill the trash in that trench. That is one messy site and I'd expect them to just bury that vermin bait.
and next time you plan a project think about posting here first. You might be able to get some worthwhile guidance b/4 you get took.
NO way that a pt plate.
There is no way thats a pt plate toolbabe. with how shotty this work is you should not accept anything this guy is telling you.
Even if you arent required to have inspections out there, call the city, give them a brief description of what going on and see if an inspector is willing to come by and asses your situation. Use that as a starting point to build your case against this ass clown.
The sill plate is the piece of wood that sits directly on the concrete. In your original 007.JPG (there seem to be two with that name) the wood I see sitting on the concrete looks like plain old lumber, not treated.
Looking at 005.JPG, it looks like they placed a sill plate in the wet concrete during the pour, and just leveled it with the top of the forms.
It does seem to have a light green tint to it, so perhaps it is PT.
Yeah, but looking at 007 it appears that the wall plate is placed directly on top of the concrete, meaning that it's exposed to moisture intrusion and rot just as a sill plate would be. And one can just about see daylight under it.
And I've never seen a sill plate embedded in the concrete like that (though I suppose it may be "legal").
I had not seen wet set mudsills either. Once again Google to the rescue. I found this:
http://www.jlconline.com/concrete/wet-set-mudsills.aspx
John Spier showing how it is done properly.
But from all appearances the OP's sill was set not just on top of the concrete but IN it, with the appearancre that the sill may have been placed in the form before the concrete was poured. (This would help explain the poor job of rodding.)
what you see is the cripple wall bottom plate which isn't treated lumber. It's 2X6 The sill plate is underneath but you can't' see it from the inside because it's only a 2X4 sill plate.
concrete foundation
Hi,
More pictures from today. JPEG #7.. hmmmmm that patch work on the corner doesn't look too good. Water is going to find its way into those crevices eventually. What nasty honey coombs!
there is the pt plate
Toolbabe, there is the pt sill, your "incorrect sheathing" photo shows a pt plate. dont know if it is that way all the way around,(no reason why it wouldnt) and why it is not seen from the inside.
"1/2" plywood or "7/16" osb is very commonly used as sheathing.
From what the pictures tell i would say that there is no reason for the waterproofing processes to get delayed. Is the site a wreck, sure. But the foundation can be waterproofed and not backfilled until the clean up is to your satisfaction.
make sure you get a good look at the complete waterproofing instalation and give them the all clear before they back fill...make that clear. do not allow backfilling until waterproofing is approved by you.
toolbabe
The top of the foundation appears to be very close to grade. How far down will the grade be from that sill plate and wood framed wall?
What is the plan for waterproffing and siding?
if the ground level is too high, may be a problem with water infiltration.