Anyone ever hear of a concrete nail called “Gripcon” (not sure of spelling). You have to pre-drill with them and they are not the zig-zag type. I was told by a flooring contractor that they hold better than Tapcon’s, etc. I need to put sleepers over concrete. Did a search on the WEB but can’t locate. Thanks -Ed
Discussion Forum
Discussion Forum
Up Next
Video Shorts
Featured Story
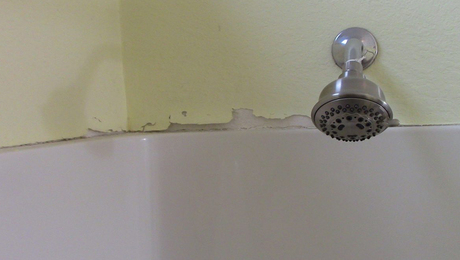
Learn how to patch drywall above a fiberglass shower without totally redoing everything.
Featured Video


Highlights


"I have learned so much thanks to the searchable articles on the FHB website. I can confidently say that I expect to be a life-long subscriber." - M.K.
Fine Homebuilding Magazine


Fine Home Building
Follow
-
Fine Homebuilding
Dig into cutting-edge approaches and decades of proven solutions with total access to our experts and tradespeople.
Start Free Trial Now -
GBA Prime
Get instant access to the latest developments in green building, research, and reports from the field.
Start Free Trial Now
- Home Group
- Antique Trader
- Arts & Crafts Homes
- Bank Note Reporter
- Cabin Life
- Cuisine at Home
- Fine Gardening
- Fine Woodworking
- Green Building Advisor
- Garden Gate
- Horticulture
- Keep Craft Alive
- Log Home Living
- Military Trader/Vehicles
- Numismatic News
- Numismaster
- Old Cars Weekly
- Old House Journal
- Period Homes
- Popular Woodworking
- Script
- ShopNotes
- Sports Collectors Digest
- Threads
- Timber Home Living
- Traditional Building
- Woodsmith
- World Coin News
- Writer's Digest

Replies
Ed
I tried a google with that spelling and got two hits.
This one is a distributor and says to contact them for more info.
http://www.jjhammond.org/products/anchors.htm
Bill, I gave them a call and they have them. They are called Gripcon nails. Just predrill and hammer them in. Thanks much. -Ed
Tapcons are OK in block or soft concrete, but in a good quality slab they're no fun to work with.
A few other folks have suggested this technique before, but here it is again.
You can drill a hole the same size as a sinker, poke a piece of tie wire into the hols, and drive the sinker, or (as I prefer) drill a 1/4 inch hole and drive two 3" sinkers. We call that a Texas Tie and it works surprisingly well.
I had to fasten some Hardiboard to a poured concrete wall last week, and tried tapcons. Not a chance. Ended up cutting sinkers in half with a bolt cutter and pounding them into a 1/4" hole. I wish I'd just done that first.
So maybe a little adhesive on those sleepers and a few Texas Ties and you ought to be good to go?
DRC
Dave, I have used that method in the past and it does work well. i just didn't want to have to cut all that tie wire. The gripcons are available from the url posted above. I'll give them a try. Thanks very much for your advice. -Ed
I have found that the main problem with people not being able to get Tapcons to pull up is caused by using an old Tapcon bit.
I had the devils own time mounting a panel a while back. I would drill deep enough but couldn't get the Tapcons to pull up tight. Several were about 3/8" shy and I snapped one off. In frustration I kicked the drill. It spun around and the Tapcon bit snapped off. After cooling off I got a fresh bit from the truck and after extracting the Tapcons I redrilled the holes. Suddenly all the Tapcons seated nicely.
On the way back to the shop, I had help that day and made him drive, I compared the new bit to the broken one. At first glance they looked much the same. Only on close examination could I see that the carbide inserts on the old bit were worn along the outer edge. The bit was drilling smaller holes. This explained the trouble with getting the screws to pull up tight.
I tried the old bit on softer concrete the next day with shorter Tapcons and had no problems setting the screws. The problem seems much worse on tough, old concrete. Now I try to keep a couple of new bits on hand. Around here the inspector will not go for the two sinkers in a 1/4" hole trick. A coworker tried. The irony being that he slapped in plastic anchors and it passed. Go figure. Something about the nails not being rated for that purpose.
They will go for the deformed nails designed for the job. You drill the right sized hole and hammer in the nail. They also come in studs and sizes from about 10 penny to about 1/2". If you screw up a placement with these they can be a bear to pull out. I mislocated one the size of a 16p nail. I was figuring to just hook the claws on my hammer and yank it out. How hard could it be? I ended up using a 3' pry bar and pulled out a good sized piece of concrete with it.
Gripcons? I haven't seen them. Sounds like one of the Tapcon wannabees. Dunno.
Any problem using 1/4" split drives? That's what I use, work very well about 95% of the time.
Ken Hill
Just found a cool site.
http://www.confast.com/general_info.htm
Pictures of 14 different kinds of concrete anchors (and 2 sheetrock anchors), with a bunch of the different names that each one goes by. No advice on usage, just identification.
No wonder I spend so much time on this site.
This is even better than going to college -- not only does it cost less, at this here construction school the instructors actually know what they're talking about. <G>
Thanks, all.
DRC
If by split drive you mean those, I don't know the official name but they call them drive anchors here, mushroom shaped zinc drive rivets where you drill a 1/4" hole, position what your hanging, insert the unit and hammer home a protruding pin. Yes, in this area they are accepted for mounting electrical panels. Rawl calls them nail-ins. There is a variation in nylon that I wouldn't use for anything but very light work. They are quick, strong and handy.
They aren't widely used because they are difficult to undo. Sometimes they will rebound when struck and expand with the head a bit shy of clamping what your hanging and leaving the box loosely attached. Removal in these cases can be an ordeal involving strong language and damage to the mounting surface.
Quite often it is necessary to temporarily mount boxes and panels so measurements and adjustments can be made. Tapcons, plastic and lead plugs used with sheet metal screws, and caulking anchor work well in these cases. These and toggle bolts, used for hollow walls, seem to make up about 95% of fasteners I see used by electricians in this area for mounting to concrete and masonry.
Heavy units in concrete are mostly wedge anchors of various types that fall under the proprietary name and generic descriptor of "Redheads".
This is getting long but I found a handy little book on the subject. Had to dig for it. Years ago you could get from supply houses something called the "Rawl drilling and anchoring handbook 43M". A 4x9 booklet of 107 pages. It covers just about every conceivable anchor and includes charts of design strengths in various configurations. Very handy this. I will look into where people can get a copy.
Why not use power actuate fastners. Most flooring contractors around here shoot the sleepers into the slab. It works best with 2X sleepers (1 x tend to split).
Have to agree with Archy 11 powder actuated guns or "shotguns" as we call them in N.Y. are the way to go when installing anything into concrete that isn't aremovable panel.The speed of installation makes the job a pleasure compared to predilling a hole than installing the tapcons .
While I won't say you can't use power actuated fastners for mounting electrical equipment, my primary concern, I will say that it has been thought of and rejected for several reasons.
Pins fired by Hilti guns don't work well for cinder or concrete blocks and clay tiles. This is a large part of the jobs. For field stone walls they are an invitation to disaster because hidden rocks, especially if of a very tough sort are likely to spall, fail or deflect the pin due to the pin going in at something other than right angles.
Also the idea of firing a hardened nail at bullet speeds through a 1/4" hole in a panel while supporting both the gun and panel and trying to maintain alignment does not comfort me. Knowing that missing the hole and hitting the steel enclosure could cause the pin to deflect into valuable main breakers or back at me limits my enthusiasm for the technique. Realizing that if I miss the mounting point the fastner is not easily undone only reinforces my doubts.
There are conduit straps preloaded with a pin and washer that work quite well in reinforced concrete. These I have used and endorse. I have also used a Hilti gun to mount small, 4x4, boxes. The concrete was thick and of a known quality. The boxes light. The work in easy reach. I was never comfortable doing this but do it I did. Many times. Once I did attempt to fire a pin into a hidden piece of rebar. The pin deflected off the rebar spalling the wall, denting the box and passing very close to my hand before striking a wall 20' away. No one was hurt but my confidence in the method remained underwhelming for quite some time.
Acomment per tapcons and dull bits - then tapcon threads strip - thus they don't pull.
The easy solution I use is to then whap the partially stripped tapcon a few straight and hard blows with a 6# hand sledge, works great, holds about like a 20d into white oak.
You might be right on your observation. The threads on the Tapcons that jam and won't seat do seem a bit worn. Better to use new ones. Especially in critical applications.
Interesting solution.
Removal of pin anchors.
I use a lot of pin anchors, for a removable anchor, pull the pin out and then tap the anchor flush, with out the pin. Then take the pin and hammer it in, to the point that it still protrudes slightly. The protruding pin can be pulled at a later date if nedded, this allows the anchor to be removed and even reused if neccesary.
I have also removed well set pin anchors by using a catspaw on the set pin, it really was not hard at all using this technique.