I’m in the process of reframing and siding a walkout basement wall. The wall is constructed with 2×4 stud framing and zip system sheathing. The wall is framed on a basement slab (concrete slab on grade). All sheating panel joints are tapped and I have a 6″ strip of Grace Vycor running around the base of the wall (3″ up sheating and 3″ down exterior edge of slab). We’ve had some heavy rains today and now the PT 2×4 sill plate is wet in areas. There’s also a couple of wall studs that are wet along the outter bottom edge of the stud where it meets the sill plate. Is it possible for the conrete slab to soak up enough water to allow the wood framing to become this wet? Any other ideas of how this could happen?
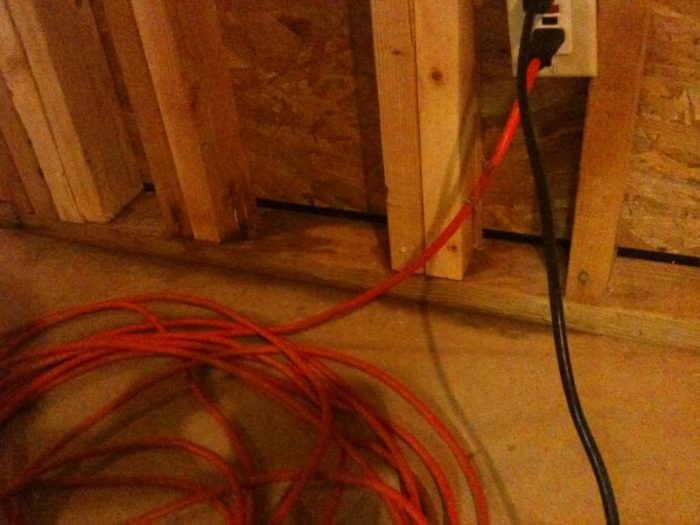
I’ve attached a couple of pictures showing what has happend. The dark areas on the sill plate are wet. I didn’t feel any moisture on the back side of the sheathing – only the sill plate.
If it is the concrete soaking up water, how do I fix this? I’ve seen details where plastic sheeting gets attached to the wall and then run about 2-3 feet out from the house/foundation… is this the fix?
I appreciate any advice or suggestions offered.


Replies
door
How'd you deal with the waterproofing of the foundation and was the backfill stone?
How far is finished grade in relation to the top/bottom of the slab?
Was the slab turned down to the footing?
Before I started all this the existing grade was actually higher than the floor slab. After removing the exisiting siding I dug down the grade so that it's now about 6" below the top of slab and slopped away from the house. At this location it's a turn-down slab over a stip footing with backfilled soil - no stone (yet).
However, with the wall in it's current state (sheathing only with no siding yet), the sheathing comes down the wall and flushes out with the edge of the slab. So all the heavy wind blown rain that hits the wall will run down the sheathing and down the exteriof face of the turn down slab. Would this be enough rain water to do this?
details
The sheathing and house wrap should extend about 1/2-inch below the slab grade so that the rainwater is guided past the top of slab.
In a wet climate such as Portland or Seattle you wooul also put a strip of wrap under the sill plate and then wrap it back up under the wrap on the sheathing to limit the water penetration.
Cured concrete will absorb and transmit moisture, but it shouldn't be very liquid permeable. A lot of water rewervoirs, and pipes are made of concrete.
existing conditions
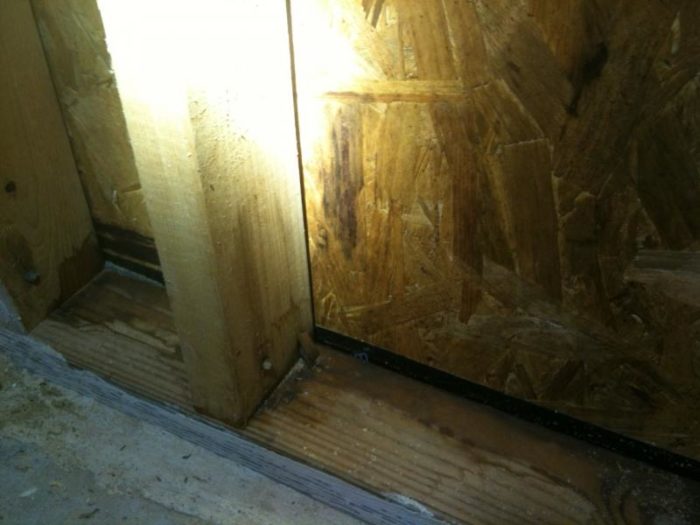
If I were able to completely rebuild the wall I would have done that. However, the existing stud framing was set back 1/2" from the slab edge. So when the sheathing was installed it worked out to be flush with the slab edge and unable to extend below. I was worried about the water running down the sheathing and wicking back under to the studs so I installed the 6" strip of Grace around the base to cover the transition between framing and slab. With the studs already in place I wasn't able to put anything under the sill plate either.
I've added a photo from the exterior showing what conditions are like.
It looks like the housewrap is not lapped over the vycor
No Housewrap
I'm using the Zip System wall sheathing - no housewrap required. (http://www.zipsystem.com/zip-system/wall.aspx)
I've also verified that the Grace Vycor, which extends about 3" down the face of the slab, is sealed to the sheathing.
The photos of water leaks suggest otherwise
Water behind Grace
The Grace Vycor appears to be fully adhered to the sheathing the best I can tell. Is it common for water to get behind Grace in this type of application? If the Grace won't work, what should be done in this application?
Yes, an uphill facing lap will leak sooner or later, more or less, but it WILL leak
something is not kosher
Stand back and take an overall shot-mark the photo or mark the spot in the shot that corresponds with the leak area.
Do it from in and out.
Maybe something will jump out at this group of fine adults.
thanks.
How far above grade is the top of the slab? How is the drainage around the slab?
new photo
I added another photo showing the exterior condition. Everything is sloped to drain away from the foundation.
Makes little difference. That much water does not wick UP, and a lap facing uphill is not secure against water unless it is welded.
There are also nail holes and butt joints and the top of that sheathing to let water in
The water is coming from above no matter what you can or can't see. if it were my house I'd go ahead and run some felt on that wall then water test it.
My goal in using the Zip System was to avoid having to use any type of housewrap. I know the system is used everywhere with success. I'm convinced the water has to be entering from either behind the grace or working it's way up from the slab. None of the framing or sheating above the sill plate show any signs of water (except for what the studs have soaked up from the plate). I think it's time I get out the garden hose and see if I can trace it.
I know it's not typical practice to use uphill facing laps, but the Zip System is designed for that type of tape. All the seams in the sheathing are sealed with Zip Tape... and if anyone is familiar with this product, they'll understand when I say this stuff really seals up tight. I just can't see any possible way water could be getting in from any of the sheathing seams.
I'll take another look at the Grace Vycor lap between the sheating and the slab - that may be the cause. I've heard nothing but good stuff about Grace products and from what I can tell it appears to be well adhered to the sheathing, but maybe I missed something.
One solution I've thought about is using a silicone adhesive to attach plastic sheating to the base of the wall sheating, extend the plastic down the face of the slab and slope outward from the foundation a few feet, then come back and cover with stone to allow drainage. I would also run a line of Zip Tape along the seam between the plastic and the wall sheathing. Heck, I may even apply a liquid sealer to the exterior slab edge too... I want to ensure this doesn't leak!
Thanks for all the help and suggestions!
I don't think that much moisture could have worked its way up through several inches of concrete in a relatively brief period of time -- somehow the moisture is being delivered to the top of the slab from above. But keep in mind that the moisture may travel several feet along the bottom plate from where it enters to where you see it.
door
I'll ask again, show some pictures of the whole wall in/out and locate you water problem areas.
thanks.
If he would simply spend as much time shooting a cople good photos and running tarpaper or wrap on that wall as he is arguing that it can't be leaking, he would be done and moving on by now
Sorry for the delay - today was the first time I've been home during daylight hours when it wasn't raining and able to take photos.
Photos are taken in the same order/direction exterior and interior. I've marked each photo where I've found a wet sill plate. All seams/joints in the Zip Sheathing has the Zip Tape. The felt paper at the top of the wall is tucked under the existing siding to keep the original osb sheathing dry.
If better photos of a certain area are needed, just let me know.
Thanks!
"the Zip System is designed
"the Zip System is designed for that type of tape."
Sure, and it only works perfectly when it is applied perfectly which it never is.
I have been doing water proofing work and repairing failures from others for over forty years now. I have never seen a reverse lap that did not leak soner or later
I'm not arguing that it's not leaking - it obviously is because it's wet on the interior. I'm just not convinced it's leaking from anything above. I've thoroughly checked all framing above and nothing is wet and there are no signs of water.
I take it you're not a fan of the zip system? I know the system only works when the tape has been properly installed. I can assure you I've taken the time necessary to ensure the zip tape has been installed properly, rolled and fully bonded to the zip panels. I've seen installs where the tape was just thrown up without care and it looks sloppy... I could see leaks in that type of install.
So far it sounds like concrete would not allow this much moisture to be absorbed... so I believe it's got to be the Grace (with reverse lap) that is leaking. If anything else stands out from the photos, please let me know.
I'm very detailed about my work and will loose sleep at night knowing there is a leak, so I am committed to resolving this. I'm just hoping there is a solution without having to wrap the entire wall - that was the point of using the zip system in the first place.
I think the grade is too high in the leaking area. Also it looks like there is exposed concrete ledge for water to sit on and penetrate under the wall.
Originally the soil was 8"-12" above the floor slab before I started this project, but now it's graded down. The top of the basement concrete slab is about 6" above the concrete ledge/footing and then the soil slopes away from their (see ext_1.jpg photo). That was my concern about the concrete soaking up the water because it could run back under the slab at these areas.
Well, try some concrete waterproofing, or use the time tested approach of putting plastic on top of the slab to see if water appears under or on top of the plastic. Then you may have an answer.
I would put felt on the outside if I built it. I haven't read this thread closely, so I don't know why you don't want a proper weather barrier.
From what I've read, the zip system is supposed to be a superior system for protection from weather.
I've read the same thing, but I should have been named Thomas, because, well, you know.
Door.
Just back from a lovely time in Nashville-and took a quick look at last set of photo[s
From that quick scan I see a door above that's near above the panel?
And the lower door, that has leak on either side of it.
How did you detail those doors? Sill pan and NO LEAK down the sides or at the top?
I ask because if water can enter there at the door---------------
It could work over to the corner (in the panel shot)-down the corner and then under the plate-to it's lowest spot-sit and wick up the plate/stud/back of sheeting.
In the other-same thing-with your caulking on the interior of the plate-it might not turn up at it's source-but be forced to flow to a low spot.
How is that slab for flat and level out where the walls sit?
All of the doors located on the upper level are in really bad shape. They will be replaced once the new deck is built - after the siding is up on the basement wall. I suppose it is possible that those could be the source. The water would have to run down the corner studs where it's not visible from the inside because I haven't been able to find any signs of water on any of the framing above the sill plate so far.
When I installed the new door at the basement level I taped and flashed around the entire opening, caulked behind the door flanges, and then caulked the perimeter. I'll take a closer look at that and see if that could be the source. The slab appears level to my eye, but I can see your point where it would drain to a low spot and then show on the sill plate.
Thanks for the suggestions!
Lower door?
Did you install a pan or fab one up with a vicor type product? On the slab, with a lip at the backside and run up both ends of the framed opening? There's a flexible product (or two) that you can form up and around giving you a one pc seal. I've only done it with pcs, overlapping as I go.
Something that gets in will not get stopped at the bottom corners. All the caulking in the world under the threshold will not stop the water from going sideways-easily to your wet points.
Take some paper towel or whatever.............
cram it in from the inside - down at the bottom corners.
Go outside and spray just at the bottom-slab/wall joint.
Check that paper after an hour.
Put another couple pcs in the corners from the inside.
Flood the area a little higher.
Work your way up-giving at least a hour to let the water work it's way in and down.
I found a slab wall leak after a whole lotta trying, at the bottom of some brick on slab veneer. It took easily an hour for it to work its way inside. The gap was UNDER the brick, in the bed joint of mortar------------couldn't see it if you stood on your head.
I used the Grace Vycor - overlapping and running up the sides. I'll get out the hose and paper towels tomorrow.
Thanks for the suggesion.
I took your exterior photo again, saved it to my HD and enlarged it. I see that the vertical corner vycor is applied first, then your horizontal lower run applied over it. That again is a water trap where they meet.
I actually am a fan of this system as a temporary water shed, but everything in it's place.
I see no photos of the top of this wall to have any idea if water is being kept out p there
You are correct, the grace vycor does have a horizontal top lap over the vertical zip tape. If it helps, the zip tape behind the grace vycor does run full length to the bottom of the wall.
The photos don't show it, but the top has the zip panels butted up to the original sheathing with a horizontal run of zip tape. The house was originally built 20+ years ago without a housewrap... just sheathing and siding. Surprisingly nothing has leaked but the new stuff!
What does "buttoned up" mean?
What does "buttoned up" mean? Is there a lap of something under the upper siding and over the sheathing?
The new zip sheathing is installed up flush to the original house sheathing on the main level. At that point I've zip taped the joint. There's no house wrap installed up above - just the orinigal sheating with the original siding installed directly over (which is remaining). I'm only upgrading from the main level down (basement wall).
I did find small gaps at the bottom of the new door on each side... hard to image that much water could come from such a small gap, but I guess anything is possible. I'm going to seal those up and hopefully resolve that area. As for the third area, I belive it must be coming from one of the door openings above on the main level. I plan on replacing those doors after the new deck is built (after siding). Hopefully that will fix that area. I'll be leaving the interior unfinished for now so anything that does get in will be easy seen.
Thanks for all the help and suggestions.
Lot slope
What is the slope of the lot from back to front? I assume that back is lower, how much lower is it?
You say slab on grade but you also say basement walkout. Is the mainfloor at the front of the house a walk up?
One possible though probably unlikely situation is that the front of the house is at a sufficiently higher grade than the back yard, the rain flows through the soil hits the front foundation wall, runs down the wall to hit the perimeter drain, drain is either clogged or not working well enough such that water table rises to top of slab inside, water fills gravel area under slab and works its way to the backyard where the slope is lower, the water can't flow well as it has to either push through slow draining hardpan under the back footing and is forced up at the low spot.
Other unlikely scenario, a water spring under the slab, same scenario water fills void and is forced up crack at lowest spot.
I don't see that much water coming up out of the concrete, concrete will wick up water but it isn't going to expell the water just as you don't see trees dripping water from the top (there is evaporation coming from the leaves just like there is going to be evapouration from a concrete surface that has wicked water).
Based on the first 2 pictures I suspect that the water is not coming up, the water looks to be on top of the sill and 2" up one of the studs, is the shadow under the orange cord a moisture shadow or a light shadow.
Based on the amount of water I'd put my bet on the existing top floor wall or the interface between the old and new with the water following the space between the stud and the sheathing on the inside.
This old house had the zip system demo'd recently, looks like a good system. Interesting thoughts on the uphill tap joint.
Good luck
The front yard is higher - even with the main level of the house. The grade slopes on each side of the house to have a walkout basement on the back. It's the basement slab that is on grade. The front has great drainage going to the sides away from the house, so I don't think it's anything from that. I think the leak is either from something up top that I haven't found yet or the small gaps at the bottom of the door. Either way, I'm sealing up the base of the wall with plastic that runs down the face of the slab and out from the foundation about a foot. I'm applying sealant behind the plastic and zip taping the seam... nothing will get behind that. At the top I'm going install some felt and flash everything properly. My main concern was that the slab was soaking up that much water - which from most opinions here that seems to not be the case.
The grade going away from the basement is all sloped properly. I'm also installing french drains and backfilling the entire area around the basement slab with gravel to allow for drainage. I can't imagine having any water issues when this is done.
Now I'm rethinking this idea of putting plastic around the slab edge and foundation... several places online that say this will actually trap moisture within the founation, but I've also found details recommending it. So now I don't know what to do. Any suggestions? Think I'll create a new post for this question too.
The water did not get onto the top of the plate (as it clearly did in your photos) by coming up through the crack between plate and slab. It came from somewhere above. It may, eg, have come through the nail holes in your sheathing, or through a joint somewhere. What you do to the slab won't make much difference.
That's it, in a nutshell !
Wall
Looks like the wall is leaking, because the water is on top of the sill plate.
I don't know how much back-fill you have but looks like (if it was me) I'd dig it out and install drainage. Just be sure the bottom grade goes away from all structures.
I know, easier said than done. But if you don't do it, it will do greater damage.
Howdy it appears that the drainage is not great next to this wall an 2 down spouts draining right next to the house only add to potential water issues. Consider extending the downspouts 6 foot away from the wall. Might consider adding acustic caulk behind the sill plate too.
Howdy it appears that the drainage is not great next to this wall an 2 down spouts draining right next to the house only add to potential water issues. Consider extending the downspouts 6 foot away from the wall. Might consider adding acustic caulk behind the sill plate too.
Howdy it appears that the drainage is not great next to this wall an 2 down spouts draining right next to the house only add to potential water issues. Consider extending the downspouts 6 foot away from the wall. Might consider adding acustic caulk behind the sill plate too.
I've got the grade sloped as much as I can without having to dig out the entire back yard. The grade was originally about 12-16 inches above slab before I started. The bottom 24" of the wall was brick with soil backfilled. I've taken out all the brick and plan to install siding up the wall. The grade slopes down to where I'm installing a new french drain system. The down spouts will go into solid 4" pvc pipe that runs about 20 feet out from the house into a gravel pit for drainage.
did you get the doors sealed up?
And the outcome?
did you end up water flooding in vertical lifts to find the source of the problem?
Got the bottom of the door sealed where the brick mold meets the sheathing. I also found there was a small gap between the brick mold and the door jamb, so I sealed that all around also. I decided against pulling out the hose and soaking the wall just yet. That area around the house stays wet anytime it rains and takes forever to dry out. I'm currently in the process of backfilling and sloping all the grade just out from the house and installing a french drain. It's wet enough just from the rain we've gotten lately. If I were to wet the wall with the hose right now I would have nothing but mud I'm trying to work with. After all the grading and drains are done, I'm covering the entire area with 2-3 inches of 57 stone. I'll hold off on the siding, finish all the earth work, and then try the hose test and be sure to post the outcome. That way I can test the wall and my new drains!
How bout inside?
have you used fans in an attempt to dry out the framing?
If you get it dry will it stay that way?