FHB Logo Facebook LinkedIn Email Pinterest Twitter X Instagram Tiktok YouTube Plus Icon Close Icon Navigation Search Icon Navigation Search Icon Arrow Down Icon Video Guide Icon Article Guide Icon Modal Close Icon Guide Search Icon Skip to content
Subscribe
Log In
  • How-To
  • Design
  • Tools & Materials
  • Restoration
  • Videos
  • Blogs
  • Forum
  • Magazine
  • Members
  • FHB House
  • Podcast
Log In

Discussion Forum

Discussion Forum

conversion: attic —-> master bed/bath

chusterfield | Posted in Construction Techniques on May 22, 2012 01:55am
Hello everyone…
Please let me preface all of my following statements and questions with a little background on my situation. This is the first forum to which I have ever posted. (I know, pretty strange these days). Most of the time I try to glean what I can from other people’s threads who have similar questions. This method has served well in the past, but it is not quite cutting it this time. I don’t feel that I have a situation completely unique to ONLY me, but I cannot seem to find one similar enough to jump on board with the answers.
 
OK… here we go
 
My questions involve an almost complete tear-down of a 1.5 story, brick and stucco home built outside of Denver, Colorado in 1947. Now that I have been working on it for a year already, I get the feeling I should have bulldozed the thing and started from scratch, but I’m in it up to my eyelids now.
 
Starting from the ground and moving upwards, I have repaired small cracks in the foundation, replaced/sistered sagging floor joists, etc. and I believe my last step in structural additions/repairs is to prepare the previously unused attic to be used for a master bed/bath.  Everything is on 16″ centers.
 
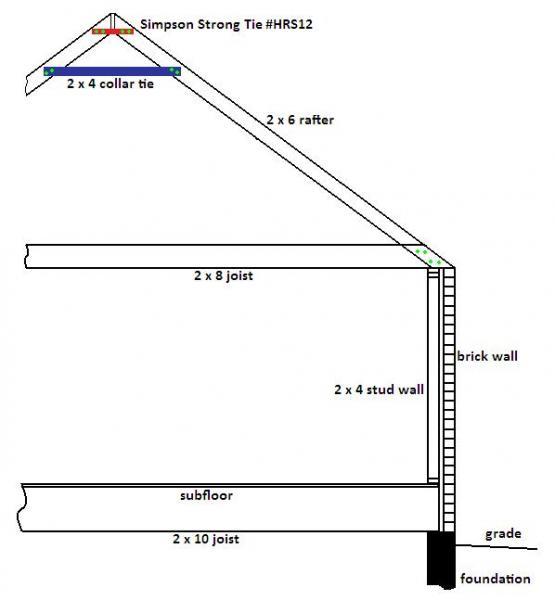
We will call the main floor ceiling joists 2×8’s, although their actual nominal dimensions are 2″ x 7 1/4″ (strange to me, but I don’t know much about lumber in the 1940’s). They are toenailed to 2×4 double top plate interior walls and also bear some on the top course of brick. The roof rafters are 2×6 lumber also toenailed to wall top plate and side-nailed to the ceiling joists. I don’t think this has any effect on things, but there are no soffits on the house, just a 1″ overhang of roofing materials, so there are not any birdsmouth notches, just slanted cuts. The roof pitch is very close to a 13′ run to 10′ rise, (actual size) which yields about a 16′ 6″ LINEAR rafter.  There are 2×4 collar ties lapped and side nailed to every rafter pair.  They are approximately 4′ long (between the rafters w/o the lap included) and located 2′ below the ridge.  The ridge is not a structural ridge beam, it is just a 1×6 with the rafters toenailed to it and to each other.  The ends of the rafters line up really well.  Oh, and the proposed roof section to undergo changes is 25 feet long (ridge length).
 
I’m going to do a sealed (non-vented), exposed-beam, cathedral ceiling with closed-cell foam insulation to get around R36 in 5 1/2″.  I would really like the look of the ties as double 2×6’s sandwiching rafter pairs.  These would be bolted through instead of nailed.  For aesthetic reasons and to make drywall a lot simpler I would like to “conventionally tie” only every third rafter pair. I would keep roughly the same vertical location and length.  I would then use solid 2×6 blocking from each tie to the next, through the two bays to help eliminate twisting because of the collar tie removal.  To keep the roof from opening up in high winds though, I would install something like this Simpson Strong Tie strap to join every rafter pair directly underneath the ridge board:
 
http://www.homedepot.com/buy/building-materials/builders-hardware/simpson-strong-tie/hrs12-12-in-heavy-duty-strap-67474.html
 
I’m not sure if the original design lessened rafter sag due to snow loading, or if it was just to keep rafters in line and to keep roof from spreading at the ridge since the joists are keeping the roof from pushing on walls.  To help with the snow loading issue, I also am planning on building knee walls at a height of 4′ which would put them about 5′ 6″ in from the eaves, leaving a room width of around 15′ between knee walls.  If my thinking is correct (BIG IF!) this would help with the rafter sag if I install the knee wall studs as compressive members, tight fitting, in other words.
 
OK… there it is.  I am sure I left something out.  At least one something, so if anyone needs clarification before pondering this, please let me know.  Judging by previous posts, you guys are not going to pull any punches, but please feel free to pick this apart.  I could maybe guess on the wood species and grade if anyone needs it, but I haven’t seen any stamps
 
I certainly don’t intend to ignite terminology riots, so if anyone feels I have mis-named something please try to educate me.  ANY clarification would be MUCH appreciated.  I have attached a drawing of the whole mess, my proposed additions in red, removals in blue, nail locations in green dots, bolts in yellow.


I am wondering if the plan above is acceptable, in whole or part, from the ties to the straps to the knee walls, so have at it!
Oh… and no inspections/permits/IRC dilemmas, just worried about CORRECT, SAFE work that will last.  Anything worth doing is worth doing right!  Right?  Right.
 
Regards, and thanks in advance to everyone…
 
DB
Reply
  • X
  • facebook
  • linkedin
  • pinterest
  • email
  • add to favorites Log in or Sign up to save your favorite articles

Replies

  1. User avater
    chusterfield | May 22, 2012 11:31am | #1

    spliced/fastened well... i'll check the sag tonight

    DanH...

    thanks for the speedy response!

    first answer:

    the rafters are nailed to the joists with some pretty beefy nails.   not sure of the exact type but i can see tips coming through on each side.   There looks to be about 3 nails in each direction.  1 1/2" 2x6 + 2" joist + 1/2" tip, and the heads are around 3/8" dia. so i would guess them to be 20d?

    the joists are spliced in the center with 24" long plates made from 1x8, one on each side, and they are peppered with nails.  i count around 5 per side, per foot = 20 per splice.

    second answer:

    i will get a string line on a couple of rafters tonight... but my eyeballs tell me it is really good, they have been known to lie to me, but not very often.  i will let you know...

    thanks again!

    hope this helps everyone

    DB

  2. User avater
    xxPaulCPxx | May 22, 2012 12:56pm | #2

    Well, I really don't think that's going to work.

    FWIW, I'm doing a similar project right now:  Preparing an attic space to be a 2nd floor.

    If your attic is 26 feet wide (13'+13') x 25 feet (ridge plank) long, you will need some good mid-span support.  That requires interior bearing walls and footings suitble for a 2nd story.  Some engineering needs to be done here.

    No matter what, you can't do a floor with those 2x8s as they will be undersized.  Depending on where the midspan supprot is, you might be able to use 2x10's as the floor joist for the attic... but you can't cut off the corners so they fit under the roof.  I think you will have to raise your roof to sit on TOP of  the new platform that your new floor joists will present.

    1. User avater
      chusterfield | May 22, 2012 02:54pm | #3

      yep... i left stuff out!

      xxpaulcpxx...

      Okay, in my original post i didn't mention that i am not at all concerned with first-floor bearing. The longest span on which the 2x8's would see live loads is 14'. For this section i sistered the old dimensional stuff with new fir-hem #1 joists. All the other spans are 12' or shorter. Also, the bearing walls on the first floor sit on cinderblock walls layed on footings in the basement. The attic situations are the only ones in question.

      Thanks!

      DB

  3. User avater
    chusterfield | May 23, 2012 12:01am | #4

    rafter bellies are minimal!

    DanH...

    As promised, I put the string to several rafters in the house tonight and found most were only sagged by a string width or slightly more.  3/32" on average if I had to put a number on it.

    I did find one that had about 3/16" of a belly, but all the others were well under the 1/8" margin.  Pretty good in my book... What do you think?

    DB

  4. User avater
    chusterfield | May 23, 2012 12:06pm | #5

    and the knee wall verdict is?

    Thanks DanH...

    I think i will be just fine going ahead according to my plans, but I'm a step or three away so I can wait for more comments to come in (if they do).

    In the meantime, what do you think about slightly pushing each rafter up with the knee wall studs? My only concern is; during high winds, the roof probably will flex a little, right? Do I want the walls compressed so much already (by jacking the rafters up during knee wall construction) that there may be noises or other adverse movement/energy translations during slight roof lift or fall? Maybe it's negligible, your thoughts?

    Thanks for your time and expertise!

    DB

    1. calvin | May 23, 2012 02:31pm | #6

      Chuster

      Do you have any concerns with the added load applied to your joists with these pushing up kneewalls?

      And don't forget-know where the ceiling is when you walk around.  I've worked in many kneewalled borrowed spaces and I understand why our code officials here will not allow anything under 5' high to be considered liveable.

      Put a hat on and the condition is even worse.

Log in or create an account to post a comment.

Sign up Log in

Become a member and get full access to FineHomebuilding.com

Video Shorts

Categories

  • Business
  • Code Questions
  • Construction Techniques
  • Energy, Heating & Insulation
  • General Discussion
  • Help/Work Wanted
  • Photo Gallery
  • Reader Classified
  • Tools for Home Building

Discussion Forum

Recent Posts and Replies

  • |
  • |
  • |
  • |
  • |
  • |
View More Create Post

Up Next

Video Shorts

Featured Story

Eichlers Get an Upgrade

Performance improvements for the prized homes of an influential developer who wanted us all to be able to own one.

Featured Video

How to Install Cable Rail Around Wood-Post Corners

Use these tips to keep cables tight and straight for a professional-looking deck-railing job.

Related Stories

  • Podcast Episode 690: Sharpening, Wires Behind Baseboard, and Fixing Shingle Panels
  • FHB Podcast Segment: Hand Tool Sharpening Tips
  • Old House Air-Sealing Basics
  • A Drip-Free, Through-Window Heat Pump

Highlights

Fine Homebuilding All Access
Fine Homebuilding Podcast
Tool Tech
Plus, get an extra 20% off with code GIFT20

"I have learned so much thanks to the searchable articles on the FHB website. I can confidently say that I expect to be a life-long subscriber." - M.K.

Get home building tips, offers, and expert advice in your inbox

Signing you up...

This site is protected by reCAPTCHA and the Google Privacy Policy and Terms of Service apply.
See all newsletters
See all newsletters

Fine Homebuilding Magazine

  • Issue 332 - July 2025
    • Custom Built-ins With Job-Site Tools
    • Fight House Fires Through Design
    • Making the Move to Multifamily
  • Issue 331 - June 2025
    • A More Resilient Roof
    • Tool Test: You Need a Drywall Sander
    • Ducted vs. Ductless Heat Pumps
  • Issue 330 - April/May 2025
    • Deck Details for Durability
    • FAQs on HPWHs
    • 10 Tips for a Long-Lasting Paint Job
  • Old House Journal – August 2025
    • Designing the Perfect Garden Gate
    • Old House Air-Sealing Basics
  • Issue 329 - Feb/Mar 2025
    • Smart Foundation for a Small Addition
    • A Kominka Comes West
    • Making Small Kitchens Work

Fine Home Building

Newsletter Sign-up

  • Fine Homebuilding

    Home building tips, offers, and expert advice in your inbox.

  • Green Building Advisor

    Building science and energy efficiency advice, plus special offers, in your inbox.

  • Old House Journal

    Repair, renovation, and restoration tips, plus special offers, in your inbox.

Signing you up...

This site is protected by reCAPTCHA and the Google Privacy Policy and Terms of Service apply.
See all newsletters

Follow

  • Fine Homebuilding

    Dig into cutting-edge approaches and decades of proven solutions with total access to our experts and tradespeople.

    Start Free Trial Now
    • Facebook
    • Instagram
    • X
    • LinkedIn
  • GBA Prime

    Get instant access to the latest developments in green building, research, and reports from the field.

    Start Free Trial Now
    • Facebook
    • YouTube
  • Old House Journal

    Learn how to restore, repair, update, and decorate your home.

    Subscribe Now
    • Facebook
    • Instagram
    • X

Membership & Magazine

  • Online Archive
  • Start Free Trial
  • Magazine Subscription
  • Magazine Renewal
  • Gift a Subscription
  • Customer Support
  • Privacy Preferences
  • About
  • Contact
  • Advertise
  • Careers
  • Terms of Use
  • Site Map
  • Do not sell or share my information
  • Privacy Policy
  • Accessibility
  • California Privacy Rights

© 2025 Active Interest Media. All rights reserved.

Fine Homebuilding receives a commission for items purchased through links on this site, including Amazon Associates and other affiliate advertising programs.

  • Home Group
  • Antique Trader
  • Arts & Crafts Homes
  • Bank Note Reporter
  • Cabin Life
  • Cuisine at Home
  • Fine Gardening
  • Fine Woodworking
  • Green Building Advisor
  • Garden Gate
  • Horticulture
  • Keep Craft Alive
  • Log Home Living
  • Military Trader/Vehicles
  • Numismatic News
  • Numismaster
  • Old Cars Weekly
  • Old House Journal
  • Period Homes
  • Popular Woodworking
  • Script
  • ShopNotes
  • Sports Collectors Digest
  • Threads
  • Timber Home Living
  • Traditional Building
  • Woodsmith
  • World Coin News
  • Writer's Digest
Active Interest Media logo
X
X
This is a dialog window which overlays the main content of the page. The modal window is a 'site map' of the most critical areas of the site. Pressing the Escape (ESC) button will close the modal and bring you back to where you were on the page.

Main Menu

  • How-To
  • Design
  • Tools & Materials
  • Video
  • Blogs
  • Forum
  • Project Guides
  • Reader Projects
  • Magazine
  • Members
  • FHB House

Podcasts

  • FHB Podcast
  • ProTalk

Webinars

  • Upcoming and On-Demand

Podcasts

  • FHB Podcast
  • ProTalk

Webinars

  • Upcoming and On-Demand

Popular Topics

  • Kitchens
  • Business
  • Bedrooms
  • Roofs
  • Architecture and Design
  • Green Building
  • Decks
  • Framing
  • Safety
  • Remodeling
  • Bathrooms
  • Windows
  • Tilework
  • Ceilings
  • HVAC

Magazine

  • Current Issue
  • Past Issues
  • Magazine Index
  • Subscribe
  • Online Archive
  • Author Guidelines

All Access

  • Member Home
  • Start Free Trial
  • Gift Membership

Online Learning

  • Courses
  • Project Guides
  • Reader Projects
  • Podcast

More

  • FHB Ambassadors
  • FHB House
  • Customer Support

Account

  • Log In
  • Join

Newsletter

Get home building tips, offers, and expert advice in your inbox

Signing you up...

This site is protected by reCAPTCHA and the Google Privacy Policy and Terms of Service apply.
See all newsletters
See all newsletters

Follow

  • X
  • YouTube
  • instagram
  • facebook
  • pinterest
  • Tiktok

Join All Access

Become a member and get instant access to thousands of videos, how-tos, tool reviews, and design features.

Start Your Free Trial

Subscribe

FHB Magazine

Start your subscription today and save up to 70%

Subscribe

Enjoy unlimited access to Fine Homebuilding. Join Now

Already a member? Log in

We hope you’ve enjoyed your free articles. To keep reading, become a member today.

Get complete site access to expert advice, how-to videos, Code Check, and more, plus the print magazine.

Start your FREE trial

Already a member? Log in

Privacy Policy Update

We use cookies, pixels, script and other tracking technologies to analyze and improve our service, to improve and personalize content, and for advertising to you. We also share information about your use of our site with third-party social media, advertising and analytics partners. You can view our Privacy Policy here and our Terms of Use here.

Cookies

Analytics

These cookies help us track site metrics to improve our sites and provide a better user experience.

Advertising/Social Media

These cookies are used to serve advertisements aligned with your interests.

Essential

These cookies are required to provide basic functions like page navigation and access to secure areas of the website.

Delete My Data

Delete all cookies and associated data