FHB Logo Facebook LinkedIn Email Pinterest Twitter X Instagram Tiktok YouTube Plus Icon Close Icon Navigation Search Icon Navigation Search Icon Arrow Down Icon Video Guide Icon Article Guide Icon Modal Close Icon Guide Search Icon Skip to content
Subscribe
Log In
  • How-To
  • Design
  • Tools & Materials
  • Restoration
  • Videos
  • Blogs
  • Forum
  • Magazine
  • Members
  • FHB House
  • Podcast
Log In

Discussion Forum

Discussion Forum

Cracked Tile – Why?

| Posted in Construction Techniques on December 31, 2003 08:04am

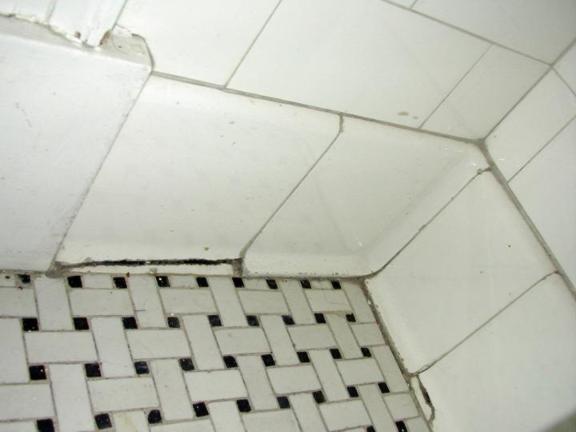
The ceramic base cove tiles in our bathroom are nearly all cracked at the point where they transisition form horizontal to vertical (see pictures).  I plan on replacing them and was wondering what I could do to prevent the problem from recurring.

I am speculating that thermal expansion/contraction of the floor tile couls have caused the cracking…is this a reasonable assumption, and what should be done in order to prevent the new tile from cracking in the same spot?

Reply
  • X
  • facebook
  • linkedin
  • pinterest
  • email
  • add to favorites Log in or Sign up to save your favorite articles

Replies

  1. andybuildz | Dec 31, 2003 08:48pm | #1

    Are the floors/walls under them new?

    Thats my guess....

    What kind of substrate did you use?

    We need more information here.

    Funny how some peeps give tons of info and no pictures and some give pictures with little information......OK OK...keep going with specs.

    Be well

                andy

    My life is my practice!

    http://CLIFFORDRENOVATIONS.COM

    1. 1sor1 | Dec 31, 2003 08:58pm | #3

      Well, if its specs you want...it's a small bathroom (7'x6' or so), with ceramic tile floor, 3x6 "subway" wall tiles to half-height, painted plaster above that.

      As far as I know, everything in the room is original to the house (built 1928).  Cast iron pedestal sink had seperate hot & cold water water spigots, etc.  So I have no idea what's under the tile floor or walls.

      I don't mind doing some investigation if that would help...I'll be knocking out all the base tiles anyway...

  2. BungalowJeff | Dec 31, 2003 08:55pm | #2

    It is probably due to a combination of things. There is no proper subbase for the old tiles. Old base mold tiles do not have beefed up cross sections at the fillet area the cracks are forming in. And, the grout lines are so tight, expansion of the floor tiles probably put repeated stress on those base mold tiles over the years (those tiles look like an early 20's, or earlier vintage).

    With a new subbase and modern tiles, your replacement tiles should be fine.

    ...that's not a mistake, it's rustic

    1. 1sor1 | Dec 31, 2003 09:03pm | #5

      You're right on the money (1920's vintage everything).  So you think that the heavier cross-section of a more modern cove tiles would solve the problem?  Excuse my ignorance, but what is typically used as a sub-base?

      Steve

  3. MisterT | Dec 31, 2003 08:59pm | #4

    Does the floor have a mud bed under it?

    Are the wall and base tiles newer than the floor?

    Is this an older home? 50+/-

    My Guess is that the walls are settling for some reason and putting pressure on the Cove of the base tiles.

    You may find rotten wall plates behind the tile.

    Got Leaks?     Plumbing or Roof.

    Done any work above this bath?

    Below?

    Did the house sit unoccupied for over a winter?

    with no heat?

    Get ready to find something bad when you take off those tiles.

    Got $$$$$$$$$ ?

    Mr T

    Do not try this at home!

    I am an Experienced Professional!

    1. 1sor1 | Dec 31, 2003 09:11pm | #6

      You're scaring me now...this was supposed to be simple :)

      To answer your questions, though:

      - Everything is original to the house (1928), as far as I know

      - Don't know what's under the floor tile

      - No work done, always occupied/heated, no known or obvious leaks (although this is a bathroom with a tub & kids; grout is not in the best shape throughout), no settlement problems anywhere else in the house (discovered that window openings are all square(!) during window replacement project).

       Well, I'm taking off the base tiles regardless...I can let you know how bad the "something" is back there once they're off...

      1. andybuildz | Dec 31, 2003 09:32pm | #7

        This is a confusing one to me.........

        If yer gonna rip it out do a mud job or at least lay in some wire lathe under the thinset job you do, do.

        Very interesting problem...My house is 325 years old and I havent a problem at all with the tile work I've just done.

        Post a picture of the house from outside if you wouldn't mind

        Ne well

                  andyMy life is my practice!

        http://CLIFFORDRENOVATIONS.COM

      2. MojoMan | Jan 01, 2004 01:11am | #8

        The floor tiles look just like the ones I recently removed from my 1929 home. It had wire lath and about 1" of mud on the walls and about 1-1/2" of mud over about 1-1/2" of concrete on the floor. As soon as you start, you will have likely opened a can of worms. Unless you're one very lucky fellow, you will have remodeled the whole bath by the time you are done. I hated tearing mine out, because it had served well for 70 years and once I started, I knew why. Everything was very solid and very heavy. I doubt it will surrender just those tiles without damage to surrounding areas.

        Those cracks are not new are they?

        Al Mollitor, Sharon MA

        1. 1sor1 | Jan 01, 2004 01:19am | #9

          The cracks are not new - they were there when we moved in a few years ago.  I'm pretty daunted by the notion of having this base replacement turn into a full; on the other hand, as the inevitable water that gets on the floor makes it's way through those cracks, it can only make things worse (rotted wood...).

          Steve

          1. UncleDunc | Jan 01, 2004 01:41am | #11

            >> ... as the inevitable water that gets on the floor makes it's way through those cracks ...

            If those cracks weren't there, wouldn't the inevitable water make it's way through cracks in the grout, or cracks between the floor tiles and the grout? I have a hard time believing a 75 year old tile job would be waterproof if it weren't for the cracked base tiles.

            And besides that, what you doing taking pictures in my mama's bathroom?

            Edited 12/31/2003 5:43:34 PM ET by Uncle Dunc

        2. brownbagg | Jan 01, 2004 01:21am | #10

          80 years old and onlt that cracking. could it just be that they are old. put in before a/c so no thermal protection. I do not think there is a problem, just old.

          The best employee you can have but you wouldn't want him as a neighbor " He the shifty type"

      3. MisterT | Jan 01, 2004 01:59am | #13

        The floor looks good.

        What I can see of it.

        If it is a fullbed mud job, which is pretty likely, it should be fine.

        You don't want to tear out a mud bed tile floor if you don't have to!!!

        Mr T

        Do not try this at home!

        I am an Experienced Professional!

  4. SEBDESN | Jan 01, 2004 01:54am | #12

    IMHO the problem is that the wall and the floor are moving separate from each other.

    I have a similar effect in a bath with a mud floor, and the wall tiles are on a solid masonry wall. from summer to winter the floor joists shrink/expand and the joint between wall and floor cracks. fortunately there is not a cove tile at the transition so the grout cracks out. I put silicone in place of the grout and the problem went away as the silicone moves. If there were coves at that joint they would undoubtably crack.you probably need to figure out how to let it move when you replace the coves.ie don't replace the coves.

    Bud

  5. User avater
    EricPaulson | Jan 01, 2004 02:11am | #14

    I can't say what caused it but it is not at all unusual. If you think about it; if the base cove tile are stuck to both the wall and the floor they're gonna crack sooner or later.

    Yuo are NOT going to fix it even IF you could find replacement tile. Clean it up, force some Phenoseal into the cracks and live with it. Or gut the whole room.

    Eric


    Edited 12/31/2003 6:14:39 PM ET by firebird

  6. Scooter1 | Jan 01, 2004 02:26am | #15

    This is an easy one. Typically Cove Base tile is only thinsetted on the walls not the floor, and is left hovering over the floor to float. The space between the cove and the floor is caulked.

    Your installer thinsetted the cove base to the wall and to the floor. One of the planes moved, the other didn't. The tile cracked.

    When you replace them, dig out all the thinset you can and clean off the backs of the good tiles that you dig out. Get all the grout out, too. Soak the setting bed in water or run a sponge over it and thinset the heck out of it on the walls only. Put no thinset on the 3/4" or so of the floors. Just let it lie there. If that really upsets you, then use a caulk on the floor.

    Once the thinset is cured, the next day or so, grout the tile and caulk the space between the cove tile and the floor tile with a sanded caulk to match your grout.

    Good Luck

    Regards,

    Boris

    "Sir, I may be drunk, but you're crazy, and I'll be sober tomorrow" -- WC Fields, "Its a Gift" 1934

    1. User avater
      JeffBuck | Jan 01, 2004 10:48am | #16

      Right on the money ...

      except for the "typical" comment ...

      at that age  .... typically ... this was the installation.

      Simply ... the walls and floor were a full mud job install ....

      and the base cove was installed tying both the floor and the wall together

      and we all know what's gonna happen  then ... a crack.

      Gotta go ... Kid's awake!

      Jeff

      Buck Construction   Pittsburgh,PA

           Artistry in Carpentry                

      1. HeavyDuty | Jan 01, 2004 11:20am | #17

        ...but they didn't have modern elastomeric caulking back then.

        Gotta go... I am half asleep.

    2. 1sor1 | Jan 02, 2004 05:26pm | #18

      Hey All, thanks for the input.

      I'm gonna go with Boris's suggested method (since he said what I thought I wanted to hear)...I'll let you know how it goes.

      Steve

  7. archyII | Jan 03, 2004 02:59am | #19

    I would just replace them and hope that your new tile looks that good 70 years from now.  In that amount of time a lot of things could happen.  All tile has small faults in it from the firing process and over time cracks will appear.  The same with the glaze.  We now pay a premium for tile that has a crazed glaze to make it look older.

Log in or create an account to post a comment.

Sign up Log in

Become a member and get full access to FineHomebuilding.com

Video Shorts

Categories

  • Business
  • Code Questions
  • Construction Techniques
  • Energy, Heating & Insulation
  • General Discussion
  • Help/Work Wanted
  • Photo Gallery
  • Reader Classified
  • Tools for Home Building

Discussion Forum

Recent Posts and Replies

  • |
  • |
  • |
  • |
  • |
  • |
View More Create Post

Up Next

Video Shorts

Featured Story

Picture-Perfect Pergola

Built from locally sawn hemlock, this functional outdoor feature uses structural screws and metal connectors for fast, sturdy construction.

Featured Video

Builder’s Advocate: An Interview With Viewrail

Learn more about affordable, modern floating stairs, from design to manufacturing to installation.

Related Stories

  • FHB Podcast Segment: Embodied Greenhouse Gas Emissions and the Building Codes
  • Old Boots Learn New Tricks
  • Install Denim Insulation Like a Pro
  • Podcast Episode 691: Replacing Vinyl Siding, Sloping Concrete, and Flat vs. Pitched Roofs

Highlights

Fine Homebuilding All Access
Fine Homebuilding Podcast
Tool Tech
Plus, get an extra 20% off with code GIFT20

"I have learned so much thanks to the searchable articles on the FHB website. I can confidently say that I expect to be a life-long subscriber." - M.K.

Get home building tips, offers, and expert advice in your inbox

Signing you up...

This site is protected by reCAPTCHA and the Google Privacy Policy and Terms of Service apply.
See all newsletters
See all newsletters

Fine Homebuilding Magazine

  • Issue 332 - July 2025
    • Custom Built-ins With Job-Site Tools
    • Fight House Fires Through Design
    • Making the Move to Multifamily
  • Issue 331 - June 2025
    • A More Resilient Roof
    • Tool Test: You Need a Drywall Sander
    • Ducted vs. Ductless Heat Pumps
  • Issue 330 - April/May 2025
    • Deck Details for Durability
    • FAQs on HPWHs
    • 10 Tips for a Long-Lasting Paint Job
  • Issue 329 - Feb/Mar 2025
    • Smart Foundation for a Small Addition
    • A Kominka Comes West
    • Making Small Kitchens Work
  • Issue 328 - Dec/Jan 2025
    • How a Pro Replaces Columns
    • Passive House 3.0
    • Tool Test: Compact Line Lasers

Fine Home Building

Newsletter Sign-up

  • Fine Homebuilding

    Home building tips, offers, and expert advice in your inbox.

  • Green Building Advisor

    Building science and energy efficiency advice, plus special offers, in your inbox.

  • Old House Journal

    Repair, renovation, and restoration tips, plus special offers, in your inbox.

Signing you up...

This site is protected by reCAPTCHA and the Google Privacy Policy and Terms of Service apply.
See all newsletters

Follow

  • Fine Homebuilding

    Dig into cutting-edge approaches and decades of proven solutions with total access to our experts and tradespeople.

    Start Free Trial Now
    • Facebook
    • Instagram
    • X
    • LinkedIn
  • GBA Prime

    Get instant access to the latest developments in green building, research, and reports from the field.

    Start Free Trial Now
    • Facebook
    • YouTube
  • Old House Journal

    Learn how to restore, repair, update, and decorate your home.

    Subscribe Now
    • Facebook
    • Instagram
    • X

Membership & Magazine

  • Online Archive
  • Start Free Trial
  • Magazine Subscription
  • Magazine Renewal
  • Gift a Subscription
  • Customer Support
  • Privacy Preferences
  • About
  • Contact
  • Advertise
  • Careers
  • Terms of Use
  • Site Map
  • Do not sell or share my information
  • Privacy Policy
  • Accessibility
  • California Privacy Rights

© 2025 Active Interest Media. All rights reserved.

Fine Homebuilding receives a commission for items purchased through links on this site, including Amazon Associates and other affiliate advertising programs.

  • Home Group
  • Antique Trader
  • Arts & Crafts Homes
  • Bank Note Reporter
  • Cabin Life
  • Cuisine at Home
  • Fine Gardening
  • Fine Woodworking
  • Green Building Advisor
  • Garden Gate
  • Horticulture
  • Keep Craft Alive
  • Log Home Living
  • Military Trader/Vehicles
  • Numismatic News
  • Numismaster
  • Old Cars Weekly
  • Old House Journal
  • Period Homes
  • Popular Woodworking
  • Script
  • ShopNotes
  • Sports Collectors Digest
  • Threads
  • Timber Home Living
  • Traditional Building
  • Woodsmith
  • World Coin News
  • Writer's Digest
Active Interest Media logo
X
X
This is a dialog window which overlays the main content of the page. The modal window is a 'site map' of the most critical areas of the site. Pressing the Escape (ESC) button will close the modal and bring you back to where you were on the page.

Main Menu

  • How-To
  • Design
  • Tools & Materials
  • Video
  • Blogs
  • Forum
  • Project Guides
  • Reader Projects
  • Magazine
  • Members
  • FHB House

Podcasts

  • FHB Podcast
  • ProTalk

Webinars

  • Upcoming and On-Demand

Podcasts

  • FHB Podcast
  • ProTalk

Webinars

  • Upcoming and On-Demand

Popular Topics

  • Kitchens
  • Business
  • Bedrooms
  • Roofs
  • Architecture and Design
  • Green Building
  • Decks
  • Framing
  • Safety
  • Remodeling
  • Bathrooms
  • Windows
  • Tilework
  • Ceilings
  • HVAC

Magazine

  • Current Issue
  • Past Issues
  • Magazine Index
  • Subscribe
  • Online Archive
  • Author Guidelines

All Access

  • Member Home
  • Start Free Trial
  • Gift Membership

Online Learning

  • Courses
  • Project Guides
  • Reader Projects
  • Podcast

More

  • FHB Ambassadors
  • FHB House
  • Customer Support

Account

  • Log In
  • Join

Newsletter

Get home building tips, offers, and expert advice in your inbox

Signing you up...

This site is protected by reCAPTCHA and the Google Privacy Policy and Terms of Service apply.
See all newsletters
See all newsletters

Follow

  • X
  • YouTube
  • instagram
  • facebook
  • pinterest
  • Tiktok

Join All Access

Become a member and get instant access to thousands of videos, how-tos, tool reviews, and design features.

Start Your Free Trial

Subscribe

FHB Magazine

Start your subscription today and save up to 70%

Subscribe

Enjoy unlimited access to Fine Homebuilding. Join Now

Already a member? Log in

We hope you’ve enjoyed your free articles. To keep reading, become a member today.

Get complete site access to expert advice, how-to videos, Code Check, and more, plus the print magazine.

Start your FREE trial

Already a member? Log in

Privacy Policy Update

We use cookies, pixels, script and other tracking technologies to analyze and improve our service, to improve and personalize content, and for advertising to you. We also share information about your use of our site with third-party social media, advertising and analytics partners. You can view our Privacy Policy here and our Terms of Use here.

Cookies

Analytics

These cookies help us track site metrics to improve our sites and provide a better user experience.

Advertising/Social Media

These cookies are used to serve advertisements aligned with your interests.

Essential

These cookies are required to provide basic functions like page navigation and access to secure areas of the website.

Delete My Data

Delete all cookies and associated data