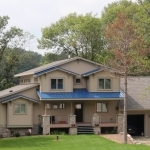
I want to add Crafstman Style Brackets to our house. I have the positions for the rear elevation figured out, but I am little stumped on the front.
I have attached a clean picture, and then one with two layout ideas. One idea is 3 per small gable (1 center, 1 at each corner). The other idea is 2 per small gable, each about 2/3rds down from the peak.
I also then need to decide how to do the large gable. There is not much room where the small gables are. . .
Maybe instead of traditional 45’s in the brackets, I should do something else?
Any ideas out there?
http://jhausch.blogspot.com
Adventures in Home Building
An online journal covering the preparation and construction of our new home.
Adventures in Home Building
An online journal covering the preparation and construction of our new home.


Replies
I think your second pic - the suggested layout looks good except for maybe add one in the peak of the large gable although from the angle of the shot, it's a bit hard to tell how much room there is between the small gables and the big one.
How wide are the overhangs?
As far as going other than 45 degrees, they make them that have maybe a 35/55 degree arrangement but normally the larger part of the triangle would be mounted vertical which would not accomplish what you are trying to do - if I understand correctly. That is not to say you can't make your own brackets, but still, IMO, the proportioning of the height to width applies. Maybe it's just that I have never seen it done the other way...
If you were to put 3 on all 3 of the small gable, it would be kinda busy.
It's a lot of gables though... here is an idea - how about just using the horizontal element of the bracket?
Edited 8/30/2006 8:01 am ET by Matt
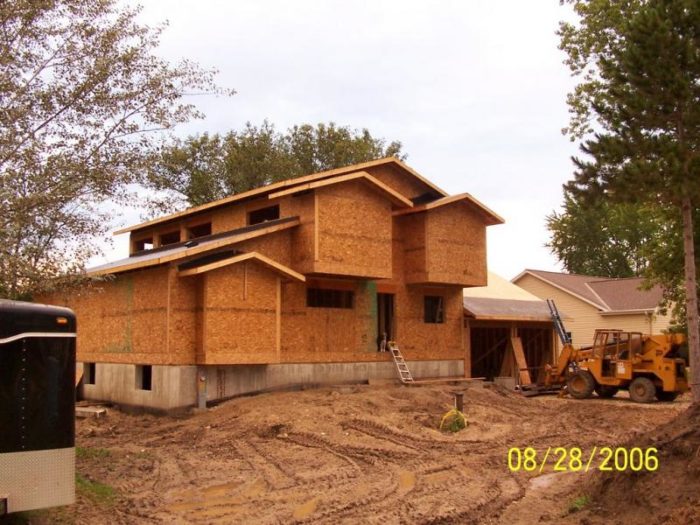
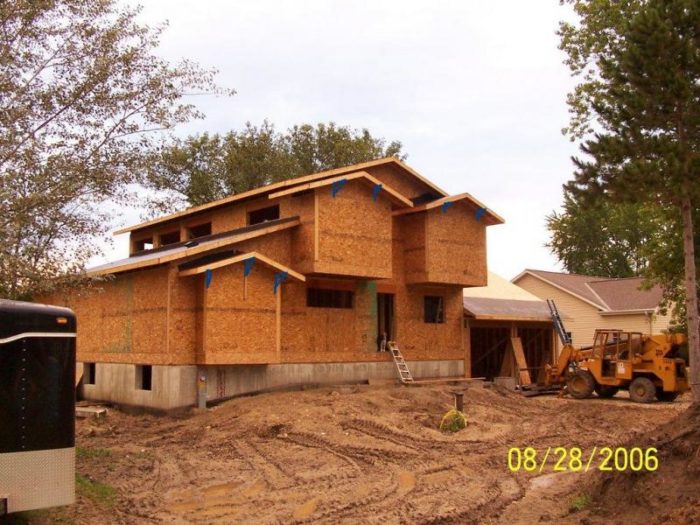
Looks as if you are going to have to train a small monkey to do the siding and trim details back in those deep between-roof recesses!
Gene:
It's not my project... I avoid those situations like the plague...
Yes, that is an unfortunate result of some compromises.
The porch and bumpout roofs will be standing seam metal like my garage. Could not afford to do the whole house since prices have gone up so much. Rather than deal with an un-sighly shingle to steel transition on the same roof plane, I dropped them down a bit.
It is so hidden, I may just run a trim board in there.
http://jhausch.blogspot.comAdventures in Home BuildingAn online journal covering the preparation and construction of our new home.
I thought about the horizontal element only. I may end up with a few mock ups first.
The overhang is 18"
You seem to be in the minority preferring the 2, but I, too, thought 3 on all three would be "busy". There is enough room between them. Visit my blog (this archive link: http://jhausch.blogspot.com/2006_04_02_jhausch_archive.html and you'll see some elevations. You'll also see that I changed the lower bump out to a gable from a shed roof.
I, too, agree on the 45. I have seen some where the leg on the wall is the short leg and the leg. Looks kinds funny, but was on a prairie wannabe tower on a suburban bank branch office.
Lotsa replies to reply to on this one. We'll see where it goes.
http://jhausch.blogspot.comAdventures in Home BuildingAn online journal covering the preparation and construction of our new home.
I think these would be perfect :-)
View Image
I made these for an addition on a Sears bungalow in Arlington, VA.
They were completely made with a circ. saw and CCA 6x6 - just for the exercise of no routing.
View Image
After 6 months or so, they were painted, and the client just loves them.
Note the "double teardrop" SYP siding. I had it made at a planing mill in Cavetown, MD to match the original (destroyed) siding on the original house.
Forrest
Nice work.
You did only the horizontal element at the peak. Are you suggesting the same for my gables?
I think 6x6 would be too big for this project. I was considering a few ideas for dressing them up. I like the "fender" detail at the ends of the angled member.
http://jhausch.blogspot.comAdventures in Home BuildingAn online journal covering the preparation and construction of our new home.
Yes, skipping the brace at the top would give a lighter look.
Having said that, I would say that by far the biggest mistake non-architects (I'm not one!) make is under-scaling exterior trim elements. Yeah, it may look big in your workshop, but it might look like a postage stamp on a whale on a big wall. 6x6 aren't that big in context.
I mean, I drew this balustrade to scale from a 1903 book:
View Image
Sure enough, this old rail I salvaged was within 8% of those "classical" dimensions, and will look great on a balcony on a 19' high porch roof - BUT the balcony is only 7' wide and 3' deep AND these top and bottom rails are 3x8. It looks stupidly huge sitting in my shop, but will look right when it's installed on the balcony.
View Image
The cornice and entablature to that porch is 30" high; seems stupid when I'm up beside it, but it is "right" from the ground
Do scaled elevation drawings, with perspective if you can, and ONLY scale decorative elements from that. I'm really on a soap box here!
Forrest - helping builders everywhere from falling into the "skinny trim" trap
Forrest - I know that planing mill, its local to me - why Cavetown? Seems a long way from GA.
this thread has me thinking of brackets for my house now...
Treat every person you meet like you will know them the rest of your life - you just might!
The job was in Arlington, VA - all my millwork and windows came from them - good guys, and they could get the CYP I feed on!
Forrest
Boy, I hope you left a gap between siding boards for expansion.
Whatchoo mean?
Forrest
Gap between the siding boards. But you already knew that.
When I saw you photo I rememberered a job we did about 10-12-years ago. Same siding profile, same wood, almost the same neighbouirhood. After buyiing ever last bit that Smoot's had in stock, we had the rest made. Primed it both sides. After one side of the house was sided, it rained that very night. Came in the next morning, and two courses were buckled. The carpemtry sub said it was impossible to leave a consistent gap between courses because of the crown in a 14' long board. He would have to slam the ends down tight, and have to use a lot of levering to get the center down for a consistent reveal. That job was a tough one.
I guess I was lucky. The wood went up fairly moist, and I DIDN"T EVEN PRIME the back. It sat like the picture for about 4-6 months, then was painted. Two years later, it's fine - no buckling at all. It's my SIL's house, and she would certainly let me know if there was a problem!
Forrest
If you put little brackets on the eaves you better put some huge ones under the bumpouts.
Take a look at these elevations:
http://jhausch.blogspot.com/2006_04_02_jhausch_archive.html
I think you may be onto something for the small one, but the large ones will be wrapped by the porch roof and have columns out a bit past where they end.
http://jhausch.blogspot.comAdventures in Home BuildingAn online journal covering the preparation and construction of our new home.
One idea is 3 per small gable (1 center, 1 at each corner).
More Authentic look.....Craftsman houses do not have "applied detail"....the braces were structural. They usually occur at the wall plates, and the ridge.
other idea is 2 per small gable, each about 2/3rds down from the peak
This would look all wrong.
Well, ostensibly structural. Oftentimes pieces were added in a faux structural context. Added-on rafter tails are a common one
In any case, you're right - any applied pieces better LOOK like they were completely functional.
Forrest - 'jus wantin' ta' use "ostensibly", "faux", an' "context" in one sentence
Copy that.......only Greene et al in southern Cal could get away with the actual structural beams extending out.
The rest of us should at least put said "faux" supports in the right location.
Good job on the word use........Been readin' the dixshonary again?
Just be careful not to over-utilize extremely extensive verbiage when comparatively diminutive particles of speech would undoubtedly suffice.
I like three per gable at all three per your suggestion, and the material should be 4x or less.
Larger (6x min.) brackets would look good under the two high cantilevers and would also lend the structural sensibility that makes craftsman houses so expressive.
Its a great looking start with a lot of potential for craftsman elements and materials.
Another vote for 3. . .
I'll refer you to some elevations, too - to address the comment about supporting the cantilevers. Take a look and tell me if you still think that is the way to go:
http://jhausch.blogspot.com/2006_04_02_jhausch_archive.html
http://jhausch.blogspot.comAdventures in Home BuildingAn online journal covering the preparation and construction of our new home.
Sorry - I'm gonna have to disagree on both points, although will agree with the "usually" in >> They usually occur at the wall plates, and the ridge. <<
From a book I have "Field Guide to American Houses" in the section "Eclectic Houses" craftsman 1905-1930" on the first page "Decorative (false) beams or braces under gables" and pictures of many if not most having brackets in the gables at house corners, at peak, and midway down, and few pics of houses with them only at intermediate points.
I've spent a number of hours doing field studies (driving around and taking pics) of this era and type of house in a near by historic district and others in the SE, and the one thing I know for sure is there there is no steadfast rules. Often styles are mixed, etc. I guess that is why the above author has them under "Eclectic".
Thanks.......I have the book....
While I agree that there are many photo examples showing additional brackets, they are always in addition to , not in liew of (as the OP questioned in blue below), the ones at the ridge and plates.
The other idea is 2 per small gable, each about 2/3rds down from the peak.
For more than a few of those photos.......Study the side walls carefully. Many of the "in between" brackets that occur between ridge and plate are actually located in line w/ the knee walls....this is done to keep the "Craftsman feel".
The very essence of Craftsman homes is a backlash against the Victorian excesses. They were not adorned w/ decorative "ornaments", but were designed to "show off" the exposed structural elements......
The fact that a lot of the knee braces present in most of the Craftsman homes were "decorative" is a result of the mass production of the "Sears kit homes".......does not mean that their placement was random.
Edited 9/1/2006 10:03 am ET by pickings
That's one vote for many.
Here are some interesting pics I found
http://tinyurl.com/s2o3z
http://jhausch.blogspot.comAdventures in Home BuildingAn online journal covering the preparation and construction of our new home.
You dont like windows much do you? You hiding something?
cute . . .
You probably already know this, but with SIPs, if the load above a window is calculated to be below a certain point, then no header is required beyond 1' of panel above the window.
You can have the holes cut at the factory or on-site when that is the case. In my case, it is less expensive to allow the contractor to cut them out. He has a chainsaw with a base like a circ saw. He then melts out a strip of the interior foam 1-1/2" deep with another specialty tool to accept 2x6 lumber around the perimeter.
I could have answerd any of the following however:
1) I'm treated like a mushroom at work (kept in the dark and fed Bull$hit), and wanted it to be the same at home
2) We can't afford any windows yet
3) Any you homos or preverts caught looking in my windas, I'll kill ya (lighten up Francis - a joke for folks who saw "Stripes")
4) We are into photography and those are darkrooms
5) "I always feel like somsbody's wachin' me (can't get no privacy- woh woh woh wooh oh)"
http://jhausch.blogspot.comAdventures in Home BuildingAn online journal covering the preparation and construction of our new home.
>>5) "I always feel like somsbody's wachin' me (can't get no privacy- woh woh woh wooh oh)"That's what you get for being a photographer. You're always watching other people, so why shouldn't they watch you?BTW, Just because you are paranoid it doesn't mean they aren't out to get you....
Is that the head of security there in the doorway?
5) "I always feel like somsbody's wachin' me (can't get no privacy- woh woh woh wooh oh)"
With Micheal Jackson singing backup, I can't imagine how he only had one popular song. ;)
jt8
"Success is not the key to happiness. Happiness is the key to success." --Albert Schweitzer
That's half of our on-site security team. Really, she's the bad cop, the other play's good cop.
However, DW wants a sign on the fence "Forget about the dogs, beware of wife"
http://jhausch.blogspot.comAdventures in Home BuildingAn online journal covering the preparation and construction of our new home.
Sips panels?
I think that the two on the eaves look better without the third one in the middle. Makes it look as if the top plate was run long to support the gable lookouts. (Semistructural, okay not really but I think that is the effect youre loking for. My dad used to do that on places, I remember this detailbecause he would often get comments about them and that they looked kind of neat. Pity I don't any pictures from my childhood...maybe I'll look in the old photo albums and see what I can find.
Edited 8/30/2006 9:41 pm by CRF
Yep, SIPs
So your vote is 2 per gable, at the eaves only, no bracket at the gable peak?
How about in the middle/the largest gable? No room at the eaves. Just the horizontal element, or put on the middle on that one?
http://jhausch.blogspot.comAdventures in Home BuildingAn online journal covering the preparation and construction of our new home.
I would leave out the gable peak bracket, but it is your house. Heck when you make the others tack one up there to see if you like it... but I think it would look out of place. I also wouldn't try to force any where they just don't fit. The ones n the bumpouts should be fine by themselves. But what do I know? What does your DW think?
How was your SIPs experience? My first one was pretty good but since then has gone downhill. Nothing bad against the product, but am becoming very disappointed with the single installer around here. I referred the installer to a friend who has had nothing but problems with him. Doh! (insert Homer Simpson voice here)
I will probably build 3 or 4 brackets and do just what you are saying. The DW is not very good at visualization and she doesn't care much about stuff like the brackets anyway.
SIP experience - so far, so good. One of the R-control/ACH factories is about an hour North of here, however, they don't mfg the SIPs there. That's done at the factory in Michigan.
The panel layout guy recommended a small 2.5-man operation located nearby. He knew I wanted to do a lot of work myself (really act as a helper and un-official "2nd-shift") and this guy has been OK with that. I'd like things to go faster, but I am not unhappy with the progress.
The builder is coming by today to check a few things since his younger helpers have been doing odd jobs (Tyvek, Tar Paper, etc) while he finishes up his last house. May cut out a couple of doors and windows today.
http://jhausch.blogspot.comAdventures in Home BuildingAn online journal covering the preparation and construction of our new home.
On the SIPs, what is the advertized R-value, and what is their thickness?
Did you do the math to figure out the difference in price between that and conventional framing? If so, what did it come out with per heated square foot or whatever?
R-24 for the 6.5" panels. It's 7/16ths OSB - 5.5" EPS - 7/26ths OSB. Basically, it straddles a 2x6 bottom plate.
The other benefit is that the house is very air-tight. A HRV is required.
They make widths for 2x4's and they make much thicker, too. I think they may even go us to ones that can take an 11-7/8ths I-joist as the spline.
The industry line is "more expensive materials, faster construction" Check back in 4-5 months and I'll post the ever-controversial "cost per square foot" number.
http://jhausch.blogspot.comAdventures in Home BuildingAn online journal covering the preparation and construction of our new home.
Well after spending the weekend I couldn't help but notice almost everywhere I looked any and all variations of these brackets. Two at the eaves, three with one at the peak, two in the middle of the gable, five and it goes on.
After I saw the first one I thought I'd get the camera and take you a picture, but then I saw another and another and...
So I'd say to go woth your plan make an extra and tack it up there get down off the ladder and see what you like.
There, it is off my shoulders and now I can get back to my own details (Am also building my own house). Good Luck!