FHB Logo Facebook LinkedIn Email Pinterest Twitter X Instagram Tiktok YouTube Plus Icon Close Icon Navigation Search Icon Navigation Search Icon Arrow Down Icon Video Guide Icon Article Guide Icon Modal Close Icon Guide Search Icon Skip to content
Subscribe
Log In
  • How-To
  • Design
  • Tools & Materials
  • Restoration
  • Videos
  • Blogs
  • Forum
  • Magazine
  • Members
  • FHB House
  • Podcast
Log In

Discussion Forum

Discussion Forum

Curved deck idea works!

| Posted in Construction Techniques on June 2, 2004 08:57am

Hi all:

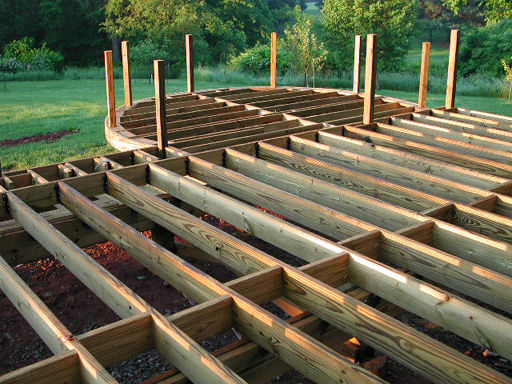
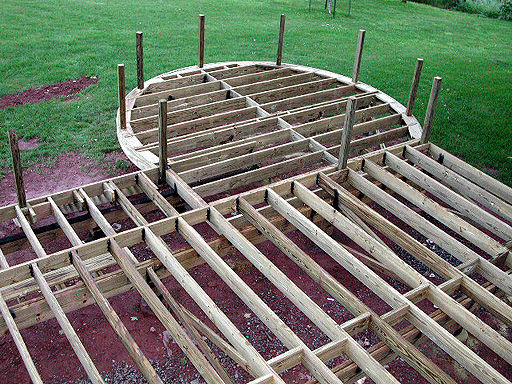
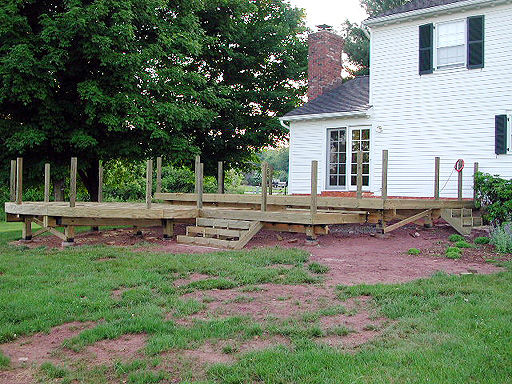
When I decided to build a deck with a circular tier, I stole some framing ideas from a FHB article a little while back (sorry, don’t have the number or author with me).  The idea was to block the joists top and bottom and wrap treated plywood around the circle. Well, it worked pretty well!  I’ve included some pictures.  Now if I can figure out the curved railing I’ll be in good shape! 😉

J Painter

Reply
  • X
  • facebook
  • linkedin
  • pinterest
  • email
  • add to favorites Log in or Sign up to save your favorite articles

Replies

  1. User avater
    CloudHidden | Jun 02, 2004 11:12pm | #1

    Looks like real nice work. A good idea to keep in mind.

  2. mike4244 | Jun 02, 2004 11:49pm | #2

    Nice job, the rail is not all that difficult. Clamp a piece of scrap to the inside of each post, let the piece protrude the thickness of the rail.Select straight grain material for rail. You will have to experiment to see what thickness you can bend easily. My guess from the pics would be 5/8" thick by what ever your height. Rip enough pieces to get width you need. Clamp then screw first piece to scrap, holes will be covered later by more rips.Screws should not stick past first piece. Add glue to second rip and screw to first rip , but not thru scrap, from second rip into first rip. Continue until you get width plus over hang if needed. Last rip can be finished nailed insted of screws, or maybe trim screws.  You are building the rail in place, you will have to plane any high spots and sand in place.

    Fasten rail to posts, remove scrap piece. Add any additional rips for overhang. A router with a 1/2" round over bit adds a nice look to the rail.

    1. DougU | Jun 03, 2004 01:40am | #3

      jpainter

      Mike gave you one way to do the handrail, probably the one I would use, but here is another.

      You can use short pieces of wood,(probably need to use wider that what you want to finish at) cut miters to form the radius that you need, it will look somewhat like 1/2 of a stop sign, except more sides, hope you get the picture. Then you can either use a router to swing the radius and give it that nice curve or cut it free hand and clean it up with a belt sander.

      I think if you go over to the "Gallery" and find some pictures of decks by Prodeck you will find some with curved railings. I think if I remember right that he cuts his with a circular saw!

      You can spline the joints, highly recomend it, to keep them together.

      Doug

  3. User avater
    dieselpig | Jun 03, 2004 02:03am | #4

    Nice looking frame man.  Keep the pics coming as the job progresses.

  4. User avater
    JeffBuck | Jun 03, 2004 02:06am | #5

    good looking deck ...

    plan on a powder coated metal rail ....

    make the call ...

    sit back and drink cold beer.

    Jeff

    Buck Construction, llc   Pittsburgh,PA

         Artistry in Carpentry                

  5. davidmeiland | Jun 03, 2004 03:29am | #6

    I've got a similar deck coming up and need to create about 135 degrees of a circle with a 4' radius. I like the way you handled it, that's a very clean job. Is the ply in the photos the finished face around the radius? I've been debating way to wrap my finish material (cedar, mahogany, ipe, not sure yet) around the radius and haven't settled on an idea yet.

    I'll probably frame the way you did and one thing that concerns me is water sitting on the tops of those horizontal blocks around the radius. Are you going to flash those? Seems like some copper would be a good idea, to shed water off the tops of the blocks when it goes thru the decking gaps.

    1. jpainter | Jun 03, 2004 05:04pm | #9

      David:

      The plywood I wrapped around the blocking will be covered with a finish layer.  I'm using Ipe decking and Koma PVC synthetic trim boards.  The railing will be painted cedar.

      The horizontal blocks concerned me too.  I've watched the frame through a couple of rain storms to see how it holds water.  I've used an ice and water shield self adhering roofing membrane to flash over post tops and one beam that I couldn't space with plywood.  The membrane has granules on it so that it will hold up over time.  I think I'll use the same method over the exposed edge of the plywood and partially over the blocking.  If I find any blocking holding water I'll just drill a small drainage hole.  Most of the blocking seems to be draining fine, though.

      J Painter

  6. AndyW22 | Jun 03, 2004 05:14am | #7

    Beauty job JP!

    Hows your decking going to run - seems like you can spend forever just putting in blocking for a fancy decking layout sometimes.

    As for the railing , I did one a few years ago that had a 18-20' radius simply by laying an MDF 2x10 on the deck and scribing the radius in place, then using this as a template, sanding and smoothing it, tracing it onta a cedar 2x10, rough cutting it with ajigsaw (or circ saw), and finally using a 11/2"  flush cutting bit with a bearing to trim the radius. It worked really well, and gave me a bottom,  middle and top rail that matched up perfectly. I then used square balusters but instead of trying to set then radially to the centre of the arc, I just turned them 45degrees which seemed to cover any discrepancy in the layout. If your radius will allow it, cutting from a wide board sounds way easier than laminating. 

    good luck, and have great summer!

    andy

    1. jpainter | Jun 03, 2004 04:57pm | #8

      There are a few ways to make curved railings-- I've actually chosen to use wide boards cut to the curve.  I'm using 2x and 1x cedar sandwiched together with gorilla glue to give me the thickness I want, then a series of router profiles on the rail.  I'll use a plywood pattern and a pattern bit to create the finished curve.  The chords between posts are only about 5 feet, so it won't be awful to work with.  I am doing a bottom rail, not attaching the ballusters to the edge, so I've got my work cut out for me!

      The decking will be parallel to the house for the first tier and the opposite direction for the circle part.  The little rectangle on the second tier will match the direction of the top part, and I'll use blocking so that I can carry the circle around.

      J Painter

  7. CAGIV | Jun 04, 2004 03:35am | #10

    any chance you have any close ups of the framing details on the curve.

    Nice looking work

    Team Logo

    1. jpainter | Jun 04, 2004 05:09pm | #11

      Cag;

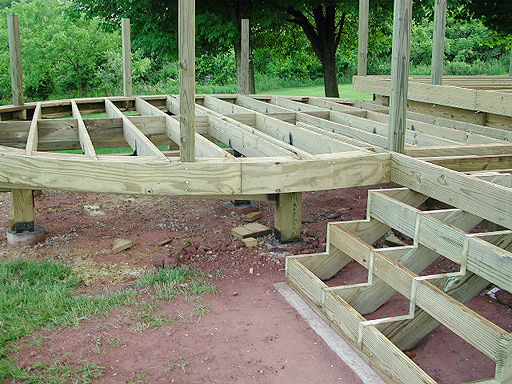
      Sure-- here are some detailed pictures of the curve process.  First, block the top of the joists and leave everything long.  Then use a trammel to mark the curve on the top.  I used a circular saw to cut the curve (16 foot diameter).  Then extend the saw cut down the joist using a recip saw or a hand saw.  Next, mark the the bottom blocking by tracing the top blocking, cut it and install it.  Finally, wrap the whole shebang with half inch treated plywood.  I used three layers, glued with PL premium and each layer nailed every 8 inches or so.  This is basically the same process shown in the FHB article.

      J Painter 

      1. JohnCollins | Jun 04, 2004 08:13pm | #12

        As I look at the horizontal blocks in consideration of avoiding standing water, you could install the blocks on a 15 degree angle in relation to the decking (like a windowsill) with a 15 degree bevel cut on the outside edge so you still had a flat surface to attach the curved plywood.  No standing water, and still good nailing.  Just a thought...  John

Log in or create an account to post a comment.

Sign up Log in

Become a member and get full access to FineHomebuilding.com

Video Shorts

Categories

  • Business
  • Code Questions
  • Construction Techniques
  • Energy, Heating & Insulation
  • General Discussion
  • Help/Work Wanted
  • Photo Gallery
  • Reader Classified
  • Tools for Home Building

Discussion Forum

Recent Posts and Replies

  • |
  • |
  • |
  • |
  • |
  • |
View More Create Post

Up Next

Video Shorts

Featured Story

Guest Suite With a Garden House

This 654-sq.-ft. ADU combines vaulted ceilings, reclaimed materials, and efficient design, offering a flexible guest suite and home office above a new garage.

Featured Video

How to Install Exterior Window Trim

Learn how to measure, cut, and build window casing made of cellular PVC, solid wood, poly-ash boards, or any common molding material. Plus, get tips for a clean and solid installation.

Related Stories

  • Old House Air-Sealing Basics
  • A Drip-Free, Through-Window Heat Pump
  • Insulation for Homes in the Wildland Urban Interface
  • An Impressive Air-to-Water Heat Pump

Highlights

Fine Homebuilding All Access
Fine Homebuilding Podcast
Tool Tech
Plus, get an extra 20% off with code GIFT20

"I have learned so much thanks to the searchable articles on the FHB website. I can confidently say that I expect to be a life-long subscriber." - M.K.

Get home building tips, offers, and expert advice in your inbox

Signing you up...

This site is protected by reCAPTCHA and the Google Privacy Policy and Terms of Service apply.
See all newsletters
See all newsletters

Fine Homebuilding Magazine

  • Issue 332 - July 2025
    • Custom Built-ins With Job-Site Tools
    • Fight House Fires Through Design
    • Making the Move to Multifamily
  • Issue 331 - June 2025
    • A More Resilient Roof
    • Tool Test: You Need a Drywall Sander
    • Ducted vs. Ductless Heat Pumps
  • Issue 330 - April/May 2025
    • Deck Details for Durability
    • FAQs on HPWHs
    • 10 Tips for a Long-Lasting Paint Job
  • Old House Journal – August 2025
    • Designing the Perfect Garden Gate
    • Old House Air-Sealing Basics
  • Issue 329 - Feb/Mar 2025
    • Smart Foundation for a Small Addition
    • A Kominka Comes West
    • Making Small Kitchens Work

Fine Home Building

Newsletter Sign-up

  • Fine Homebuilding

    Home building tips, offers, and expert advice in your inbox.

  • Green Building Advisor

    Building science and energy efficiency advice, plus special offers, in your inbox.

  • Old House Journal

    Repair, renovation, and restoration tips, plus special offers, in your inbox.

Signing you up...

This site is protected by reCAPTCHA and the Google Privacy Policy and Terms of Service apply.
See all newsletters

Follow

  • Fine Homebuilding

    Dig into cutting-edge approaches and decades of proven solutions with total access to our experts and tradespeople.

    Start Free Trial Now
    • Facebook
    • Instagram
    • X
    • LinkedIn
  • GBA Prime

    Get instant access to the latest developments in green building, research, and reports from the field.

    Start Free Trial Now
    • Facebook
    • YouTube
  • Old House Journal

    Learn how to restore, repair, update, and decorate your home.

    Subscribe Now
    • Facebook
    • Instagram
    • X

Membership & Magazine

  • Online Archive
  • Start Free Trial
  • Magazine Subscription
  • Magazine Renewal
  • Gift a Subscription
  • Customer Support
  • Privacy Preferences
  • About
  • Contact
  • Advertise
  • Careers
  • Terms of Use
  • Site Map
  • Do not sell or share my information
  • Privacy Policy
  • Accessibility
  • California Privacy Rights

© 2025 Active Interest Media. All rights reserved.

Fine Homebuilding receives a commission for items purchased through links on this site, including Amazon Associates and other affiliate advertising programs.

  • Home Group
  • Antique Trader
  • Arts & Crafts Homes
  • Bank Note Reporter
  • Cabin Life
  • Cuisine at Home
  • Fine Gardening
  • Fine Woodworking
  • Green Building Advisor
  • Garden Gate
  • Horticulture
  • Keep Craft Alive
  • Log Home Living
  • Military Trader/Vehicles
  • Numismatic News
  • Numismaster
  • Old Cars Weekly
  • Old House Journal
  • Period Homes
  • Popular Woodworking
  • Script
  • ShopNotes
  • Sports Collectors Digest
  • Threads
  • Timber Home Living
  • Traditional Building
  • Woodsmith
  • World Coin News
  • Writer's Digest
Active Interest Media logo
X
X
This is a dialog window which overlays the main content of the page. The modal window is a 'site map' of the most critical areas of the site. Pressing the Escape (ESC) button will close the modal and bring you back to where you were on the page.

Main Menu

  • How-To
  • Design
  • Tools & Materials
  • Video
  • Blogs
  • Forum
  • Project Guides
  • Reader Projects
  • Magazine
  • Members
  • FHB House

Podcasts

  • FHB Podcast
  • ProTalk

Webinars

  • Upcoming and On-Demand

Podcasts

  • FHB Podcast
  • ProTalk

Webinars

  • Upcoming and On-Demand

Popular Topics

  • Kitchens
  • Business
  • Bedrooms
  • Roofs
  • Architecture and Design
  • Green Building
  • Decks
  • Framing
  • Safety
  • Remodeling
  • Bathrooms
  • Windows
  • Tilework
  • Ceilings
  • HVAC

Magazine

  • Current Issue
  • Past Issues
  • Magazine Index
  • Subscribe
  • Online Archive
  • Author Guidelines

All Access

  • Member Home
  • Start Free Trial
  • Gift Membership

Online Learning

  • Courses
  • Project Guides
  • Reader Projects
  • Podcast

More

  • FHB Ambassadors
  • FHB House
  • Customer Support

Account

  • Log In
  • Join

Newsletter

Get home building tips, offers, and expert advice in your inbox

Signing you up...

This site is protected by reCAPTCHA and the Google Privacy Policy and Terms of Service apply.
See all newsletters
See all newsletters

Follow

  • X
  • YouTube
  • instagram
  • facebook
  • pinterest
  • Tiktok

Join All Access

Become a member and get instant access to thousands of videos, how-tos, tool reviews, and design features.

Start Your Free Trial

Subscribe

FHB Magazine

Start your subscription today and save up to 70%

Subscribe

Enjoy unlimited access to Fine Homebuilding. Join Now

Already a member? Log in

We hope you’ve enjoyed your free articles. To keep reading, become a member today.

Get complete site access to expert advice, how-to videos, Code Check, and more, plus the print magazine.

Start your FREE trial

Already a member? Log in

Privacy Policy Update

We use cookies, pixels, script and other tracking technologies to analyze and improve our service, to improve and personalize content, and for advertising to you. We also share information about your use of our site with third-party social media, advertising and analytics partners. You can view our Privacy Policy here and our Terms of Use here.

Cookies

Analytics

These cookies help us track site metrics to improve our sites and provide a better user experience.

Advertising/Social Media

These cookies are used to serve advertisements aligned with your interests.

Essential

These cookies are required to provide basic functions like page navigation and access to secure areas of the website.

Delete My Data

Delete all cookies and associated data